
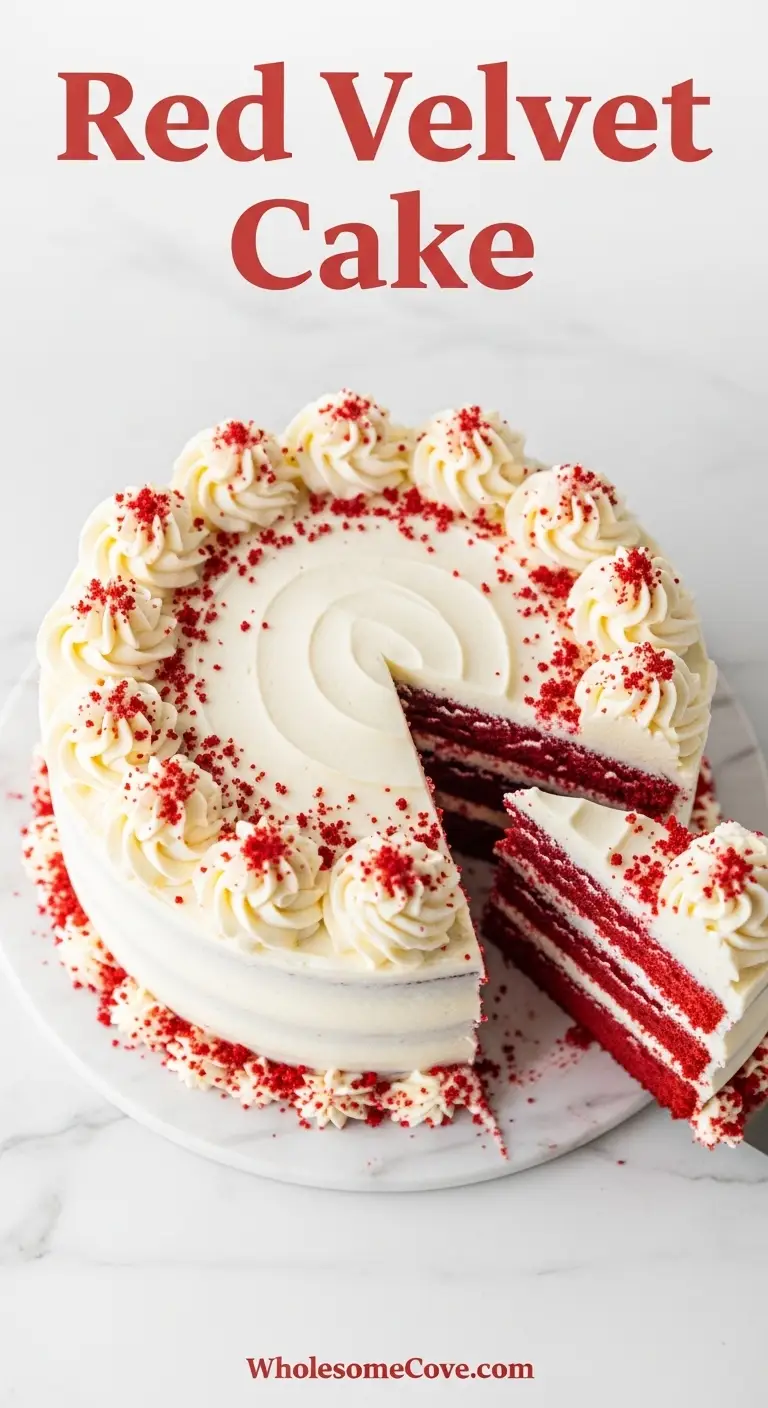
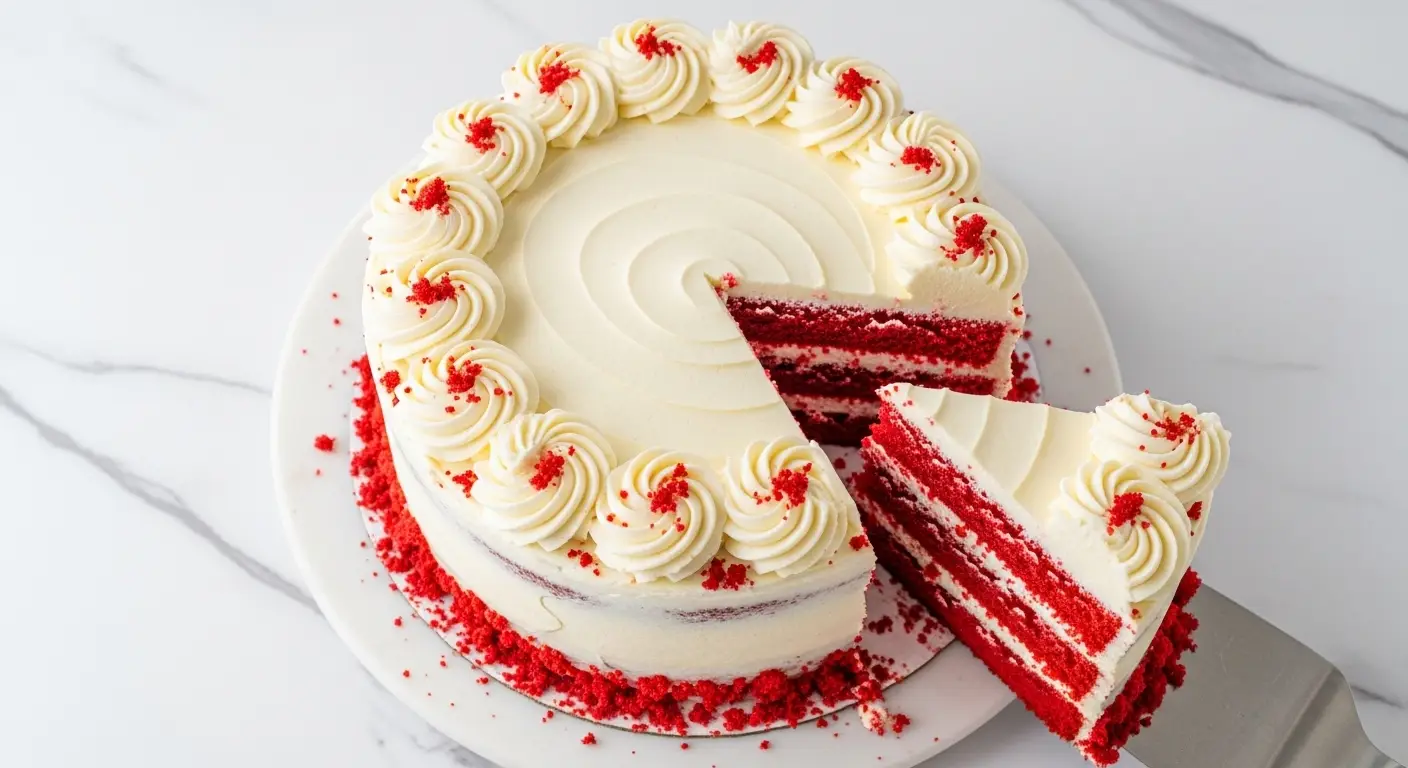
My grandmother’s red velvet cake was the stuff of family legend, and I can still remember that distinctive deep red color peeking through the swirls of cream cheese frosting.
When she passed away three years ago, I found her handwritten recipe card tucked between the pages of her old Betty Crocker cookbook, complete with flour stains and notes scribbled in the margins.
That discovery kicked off my obsession with perfecting this Red Velvet Cake Recipe. I’ve made it at least 20 times since then, tweaking ratios and techniques until I got it just right.
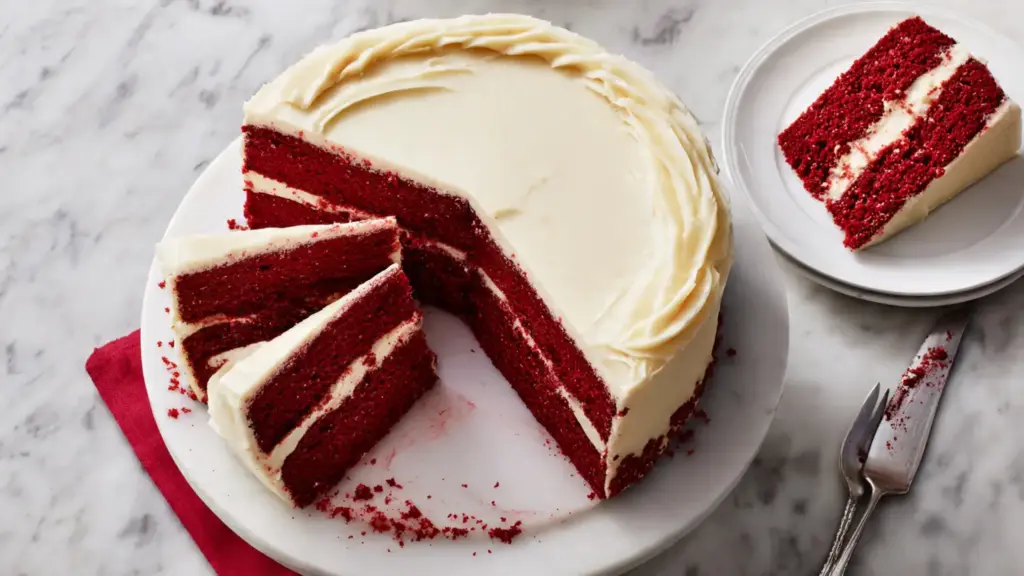
The result is a cake with a tender, velvety crumb, a subtle cocoa flavor balanced by tangy buttermilk, and that signature red hue that makes everyone stop and stare.
| Quick Recipe Summary | |
|---|---|
| Prep Time | 20 minutes |
| Cook Time | 30 minutes |
| Total Time | 50 minutes |
| Servings | 12 slices |
| Difficulty Level | Intermediate |
For another classic dessert that’s perfect for special occasions, try my Pumpkin Cheesecake Recipe.
Why You’ll Love This Red Velvet Cake Recipe
This isn’t just another chocolate cake with red food coloring. Red velvet has its own distinct personality with a subtle cocoa flavor that’s balanced by the tanginess of buttermilk and vinegar.
The texture is what really sets this cake apart. It’s incredibly soft and tender with a fine, velvety crumb that literally melts in your mouth. The layers stay moist for days, making it perfect for baking ahead.
- Perfect balance of flavors: The slight cocoa taste pairs beautifully with the tangy cream cheese frosting without being overpowering
- Stunning presentation: That vibrant red color makes this cake a showstopper at any gathering, from birthdays to Valentine’s Day
- Foolproof technique: Using the reverse creaming method and whipped egg whites ensures a tender crumb every single time
- Make-ahead friendly: The cake layers can be wrapped and frozen for up to three months without losing moisture
- Crowd-pleaser: I’ve never met anyone who doesn’t love a good slice of red velvet cake
Read Also: Fruit Cocktail Cake Recipe
Ingredients
This recipe uses classic ingredients that work together to create that signature red velvet flavor and texture. Each component plays a crucial role, from the buttermilk that tenderizes the crumb to the vinegar that reacts with the baking soda for the perfect rise.
For the Cake:
- 2 1/2 cups (300g) cake flour, sifted
- 1 1/2 cups (300g) granulated sugar
- 1 teaspoon baking soda
- 1 teaspoon fine sea salt
- 2 tablespoons natural cocoa powder (not Dutch-processed)
- 1 1/2 cups (360ml) vegetable oil
- 1 cup (240ml) buttermilk, room temperature
- 2 large eggs, room temperature
- 2 tablespoons red gel food coloring
- 1 teaspoon white vinegar
- 1 teaspoon pure vanilla extract
For the Cream Cheese Frosting:
- 16 ounces (450g) cream cheese, softened to room temperature
- 1 cup (226g) unsalted butter, softened to room temperature
- 4 cups (480g) powdered sugar, sifted
- 2 teaspoons pure vanilla extract
- 1/4 teaspoon fine sea salt
Another dessert that features cream cheese frosting is my Easy Carrot Cake Recipe.
Kitchen Equipment Needed
Having the right tools makes all the difference when baking a layer cake. I learned this the hard way after my first attempt resulted in cakes that stuck to the pans and broke apart when I tried to remove them.
- Two 9-inch round cake pans
- Parchment paper
- Stand mixer or hand mixer
- Large mixing bowls
- Medium mixing bowls
- Whisk
- Rubber spatula
- Offset spatula for frosting
- Cake turntable (optional but helpful)
- Wire cooling racks
- Measuring cups and spoons
- Sifter or fine-mesh strainer
If you love baking from scratch, you’ll also enjoy my Chocolate Chip Cookies Recipe.
Recommended Products for This Recipe
After making this cake dozens of times, I’ve found a few products that truly make a difference in the final result. These aren’t just nice to have; they genuinely improve the texture and ease of the baking process.
1. Wilton Red Red Gel Food Coloring
This concentrated gel food coloring gives you that vibrant red hue without adding extra liquid to your batter. I used to use liquid food coloring and needed nearly a whole bottle to get the right color, which threw off the moisture balance. With gel coloring, just a tablespoon or two does the trick, and the color stays true even after baking.
2. Nordic Ware Natural Aluminum Commercial Baker’s Half Sheet
I use this sheet pan as my staging area when assembling the cake, and it’s also perfect for toasting cake crumbs for decoration. The aluminum conducts heat evenly, and the rolled edges prevent warping. It’s become one of my most-used kitchen tools beyond just this recipe.
3. Ateco Offset Spatula Set
These offset spatulas transformed my cake decorating game. The angled blade gives you so much control when spreading frosting, especially on the sides of the cake. I use the medium one for the crumb coat and the large one for the final frosting layer.
4. Authentic Buttermilk Powder
I keep buttermilk powder on hand for times when I don’t have fresh buttermilk in the fridge. Just mix it with water according to package directions, and it works perfectly in this recipe. It has a long shelf life, so you can always be ready to bake.
You might also enjoy: Healthy Chocolate Chip Cookies Recipe
Step-by-Step Instructions: How to Make Red Velvet Cake
Follow these detailed instructions to create the perfect red velvet cake. I’ve included all the little tips and tricks I’ve learned through trial and error to help you avoid common pitfalls.
1. Prepare Your Pans and Preheat the Oven
- Preheat your oven to 350°F (175°C).
- Generously grease two 9-inch round cake pans with butter or non-stick cooking spray, making sure to coat the sides and bottom completely.
- Cut two circles of parchment paper to fit the bottom of each pan, then press them into place.
- Lightly dust the pans with flour, tapping out any excess, which will help prevent sticking and ensure clean cake removal.
- Set the prepared pans aside while you make the batter.
2. Sift and Mix the Dry Ingredients
- In a large mixing bowl, sift together the cake flour, granulated sugar, baking soda, salt, and cocoa powder.
- Use a whisk to thoroughly combine these dry ingredients, making sure there are no lumps of cocoa powder or clumps of flour.
- Sifting aerates the flour and removes any lumps, which contributes to that light, tender crumb we’re after.
- Set this bowl aside while you prepare the wet ingredients.
3. Combine the Wet Ingredients
- In a medium bowl, whisk together the vegetable oil and buttermilk until well combined.
- Add the eggs one at a time, whisking after each addition until fully incorporated.
- Stir in the red gel food coloring, white vinegar, and vanilla extract, mixing until the color is evenly distributed and the mixture is a vibrant red.
- The vinegar will react with the baking soda later to help the cake rise and create a tender texture.
- Make sure your buttermilk and eggs are at room temperature, as this helps them combine more smoothly with the oil.
4. Mix the Batter
- Pour the wet ingredients into the bowl with the dry ingredients.
- Using a hand mixer on low speed or a whisk, gently mix everything together until just combined, being careful not to overmix.
- Stop mixing as soon as you no longer see dry flour, as overmixing can lead to a tough, dense cake.
- The batter should be smooth and pourable with a deep red color.
- Scrape down the sides and bottom of the bowl with a rubber spatula to make sure everything is evenly incorporated.
5. Divide and Bake the Cake Layers
- Divide the batter evenly between your two prepared cake pans, using a kitchen scale for accuracy if you have one (this ensures even layers).
- Smooth the tops with a spatula, then tap each pan gently on the counter a few times to release any air bubbles.
- Place the pans on the center rack of your preheated oven, making sure they’re not touching each other or the oven walls for even heat circulation.
- Bake for 28-32 minutes, or until a toothpick inserted into the center comes out with just a few moist crumbs attached.
- The tops should spring back when lightly touched, and the edges will start to pull away from the sides of the pan.
- Avoid opening the oven door for at least the first 25 minutes to prevent the cakes from sinking.
6. Cool the Cakes
- Remove the pans from the oven and let them cool on wire racks for 10 minutes.
- Run a thin knife around the edge of each pan to loosen the cakes.
- Carefully invert each pan onto a wire rack, then gently lift off the pan and peel away the parchment paper.
- Flip the cakes right-side up and let them cool completely on the racks, which will take about 1-2 hours.
- It’s crucial to let the cakes cool completely before frosting, or the frosting will melt and slide off.
7. Make the Cream Cheese Frosting
- In the bowl of a stand mixer fitted with the paddle attachment, beat the softened cream cheese on medium speed for about 2 minutes until smooth and creamy with no lumps.
- Add the softened butter and continue beating for another 2-3 minutes until the mixture is light and fluffy.
- Reduce the speed to low and gradually add the sifted powdered sugar, about 1 cup at a time, mixing well after each addition.
- Add the vanilla extract and salt, then increase the speed to medium-high and beat for 3-4 minutes until the frosting is smooth, creamy, and spreadable.
- If the frosting seems too soft, refrigerate it for 15-20 minutes to firm up slightly before using.
8. Assemble and Frost the Cake
- Place one cake layer on a serving plate or cake stand, flat side up.
- Spread about 1 1/2 cups of cream cheese frosting evenly over the top, going all the way to the edges.
- Carefully place the second cake layer on top, flat side down, pressing gently to secure it.
- Apply a thin crumb coat of frosting all over the cake, spreading it thinly to seal in any loose crumbs, then refrigerate for 20-30 minutes to set.
- Once the crumb coat is firm, apply the remaining frosting in a thick, even layer on the top and sides of the cake.
- Use an offset spatula to create swirls or a smooth finish, depending on your preference.
- For a decorative touch, you can pipe rosettes on top or press toasted cake crumbs around the bottom edge.
If you’re looking for more show-stopping desserts, check out my Creme Brulee Recipe.
Tips for The Best Red Velvet Cake
These tips come from my many rounds of testing and occasional failures. Follow them, and you’ll avoid the mistakes I made along the way.
- Use room temperature ingredients: Cold eggs and buttermilk won’t incorporate smoothly into the batter, which can result in an uneven texture. Take them out of the fridge 30-60 minutes before baking.
- Don’t skip the sifting: Sifting the dry ingredients removes lumps and aerates the flour, which is essential for achieving that signature velvet crumb.
- Measure flour correctly: Spoon the flour into your measuring cup and level it off with a knife rather than scooping directly from the bag, which can pack the flour and lead to dry cake.
- Use gel food coloring: Liquid food coloring requires too much volume to achieve a vibrant red, which can throw off the moisture balance in the cake. Gel is concentrated and doesn’t add extra liquid.
- Don’t overmix the batter: Mix only until the dry ingredients are just incorporated to avoid developing too much gluten, which makes the cake tough and dense.
- Test for doneness carefully: Insert a toothpick into the center of the cake; it should come out with a few moist crumbs but no wet batter. Overbaking will dry out the cake.
- Cool completely before frosting: Warm cake will cause the frosting to melt and slide off, ruining all your hard work.
- Make ahead for easier assembly: Bake the cake layers a day ahead, wrap them tightly in plastic wrap, and refrigerate. They’re actually easier to frost when slightly chilled.
For another recipe that requires careful technique, try my Creme Brulee Cheesecake Recipe.
What to Serve with Red Velvet Cake
This cake is rich and sweet, so I like to balance it with lighter accompaniments. Here are some of my favorite pairings.
Red velvet cake is decadent enough to stand alone, but a few simple additions can make it even more special. Consider the occasion and your guests’ preferences when choosing what to serve alongside.
- Fresh berries: Strawberries, raspberries, or blackberries add a tart contrast to the sweet frosting
- Vanilla ice cream: A scoop of vanilla ice cream turns each slice into an indulgent dessert
- Whipped cream: Lightly sweetened whipped cream provides a lighter alternative to more frosting
- Hot coffee or espresso: The bitterness of coffee balances the sweetness perfectly
- Champagne or sparkling wine: For celebrations, a dry champagne cuts through the richness beautifully
- Cold milk: Classic and simple, cold milk is perfect for kids and adults alike
- Hot Chocolate: During winter months, serve this with a mug of homemade hot chocolate
Read Also: Eggnog Recipe
Variations of Red Velvet Cake
Once you’ve mastered the classic version, these variations let you put your own spin on this beloved cake.
- Red velvet cupcakes: Divide the batter among lined muffin tins and bake for 18-22 minutes for perfectly portioned individual servings.
- Red velvet sheet cake: Pour the batter into a greased 9×13-inch pan and bake for 35-40 minutes for easier serving at large gatherings.
- Red velvet bundt cake: Use a bundt pan for a stunning presentation, baking for 45-50 minutes, and drizzle with cream cheese glaze instead of frosting.
- Southern red velvet with ermine frosting: Replace the cream cheese frosting with traditional cooked flour frosting (ermine) for a lighter, less sweet alternative.
- Red velvet cake pops: Crumble leftover cake, mix with cream cheese frosting, roll into balls, and dip in white chocolate for party-perfect treats.
- Red velvet layer cake with white chocolate: Add 1/2 cup of white chocolate chips to the batter for extra richness and a subtle sweetness.
- Red velvet poke cake: After baking, poke holes in the cake and pour sweetened condensed milk over the top before frosting for extra moisture.
You might also enjoy: Amish Apple Cake Recipe
Storage and Reheating
Proper storage keeps your red velvet cake tasting fresh for days. Here’s what I’ve learned about preserving that moist, tender texture.
- Room temperature: Store the frosted cake under a cake dome or in an airtight container at room temperature for up to 2 days, though it’s best eaten within 24 hours.
- Refrigeration: For longer storage, refrigerate the cake in an airtight container for up to 5 days; let it sit at room temperature for 30 minutes before serving to restore the tender texture.
- Freezing unfrosted layers: Wrap cooled, unfrosted cake layers tightly in plastic wrap, then aluminum foil, and freeze for up to 3 months; thaw overnight in the refrigerator before frosting.
- Freezing frosted cake: Freeze the frosted cake uncovered until the frosting is firm, then wrap tightly in plastic wrap and foil; freeze for up to 2 months and thaw in the refrigerator overnight.
- Individual slices: Cut the cake into slices, wrap each one in plastic wrap, and freeze in a freezer-safe container for grab-and-go portions; thaw at room temperature for 1-2 hours.
- Reviving refrigerated cake: If your cake seems a bit firm from refrigeration, microwave individual slices for 10-15 seconds to restore that fresh-baked softness.
Another make-ahead friendly dessert is my Healthy Carrot Cake Recipe.
Nutritional Facts
Per serving (1 slice, based on 12 slices):
- Calories: 620
- Total Fat: 38g
- Saturated Fat: 16g
- Cholesterol: 95mg
- Sodium: 380mg
- Total Carbohydrates: 68g
- Dietary Fiber: 1g
- Sugars: 52g
- Protein: 6g
Note: Nutritional information is approximate and will vary based on specific ingredients used and portion sizes.
If you’re looking for healthier dessert options, check out my Healthy Pumpkin Pie Recipe.
Health Benefits of Key Ingredients
While red velvet cake is definitely a treat, some of its ingredients do offer nutritional value. Here’s what you’re getting beyond the deliciousness.
Buttermilk provides probiotics that support digestive health and is lower in fat than regular milk while still delivering calcium and protein.
The cocoa powder contains antioxidants called flavonoids that may support heart health and improve blood flow. Eggs contribute high-quality protein, vitamins B12 and D, and choline for brain function.
- Buttermilk: Contains probiotics for gut health, calcium for bones, and protein for muscle maintenance
- Cocoa powder: Rich in flavonoid antioxidants that may reduce inflammation and support heart health
- Eggs: Provide complete protein, vitamin B12 for energy, vitamin D for immune function, and choline for brain health
- Vanilla extract: Contains small amounts of antioxidants and may have calming properties
- Vegetable oil: Provides vitamin E and healthy fats that help absorb fat-soluble vitamins
For more desserts with wholesome ingredients, try my Healthy Apple Pie Recipe.
FAQs About Red Velvet Cake
1. What makes red velvet cake different from chocolate cake?
Red velvet cake uses much less cocoa powder than chocolate cake, giving it a subtle cocoa flavor rather than a pronounced chocolate taste. The combination of buttermilk and vinegar creates a unique tangy flavor profile and tender, velvety texture that chocolate cake doesn’t have.
The texture is also lighter and more delicate due to the specific ratio of ingredients and the chemical reaction between the acidic ingredients and baking soda.
2. Can I use natural food coloring instead of red gel coloring?
Yes, you can use natural alternatives like beet powder or beet juice to color your cake, though the shade will be more burgundy or brown-red rather than the vibrant red of gel coloring. You’ll need about 2-3 tablespoons of beet powder or 1/4 cup of beet juice.
Keep in mind that natural colorings may slightly affect the flavor, adding an earthy undertone that some people enjoy while others prefer the neutral taste of artificial coloring.
3. Why did my red velvet cake turn brown instead of red?
This usually happens when you use Dutch-processed cocoa powder instead of natural cocoa powder. Dutch-processed cocoa is alkalized, which neutralizes the acidity that helps maintain the red color.
Always use natural (non-alkalized) cocoa powder for red velvet cake, and make sure you’re using enough red food coloring. The color can also fade if the cake is overbaked.
4. Can I make this cake without buttermilk?
While buttermilk is essential to the authentic red velvet flavor and texture, you can make a substitute by mixing 1 cup of whole milk with 1 tablespoon of white vinegar or lemon juice. Let it sit for 5-10 minutes until it curdles slightly.
This won’t taste exactly the same as real buttermilk, but it will provide the necessary acidity for the cake to rise properly and maintain a tender crumb.
5. How do I prevent my cake layers from doming in the middle?
Domed cakes are caused by the edges cooking faster than the center. To prevent this, use baking strips (dampened cloth strips wrapped around the pans) or bake at a slightly lower temperature (325°F) for a few minutes longer.
You can also level the domes after baking by using a serrated knife or cake leveler to trim the tops, saving the scraps to make cake crumbs for decoration.
Another classic Southern dessert you might enjoy is my Baked Ziti Recipe.
Red Velvet Cake
Ingredients
- 2 1/2 cups cake flour - 300g, sifted
- 1 1/2 cups granulated sugar - 300g
- 1 teaspoon baking soda
- 1 teaspoon fine sea salt
- 2 tablespoons natural cocoa powder - not Dutch-processed
- 1 1/2 cups vegetable oil - 360ml
- 1 cup buttermilk - 240ml, room temperature
- 2 large eggs - room temperature
- 2 tablespoons red gel food coloring
- 1 teaspoon white vinegar
- 1 teaspoon pure vanilla extract
- 16 ounces cream cheese - 450g, softened to room temperature
- 1 cup unsalted butter - 226g, softened to room temperature
- 4 cups powdered sugar - 480g, sifted
- 2 teaspoons pure vanilla extract
- 1/4 teaspoon fine sea salt
Equipment
- Two 9-inch round cake pans
- Parchment paper
- Stand mixer or hand mixer
- Large mixing bowls
- Medium mixing bowls
- Whisk
- Rubber spatula
- Offset spatula - For frosting
- Wire cooling racks
- Measuring cups and spoons
- Sifter or fine-mesh strainer
Method
- Preheat oven to 350°F (175°C). Grease two 9-inch round cake pans, line with parchment paper, and dust with flour.
- In a large bowl, sift together cake flour, sugar, baking soda, salt, and cocoa powder. Whisk thoroughly to combine.
- In a medium bowl, whisk together oil and buttermilk. Add eggs one at a time, then stir in red food coloring, vinegar, and vanilla until evenly distributed.
- Pour wet ingredients into dry ingredients and mix on low speed until just combined, being careful not to overmix. Scrape down sides of bowl.
- Divide batter evenly between prepared pans and smooth tops. Bake for 28-32 minutes until toothpick comes out with moist crumbs.
- Cool cakes in pans for 10 minutes, then invert onto wire racks, remove parchment, and cool completely for 1-2 hours.
- Beat cream cheese until smooth, add butter and beat until fluffy. Gradually add powdered sugar, then vanilla and salt, beating until smooth and creamy.
- Place one cake layer on serving plate, spread with frosting, top with second layer. Apply thin crumb coat, refrigerate 20 minutes, then frost with remaining frosting.
Nutrition
Notes
- Use room temperature ingredients for best results. Cold eggs and buttermilk won’t incorporate smoothly into the batter.
- Always use natural cocoa powder, not Dutch-processed, to maintain the red color and proper texture.
- Gel food coloring is essential for vibrant color without adding extra liquid to the batter.
- Don’t overmix the batter – mix only until dry ingredients are just incorporated to avoid a tough, dense cake.
- Cool cakes completely before frosting, or the frosting will melt and slide off.
- Make buttermilk substitute: Mix 1 cup milk with 1 tablespoon vinegar or lemon juice, let sit 5-10 minutes.
- Cake layers can be baked ahead, wrapped tightly in plastic wrap, and frozen for up to 3 months.
- Store frosted cake in refrigerator for up to 5 days in an airtight container.
- For red velvet cupcakes, divide batter among lined muffin tins and bake for 18-22 minutes.
- If frosting is too soft, refrigerate for 15-20 minutes to firm up before using.
Private Notes
Tried this recipe?
Let us know how it was!Final Thoughts
Red velvet cake holds a special place in Southern baking tradition, and making it from scratch is so much more rewarding than anything from a box. The combination of that tender, cocoa-kissed crumb with tangy cream cheese frosting is truly unbeatable.
Don’t be intimidated by the process. Once you make this a couple of times, you’ll find your rhythm and might even start experimenting with your own variations. I’d love to hear how your cake turns out, so please leave a comment below and share your experience!
Recommended:
- Eggnog Cake Recipe
- Eggnog Cookies Recipe
- Eggnog Pie Recipe
- Pumpkin Roll Recipe
- White Fruitcake Recipe
- Fruitcake Recipe
- Fudge Brownie Recipe
- Healthy Tiramisu Recipe
- Oatmeal Raisin Cookie Recipe
- Peanut Butter Cookies Recipe
