
I’ll never forget the night I decided to combine two of my absolute favorite desserts into one spectacular creation. My husband had been begging me to make creme brulee for weeks, while I was craving the dense, creamy comfort of cheesecake.
Instead of choosing between them, I thought, why not marry the two? The result was this creme brulee cheesecake recipe that’s become my most requested dessert at every family gathering.
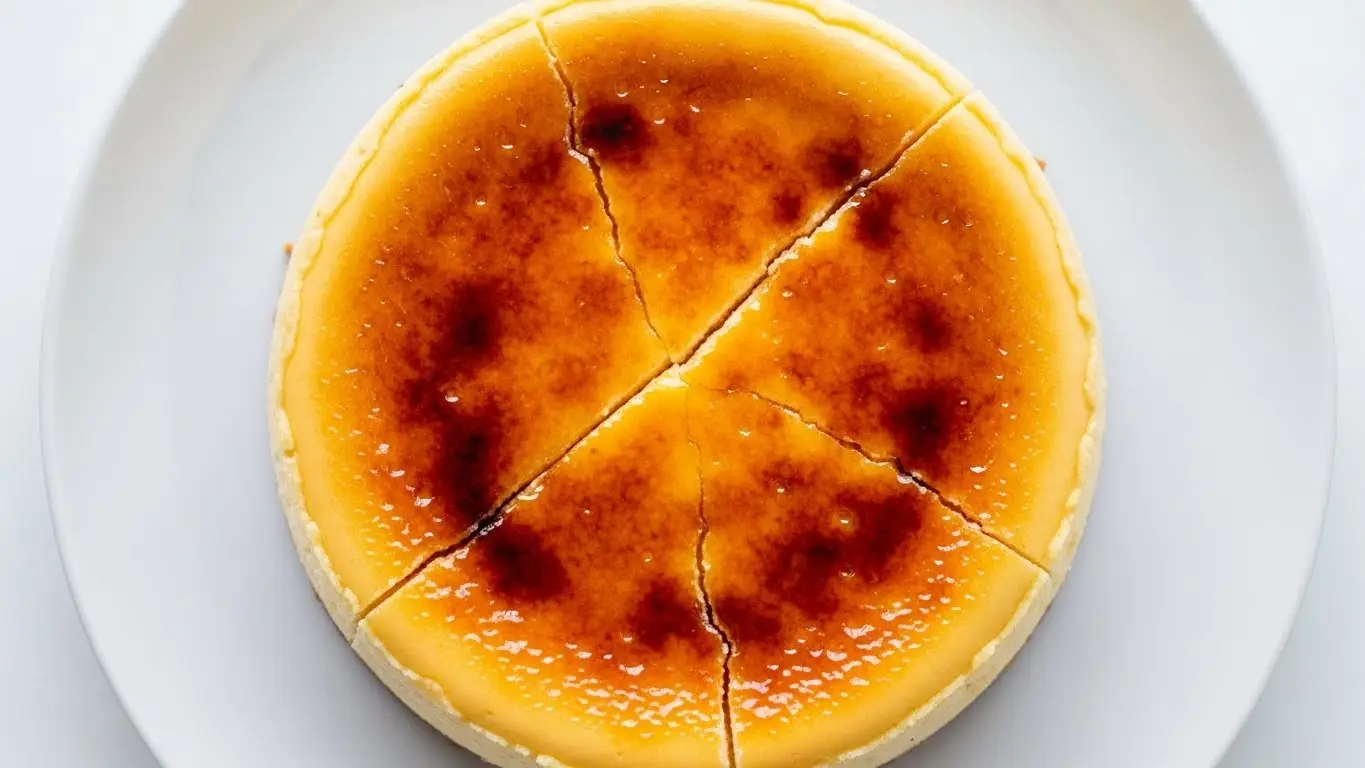
The first time I pulled this beauty from the oven, I was nervous about how the delicate custard topping would set on the cheesecake base. But when I cracked that caramelized sugar shell with my spoon and revealed the silky vanilla cheesecake underneath, I knew I’d created something truly special. My sister actually gasped when she tasted it at our holiday dinner, and now she refuses to celebrate her birthday with any other cake.
| Quick Recipe Summary | |
|---|---|
| Prep Time | 30 minutes |
| Cook Time | 75 minutes |
| Total Time | 6 hours 45 minutes (including chilling) |
| Servings | 12 slices |
| Difficulty Level | Intermediate |
You may also like my Creme Brulee Recipe.
Why You’ll Love This Creme Brulee Cheesecake Recipe
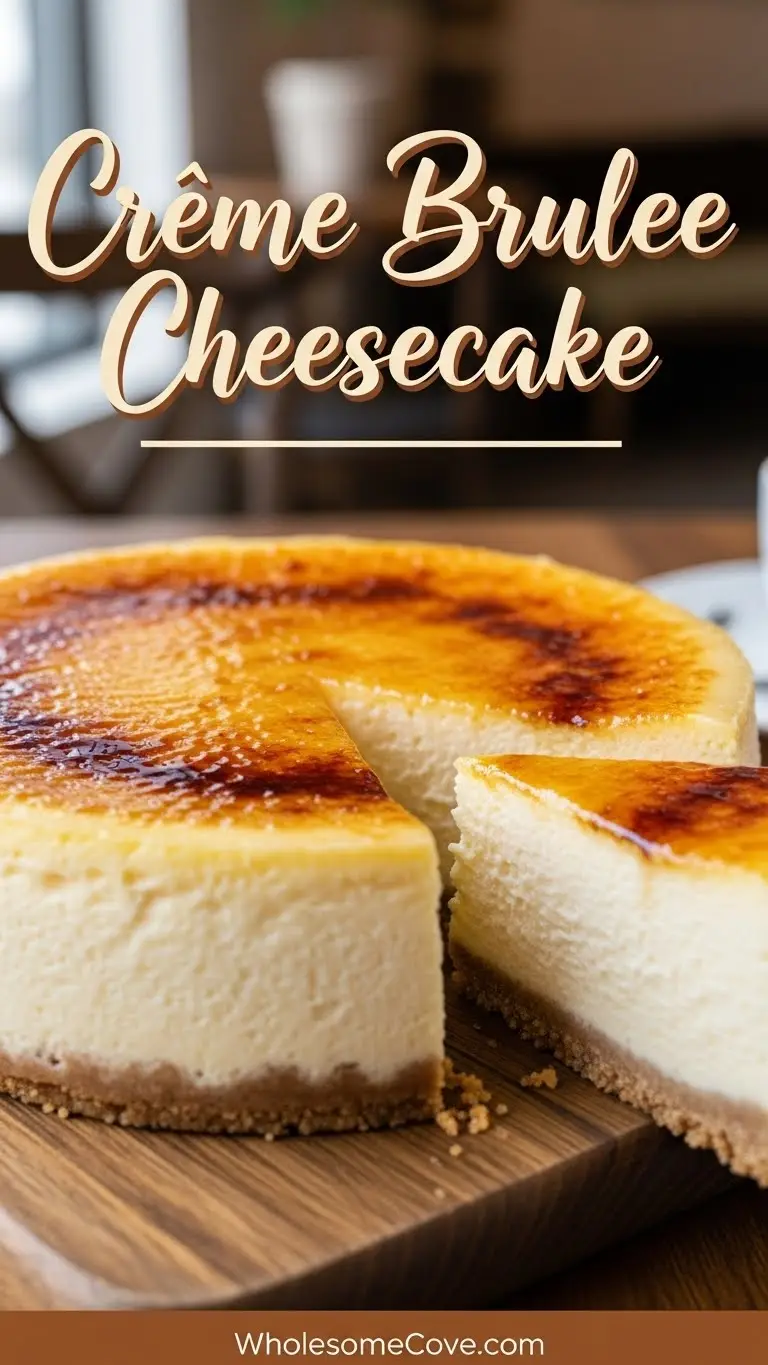
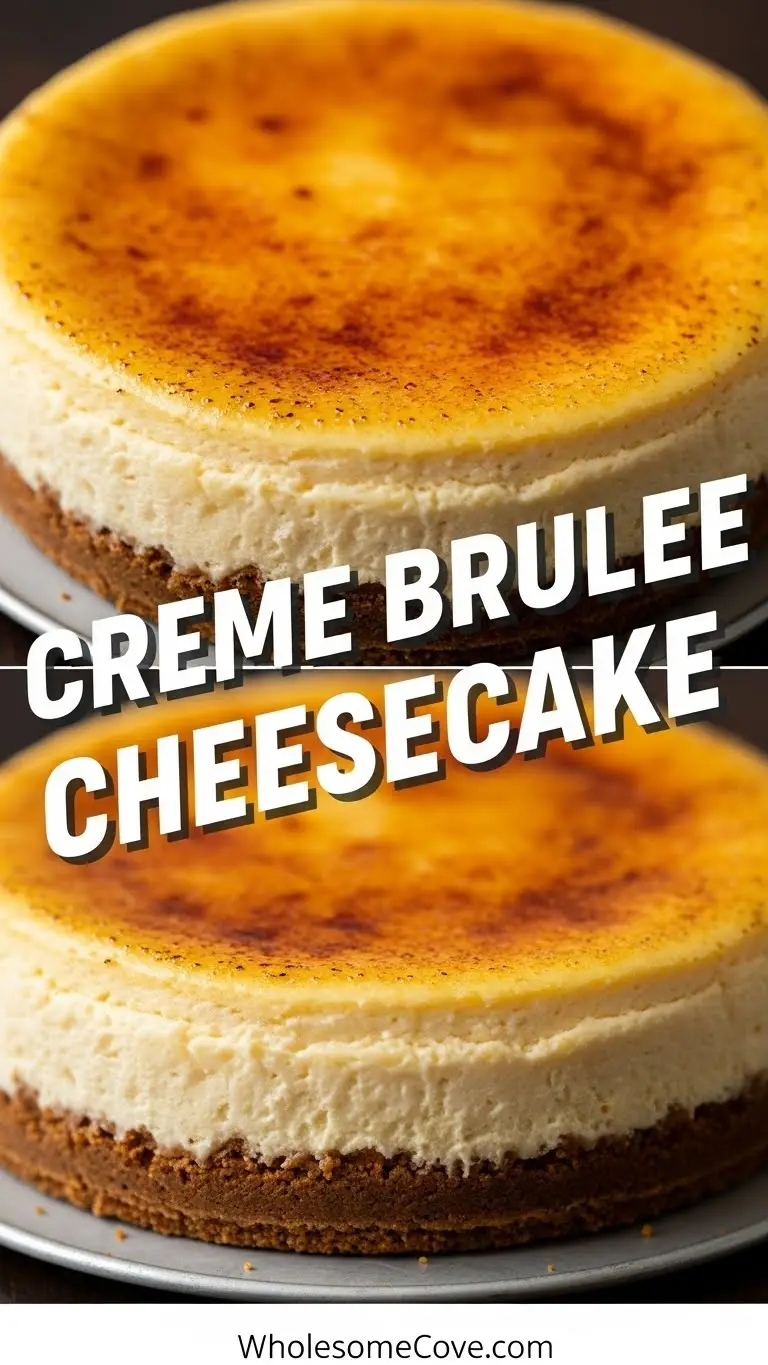
This dessert is pure luxury in every bite. The combination of a buttery graham cracker crust, ultra-creamy cheesecake filling, and that signature caramelized sugar topping creates an experience that feels like you’re dining at a five-star restaurant.
What makes this recipe truly special is how it captures the best of both worlds. You get the rich, dense texture of New York-style cheesecake with the elegant sophistication of classic French creme brulee. The contrast between the crispy, caramelized top and the velvety smooth filling is absolutely divine.
Here’s why this creme brulee cheesecake will become your new favorite:
- Restaurant-quality results at home: You don’t need culinary school to master this recipe, just a little patience and attention to detail
- Make-ahead friendly: Perfect for entertaining since it needs to chill overnight anyway
- Impressive presentation: That torch-caramelized top always elicits gasps from guests
- Versatile flavoring: The vanilla base pairs beautifully with countless variations
- Feeds a crowd: One cheesecake serves 12 people generously
- Worth every calorie: Sometimes you need a dessert that’s pure indulgence
For another elegant dessert option, try my Pumpkin Cheesecake.
Ingredients
Getting the right ingredients is crucial for this recipe. I learned this the hard way when I tried to use low-fat cream cheese once, and the texture was all wrong. Trust me, this is not the time to cut corners on quality.
For the Graham Cracker Crust:
- 2 cups (240g) graham cracker crumbs (about 16 full sheets)
- 1/3 cup (67g) granulated sugar
- 1/2 cup (113g) unsalted butter, melted
For the Cheesecake Filling:
- 32 oz (907g) full-fat cream cheese, softened to room temperature
- 1 cup (200g) granulated sugar
- 1/4 cup (50g) light brown sugar, packed
- 3 tablespoons all-purpose flour
- 1 cup (240ml) heavy cream
- 4 large eggs, room temperature
- 2 large egg yolks, room temperature
- 2 teaspoons pure vanilla extract
- 1/4 teaspoon salt
For the Creme Brulee Topping:
- 1/2 cup (100g) granulated sugar for caramelizing
Try my Crème Brûlée French Toast Recipe.
Kitchen Equipment Needed
Having the right tools makes all the difference. I once tried to make this without a springform pan, and extracting the cheesecake was a disaster. Learn from my mistakes and invest in proper equipment.
Here’s what you’ll need:
- 9-inch springform pan: Essential for clean removal and beautiful presentation
- Electric mixer: Stand mixer or hand mixer for smooth, lump-free filling
- Food processor: For finely grinding graham crackers (or use pre-made crumbs)
- Large roasting pan: For the water bath
- Kitchen torch: Absolutely necessary for caramelizing the sugar topping
- Heavy-duty aluminum foil: To wrap the springform pan and prevent water seepage
- Mixing bowls: Various sizes for different components
- Rubber spatula: For scraping down the bowl and folding ingredients
- Fine-mesh sieve: For a silky-smooth filling
- Wire cooling rack: For even cooling
- Offset spatula: For smoothing the top
Another favorite: Authentic Italian Tiramisu.
Recommended Products for This Recipe
After making this dessert dozens of times, I’ve found certain products that genuinely make the process easier and the results better. These aren’t just random recommendations; they’re tools and ingredients I actually use in my own kitchen.
1. Le Creuset Heritage Springform Pan
This springform pan has changed my cheesecake game completely. The watertight seal means I never worry about water seeping into my crust during the water bath, and the nonstick coating ensures every slice releases perfectly. It’s pricey, but I’ve used mine for years without any warping or deterioration.
2. Iwatani Pro2 Culinary Butane Torch
This is the torch I reach for every time. It produces consistent, powerful heat that caramelizes sugar evenly without creating hot spots or burning. The adjustable flame lets you control exactly how much caramelization you want, and it’s much safer than the cheap torches that sputter and flame out.
3. Nielsen-Massey Madagascar Bourbon Vanilla Extract
Since vanilla is one of the star flavors in this dessert, using high-quality extract makes a noticeable difference. This Madagascar bourbon vanilla has such a rich, complex flavor that elevates the entire cheesecake. I can taste the difference between this and regular supermarket vanilla, and so will your guests.
4. Philadelphia Cream Cheese Brick
I’ve tested different brands, and Philadelphia consistently gives me the smoothest, creamiest texture. The brick form (not the tub) has a better moisture content for cheesecakes. Make sure you soften it properly to room temperature; cold cream cheese creates lumps that are impossible to smooth out.
5. KitchenAid Artisan Stand Mixer
While you can make this with a hand mixer, a stand mixer makes the process so much easier. The paddle attachment whips the cream cheese to perfect smoothness without overworking it, and you can multitask while it’s mixing. I use mine for the crust, filling, and countless other recipes.
Read Also: Coconut Cream Pie
Step-by-Step Instructions: How to Make Creme Brulee Cheesecake
I’ve broken down every step in detail because I know how intimidating cheesecake can be. Follow these instructions carefully, and you’ll have a perfect creme brulee cheesecake every single time.
1. Prepare Your Pan and Preheat the Oven
- Position your oven rack to the lower-middle position and preheat to 325°F (163°C).
- Take your springform pan and wrap the bottom and sides completely with two layers of heavy-duty aluminum foil, making sure it comes up the sides at least 2 inches. This prevents any water from the water bath from seeping in.
- Spray the inside of the pan generously with nonstick cooking spray, making sure to coat the bottom and sides thoroughly.
- Place a large roasting pan (big enough to hold your springform pan) on the counter and fill a kettle or pot with water, then set it to boil. You’ll need this hot water for the water bath later.
2. Make the Graham Cracker Crust
- If using whole graham crackers, break them into pieces and pulse in a food processor until you have fine, even crumbs. You want the texture of sand, not chunks.
- Pour the graham cracker crumbs into a medium bowl and add the granulated sugar, stirring to combine evenly.
- Drizzle in the melted butter and use a fork to mix everything together until the mixture looks like wet sand and holds together when you squeeze it.
- Dump the crumb mixture into your prepared springform pan and use the bottom of a measuring cup or glass to press it firmly into the bottom and about 1 inch up the sides.
- The key here is to pack it tightly so it doesn’t crumble when you slice the cheesecake later. I use a combination of pressing down hard and rotating the pan to get even coverage.
- Place the crust in the preheated oven and bake for 10 minutes until it’s lightly golden and fragrant. Remove and let it cool while you prepare the filling.
3. Beat the Cream Cheese Until Smooth
- Cut your softened cream cheese into chunks and place them in the bowl of your stand mixer fitted with the paddle attachment (or use a large bowl if using a hand mixer).
- Beat the cream cheese on medium speed for 3-4 minutes, stopping to scrape down the sides of the bowl several times, until it’s completely smooth and fluffy with no lumps whatsoever.
- This step is crucial. If your cream cheese has any lumps, they’ll remain in your finished cheesecake. Be patient and thorough here.
- The cream cheese should look lighter in color and have increased in volume slightly when it’s ready.
4. Add the Sugars and Flour
- With the mixer running on low speed, add both the granulated sugar and brown sugar gradually, letting them incorporate fully before adding more.
- Beat on medium speed for another 2 minutes until the mixture is light and fluffy. Scrape down the bowl again.
- Sprinkle in the flour and beat on low speed for about 30 seconds, just until combined. The flour helps stabilize the cheesecake and prevents cracking.
You might also enjoy: No Bake Cookies
5. Incorporate the Heavy Cream
- Pour in the heavy cream with the mixer on low speed, then increase to medium and beat for 1-2 minutes until the mixture is smooth and velvety.
- The heavy cream adds extra richness and helps create that luxurious, dense texture that makes this cheesecake so decadent.
- Stop and scrape down the bowl and paddle to ensure everything is evenly mixed.
6. Add the Eggs One at a Time
- Reduce the mixer speed to the lowest setting. This is important because you don’t want to incorporate too much air into the batter at this stage.
- Add the eggs one at a time, waiting until each egg is fully incorporated before adding the next. This should take about 30 seconds per egg.
- After all four whole eggs are in, add the two egg yolks one at a time, mixing just until combined.
- The extra yolks contribute to the custard-like quality that makes this dessert taste like creme brulee.
- Overbeating at this stage creates air bubbles that can cause cracks, so keep the speed low and mix just until everything is uniform.
7. Add Vanilla and Salt
- Pour in the vanilla extract and add the salt, then beat on low speed for just 10-15 seconds until incorporated.
- Give the bowl one final scrape down, making sure to get the bottom and sides where ingredients sometimes hide.
- For the silkiest possible texture, pour the batter through a fine-mesh sieve set over a large bowl. This catches any remaining lumps of cream cheese or bits of cooked egg.
8. Pour into the Prepared Crust
- Carefully pour the smooth cheesecake batter over your cooled graham cracker crust, making sure it spreads evenly to the edges.
- Use an offset spatula to smooth the top, working from the center outward in gentle circular motions.
- Gently tap the pan on the counter a few times to release any air bubbles that might be trapped in the batter. You should see a few small bubbles rise to the surface and pop.
9. Create the Water Bath
- Place your filled springform pan into the large roasting pan you prepared earlier.
- Carefully pull out the oven rack (with the roasting pan on it) and pour the hot water from your kettle into the roasting pan, filling it until the water comes about halfway up the sides of the springform pan.
- The water bath, or bain-marie, helps the cheesecake cook gently and evenly, preventing cracks and creating that silky texture we’re after.
- Carefully slide the rack back into the oven, being very careful not to slosh water onto the cheesecake.
For a different custard dessert, try: Eggnog Pie
10. Bake the Cheesecake
- Bake the cheesecake at 325°F (163°C) for 70-75 minutes. The cheesecake is done when the edges are set and slightly puffed, but the center 3-inch circle still jiggles slightly when you gently shake the pan.
- This wobble is what you want. It might seem underdone, but the residual heat will continue cooking the center as it cools.
- If the edges start browning too much, tent the cheesecake loosely with aluminum foil.
- Don’t open the oven door during the first hour of baking, as temperature fluctuations can cause cracking.
11. Cool Gradually to Prevent Cracking
- When the baking time is up, turn off the oven but leave the cheesecake inside with the door closed for 1 hour. This gradual cooling prevents thermal shock that causes cracks.
- After an hour, crack the oven door open about 4 inches and let the cheesecake sit for another 30 minutes.
- Remove the cheesecake from the water bath (be careful, the water will still be hot) and remove the foil wrapping from the pan.
- Place the cheesecake on a wire rack and let it cool to room temperature, about 2 hours. You’ll see it sink slightly in the center as it cools, which is completely normal.
12. Chill Overnight
- Once the cheesecake has reached room temperature, cover it loosely with plastic wrap (don’t let the wrap touch the surface) or aluminum foil.
- Refrigerate for at least 8 hours or overnight. This chilling time is essential for the cheesecake to set properly and develop its full flavor.
- I usually make mine the day before I plan to serve it.
13. Caramelize the Sugar Topping
- When you’re ready to serve, remove the cheesecake from the refrigerator and carefully run a thin knife around the edge to loosen it from the pan.
- Release the springform and remove the sides of the pan. If desired, you can leave the cheesecake on the pan bottom or carefully transfer it to a serving plate using two large spatulas.
- Evenly sprinkle the 1/2 cup of sugar over the top of the cheesecake in a thin, uniform layer. You want complete coverage, but not too thick or it won’t caramelize properly.
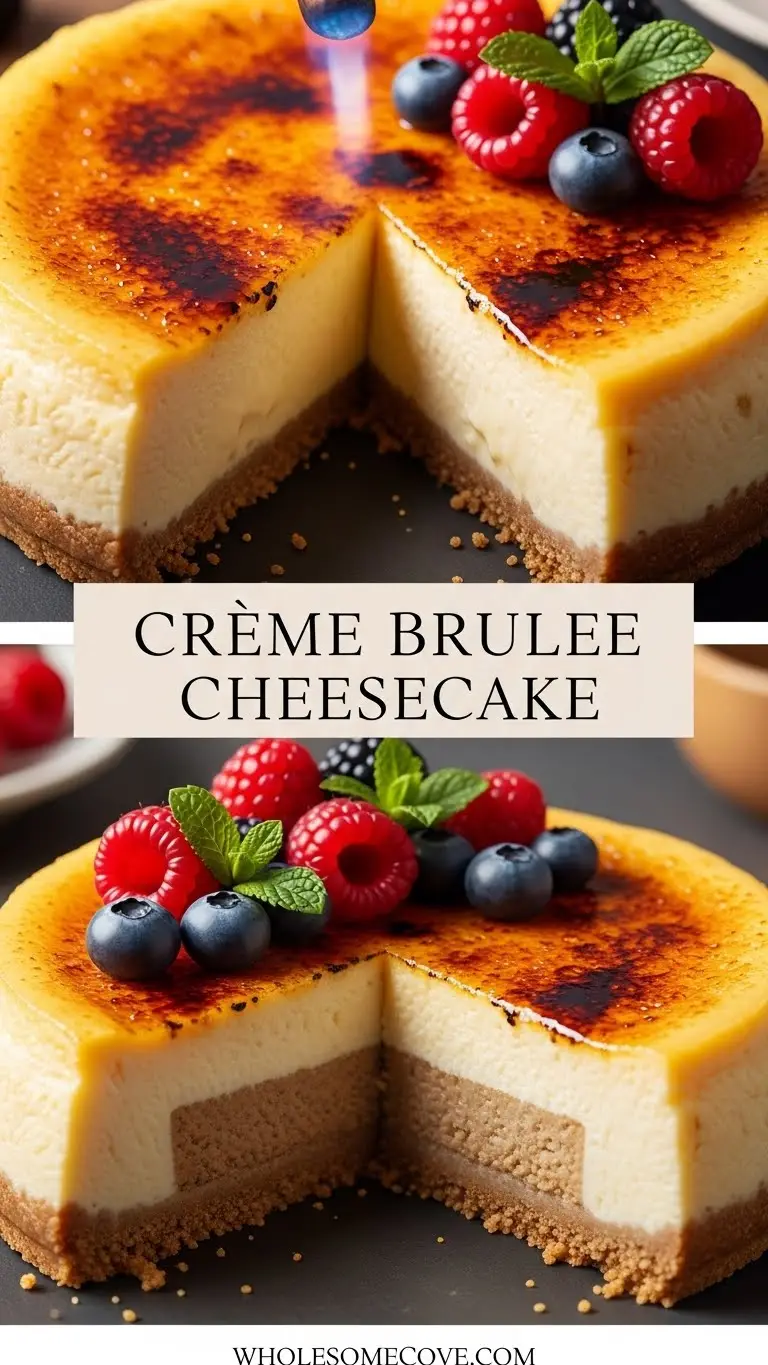
- Using your kitchen torch held at a 45-degree angle about 3-4 inches from the surface, move the flame in small circular motions across the sugar.
- Watch as the sugar melts and turns from white to light brown to deep amber. You want a rich, golden caramel color, but be careful not to let it burn black.
- If you don’t have a torch, you can place the cheesecake under a very hot broiler for 2-3 minutes, watching constantly, but a torch gives you much more control.
- Let the caramelized sugar cool for 5 minutes until it hardens into that signature creme brulee shell.
14. Slice and Serve
- For the cleanest slices, wipe your knife clean with a hot, damp towel between each cut.
- Slide the knife straight down through the caramelized top (you’ll hear a satisfying crack), then pull it toward you to complete the slice.
- Serve immediately while the sugar topping is still crisp and the cheesecake is perfectly chilled.
Tips for The Best Creme Brulee Cheesecake
I’ve made this dessert enough times to learn what works and what doesn’t. Here are my hard-won tips for cheesecake perfection.
Temperature Matters More Than You Think
All your dairy ingredients must be at room temperature before you start mixing. Cold cream cheese creates lumps that are impossible to eliminate, and cold eggs don’t incorporate smoothly. Take everything out of the fridge at least 2 hours before baking.
Here are my essential tips:
- Don’t skip the water bath: I tried baking without it once to save time, and the edges were dry while the center was undercooked. The water bath is non-negotiable for even cooking.
- Use room temperature ingredients: This is so important I’m mentioning it twice. Room temperature cream cheese blends much more smoothly and creates a silkier texture.
- Don’t overbeat after adding eggs: Too much air in the batter creates bubbles that expand during baking and cause cracks. Mix on low speed and only until just combined.
- Test doneness with the jiggle test: When you gently shake the pan, the center 3-inch circle should wobble like jello. If it’s completely solid, you’ve overbaked it.
- Let it cool gradually: Sudden temperature changes are the enemy of smooth cheesecake. The slow cooling process prevents cracks.
- Chill completely before caramelizing: The cheesecake needs to be thoroughly chilled so the heat from the torch doesn’t melt it.
- Caramelize right before serving: The sugar topping is crispest immediately after torching. If you do it too far in advance, it will soften from the moisture in the cheesecake.
- Use a sharp knife and wipe between cuts: This gives you those perfect, Instagram-worthy slices.
- Store properly: Keep the cheesecake covered in the refrigerator, and if you’ve already caramelized the top, it’s best eaten within a few hours for optimal texture.
- Practice your torch technique: Hold the torch at a 45-degree angle and keep it moving constantly. Stationary flames create hot spots that burn the sugar.
For another show-stopping dessert: Fruit Tart
Serving Suggestions
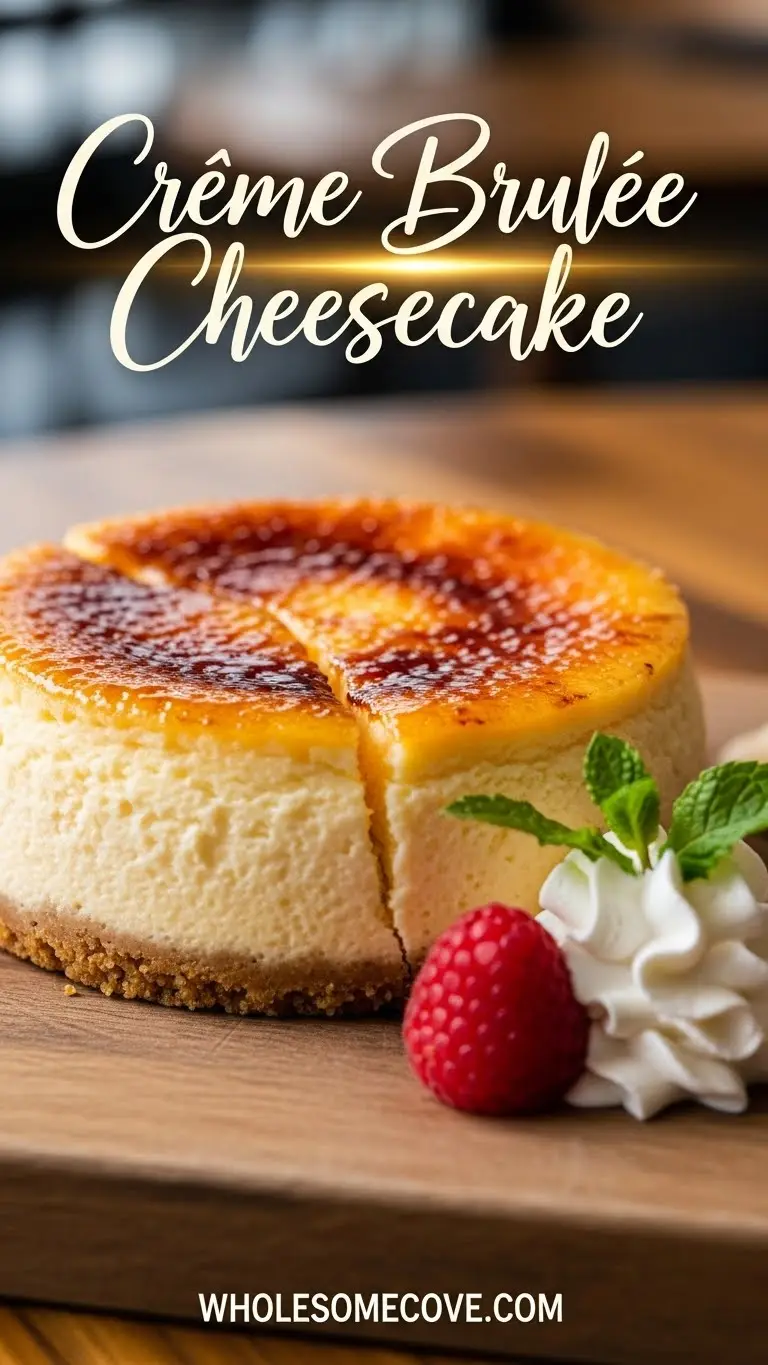
This creme brulee cheesecake is stunning enough to stand alone, but the right accompaniments can elevate it even further. I like to keep things simple and let the cheesecake be the star.
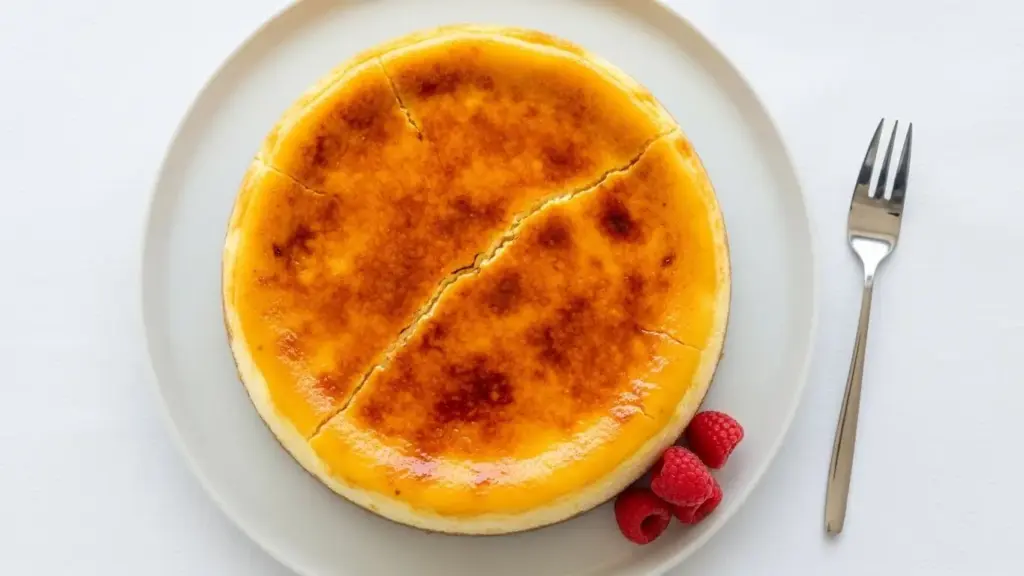
For an elegant presentation, serve each slice on a white plate with a few fresh berries scattered around the base. The tartness of raspberries or strawberries cuts through the richness beautifully.
Consider these serving ideas:
- Fresh berry compote: A spoonful of Strawberry Sauce adds color and balances the sweetness
- Whipped cream rosettes: Pipe small swirls of lightly sweetened whipped cream on the plate
- Espresso or coffee: The bitter notes of good coffee are the perfect counterpoint to the sweet, creamy cheesecake
- Dessert wine pairing: A late-harvest Riesling or Sauternes complements the vanilla and caramel flavors
- Chocolate drizzle: Melt some dark chocolate and drizzle it artistically on the plate for chocolate lovers
- Toasted nuts: Scatter a few candied pecans or sliced almonds for textural contrast
- Mint garnish: A small sprig of fresh mint adds a pop of color and a hint of freshness
Variations of Creme Brulee Cheesecake
Once you’ve mastered the basic recipe, these variations will keep things interesting. I rotate through these based on the season and my mood.
Flavor Variations to Try
The beauty of this recipe is how adaptable it is. A few simple additions or substitutions can completely transform the flavor profile while maintaining that signature creme brulee top.
Here are my favorite variations:
- Chocolate Creme Brulee Cheesecake: Melt 6 oz of dark chocolate and fold it into the batter after adding the eggs. Use chocolate graham crackers for the crust. The result is like a chocolate creme brulee and cheesecake hybrid.
- Espresso Creme Brulee Cheesecake: Dissolve 2 tablespoons of instant espresso powder in 1 tablespoon of hot water, let it cool, and add it with the vanilla. This adds a sophisticated coffee flavor that adults love.
- Lemon Creme Brulee Cheesecake: Add the zest of 2 lemons to the filling and replace 1 teaspoon of vanilla with lemon extract. The bright citrus cuts the richness perfectly.
- Pumpkin Creme Brulee Cheesecake: Replace 1 cup of the heavy cream with canned pumpkin puree and add 1 teaspoon cinnamon, 1/2 teaspoon nutmeg, and 1/4 teaspoon ginger. Perfect for fall.
- Salted Caramel Creme Brulee Cheesecake: Swirl 1/2 cup of Caramel Sauce into the batter before baking, and sprinkle flaky sea salt on top after caramelizing the sugar.
- Berry Swirl: Drop spoonfuls of berry jam (raspberry works beautifully) on top of the batter and swirl with a knife before baking.
- Amaretto Cheesecake: Replace the vanilla extract with amaretto liqueur for an almond-flavored twist.
- Coconut Version: Replace the graham cracker crust with a coconut cookie crust and add 1/2 cup of coconut cream to the filling.
Storage and Reheating
Proper storage keeps your creme brulee cheesecake tasting fresh and maintains that perfect texture. Here’s how I handle leftovers (when there are any).
Storage and Shelf Life
Cheesecake is actually quite forgiving when it comes to storage. The high dairy content means it stays moist and delicious for several days when properly covered.
Follow these storage guidelines:
- Refrigerator storage: Cover the cheesecake tightly with plastic wrap or store it in an airtight container. It will keep for 5-7 days in the refrigerator.
- Before caramelizing: If you haven’t added the sugar topping yet, the plain cheesecake can be refrigerated for up to a week. Add the sugar and torch it just before serving for the best texture.
- After caramelizing: Once you’ve caramelized the sugar topping, the cheesecake is best eaten within 12 hours. The sugar absorbs moisture from the cheesecake and loses its crispy texture over time.
- Freezing: You can freeze the plain cheesecake (before adding the sugar topping) for up to 2 months. Wrap it tightly in plastic wrap, then aluminum foil, and freeze on the springform pan base. Thaw overnight in the refrigerator before adding the topping.
- Freezing individual slices: Cut the cheesecake into slices, wrap each one individually in plastic wrap and foil, and freeze in a freezer-safe container. This way you can defrost just what you need.
- Don’t freeze with the caramelized topping: The sugar topping doesn’t freeze well and will become soggy and weep when thawed.
- Room temperature serving: Take the cheesecake out of the refrigerator about 15 minutes before serving to take the chill off. It tastes best when it’s cool but not ice-cold.
- Protecting the surface: If you need to cover a partially eaten cheesecake, insert toothpicks into the top so the plastic wrap doesn’t touch the surface and stick to it.
Read Also: Pecan Pie
Nutritional Facts
While this creme brulee cheesecake is definitely an indulgent dessert, it’s helpful to know the nutritional breakdown. I believe in enjoying treats mindfully, and knowing what you’re eating helps you make informed choices.
Per Slice (1/12 of the cheesecake):
- Calories: 485
- Total Fat: 32g
- Saturated Fat: 19g
- Cholesterol: 195mg
- Sodium: 340mg
- Total Carbohydrates: 42g
- Dietary Fiber: 0.5g
- Sugars: 35g
- Protein: 8g
Nutritional Notes:
This dessert is high in calories and fat, primarily from the cream cheese, heavy cream, and eggs. It’s rich in calcium and protein from the dairy ingredients. The sugar content is significant, so this is best enjoyed as an occasional treat rather than an everyday indulgence.
If you’re watching your calorie intake, consider serving smaller portions. Even a thin slice of this rich cheesecake is incredibly satisfying.
Health Benefits of Key Ingredients
While creme brulee cheesecake is undeniably a dessert meant for indulgence, some of its key ingredients do offer nutritional benefits. I always say that understanding what you’re eating makes you appreciate it more.
The primary ingredients in this recipe aren’t exactly health foods, but they do provide some nutritional value beyond just tasting incredible.
Here’s what each component contributes:
- Cream cheese: Provides a good source of calcium for bone health, along with protein and vitamin A. Full-fat dairy also contains fat-soluble vitamins that your body needs. The fermentation process in cheese production creates beneficial probiotics.
- Eggs: These are nutrition powerhouses, providing high-quality protein, choline for brain health, and vitamins D, B12, and B6. The yolks contain lutein and zeaxanthin, antioxidants that support eye health.
- Heavy cream: While high in calories and saturated fat, it provides fat-soluble vitamins A, D, E, and K. The fats help your body absorb these vitamins and create feelings of satiety.
- Vanilla extract: Real vanilla contains small amounts of antioxidants and has been shown to have calming properties. It also helps satisfy sweet cravings, which might help you feel satisfied with a smaller portion.
- Graham crackers: Made from whole wheat flour, they provide some dietary fiber and B vitamins, though processing reduces these benefits somewhat.
That said, this is a dessert meant for special occasions. The key is portion control and balance. Enjoy your slice thoroughly, savor every bite, and balance it with nutritious meals throughout the day.
Another indulgent treat: Fudge Brownie
FAQs About Creme Brulee Cheesecake
Over the years, I’ve received countless questions about making this dessert. Here are the ones that come up most frequently, along with the answers I’ve learned through experience.
1. Why did my cheesecake crack?
Cracks usually happen because of sudden temperature changes or overbaking. The most common culprits are opening the oven door during baking, removing the cheesecake from the oven too quickly, or overbaking until the center is completely set instead of slightly jiggly.
Make sure you’re using a water bath, which helps regulate temperature. Also, let the cheesecake cool gradually in the turned-off oven with the door closed for an hour, then cracked open for another 30 minutes. This slow cooling process is crucial for preventing cracks.
2. Can I make this without a kitchen torch?
Yes, but the results won’t be quite as good. You can place the cheesecake under a preheated broiler set to high for 2-3 minutes, watching it constantly. The sugar should caramelize and turn golden brown.
The challenge with the broiler method is that it’s much harder to control. You might get uneven browning, and there’s a higher risk of burning. A kitchen torch gives you precision and control, letting you caramelize the sugar evenly. They’re relatively inexpensive and useful for many other cooking tasks.
3. My cheesecake is too dense. What went wrong?
Overmixing the batter, especially after adding the eggs, is the usual culprit for dense cheesecake. When you overbeat the mixture, you develop the proteins in the eggs too much, resulting in a rubbery, dense texture.
Make sure you’re mixing on low speed after adding the eggs and stopping as soon as everything is just combined. Also, check that your cream cheese was properly softened to room temperature before mixing. Cold cream cheese requires more beating to become smooth, which can lead to that dense texture.
4. Can I use a different type of crust?
Absolutely! While graham crackers are traditional, you can use vanilla wafer cookies, chocolate sandwich cookies (like Oreos), gingersnaps, or even shortbread cookies. Just process them into fine crumbs and proceed with the recipe as written.
For a gluten-free version, use gluten-free graham crackers or cookies. You could even skip the crust entirely and make a crustless cheesecake, though I love the textural contrast the crust provides.
5. How do I know when the cheesecake is done baking?
The jiggle test is your best friend here. When you gently shake the pan, the outer edges should be set and firm, but the center 3-inch circle should still wobble like jello. It might seem underdone, but that’s exactly what you want.
The cheesecake will continue cooking as it cools thanks to residual heat, and that jiggly center will set up perfectly during the chilling period. If you bake it until the center is completely firm, you’ll end up with an overbaked, dry cheesecake.
Final Thoughts
This creme brulee cheesecake has earned its place as my signature dessert for good reason. Every time I crack through that caramelized sugar shell and reveal the creamy cheesecake underneath, I feel a little rush of pride.
The combination of French elegance and American comfort food is irresistible. Yes, it takes some time and effort, but the end result is absolutely worth it. There’s something deeply satisfying about creating a dessert this impressive in your own kitchen.
I hope this recipe brings you as much joy as it’s brought me and my family. Don’t be intimidated by the steps; take your time, follow the instructions, and trust the process. Your first attempt might not be perfect, but it will still be delicious.
Give this creme brulee cheesecake a try for your next special occasion, and don’t forget to share your results in the comments below! I’d love to hear about your experience making it, any variations you tried, or questions you have along the way.
Recommended:
- Pumpkin Bar Recipe
- Sugar Cookies Recipe
- Apple Pie Recipe
- Eggnog Cookies Recipe
- Fruit Cocktail Cake Recipe
- Hot Chocolate Recipe
- Gingerbread Cookie Recipe
- Oatmeal Raisin Cookie Recipe
- Peanut Butter Cookies Recipe
- Pumpkin Roll Recipe