
My first bite of Chick-fil-A mac and cheese happened completely by accident. I had ordered my usual grilled chicken sandwich and, on a whim, swapped my waffle fries for the mac and cheese side.
That decision changed everything.
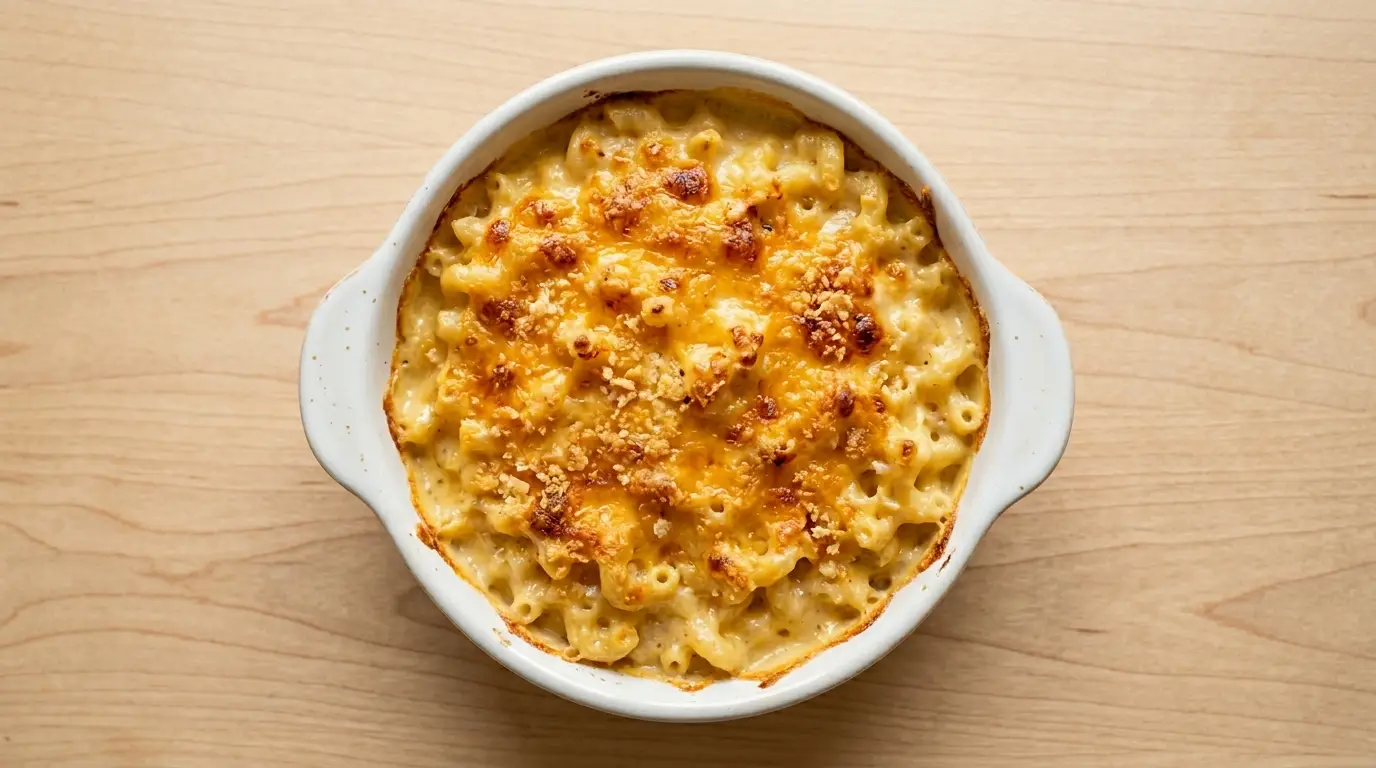
It was not what I expected from a fast-food chain. The pasta was perfectly tender, and the cheese sauce was silky, rich, and deeply savory in a way that felt more like something from a nice sit-down restaurant than a drive-thru window.
I became a little obsessed after that. I started ordering it every single time I visited, studying the flavor, and wondering exactly how they got that golden, slightly browned top on the cheese while keeping the inside so incredibly creamy. When the price of feeding my family at Chick-fil-A started adding up, I knew I had to crack this Chick-fil-A Mac and Cheese Recipe at home.
It took me several tries. My first batch was good, but it was missing that sharp, nutty depth. The second was too thick. By the third, I had figured out the secret: a multi-cheese blend using American, sharp cheddar, Parmesan, and Romano, finished under the broiler for that signature golden top.
This homemade version nails it. And it makes a big, generous batch that feeds the whole family.
| Quick Recipe Summary | |
|---|---|
| Prep Time | 15 minutes |
| Cook Time | 40 minutes |
| Total Time | 55 minutes |
| Servings | 8 servings |
| Difficulty Level | Easy |
If you love rich and cheesy pasta dishes, you might also enjoy my Creamy Mac and Cheese Recipe for another ultra-comforting weeknight option.

Why You’ll Love This Chick-fil-A Mac and Cheese Recipe
Recreating a restaurant favorite at home always feels like a small victory.
This one is particularly satisfying because the results are genuinely spot-on. The texture is velvety and smooth, and the flavor has that unmistakable sharpness from Romano and Parmesan working alongside the creamy melt of American cheese.
Here is why this recipe keeps getting made in my kitchen:
- The cheese blend is the real deal. Using four types of cheese gives you layers of flavor that single-cheese versions just cannot replicate. The American cheese creates the smooth, creamy base. The cheddar adds sharpness. Parmesan and Romano bring nutty, tangy depth.
- The broiled top is everything. That lightly golden, slightly crispy top layer of melted cheese is what separates this from ordinary mac and cheese. It takes only a few minutes under the broiler, but it makes a huge difference.
- It feeds a crowd. A 9×13 inch baking dish gives you a generous batch, perfect for family dinners, potlucks, or just having leftovers you will actually look forward to eating.
- It is beginner-friendly. If you have never made a roux or a cheese sauce before, this recipe walks you through it step by step without any complicated techniques.
- It comes together in under an hour. From start to finish, you are looking at about 55 minutes for a dish that tastes like it took all day.
- It is cheaper than the restaurant. A large batch at home costs a fraction of what you would spend at Chick-fil-A, with far more servings.
- Kids absolutely love it. This is one of those recipes that everyone at the table eats without complaint, which is a rare and beautiful thing.
Another favorite in my rotation is this Baked Mac and Cheese Recipe, which uses a similar technique with a gorgeous crispy breadcrumb topping.
Ingredients
The key to this copycat recipe is using the right cheese combination. Do not be tempted to cut it down to one or two cheeses. Each one plays a specific role in building the flavor and texture of the sauce.
- 1 lb (450g) elbow macaroni, large size if possible
- 4 tablespoons (56g) unsalted butter
- 1/4 cup (30g) all-purpose flour
- 1 teaspoon fine sea salt, plus more for pasta water
- 1/8 teaspoon paprika
- Pinch of turmeric (optional, for color)
- 2 cups (480ml) whole milk
- 1 cup (240ml) additional whole milk (added in a second pour)
- 1 large egg yolk
- 6 oz (170g) deli American cheese, torn or chopped into pieces (do not use Velveeta)
- 2 cups (225g) sharp cheddar cheese, freshly shredded, divided
- 1/2 cup (50g) freshly grated Parmesan cheese
- 1/2 cup (50g) freshly grated Romano cheese
- 1 cup (115g) shredded Colby Jack cheese (for topping)
Read Also: Southern Mac and Cheese Recipe
Kitchen Equipment Needed
You do not need any fancy equipment to pull this off. Here is what to have ready before you start:
- Large stockpot (for boiling the pasta)
- Large saucepan or deep skillet (for building the cheese sauce)
- Whisk (essential for a lump-free roux and smooth sauce)
- 9×13 inch baking dish (for assembling and broiling)
- Box grater (freshly shredded cheese melts far better than pre-shredded)
- Colander (for draining pasta)
- Measuring cups and spoons
- Small mixing bowl (for tempering the egg yolk)
- Wooden spoon or silicone spatula (for stirring)
- Oven mitts
You might also enjoy this One Pot Mac and Cheese Recipe for an even easier cleanup situation on busy weeknights.
Recommended Products for This Recipe
These are products I personally use and genuinely believe make this recipe better.
1. Staub Ceramic 9×13 Baking Dish
The even heat retention in this baking dish means your mac and cheese heats all the way through without the edges overcooking before the center is warm. It goes from oven to broiler without any issues, and the enameled surface makes cleanup surprisingly easy even with baked-on cheese. It is the baking dish I reach for every single time I make this recipe.
2. Microplane Box Grater
Pre-shredded cheese contains anti-caking agents that prevent it from melting smoothly. A good box grater lets you shred your own cheese in minutes, and the difference in the sauce texture is immediately noticeable. This is one of those small investments that genuinely improves the final result.
3. Parmigiano Reggiano Wedge (Imported)
Using genuine imported Parmigiano Reggiano instead of the green canister stuff takes this recipe from good to outstanding. The flavor is nuttier, more complex, and far more intense. A little goes a long way, and it keeps well in the fridge wrapped tightly in wax paper.
4. Deli-Style American Cheese Slices
The deli counter American cheese is completely different from processed slices wrapped in plastic. It melts into the sauce like a dream and creates that unmistakably smooth, creamy texture that defines Chick-fil-A’s mac and cheese. If your grocery store sells it at the deli counter, ask them to slice it thick.
5. Enamel Cast Iron Skillet for Sauce
Building your cheese sauce in an enameled skillet gives you excellent, even heat control. It prevents hot spots that can scorch the roux or cause the cheese to clump. I switched to using mine for all my cheese sauces and have never gone back.
For another pasta dish that uses a rich, cheesy sauce as its base, try this Tini’s Mac and Cheese Recipe, which is wildly popular for a good reason.

Step-by-Step Instructions: How to Make Chick-fil-A Mac and Cheese
Step 1: Cook the Pasta
- Fill your large stockpot with water and bring it to a rolling boil over high heat. This usually takes about 10 to 12 minutes.
- Once boiling, add a generous amount of salt to the water. The water should taste seasoned, almost like mild broth. This is the only opportunity to season the pasta itself.
- Add the 1 lb (450g) of elbow macaroni to the boiling water. Stir immediately and then stir occasionally throughout cooking to prevent sticking.
- Cook the pasta for the full time indicated on the package, or until it is just tender (al dente). You want a slight firmness in the center since the pasta will continue to soften slightly when combined with the hot cheese sauce and again under the broiler.
- Reserve about 1/2 cup (120ml) of the pasta cooking water before draining. Set it aside in case you need to thin the sauce later.
- Drain the pasta through a colander and set aside. Do not rinse the pasta. The surface starch helps the cheese sauce cling to the noodles.
Step 2: Preheat the Oven
- Set your oven to broil (high setting, approximately 500°F / 260°C). If your oven has a low broil and a high broil option, use high.
- Position your oven rack so the baking dish will sit about 6 inches (15cm) below the broiler element. You want it close enough to brown the cheese without burning it instantly.
- Lightly grease your 9×13 inch baking dish with cooking spray or a small amount of butter. Set it nearby.
Step 3: Make the Roux
- Place your large saucepan over medium heat. Add the 4 tablespoons (56g) of unsalted butter to the pan.
- Allow the butter to melt completely, swirling the pan occasionally to help it melt evenly. Do not let it brown.
- Once the butter is fully melted and shimmering, add the 1/4 cup (30g) of all-purpose flour, the 1 teaspoon of salt, and the 1/8 teaspoon of paprika to the pan.
- Immediately begin whisking constantly and vigorously. The mixture will come together into a thick, pale paste. This is your roux.
- Continue to whisk and cook the roux for exactly 60 to 90 seconds. This step cooks out the raw flour taste. The roux should smell slightly nutty, not raw or doughy. Do not let it brown.
Step 4: Build the Cheese Sauce Base
- With the heat still on medium, begin adding the whole milk gradually. Start with just 1/2 cup (120ml), pouring it in slowly while whisking constantly.
- Whisk until the milk is completely absorbed and the mixture is smooth before adding more.
- Add another 1/2 cup (120ml) of milk and whisk again until smooth.
- Pour in the remaining 1 cup (240ml) of milk and whisk until everything is fully combined and there are no lumps.
- Add the pinch of turmeric at this stage if you are using it. This adds a warm golden-orange hue similar to the restaurant version.
- Continue cooking over medium heat, whisking frequently, for about 3 to 5 minutes. The sauce will gradually thicken. You will know it is ready when it coats the back of a spoon and a finger drawn through it leaves a clean line.
Step 5: Temper the Egg Yolk
- This step is important and should not be skipped. Adding a raw egg yolk directly to the hot sauce can cause it to scramble. Tempering prevents this.
- Scoop about 1/4 cup of the hot sauce into a small bowl.
- Add the 1 large egg yolk to this small bowl and immediately whisk quickly until the egg yolk is fully incorporated into the small amount of sauce.
- Pour this egg yolk mixture back into the main saucepan while whisking constantly.
- Continue whisking for another 30 seconds to ensure everything is evenly combined. The sauce will become slightly thicker and noticeably more rich.
Step 6: Melt in the Cheeses
- Reduce the heat to low. This is important. High heat can cause the cheese sauce to become grainy or oily.
- Add the torn or chopped deli American cheese pieces to the sauce first. Stir continuously until it is fully melted and the sauce is smooth.
- Add 1 and 1/2 cups (about 170g) of the freshly shredded sharp cheddar cheese, reserving the remaining 1/2 cup for later. Stir until melted.
- Add all of the grated Parmesan cheese and all of the grated Romano cheese. Stir continuously until both are fully incorporated and the sauce is completely smooth.
- Taste the sauce at this point. Adjust salt if needed. The sauce should taste rich, savory, and slightly sharp.
Step 7: Combine Pasta and Sauce
- Add the drained elbow macaroni to the saucepan with the cheese sauce. Stir gently to combine, making sure every piece of pasta is coated.
- If the sauce feels too thick at this stage, add a splash of the reserved pasta water and stir. Add it a little at a time until the consistency looks creamy and saucy, not stiff or dry.
- Pour the mac and cheese mixture into your prepared 9×13 inch baking dish. Spread it out into an even layer using a spatula.
Step 8: Add the Topping and Broil
- Sprinkle the remaining 1/2 cup of sharp cheddar cheese evenly over the surface of the mac and cheese.
- Then sprinkle the 1 cup (115g) of shredded Colby Jack cheese evenly over the top. This combination creates a beautifully golden, gooey topping under the broiler.
- Carefully place the baking dish in the oven under the broiler.
- Broil for 3 to 5 minutes, watching closely the entire time. The cheese should melt and develop golden-brown spots across the surface, mimicking the signature look from Chick-fil-A.
- Remove from the oven as soon as the top is golden. The broiler works fast and can go from golden to burnt in less than 60 seconds.
Step 9: Rest and Serve
- Allow the mac and cheese to rest for 5 minutes before serving. This gives the sauce a chance to set slightly so it holds its shape when scooped.
- Serve warm, scooping generous portions directly from the baking dish.
You might also enjoy the hands-off approach of the Crock Pot Mac and Cheese Recipe for days when you want a slower, set-it-and-forget-it method.

Tips for The Best Chick-fil-A Mac and Cheese
A few small details make a big difference between a good mac and cheese and a truly great one. Here is everything I have learned from making this recipe repeatedly.
- Always shred your own cheese. Pre-shredded cheese is coated in anti-caking agents like cellulose that prevent it from melting smoothly. Freshly shredded cheese melts into a silkier, creamier sauce every time.
- Use deli American cheese, not Velveeta or sandwich slices. The deli counter version has a richer flavor and a better melt. It is the key to getting that smooth, creamy base sauce.
- Do not skip the egg yolk. It adds richness and helps stabilize the sauce so it stays creamy even as it cools slightly.
- Cook the roux long enough. A full 60 to 90 seconds ensures the raw flour taste is cooked out. You will notice the smell change from raw to slightly nutty.
- Add the milk slowly. Adding all the milk at once can cause lumps. Go slowly, whisking between each addition, for a perfectly smooth sauce.
- Keep the heat low when adding cheese. High heat causes cheese sauces to break, resulting in a grainy or greasy texture. Low and slow is the way to go.
- Watch the broiler constantly. Do not walk away. The cheese topping goes from perfectly golden to burnt very quickly under a broiler.
- Salt the pasta water generously. It is the only chance you have to season the pasta itself. Underseasoned pasta will make the whole dish taste flat.
- Let it rest before serving. Even five minutes makes a difference. The sauce tightens up just enough to serve cleanly.
- Reserve pasta water. If your sauce is thicker than you like, a small splash of starchy pasta water loosens it beautifully without watering down the flavor.
Read Also: Instant Pot Mac and Cheese Recipe
What to Serve with Chick-fil-A Mac and Cheese
This mac and cheese is hearty enough to eat on its own, but it is also an incredible side dish that pairs beautifully with so many different proteins and accompaniments.
- Chick-fil-A Grilled Chicken Nuggets: For the most authentic Chick-fil-A experience at home, pair this mac and cheese with homemade grilled nuggets. It is the dream combination.
- Coleslaw: The cool, creamy crunch of coleslaw contrasts beautifully with the richness of mac and cheese.
- Broccoli Salad: A bright, tangy broccoli salad cuts through the heaviness of the dish and adds freshness to the plate.
- Dinner Rolls: Soft, fluffy dinner rolls are perfect for scooping up every last bit of cheesy sauce.
- Green Bean Casserole: A classic pairing that turns this into a full, satisfying comfort food spread.
- Roast Chicken: A simply seasoned roast chicken alongside this mac and cheese is one of the most satisfying, crowd-pleasing dinners you can make.
- Hot Chicken Salad: The savory, crunchy topping of a hot chicken salad pairs wonderfully with the creamy mac and cheese.
- Tomato Soup: For a cozy, diner-style meal, serve a bowl of tomato soup alongside a scoop of this mac and cheese.
For more ideas on pairing creamy, cheesy dishes, check out the Panera Broccoli Cheddar Soup Recipe, which makes a wonderful companion to this mac and cheese at the dinner table.
Variations of Chick-fil-A Mac and Cheese
Once you have mastered the base recipe, there are so many fun directions you can take it. Here are some of my favorite ways to switch things up.
The base recipe is perfect as-is, but if you are feeling adventurous or want to customize it for different occasions, these variations all work beautifully.
- Spicy Mac and Cheese: Add 1/2 teaspoon of cayenne pepper and 1 teaspoon of hot sauce to the cheese sauce. Top with sliced pickled jalapeños before broiling for heat in every bite.
- Bacon Mac and Cheese: Stir in 1 cup of crumbled, cooked bacon into the pasta before adding it to the baking dish. Sprinkle more on top along with the cheese topping.
- Pulled Pork Mac and Cheese: Layer leftover pulled pork over the mac and cheese in the baking dish before adding the cheese topping and broiling. It is outrageously good and deeply satisfying.
- Lobster Mac and Cheese: Fold in cooked lobster meat for a luxurious, special-occasion version. Add it gently so it does not break apart.
- Vegan Version: Swap butter for vegan butter, whole milk for full-fat oat milk, and the cheese blend for high-quality vegan cheddar and vegan cream cheese. The texture will be slightly different but still creamy.
- Broccoli Mac and Cheese: Stir in 2 cups of steamed, chopped broccoli florets when combining the pasta and sauce. It adds color, nutrition, and a classic flavor combination.
- Truffle Mac and Cheese: Drizzle 1 teaspoon of white truffle oil over the finished mac and cheese just before serving. Shave a little Parmesan on top for an elevated, restaurant-worthy dish.
- Buffalo Chicken Mac and Cheese: Stir in shredded rotisserie chicken and 3 tablespoons of buffalo sauce into the pasta and cheese mixture before baking. Drizzle with blue cheese dressing after broiling.
Read Also: Vegan Mac and Cheese Recipe
Storage and Reheating
Leftovers of this mac and cheese keep beautifully, making it a great recipe to make ahead for busy weeks. Here is how to store and reheat it properly so it stays creamy and delicious.
- Refrigerator storage: Transfer leftovers to an airtight container and refrigerate for up to 4 days. The pasta will absorb some of the sauce as it sits, which is normal.
- Freezer storage: Spoon fully cooled mac and cheese into a freezer-safe, airtight container. Freeze for up to 3 months. For best results, freeze before broiling if you are planning ahead.
- Thawing: Thaw frozen mac and cheese overnight in the refrigerator. Do not thaw at room temperature.
- Reheating on the stovetop (best method): Place portions in a saucepan over low heat. Add a splash of whole milk, about 2 to 3 tablespoons per serving, and stir continuously until warmed through and creamy again. The added milk rehydrates the sauce.
- Reheating in the microwave: Transfer a portion to a microwave-safe bowl. Add 1 tablespoon of whole milk and stir. Microwave in 30-second intervals, stirring between each one, until heated through.
- Reheating in the oven: Place leftovers in an oven-safe dish, cover tightly with aluminum foil, and bake at 350°F (175°C) for about 20 minutes until warmed through. Remove the foil for the last 5 minutes to re-crisp the top if desired.
- Do not reheat on high heat. High heat will cause the cheese sauce to break and become grainy or oily.
You might also enjoy: Cheesy Potatoes Recipe
Nutritional Facts
The following values are approximate, based on 8 servings per recipe.
| Nutrient | Amount Per Serving |
|---|---|
| Calories | 520 kcal |
| Total Fat | 26g |
| Saturated Fat | 15g |
| Trans Fat | 0g |
| Cholesterol | 90mg |
| Sodium | 740mg |
| Total Carbohydrates | 50g |
| Dietary Fiber | 2g |
| Total Sugars | 5g |
| Protein | 23g |
| Calcium | 480mg |
| Iron | 2.1mg |
| Potassium | 290mg |
| Vitamin A | 12% DV |
| Vitamin D | 8% DV |
Nutritional values are estimates and may vary based on specific brands and ingredients used.
You might also like the Potato Cheese Soup Recipe, another comforting cheesy dish that hits all the same warm, satisfying notes.
Health Benefits of Key Ingredients
While this is certainly an indulgent dish, some of the core ingredients do carry real nutritional value worth highlighting.
Whole-food dairy ingredients like cheese and whole milk provide a range of nutrients that support daily health, and the pasta contributes energy-sustaining carbohydrates to keep you fueled.
- Cheddar Cheese: Cheddar is a solid source of calcium, which supports bone density and muscle function. It also provides protein and fat-soluble vitamins like A and K2.
- Parmesan Cheese: Parmesan contains a concentrated dose of protein and calcium per tablespoon. It is also rich in phosphorus, which works alongside calcium to maintain strong bones.
- Romano Cheese: Romano is high in protein and provides beneficial conjugated linoleic acid (CLA), a naturally occurring fatty acid associated with various metabolic benefits.
- Whole Milk: Whole milk contains a full spectrum of fat-soluble vitamins including A, D, E, and K. The fat content in whole milk also helps improve the absorption of these nutrients.
- Elbow Macaroni (Enriched): Enriched pasta is fortified with B vitamins including folate, thiamin, and niacin. These B vitamins play essential roles in energy metabolism and nervous system function.
- Egg Yolk: Egg yolks contain choline, which supports brain health and liver function. They are also rich in vitamins B12 and D, and provide quality fat and protein.
- Butter: Butter from grass-fed cows is a source of butyrate, a short-chain fatty acid that supports gut health, and provides small amounts of vitamins A and K2.
Read Also: Broccoli Cheese Potato Soup Recipe
FAQs About Chick-fil-A Mac and Cheese
1. What kind of cheese does Chick-fil-A use in their mac and cheese?
Chick-fil-A lists a blend of cheeses in their official ingredients, including cheddar, Parmesan, and Romano. Many copycat recipe developers also identify American cheese as a key component based on the texture and melt of the restaurant version. This recipe uses all four, plus Colby Jack on top for broiling.
2. Why does this recipe call for cooking the pasta in plain boiling water instead of for 20 minutes like some other copycat recipes?
Some popular copycat versions call for cooking the pasta for 20 full minutes to achieve a softer, starchier noodle. I prefer cooking to al dente because the pasta continues to soften when mixed with the hot cheese sauce and then goes under the broiler. Al dente pasta holds its shape better and gives a more satisfying bite.
3. Can I make this Chick-fil-A Mac and Cheese Recipe ahead of time?
Absolutely, and I highly recommend it for entertaining. Assemble the mac and cheese in the baking dish up to 24 hours in advance, cover tightly with plastic wrap, and refrigerate. When ready to serve, remove the plastic wrap, add the cheese topping, and broil directly from cold, adding an extra 2 to 3 minutes to ensure it heats through completely.
4. Can I use pre-shredded cheese to save time?
You can, but the results will not be as creamy. Pre-shredded cheese contains anti-caking agents that interfere with melting. The sauce may turn out slightly grainy or less smooth. If you are short on time, shredding the cheese is still worth the extra five minutes for this particular recipe.
5. My cheese sauce turned out grainy. What went wrong?
Grainy cheese sauce usually happens when the heat is too high when the cheese is added, or when pre-shredded cheese is used. To fix it, take the sauce off the heat and whisk in a small splash of whole milk and a teaspoon of additional butter. Stir vigorously. It usually comes back together smoothly.
Read Also: Air Fryer Mac and Cheese Recipe
Chick-fil-A Mac and Cheese
Ingredients
- 1 lb elbow macaroni - 450g; large elbow size preferred
- 4 tablespoons unsalted butter - 56g
- 1/4 cup all-purpose flour - 30g
- 1 teaspoon fine sea salt - Plus more for pasta water
- 1/8 teaspoon paprika
- 1 pinch turmeric - Optional; adds golden color similar to the restaurant version
- 2 cups whole milk - 480ml; first addition
- 1 cup whole milk - 240ml; second addition; do not substitute lower-fat milk
- 1 large egg yolk - For tempering into the sauce
- 6 oz deli American cheese - 170g; torn or chopped into pieces; do not use Velveeta or individually wrapped slices
- 2 cups sharp cheddar cheese - 225g freshly shredded; divided — 1.5 cups for sauce, 0.5 cup reserved for topping
- 1/2 cup Parmesan cheese - 50g; freshly grated
- 1/2 cup Romano cheese - 50g; freshly grated
- 1 cup Colby Jack cheese - 115g; shredded; for broiling on top
- 1/2 cup sharp cheddar cheese - Reserved from main cheese blend; sprinkled on top before broiling
Equipment
- Large stockpot - For boiling the pasta
- Large saucepan or deep skillet - For building the cheese sauce
- Whisk - Essential for a lump-free roux and smooth sauce
- 9×13 inch baking dish - For assembling and broiling
- Box grater - For freshly shredding cheese; pre-shredded cheese does not melt as smoothly
- Colander - For draining pasta
- Measuring cups and spoons
- Small mixing bowl - For tempering the egg yolk
- Wooden spoon or silicone spatula - For stirring
- Oven mitts
Method
- Bring a large pot of generously salted water to a rolling boil, add the elbow macaroni, and cook until just al dente according to package directions, stirring occasionally. Reserve 1/2 cup (120ml) of pasta water before draining, then drain through a colander without rinsing.
- Set your oven to broil on high (approximately 500°F / 260°C) and position the rack about 6 inches (15cm) below the broiler element. Lightly grease your 9×13 inch baking dish with cooking spray or butter and set aside.
- Melt the butter in a large saucepan over medium heat, then whisk in the flour, salt, paprika, and turmeric (if using). Cook the roux, whisking constantly, for 60 to 90 seconds until it smells slightly nutty and no longer raw.
- Add the whole milk gradually, starting with 1/2 cup (120ml) at a time and whisking fully between each addition, until all 3 cups are incorporated. Cook over medium heat, whisking frequently, for 3 to 5 minutes until the sauce thickens enough to coat the back of a spoon.
- Scoop about 1/4 cup of the hot sauce into a small bowl, whisk in the egg yolk until fully combined, then pour the tempered mixture back into the saucepan while whisking constantly. Whisk for another 30 seconds until the sauce is smooth and slightly thicker.
- Reduce the heat to low, then stir in the American cheese until melted, followed by 1.5 cups of the sharp cheddar, all of the Parmesan, and all of the Romano, stirring continuously until the sauce is completely smooth. Taste and adjust salt as needed.
- Add the drained macaroni to the cheese sauce and stir gently until every piece of pasta is evenly coated, adding a splash of reserved pasta water if the sauce seems too thick. Pour the mixture into the prepared 9×13 inch baking dish and spread into an even layer.
- Sprinkle the reserved 1/2 cup of sharp cheddar and the 1 cup of Colby Jack evenly over the surface, then broil for 3 to 5 minutes, watching closely, until the cheese is melted and golden brown in spots. Remove immediately once the top is golden.
- Allow the mac and cheese to rest for 5 minutes before serving so the sauce sets slightly and holds its shape when scooped. Serve warm directly from the baking dish.
Nutrition
Notes
- Always shred your own cheese. Pre-shredded cheese contains anti-caking agents that prevent smooth melting and can result in a grainy sauce.
- Use deli counter American cheese, not Velveeta or individually wrapped slices. The deli version melts more smoothly and has a richer, more complex flavor.
- Do not skip the egg yolk. It adds richness and helps stabilize the sauce so it stays creamy and does not break.
- Keep the heat on low when adding cheese to the sauce. High heat causes cheese sauces to become greasy or grainy.
- Watch the broiler constantly. The cheese topping can go from perfectly golden to burnt in under 60 seconds.
- Salt the pasta water generously. This is the only opportunity to season the pasta itself, and under-seasoned pasta will make the whole dish taste flat.
- Make-ahead tip: Assemble the mac and cheese in the baking dish up to 24 hours in advance, cover with plastic wrap, and refrigerate. Remove the plastic wrap, add the cheese topping, and broil before serving, adding 2 to 3 extra minutes since it will be cold.
- Storage: Leftovers keep in an airtight container in the refrigerator for up to 4 days, or in the freezer for up to 3 months.
- Reheat leftovers on the stovetop over low heat with a splash of whole milk, stirring continuously, for the creamiest results. Avoid reheating on high heat.
- If your sauce turns grainy, remove it from the heat and whisk in a small splash of whole milk and a teaspoon of butter. Stir vigorously and it should come back together.
Private Notes
Tried this recipe?
Let us know how it was!Final Thoughts
This Chick-fil-A Mac and Cheese Recipe has become one of those dishes I make when I want to feel like I have really nailed something.
It takes a bit of patience, but every step is straightforward and achievable for anyone.
The combination of four cheeses, the smooth roux-based sauce, and that golden broiled top makes this feel like genuine restaurant quality food made right in your own kitchen.
Give it a try this week. I promise it will not disappoint.
If you make it, leave a comment below letting me know how it turned out. I love hearing how these copycat recipes land in different kitchens, and your feedback always helps other readers too.
Recommended:
- Garlic Parmesan Sauce Recipe
- Chicken Parmesan Recipe
- Marry Me Chicken Pasta Recipe
- Chicken Spaghetti Recipe
- BLT Pasta Salad Recipe
- Air Fryer Cheddar Hash Browns Recipe
- Ham and Cheese Sliders Recipe
- Air Fryer Popcorn Chicken Recipe
- BBQ Chicken Wrap Recipe
- Chicken Caesar Pasta Salad Recipe

