
I first heard about Tini’s Mac and Cheese Recipe from my sister, who texted me a TikTok link at 11 PM on a Tuesday with the message “you NEED to make this for Thanksgiving.”
I rolled my eyes a little. I’ve been making baked mac and cheese for years, and I figured — how different could it really be?
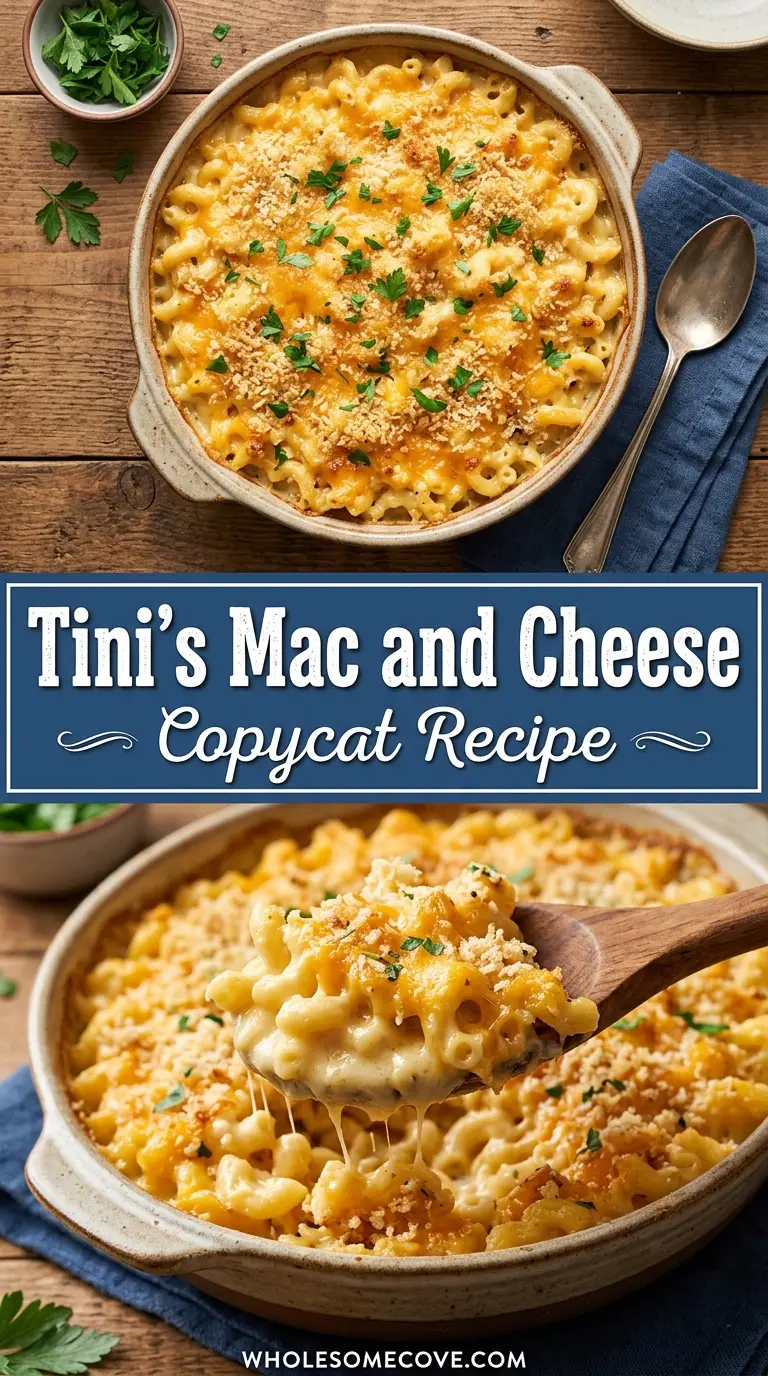
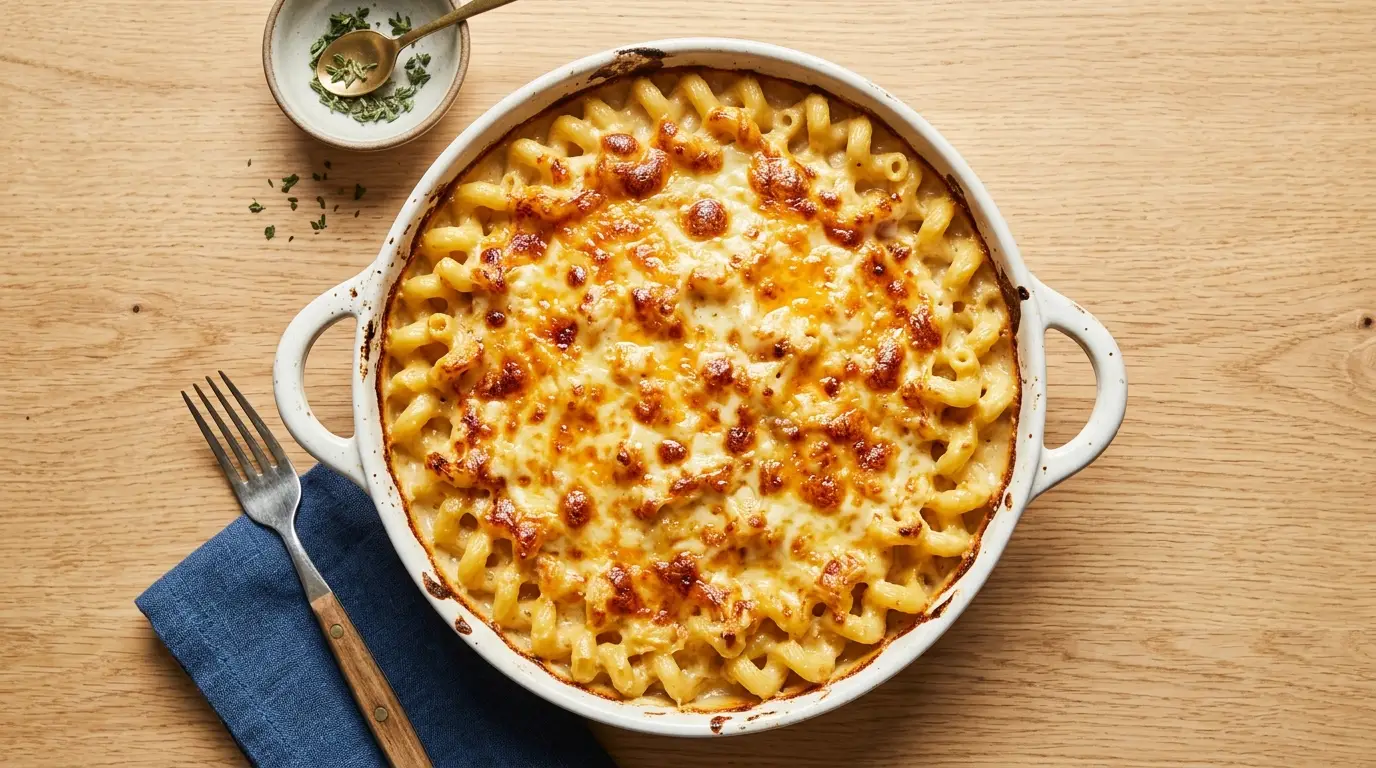
Pretty different, it turns out. The moment I pulled that bubbling, golden-topped casserole out of the oven, I understood exactly why Tineke “Tini” Younger’s recipe racked up over 100 million TikTok views. This isn’t just mac and cheese. It’s a whole event.
The magic is in the cheese blend and the layering method, which gives you that stretchy, gooey interior with a perfectly golden, slightly crispy top. Mozzarella for the pull, Colby Jack for the creaminess, and sharp cheddar for flavor — plus a roux-based sauce with heavy cream, evaporated milk, Dijon mustard, and smoked paprika that ties it all together.
I’ve made this recipe six times now, tweaked a few things along the way, and landed on a version that I’m genuinely proud of. Read on for everything you need to know.
| Quick Recipe Summary | |
|---|---|
| Prep Time | 20 minutes |
| Cook Time | 40 minutes |
| Total Time | 1 hour |
| Servings | 10–12 servings |
| Difficulty Level | Medium |
If you love cheesy baked pasta dishes, you’ll also want to check out my Baked Mac and Cheese Recipe for a classic version that’s perfect for weeknight dinners.
Why You’ll Love This Tini’s Mac and Cheese Recipe
This recipe is everything that classic baked mac and cheese should be, and then some. It delivers that deep, comforting cheesiness that makes you close your eyes and take a slow second bite.
The three-cheese blend is honestly what sets it apart from every other version I’ve tried. You get the perfect combination of stretch, creaminess, and bold flavor in every single forkful.
The layering technique — borrowed straight from lasagna principles — means you get pockets of melted cheese throughout the dish, not just on top. That golden, bubbly crust is just the beginning.
It’s a guaranteed crowd-pleaser at any holiday table, potluck, or family gathering. I’ve never once brought it somewhere and come home with leftovers.
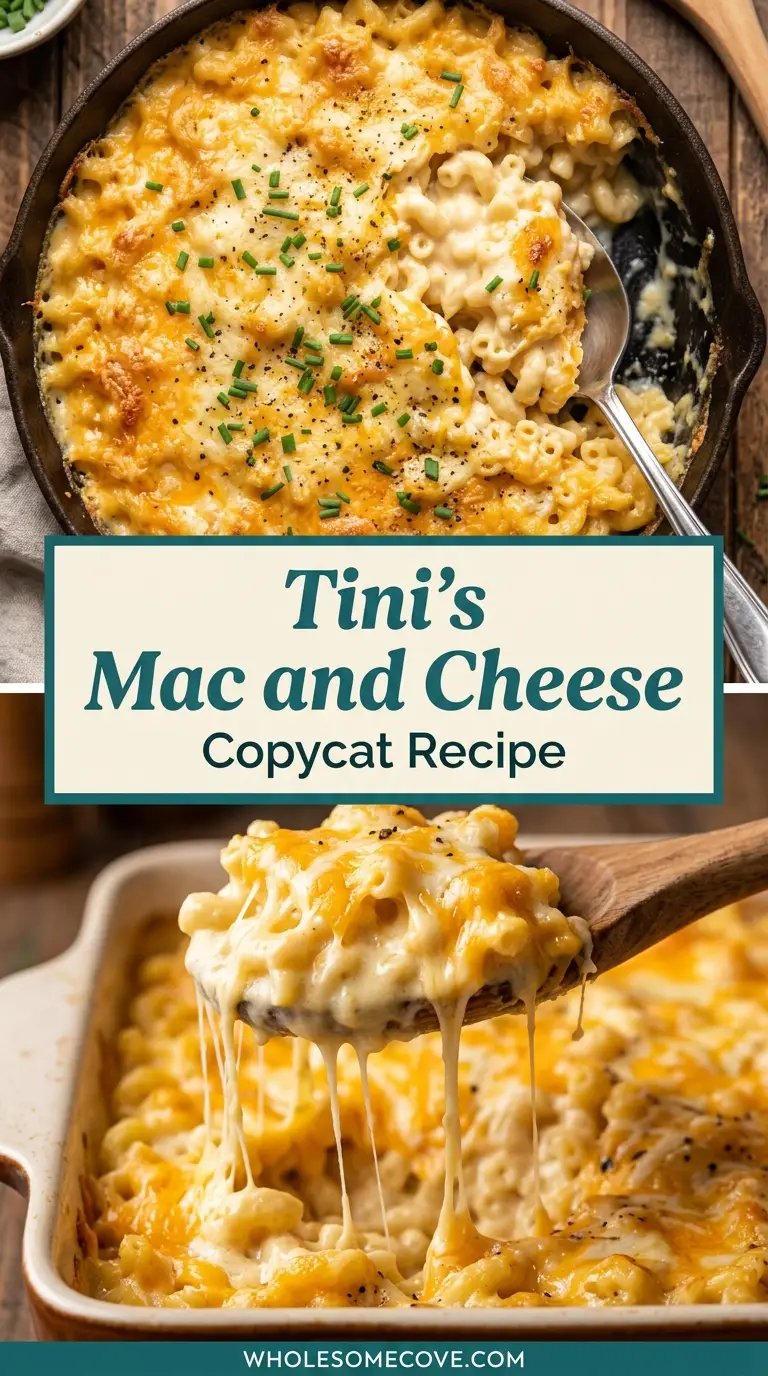
- Insanely cheesy: With 2.5 pounds of cheese going into this recipe, there’s no shortage of gooey, melty goodness in every bite.
- Rich, velvety sauce: The roux-based sauce made with evaporated milk and heavy cream creates a silky base that coats every piece of cavatappi beautifully.
- That legendary cheese pull: Thanks to the mozzarella in the blend, you get that iconic stretchy pull that made Tini’s videos go viral in the first place.
- Layered like a lasagna: Baking the pasta in layers with cheese in between means you get melty pockets of goodness all the way through, not just on the surface.
- Bold, complex flavor: Smoked paprika, garlic powder, and Dijon mustard give the sauce incredible depth without any one ingredient being overpowering.
- A true showstopper: This dish looks and tastes like something from a restaurant, but it’s completely achievable in a home kitchen.
- Great for make-ahead: You can assemble the whole dish the night before and refrigerate it unbaked, then pop it in the oven the next day. Perfect for stress-free holiday cooking.
Another fan-favorite in my house is the Air Fryer Mac and Cheese Recipe, which is a quicker option when you need that cheesy fix on a weeknight.
Ingredients
Freshness and quality matter a lot in this recipe, especially when it comes to the cheese. Do yourself a favor and buy blocks of cheese rather than pre-shredded bags — it really does make a difference in how smoothly the sauce comes together.
- 1 lb (450g) cavatappi pasta — the corkscrew shape holds the cheese sauce beautifully inside its spirals. You can substitute with elbow macaroni, rotini, or small shells.
- 1 lb (450g) block mozzarella cheese, freshly shredded — use the firmer deli-style block, not the soft fresh mozzarella balls. It melts better and is easier to grate.
- 1 lb (450g) Colby Jack cheese, freshly shredded — adds a mild, creamy flavor and melts like a dream.
- 8 oz (225g) sharp cheddar cheese, freshly shredded — this is where the bold, tangy flavor comes from. Don’t swap it for mild cheddar.
- 3 tablespoons unsalted butter
- 3 tablespoons all-purpose flour
- 1 (12 oz / 354ml) can evaporated milk — this is key for a smooth, stable sauce. It’s more concentrated than regular milk and prevents the sauce from breaking.
- 2 cups (480ml) heavy whipping cream — adds richness and a luxurious body to the sauce.
- 1 tablespoon Dijon mustard — don’t skip this! It cuts through the richness of the cheese and brightens the overall flavor.
- 1 teaspoon smoked paprika — adds a subtle smokiness and beautiful color to the sauce.
- 1 teaspoon garlic powder — for savory depth.
- 1/2 teaspoon black pepper
- 1/2 teaspoon salt, plus more for pasta water
Read Also: Velveeta Mac and Cheese Recipe
Kitchen Equipment Needed
Having the right tools makes this recipe so much easier, especially when it comes to shredding that much cheese. I learned the hard way that trying to grate 2.5 pounds by hand is a real workout.
- Large pot — for boiling the cavatappi pasta. You need enough water to cook a full pound of pasta without it sticking together.
- Box grater or rotary cheese grater — essential for freshly shredding your cheese blocks. A rotary grater makes quick work of 2.5 pounds.
- Large heavy-bottomed saucepan or Dutch oven — crucial for making the roux and cheese sauce. A heavy-bottomed pan distributes heat evenly and prevents scorching.
- Whisk — needed for making the roux and incorporating the milk without lumps.
- 9×13-inch baking dish — the standard size for this recipe. Make sure yours is deep enough to hold all the layers.
- Large mixing bowl — for combining and dividing the shredded cheese.
- Colander — for draining the cooked pasta.
- Wooden spoon or silicone spatula — for folding the pasta into the cheese sauce without breaking the noodles.
- Aluminum foil — optional, but useful if reheating from the fridge.
Read Also: Best Bacon Mac and Cheese Recipe
Recommended Products for This Recipe
These are products I personally use and genuinely love for making Tini’s Mac and Cheese. They’ve made a real difference in how my results turn out.
1. Le Creuset Enameled Cast Iron Baking Dish
I switched to this baking dish after ruining the top crust of my mac and cheese too many times with cheaper pans that had hot spots. The enameled cast iron distributes heat so evenly that your cheese browns uniformly every single time. Cleanup is also a breeze, even with baked-on cheese.
2. OXO Good Grips Box Grater
Shredding 2.5 pounds of cheese by hand is no small feat, and a flimsy grater makes it miserable. This box grater has a wide, stable base and razor-sharp holes that make grating cheese fast and easy. I use the large-hole side for all three cheeses in this recipe.
3. Cuisinart Multiclad Pro Stainless Saucepan
The roux is the backbone of Tini’s mac and cheese, and making it in a thin-bottomed pan is asking for trouble. This saucepan has a thick aluminum core that prevents burning and gives you complete control over the sauce. Worth every penny for a recipe this special.
4. Cavatappi Pasta (Barilla)
Barilla’s cavatappi is my go-to for this recipe. The spiral shape has deep ridges that capture and hold onto the cheese sauce in a way that regular elbow macaroni just can’t match. It also holds its shape beautifully after baking.
5. Smoked Paprika (La Chinata)
Not all smoked paprikas are created equal, and La Chinata is the brand that genuinely elevates this dish. It has a deep, earthy smokiness that adds incredible complexity to the cheese sauce. A little goes a long way, but it’s absolutely worth having in your spice cabinet.
You might also enjoy: Lobster Mac and Cheese Recipe
Step-by-Step Instructions: How to Make Tini’s Mac and Cheese
Step 1: Shred All Your Cheese
- Take your block mozzarella (1 lb / 450g), block Colby Jack (1 lb / 450g), and block sharp cheddar (8 oz / 225g) out of the refrigerator.
- Using a box grater or rotary cheese grater, shred all three cheeses.
- Combine all the shredded cheese in one large mixing bowl and toss everything together until evenly mixed.
- Divide the cheese mixture into two equal portions. Place one portion in a separate bowl and set aside — one half goes into the sauce, the other half goes on top and between the layers.
- This step can be done up to a day ahead. Store the shredded cheese covered in the refrigerator.
Step 2: Cook the Cavatappi Pasta
- Fill your large pot with water and add a generous amount of salt — the water should taste like the ocean. This is your only opportunity to season the pasta itself.
- Bring the water to a rolling boil over high heat.
- Add 1 lb (450g) of cavatappi pasta to the boiling water.
- Cook according to the package instructions, but aim for al dente — the pasta should have just a slight bite to it, since it will continue cooking in the oven. This is usually about 7–8 minutes for cavatappi.
- Reserve about 1/2 cup (120ml) of pasta water before draining, in case your sauce needs thinning later.
- Drain the pasta in a colander and set it aside while you make the cheese sauce.
Step 3: Preheat the Oven and Prep the Baking Dish
- Preheat your oven to 350°F (175°C). Let it come to full temperature before you add the mac and cheese — starting in a cold oven affects the texture.
- Lightly grease your 9×13-inch baking dish with butter or cooking spray, making sure to coat the sides as well as the bottom.
- Set the baking dish aside on your counter so it’s ready to go when your pasta and sauce are combined.
Step 4: Make the Roux
- Place your large heavy-bottomed saucepan or Dutch oven over medium heat.
- Add 3 tablespoons of unsalted butter to the pan. Let it melt completely, watching carefully so it doesn’t brown.
- Once the butter is melted, add half of your spice mixture: 1/2 teaspoon smoked paprika, 1/2 teaspoon garlic powder, 1/4 teaspoon black pepper, and 1/4 teaspoon salt. Stir into the butter for about 30 seconds to bloom the spices.
- Add 3 tablespoons of all-purpose flour to the butter-spice mixture. Stir continuously with a whisk, making sure there are no dry flour clumps.
- Continue cooking and whisking for 2–3 minutes until the mixture looks like a thick paste and smells slightly nutty. This step cooks out the raw flour taste — don’t rush it.
Step 5: Build the Cream Sauce
- While whisking constantly, slowly pour in the entire can of evaporated milk (12 oz / 354ml). Add it in a thin, steady stream while whisking to prevent lumps from forming.
- Continue whisking over medium heat until the mixture thickens and starts to bubble, about 3–4 minutes.
- Reduce the heat to medium-low. Slowly pour in 2 cups (480ml) of heavy whipping cream while stirring gently. Don’t add it all at once — slow and steady keeps the sauce smooth.
- Add the remaining spices: the other half of the smoked paprika, garlic powder, salt, and pepper.
- Stir in 1 tablespoon of Dijon mustard and mix until fully incorporated. The sauce should now be thick, smooth, and deeply fragrant.
Step 6: Melt in the Cheese
- Turn the heat to low. This is critical — adding cheese over high heat causes it to seize up and become grainy.
- Take one portion (half) of your shredded cheese mixture and add it to the sauce in small handfuls, roughly 1/2 cup (50g) at a time.
- After each addition, whisk vigorously and wait until the cheese is fully melted and the sauce is smooth before adding the next handful. This patience is what creates a silky-smooth sauce.
- Continue until the entire first portion of cheese is incorporated. The sauce should be thick, glossy, and incredibly creamy at this point.
Step 7: Combine Pasta and Cheese Sauce
- Add your drained cavatappi pasta to the cheese sauce.
- Gently fold everything together using a large wooden spoon or silicone spatula until every piece of pasta is coated in the sauce. Be gentle so you don’t break the pasta.
- If the mixture looks too thick, add a splash of your reserved pasta water and stir gently to loosen it.
Step 8: Layer and Top
- Pour half of the pasta and cheese sauce mixture into your prepared 9×13-inch baking dish. Spread it into an even layer.
- Sprinkle about half of your remaining (second portion) shredded cheese over this layer. This middle cheese layer creates those incredible melty pockets throughout the dish.
- Add the second half of the pasta mixture on top and spread it evenly.
- Sprinkle the remaining shredded cheese over the very top in an even layer. Make sure the top is fully covered — this is what becomes your golden, bubbly crust.
Step 9: Bake and Broil
- Place the baking dish in your preheated oven, uncovered.
- Bake for 25–30 minutes, until the cheese on top is melted, the edges are bubbling, and the dish is heated through.
- Switch the oven to the broiler setting (high broil). Move the rack up to about 6 inches from the heating element.
- Broil for 2–3 minutes, watching it the entire time, until the top is golden brown and has a few darker spots. This step is what gives the mac and cheese its signature caramelized top — but it goes from perfect to burnt quickly, so don’t walk away.
- Remove from the oven and let it sit for 5 minutes before serving. This allows the cheese to set slightly so it’s easier to portion.
The same layering technique works beautifully in my Baked Ziti Recipe — another cheesy comfort food classic worth bookmarking.

Tips for The Best Tini’s Mac and Cheese
These are the lessons I learned the hard way so you don’t have to. A few small adjustments make a huge difference in the final result.
- Always shred your own cheese: Pre-shredded cheese contains anti-caking agents like cellulose that prevent smooth melting, leaving your sauce grainy. Buy blocks and shred them yourself. It takes an extra 10 minutes and is absolutely worth it.
- Keep the heat low when adding cheese: The moment you add cheese to your sauce, reduce the heat to low or even turn it off entirely. High heat causes the proteins in cheese to tighten and separate from the fat, resulting in a greasy, broken sauce.
- Cook the pasta al dente, not fully: Since the pasta continues cooking in the oven, pulling it out slightly underdone ensures it won’t become mushy or overcooked by the time the mac and cheese is finished baking.
- Add cheese to the sauce in small handfuls: One big dump of cheese at once overwhelms the sauce and makes it lumpy. Adding it gradually and whisking each addition before the next gives you that ultra-smooth result.
- Don’t skip the Dijon mustard: I know it sounds strange, but the mustard doesn’t make the dish taste like mustard. It adds a subtle tang that cuts through all that richness and makes the whole dish taste more balanced and complex.
- Use full-fat dairy throughout: This is not the recipe to substitute with low-fat milk or half-and-half. The fat in the heavy cream and evaporated milk is what gives the sauce its body, stability, and glossy finish.
- Season the pasta water generously: Pasta absorbs the water it cooks in, so if the water is bland, the pasta will be bland. Salt your water until it genuinely tastes salty.
- Let it rest before serving: Give the mac and cheese 5 full minutes out of the oven before scooping. It firms up just enough to hold its shape while still being gloriously gooey inside.
Read Also: Cheese Sauce Recipe
What to Serve with Tini’s Mac and Cheese
This dish is rich and filling enough to be the main event, but it also works beautifully as a side dish alongside proteins and lighter vegetables.
The smokiness from the paprika and the richness of the cheese sauce pair especially well with roasted meats and bright, acidic sides that balance out all that indulgence.
- Roast Chicken — A simply seasoned roast chicken is the perfect pairing. The mild, juicy meat doesn’t compete with the bold cheese flavors.
- Broccoli Salad — The crunch and slight bitterness of fresh broccoli cut through the richness of the mac and cheese beautifully.
- Coleslaw — Creamy, tangy coleslaw is a classic alongside any baked mac and cheese. The acidity provides a welcome contrast.
- Roasted Brussels Sprouts with Bacon — The caramelized, slightly bitter sprouts and crispy bacon are a stunning match for this creamy mac.
- Deviled Eggs — Classic, crowd-pleasing, and easy to prep ahead. A natural fit for any holiday spread that includes this mac and cheese.
- Baked Ham — The sweet, savory glaze on a holiday ham and this ultra-cheesy mac are a match made for the Thanksgiving table.
- Potato Salad — For a cookout or summer gathering, a classic potato salad alongside this mac is pure comfort food heaven.
- Pulled Ham — The smoky, tender pulled ham is a wonderful partner to this baked mac, especially when the ham juices mingle with the cheese.
Another great comfort food: Sausage Gravy Recipe
Variations of Tini’s Mac and Cheese
Once you’ve mastered the base recipe, there are so many delicious directions you can take it. These variations work within the same framework — roux, cream, cheese layers — so the technique stays consistent.
- Bacon Mac and Cheese: Cook 6 strips of bacon until crispy, crumble them, and fold them into the pasta before layering. You can also sprinkle bacon crumbles between the layers for extra flavor throughout the dish.
- Lobster Mac and Cheese: Fold in 1–2 cups of cooked lobster meat after combining the pasta with the sauce. The sweetness of the lobster is incredible against all that rich, smoky cheese.
- Spicy Mac and Cheese: Add 1/4 to 1/2 teaspoon of cayenne pepper to the sauce along with the other spices, and mix in a tablespoon of your favorite hot sauce. The heat builds slowly and is absolutely addictive.
- Gouda and Smoked Mozzarella Blend: Swap half of the regular mozzarella for smoked mozzarella and add 8 oz of shredded smoked gouda to the cheese blend. The smokiness is incredible and takes the flavor profile to a whole new level.
- Buffalo Chicken Mac and Cheese: Shred 2 cups of rotisserie chicken, toss with 3 tablespoons of buffalo sauce, and fold into the pasta before layering. Top with a drizzle of extra buffalo sauce and a few crumbles of blue cheese before baking.
- Broccoli Mac and Cheese: Steam 2 cups of small broccoli florets until just tender, then fold them into the pasta along with the cheese sauce. The broccoli adds color, texture, and a nutritional boost.
- Breadcrumb Topping: For extra crunch, mix 1/2 cup of panko breadcrumbs with 2 tablespoons of melted butter and a pinch of smoked paprika. Sprinkle over the top cheese layer before baking for a crispy, golden crust.
Read Also: Stuffed Shells Recipe
Storage and Reheating
One of the best things about this recipe is that it stores and reheats really well, making it perfect for meal prep or feeding a crowd over multiple days.
- Refrigerator: Allow the mac and cheese to cool completely before covering the baking dish tightly with plastic wrap or aluminum foil, or transferring portions to airtight containers. It keeps in the refrigerator for up to 4 days.
- Freezer: This recipe freezes beautifully. Let it cool completely, then portion it into freezer-safe containers or wrap the entire baking dish tightly in plastic wrap and then foil. It will keep in the freezer for up to 3 months. Thaw overnight in the refrigerator before reheating.
- Reheating in the oven (best method): Cover the dish with aluminum foil and bake at 325°F (165°C) for 20–25 minutes until heated through. Remove the foil for the last 5 minutes to re-crisp the top. Add a splash of milk or cream before reheating if the sauce looks dry.
- Reheating on the stovetop: Transfer a portion to a small saucepan and heat over low heat, adding a splash of milk or cream and stirring frequently until creamy and warmed through.
- Reheating in the microwave: Place a portion in a microwave-safe bowl with a tablespoon of milk. Cover loosely and heat in 60-second intervals, stirring between each, until hot.
- Make-ahead tip: Assemble the entire dish up through the layering step, cover tightly, and refrigerate for up to 2 days before baking. When ready to bake, add 10–15 extra minutes to the baking time since the dish will be cold from the fridge.
You might also enjoy: Scalloped Potatoes Recipe
Nutritional Facts
The following nutritional information is per serving, based on 10 servings from this recipe.
| Nutritional Facts (Per Serving) | |
|---|---|
| Calories | 620 kcal |
| Total Fat | 42g |
| Saturated Fat | 26g |
| Trans Fat | 0.5g |
| Cholesterol | 130mg |
| Sodium | 820mg |
| Total Carbohydrates | 36g |
| Dietary Fiber | 1g |
| Total Sugars | 5g |
| Protein | 27g |
| Calcium | 600mg (46% DV) |
| Iron | 1.5mg (8% DV) |
| Vitamin A | 1,400 IU (28% DV) |
| Potassium | 220mg (5% DV) |
Nutritional values are estimates and may vary based on specific ingredients and brands used.
Read Also: Bechamel Sauce Recipe
Health Benefits of Key Ingredients
While Tini’s Mac and Cheese is undeniably an indulgent dish, several of its key ingredients do bring meaningful nutritional value to the table.
It’s comfort food, yes — but it’s also made from real, whole ingredients that nourish as well as satisfy.
- Cheese (Mozzarella, Colby Jack, Sharp Cheddar): All three cheeses are excellent sources of calcium, which is essential for strong bones and teeth. They also provide high-quality protein, phosphorus, and fat-soluble vitamins like A, D, and K2.
- Mozzarella: Lower in sodium than many other aged cheeses, mozzarella is a good source of protein and calcium. It also contains conjugated linoleic acid (CLA), a fatty acid linked to potential health benefits.
- Heavy Cream: Full-fat dairy products like heavy cream contain fat-soluble vitamins A, D, E, and K, as well as butyrate, a short-chain fatty acid that may support gut health.
- Evaporated Milk: More concentrated than regular milk, evaporated milk delivers a good dose of calcium, phosphorus, and protein in a smaller volume.
- Dijon Mustard: A low-calorie condiment that contains glucosinolates, compounds found in cruciferous plants with antioxidant properties. It also helps emulsify the sauce.
- Smoked Paprika: Rich in antioxidants, particularly capsanthin and zeaxanthin, which support eye health. Paprika also contains vitamin A and has anti-inflammatory properties.
- Garlic Powder: Contains allicin, the bioactive compound in garlic associated with immune support, cardiovascular health, and antimicrobial properties.
- Cavatappi Pasta: Provides complex carbohydrates that supply sustained energy. When cooked al dente, pasta has a lower glycemic index than fully cooked pasta.
Another great comfort food recipe to explore: Creamed Spinach Recipe
FAQs About Tini’s Mac and Cheese
1. Can I use different types of pasta instead of cavatappi?
Absolutely. Cavatappi is the pasta Tini uses in her original recipe, and the spiral shape is wonderful for holding onto sauce. That said, elbow macaroni, rotini, fusilli, or small shells all work well in this recipe. The key is to choose a pasta with some texture or ridges that give the sauce something to cling to.
2. Why does my cheese sauce turn out grainy?
A grainy sauce is almost always caused by one of two things: using pre-shredded cheese or adding cheese over heat that’s too high. Pre-shredded cheese contains anti-caking agents that prevent it from melting smoothly. Always shred your cheese from a block, and keep the heat low when adding it to the sauce.
3. Can I make Tini’s Mac and Cheese ahead of time?
Yes, and it’s actually one of the things I love most about this recipe. Assemble everything through the layering step, cover tightly with plastic wrap or foil, and refrigerate for up to 2 days. When ready to bake, allow it to sit at room temperature for 20 minutes, then bake covered with foil for 30 minutes, then uncover and bake another 10–15 minutes to get the top golden.
4. Can I make this recipe without the Dijon mustard?
You can, but I’d encourage you to try it with the mustard at least once before omitting it. The Dijon doesn’t make the dish taste like mustard — it acts more like a flavor enhancer that adds a subtle tang and brightness. If you truly can’t use it, a small splash of apple cider vinegar or a tiny pinch of dry mustard powder works as a substitute.
5. What’s the best way to get that golden, crispy top?
The broiler is your best tool for this. After the initial bake, switch to the broiler on high and watch the dish closely — it only takes 2–3 minutes to go from beautifully golden to burnt. Position the rack about 6 inches from the broiling element for the most even result. Don’t cover it during this step.
Read Also: Hashbrown Casserole Recipe
Tini’s Mac and Cheese
Ingredients
- 1 lb cavatappi pasta - 450g; can substitute elbow macaroni, rotini, fusilli, or small shells
- 1 lb block mozzarella cheese - 450g, freshly shredded; use firm deli-style block, not fresh mozzarella balls
- 1 lb Colby Jack cheese - 450g, freshly shredded from a block
- 8 oz sharp cheddar cheese - 225g, freshly shredded from a block; do not substitute mild cheddar
- 3 tablespoons unsalted butter
- 3 tablespoons all-purpose flour
- 12 oz evaporated milk - 354ml, one standard can
- 2 cups heavy whipping cream - 480ml
- 1 tablespoon Dijon mustard
- 1 teaspoon smoked paprika - divided, half used at roux stage and half added with cream
- 1 teaspoon garlic powder - divided, half used at roux stage and half added with cream
- 1/2 teaspoon black pepper - divided
- 1/2 teaspoon salt - divided, plus more for pasta water
Equipment
- Large pot - For boiling the pasta
- Box grater or rotary cheese grater - For freshly shredding cheese blocks
- Large heavy-bottomed saucepan or Dutch oven - For making the roux and cheese sauce
- Whisk - For making the roux and incorporating milk without lumps
- 9×13 inch baking dish - Deep enough to hold all layers
- Large mixing bowl - For combining and dividing shredded cheese
- Colander - For draining cooked pasta
- Wooden spoon or silicone spatula - For folding pasta into the cheese sauce
- Aluminum foil - (optional) Useful when reheating from the fridge
Method
- Shred all three blocks of cheese and combine them in a large mixing bowl, tossing until evenly blended. Divide the cheese mixture into two equal portions and set one aside for layering.
- Bring a large pot of generously salted water to a rolling boil and cook the cavatappi until al dente, about 7–8 minutes. Reserve 1/2 cup of pasta water, then drain and set aside.
- Preheat the oven to 350°F (175°C). Lightly grease a 9×13-inch baking dish with butter or cooking spray and set aside.
- Melt the butter in a large heavy-bottomed saucepan over medium heat. Add half of each seasoning (smoked paprika, garlic powder, salt, pepper), stir for 30 seconds, then whisk in the flour and cook for 2–3 minutes until the mixture is paste-like and smells slightly nutty.
- Slowly stream in the evaporated milk while whisking constantly, then cook until thickened and bubbling, about 3–4 minutes. Reduce heat to medium-low, pour in the heavy cream gradually, add the remaining seasonings, and whisk in the Dijon mustard until the sauce is smooth and thick.
- Reduce heat to low and add the first portion of shredded cheese in small handfuls, whisking each addition until fully melted before adding more. The finished sauce should be silky, glossy, and creamy.
- Add the drained cavatappi to the cheese sauce and fold gently until every piece of pasta is fully coated. If the mixture is too thick, add a splash of reserved pasta water to loosen.
- Pour half the pasta mixture into the prepared baking dish and spread evenly, then sprinkle half of the reserved shredded cheese over it. Add the remaining pasta mixture on top and cover with the rest of the shredded cheese.
- Bake uncovered at 350°F (175°C) for 25–30 minutes until the cheese is melted, the edges are bubbling, and the dish is heated through.
- Switch to the high broiler setting and broil for 2–3 minutes, watching closely, until the top is golden brown. Let rest for 5 minutes before serving.
Nutrition
Notes
- Always shred cheese from a block — pre-shredded cheese contains anti-caking agents that make the sauce grainy and prevent smooth melting.
- Keep the heat on low when adding cheese to the sauce. High heat causes the proteins to seize, resulting in a greasy or broken sauce.
- Cook the pasta al dente, not fully — it continues cooking in the oven and will become mushy if already fully cooked before baking.
- Add cheese to the sauce gradually, one small handful at a time, whisking fully between each addition for a silky-smooth result.
- Don’t skip the Dijon mustard — it doesn’t taste like mustard in the final dish, but it adds a subtle tang that balances all the richness.
- Season the pasta water generously with salt. The pasta absorbs the water as it cooks, so bland water means bland pasta.
- Make-ahead tip: Assemble the dish through the layering step, cover tightly, and refrigerate up to 2 days. When baking from cold, bake covered for 30 minutes, then uncover for an additional 10–15 minutes.
- Storage: Refrigerate leftovers covered for up to 4 days, or freeze in airtight containers for up to 3 months. Thaw overnight in the refrigerator before reheating.
- To reheat, cover with foil and bake at 325°F (165°C) for 20–25 minutes, removing foil for the last 5 minutes. Add a splash of milk or cream if the sauce looks dry.
- For variations, try adding crispy bacon crumbles between layers, folding in cooked lobster meat, or topping with buttered panko breadcrumbs for extra crunch before baking.
Private Notes
Tried this recipe?
Let us know how it was!Final Thoughts
Tini’s Mac and Cheese is one of those recipes that genuinely earns every bit of the hype surrounding it. It’s rich, creamy, deeply cheesy, and has a golden baked top that makes it look as impressive as it tastes.
I’ve made it for Thanksgiving, for potlucks, for a random Tuesday when I just needed something comforting — and it has never once let me down.
If you’ve been on the fence about trying it, consider this your sign. Once you make it, you’ll understand why cavatappi sold out in grocery stores across the country.
Give it a try and let me know how it turns out in the comments below! I’d love to hear what cheese blend you used and whether you added any of your own twists.
Recommended:
- Best Lobster Mac and Cheese Recipe
- Air Fryer Mac and Cheese Recipe
- Velveeta Mac and Cheese Recipe
- Carbonara Recipe
- Cacio e Pepe Recipe
- Pasta Fagioli Recipe
- Lasagna Recipe
- Chicken Spaghetti Recipe
- Stuffed Shells Recipe
- Marry Me Chicken Pasta Recipe