
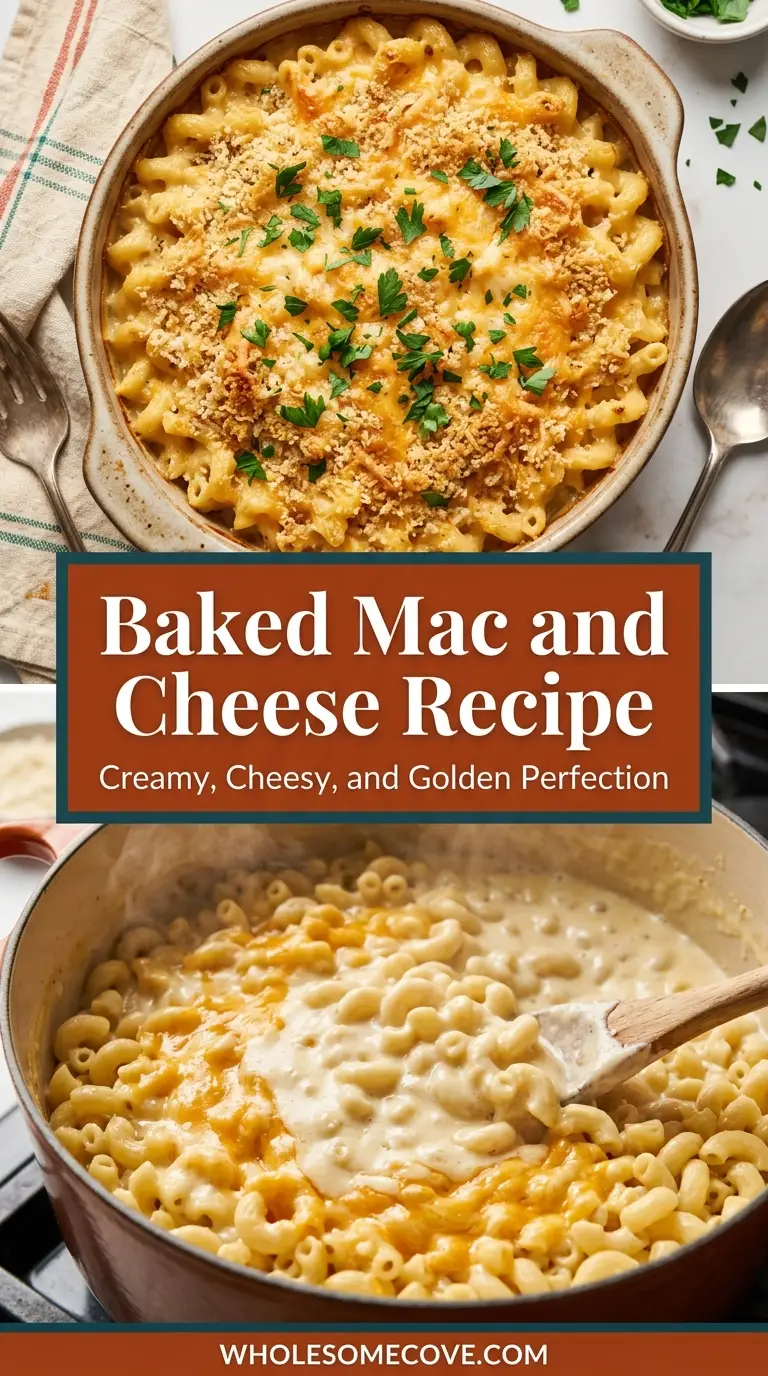
I grew up eating baked mac and cheese at every family gathering, and I’ll be honest, it took me years before I stopped reaching for the blue box and started making the real thing from scratch.
Once I finally nailed this baked mac and cheese recipe, though, I never looked back. It has a thick, velvety cheese sauce made with a proper roux, tender elbow macaroni, and a buttery breadcrumb topping that bakes up perfectly golden and crispy. It’s the kind of dish that fills your whole kitchen with the most incredible smell.
My first few attempts were a disaster. The sauce was grainy, or the pasta came out mushy, or the topping burned before the inside was hot enough. After a lot of trial and error, I finally figured out the secrets that make this dish turn out perfectly every single time.
| Quick Recipe Summary | |
|---|---|
| Prep Time | 20 minutes |
| Cook Time | 40 minutes |
| Total Time | 1 hour |
| Servings | 8 servings |
| Difficulty Level | Easy-Medium |
For a fun and faster weeknight spin on this dish, check out my Air Fryer Mac and Cheese — it’s ready in under 20 minutes and uses a similar cheese blend.
Why You’ll Love This Baked Mac and Cheese Recipe
This isn’t a complicated recipe, but it delivers results that taste like something from a Southern church potluck or a soul food restaurant. The cheese sauce is made from scratch using a butter-flour roux and whole milk, which gives it that thick, creamy consistency that coats every noodle.
The combination of sharp cheddar and Gruyère is the heart of this recipe. Sharp cheddar brings that classic tangy flavor, while Gruyère melts silky-smooth and adds a nutty depth that takes the whole dish to another level.
The breadcrumb topping is something I almost skipped the first time, thinking it was unnecessary. Turns out it’s one of the best parts, adding just the right amount of texture contrast against the creamy pasta underneath.
This recipe also reheats beautifully, which means leftovers the next day are just as good as when it first came out of the oven. That’s a big deal for a dish like this.
- Scratch-made cheese sauce: No canned soups or processed cheese products here — just a simple, foolproof roux-based sauce.
- Two-cheese blend: Sharp cheddar and Gruyère work together for bold flavor and perfect meltability.
- Golden, crispy topping: Buttery panko breadcrumbs add crunch and make every bite more interesting.
- Crowd-feeding portions: This recipe easily feeds 8 people, making it perfect for gatherings, potlucks, and holidays.
- Make-ahead friendly: You can assemble the whole dish ahead of time and refrigerate it until you’re ready to bake.
- Comfort food at its finest: Rich, cheesy, filling, and deeply satisfying — this is the kind of dish people ask you for the recipe to.
Read Also: Velveeta Mac and Cheese Recipe
Ingredients
You don’t need anything fancy for this recipe — just good-quality cheese and a few pantry staples. The quality of your cheese matters more than anything else here, so I always recommend buying a block and grating it yourself rather than using pre-shredded bags.
- 1 lb (450g) elbow macaroni — the classic shape with all those little curves that hold cheese sauce perfectly
- 4 tablespoons (57g) unsalted butter — for the roux; unsalted lets you control the saltiness
- ¼ cup (30g) all-purpose flour — to thicken the sauce into a proper béchamel base
- 3 cups (720ml) whole milk — adds richness and creaminess; don’t substitute low-fat here
- 1 cup (240ml) heavy cream — makes the sauce extra luscious and thick
- 2 cups (225g) sharp cheddar cheese, freshly grated — the bold, tangy backbone of the sauce
- 1 cup (113g) Gruyère cheese, freshly grated — nutty, smooth-melting, and absolutely worth it
- ½ teaspoon garlic powder — adds savory depth without any raw garlic sharpness
- ½ teaspoon onion powder — rounds out the flavor of the sauce
- ½ teaspoon dry mustard powder — the secret ingredient; it amplifies the cheese flavor dramatically
- ¼ teaspoon smoked paprika — a little smoky warmth that also gives the sauce a beautiful color
- Salt and black pepper, to taste
For the breadcrumb topping:
- 1 cup (60g) panko breadcrumbs — lighter and crispier than regular breadcrumbs
- 2 tablespoons (28g) unsalted butter, melted — coats the breadcrumbs so they toast evenly
- ¼ cup (28g) sharp cheddar cheese, grated — mixed into the topping for extra cheesy flavor
Another great mac and cheese variation to try: Best Bacon Mac and Cheese
Kitchen Equipment Needed
Getting the right tools in place before you start makes this recipe smooth and stress-free. The most important piece of equipment is a good heavy-bottomed saucepan — it prevents the milk from scorching at the bottom while you make the cheese sauce.
- Large pot — for boiling the macaroni
- Heavy-bottomed saucepan or Dutch oven — essential for making the roux and cheese sauce without burning
- 3-quart baking dish — the ideal size for this recipe; a 9×13 inch pan works too
- Box grater or rotary cheese grater — for freshly grating your cheese; pre-shredded cheese has anti-caking agents that affect melting
- Whisk — for making a lump-free roux and sauce
- Wooden spoon or silicone spatula — for stirring and folding the pasta into the sauce
- Colander — for draining the pasta
- Measuring cups and spoons
- Small mixing bowl — for preparing the breadcrumb topping
Read Also: Best Lobster Mac and Cheese Recipe
Recommended Products for This Recipe
These are products I personally use and genuinely stand behind. Each one makes a real difference in how this recipe turns out.
1. Le Creuset Enameled Cast Iron Baking Dish
I’ve been using this baking dish for years, and the way it distributes heat means your mac and cheese gets that evenly golden top without any burnt spots or cold centers. The enameled interior releases baked-on cheese cleanly, so cleanup is much easier than with a regular pan. It’s a real investment, but it’s honestly a lifetime piece of kitchen equipment.
2. Microplane Premium Cheese Grater
Freshly grated cheese is non-negotiable for this recipe, and a good grater makes the job quick and easy. This Microplane grater shreds Gruyère and cheddar into fine, fluffy pieces that melt into the sauce in seconds without any clumping. Pre-shredded bags contain cellulose that prevents clean melting, so this tool basically pays for itself in quality.
3. Aged Gruyère Cheese (Imported Swiss)
The quality of your Gruyère makes a huge difference in this recipe. Imported aged Gruyère has a deeper, more complex nuttiness than domestic versions, and it melts into the sauce much more smoothly. If you can find cave-aged or Réserve Gruyère, that’s the one to grab.
4. Smoked Paprika (Premium Quality)
Smoked paprika is what gives this mac and cheese that subtle warmth and gorgeous color that people always ask about. A good quality smoked paprika from Spain has a much deeper, more complex flavor than the basic grocery store version. A little goes a long way.
For another cozy baked pasta dish, you might love my Baked Ziti Recipe — it uses a similar approach to building a rich, satisfying sauce.

Step-by-Step Instructions: How to Make Baked Mac and Cheese
Step 1: Preheat the Oven and Prepare Your Baking Dish
- Preheat your oven to 375°F (190°C).
- Lightly grease your 3-quart baking dish or 9×13 inch pan with butter or cooking spray, making sure to coat the sides and corners so the pasta doesn’t stick.
- Set the prepared dish aside while you work on the rest of the recipe.
Step 2: Cook the Pasta
- Fill a large pot with water and bring it to a full rolling boil over high heat. Add a generous amount of salt to the water — it should taste faintly salty, like a light broth. This is your only chance to season the pasta itself.
- Add 1 lb (450g) of elbow macaroni to the boiling water and cook it for 2 minutes less than the package directions say. The pasta will continue cooking in the oven, so you want it slightly underdone (al dente) at this stage, not fully cooked.
- Drain the pasta thoroughly in a colander. Do not rinse it — rinsing removes the starch that helps the sauce cling to the noodles. Set the drained pasta aside.
Step 3: Make the Roux
- In a large heavy-bottomed saucepan, melt 4 tablespoons (57g) of unsalted butter over medium heat.
- Once the butter is fully melted and starting to bubble slightly, add ¼ cup (30g) of all-purpose flour all at once.
- Whisk the butter and flour together constantly for about 1 to 2 minutes. The mixture will look pale and thick — this is your roux. Cooking the roux for at least a full minute is important because it removes the raw flour taste from the final sauce.
- Keep whisking and don’t let the roux darken; you want it to stay a light golden color.
Step 4: Build the Cheese Sauce
- With the heat still on medium, slowly pour in 3 cups (720ml) of whole milk in a thin, steady stream while whisking constantly. Adding the milk gradually prevents lumps from forming.
- Continue whisking until the mixture is smooth and begins to thicken, about 3 to 4 minutes.
- Pour in 1 cup (240ml) of heavy cream and whisk again to combine. The sauce will thicken further as it heats.
- Add ½ teaspoon garlic powder, ½ teaspoon onion powder, ½ teaspoon dry mustard powder, ¼ teaspoon smoked paprika, and salt and black pepper to taste. Stir everything together.
- Reduce the heat to low and let the sauce simmer gently for 2 minutes, stirring frequently, until it coats the back of a spoon.
Step 5: Add the Cheese
- Remove the saucepan from the heat completely. This is the most important step — if you add the cheese while the sauce is still on a burner, even on low heat, the proteins in the cheese can seize up and turn grainy.
- Add the 2 cups (225g) of grated sharp cheddar and 1 cup (113g) of grated Gruyère to the hot sauce in 3 or 4 small handfuls, stirring after each addition until the cheese is fully melted before adding more.
- Keep stirring until the sauce is completely smooth, glossy, and deeply orange-yellow in color.
- Taste the sauce at this point and adjust seasoning if needed. The sauce should taste slightly more seasoned than you want the final dish to be, since the pasta will dilute the flavor a little.
Step 6: Combine Pasta and Sauce
- Add the drained cooked macaroni to the cheese sauce in the saucepan.
- Stir gently but thoroughly until every piece of pasta is completely coated in the sauce. Make sure to scrape along the bottom of the pan to mix in any sauce that settled.
- Pour the mac and cheese mixture into your prepared baking dish and spread it out into an even layer.
Step 7: Prepare the Breadcrumb Topping
- In a small bowl, combine 1 cup (60g) of panko breadcrumbs with 2 tablespoons (28g) of melted butter. Toss together until the breadcrumbs are evenly coated in butter.
- Add ¼ cup (28g) of grated sharp cheddar to the breadcrumb mixture and stir to combine.
- Sprinkle the breadcrumb topping evenly over the top of the mac and cheese in the baking dish, covering the entire surface.
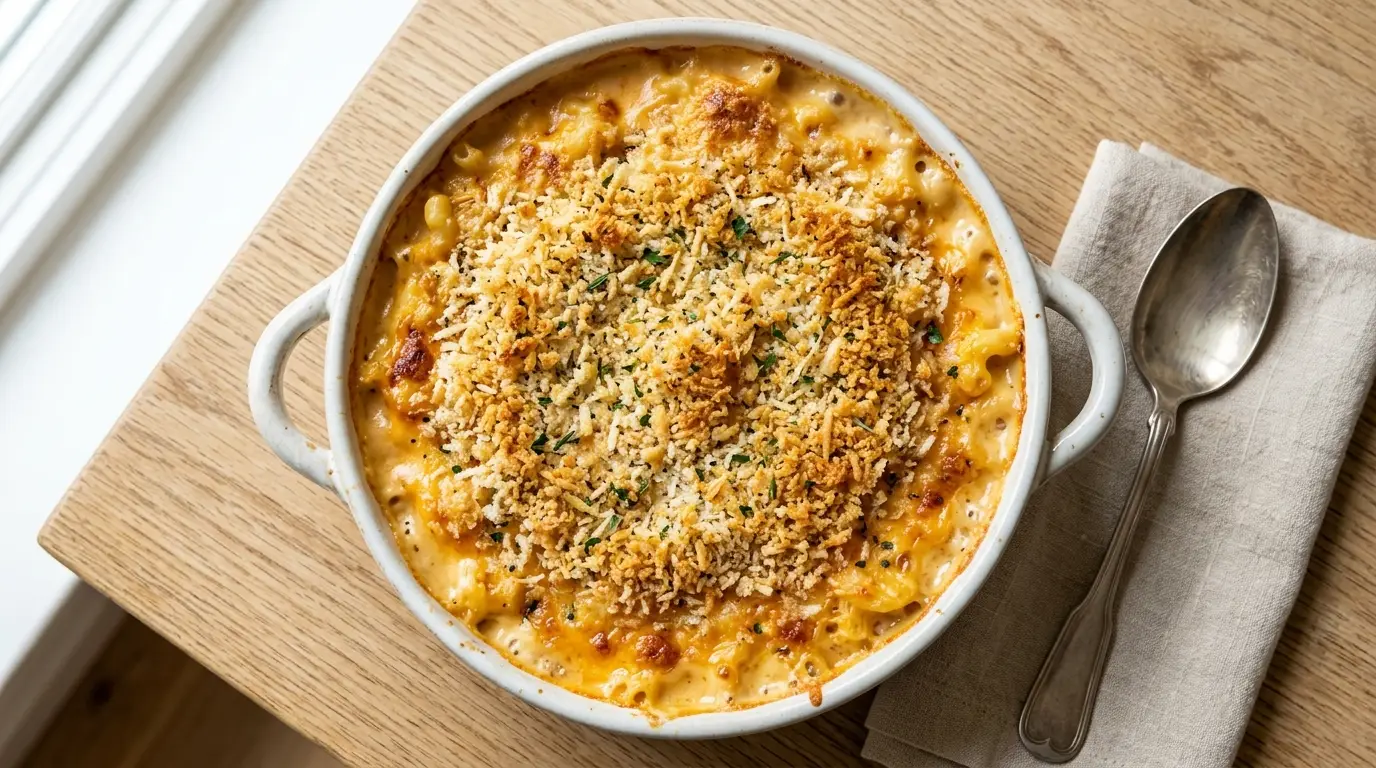
Step 8: Bake to Golden Perfection
- Place the baking dish in the preheated 375°F (190°C) oven on the center rack.
- Bake uncovered for 25 to 30 minutes, or until the breadcrumb topping is deeply golden brown and the cheese sauce is bubbling around the edges of the dish.
- If the topping starts browning too fast before the full bake time is up, loosely tent the dish with foil.
- Remove from the oven and let the mac and cheese rest for 5 minutes before serving. This resting time allows the sauce to settle and makes it easier to scoop clean portions.
You might also enjoy: Stuffed Shells Recipe

Tips for The Best Baked Mac and Cheese
These are the lessons I learned the hard way over many batches. Follow these and your mac and cheese will come out restaurant-quality every time.
- Always grate your own cheese: Pre-shredded cheese contains anti-caking agents (usually cellulose or potato starch) that prevent it from melting smoothly. Grating your own cheese directly from a block ensures a silky, lump-free sauce.
- Cook the pasta slightly underdone: Pulling the macaroni out of the boiling water 2 minutes early is non-negotiable. Fully cooked pasta will turn mushy and fall apart during the 30-minute bake.
- Take the sauce off heat before adding cheese: Cheese proteins will turn grainy and rubbery if you melt them in a pan that’s still on an active burner. Remove the saucepan from the heat completely before stirring in the cheese.
- Add cheese in stages: Dumping all the cheese in at once can cause clumping. Add it in small handfuls and stir each addition until melted before adding more.
- Don’t skip the dry mustard: It sounds odd but dry mustard powder doesn’t make the dish taste like mustard — it amplifies the cheesiness and is used in most classic mac and cheese recipes for exactly this reason.
- Season your pasta water generously: Unseasoned pasta tastes flat no matter how good your sauce is. The water should taste pleasantly salty before the pasta goes in.
- Use full-fat dairy: Whole milk and heavy cream are what give this sauce its thick, creamy body. Lower-fat options tend to produce a thinner, less luxurious sauce.
- Let it rest before serving: Give the mac and cheese 5 full minutes out of the oven before scooping. The sauce tightens up just slightly and portions come out much cleaner.
- Cover loosely if the top browns too fast: Ovens vary, and if your breadcrumbs are darkening before 25 minutes is up, a loose tent of foil will protect the top while letting the inside finish baking.
The same tips for getting a perfect golden crust also apply when making Scalloped Potatoes — another baked comfort dish worth having in your rotation.
What to Serve with Baked Mac and Cheese
Baked mac and cheese is rich and filling on its own, so the best sides are ones that add freshness, brightness, or a bit of crunch to balance out all that creamy cheese. Here are my go-to pairings:
- Broccoli Salad — the crunch and tangy dressing are a perfect contrast to the creamy pasta
- Coleslaw — cool, crisp, and refreshing alongside a rich baked dish
- Deviled Eggs — a classic Southern pairing that never fails at potlucks and family dinners
- Roasted Brussels Sprouts with Bacon — the caramelized bitterness of the sprouts cuts through the richness beautifully
- Green Bean Casserole — a holiday classic that belongs right next to a tray of baked mac
- Baked Ham — sweet and savory ham is one of the best proteins to serve alongside this dish
- Dinner Rolls — soft, buttery rolls are perfect for scooping up any leftover cheese sauce from the plate
- Healthy Coleslaw — if you want something a little lighter to offset all that cheese, this is it
Read Also: Potato Salad Recipe
Variations of Baked Mac and Cheese
The base recipe is a classic, but once you’ve mastered it there’s so much room to play. Here are some of my favorite ways to change it up:
- Bacon Mac and Cheese: Cook 6 strips of thick-cut bacon until crispy, crumble it, and fold half into the pasta before baking. Sprinkle the rest over the breadcrumb topping for a smoky, salty crunch in every bite.
- Lobster Mac and Cheese: Fold 1 lb (450g) of cooked lobster meat into the pasta before adding the breadcrumb topping. Use a mix of Gruyère and fontina in the sauce for an extra luxurious result.
- Spicy Jalapeño Mac and Cheese: Add 2 tablespoons of pickled jalapeño slices and a pinch of cayenne pepper to the cheese sauce. Top with pepper jack cheese mixed into the breadcrumbs.
- Buffalo Chicken Mac and Cheese: Stir in 2 cups of shredded rotisserie chicken and 3 tablespoons of buffalo sauce into the pasta before baking. Top with blue cheese crumbles alongside the panko.
- Truffle Mac and Cheese: Add 1 to 2 teaspoons of truffle oil to the finished cheese sauce before combining with the pasta. Use Gruyère and white cheddar for the cheese blend.
- Four-Cheese Mac and Cheese: Replace the basic cheddar/Gruyère blend with a mix of sharp cheddar, Gruyère, fontina, and a small amount of Parmesan for a deeper, more complex flavor profile.
- Stovetop Version (No Bake): Skip the oven entirely and just serve the sauced pasta straight from the pot. Without the bake time, you’ll want to cook the pasta fully (not underdone) and serve immediately.
Read Also: Lasagna Recipe
Storage and Reheating
Leftover baked mac and cheese stores well and honestly tastes great the next day once the sauce has had time to settle and the flavors meld together. Here’s how to keep it fresh and bring it back to life.
- Refrigerator storage: Transfer any leftovers into an airtight container or cover the baking dish tightly with plastic wrap or foil. It will keep well in the refrigerator for up to 4 days.
- Freezer storage: Baked mac and cheese can be frozen, though the texture of the sauce changes slightly after thawing. Portion it into freezer-safe containers and freeze for up to 2 months. Label with the date so you don’t forget.
- Reheating in the oven (best method): Place refrigerated or thawed leftovers in an oven-safe dish. Add a splash of milk (about 2 to 3 tablespoons) over the top and cover with foil. Bake at 350°F (175°C) for 20 to 25 minutes until heated through.
- Reheating on the stovetop: Transfer a single portion to a small saucepan, add a splash of milk, and heat over medium-low heat while stirring constantly until the sauce is smooth and creamy again.
- Microwave reheating: Place a portion in a microwave-safe bowl, add a small splash of milk, and microwave in 60-second intervals, stirring between each, until hot. The milk is key — without it, the mac and cheese will dry out and the sauce will separate.
- Avoid reheating without liquid: Always add a small amount of milk or cream when reheating. The pasta absorbs the moisture from the sauce as it sits, and without adding a little liquid back in, the result will be dry and clumpy.
Another cozy baked dish worth making ahead: Chicken Enchilada Casserole
Nutritional Facts
The following values are approximate and based on 1 serving (1/8 of the full recipe).
| Nutritional Facts (Per Serving) | |
|---|---|
| Calories | 580 kcal |
| Total Fat | 30g |
| Saturated Fat | 18g |
| Cholesterol | 95mg |
| Sodium | 520mg |
| Total Carbohydrates | 58g |
| Dietary Fiber | 2g |
| Total Sugars | 6g |
| Protein | 22g |
| Calcium | 400mg (31% DV) |
| Iron | 2mg (11% DV) |
| Vitamin A | 850 IU (17% DV) |
Nutritional values are estimates and may vary depending on specific brands and portion sizes used.
You might also enjoy: Cheesy Potatoes Recipe
Health Benefits of Key Ingredients
Baked mac and cheese is comfort food — it’s not trying to be a health food, and that’s okay. But some of the core ingredients do bring real nutritional value to the table.
- Cheddar cheese: Cheddar is an excellent source of calcium, which is essential for bone density and muscle function. It also provides a meaningful amount of protein and fat-soluble vitamins like A and K2 in every serving.
- Gruyère cheese: Along with calcium and protein, Gruyère contains phosphorus and zinc, which support immune function and healthy metabolism. The fat in Gruyère also helps the body absorb fat-soluble nutrients from other foods in the meal.
- Whole milk: Whole milk provides calcium, vitamin D, B12, and riboflavin. The fat in whole milk also helps the body absorb fat-soluble vitamins more effectively than low-fat versions.
- Pasta (enriched elbow macaroni): Pasta provides a steady source of complex carbohydrates for sustained energy, and enriched versions are fortified with B vitamins including folate, thiamine, and niacin.
- Dry mustard powder: Mustard seeds contain compounds called glucosinolates, which have been studied for antioxidant and anti-inflammatory properties. It also contains selenium, magnesium, and manganese.
- Garlic powder: Even in powdered form, garlic retains some of its beneficial allicin compounds, which have been associated with immune-supporting and anti-inflammatory effects.
- Smoked paprika: Paprika is rich in antioxidants, particularly carotenoids like beta-carotene and capsanthin, which support eye health and reduce oxidative stress.
For a lighter comfort dish on a weeknight, try this Healthy Shepherd’s Pie.
FAQs About Baked Mac and Cheese
1. Can I make baked mac and cheese ahead of time?
Yes, and it’s actually a great make-ahead dish. Assemble the mac and cheese up through adding the breadcrumb topping, then cover the dish tightly with foil or plastic wrap and refrigerate for up to 24 hours.
When you’re ready to bake, let it sit at room temperature for 20 to 30 minutes, then bake covered with foil at 375°F (190°C) for 20 minutes, uncover, and continue baking for another 15 to 20 minutes until the top is golden.
2. Why is my cheese sauce grainy?
Grainy cheese sauce almost always happens for one of two reasons. The first is that the sauce was too hot when you added the cheese — always remove the pan from heat before stirring in cheese.
The second is using pre-shredded cheese, which contains anti-caking starches that prevent smooth melting. Grating your own cheese from a block eliminates this problem completely.
3. What is the best cheese for baked mac and cheese?
Sharp cheddar is the classic choice because of its bold flavor and good melting quality. Gruyère is my personal favorite addition because it melts incredibly smoothly and adds a nutty complexity that elevates the whole dish.
Other great options include fontina, Gouda, Monterey Jack, and white cheddar. Avoid mozzarella on its own — it’s too mild and can turn stringy rather than creamy.
4. Can I make this recipe gluten-free?
Yes, with two substitutions. Use your favorite gluten-free pasta in place of regular elbow macaroni, and swap the all-purpose flour in the roux for an equal amount of a 1:1 gluten-free flour blend.
For the breadcrumb topping, use gluten-free panko breadcrumbs, which are widely available in most grocery stores. The rest of the recipe stays exactly the same.
5. Can I freeze baked mac and cheese?
You can freeze it, though the texture of the sauce does change slightly. The pasta absorbs moisture as it freezes and thaws, which can make the sauce a bit grainy or separated.
To minimize this, freeze individual portions in airtight containers and reheat with a splash of milk, stirring well. It’s still delicious, just slightly different from fresh. For the best results, enjoy it within 2 months of freezing.
Read Also: Fall Dinner Recipes
Baked Mac and Cheese
Ingredients
- 1 lb elbow macaroni - 450g
- 4 tablespoons unsalted butter - 57g; for the roux
- ¼ cup all-purpose flour - 30g
- 3 cups whole milk - 720ml
- 1 cup heavy cream - 240ml
- 2 cups sharp cheddar cheese - 225g; freshly grated from a block
- 1 cup Gruyère cheese - 113g; freshly grated
- ½ teaspoon garlic powder
- ½ teaspoon onion powder
- ½ teaspoon dry mustard powder - Amplifies the cheese flavor
- ¼ teaspoon smoked paprika
- salt - To taste; plus more for pasta water
- black pepper - To taste
- 1 cup panko breadcrumbs - 60g
- 2 tablespoons unsalted butter - 28g; melted
- ¼ cup sharp cheddar cheese - 28g; grated; mixed into the topping
Equipment
- Large pot - For boiling the macaroni
- Heavy-bottomed saucepan or Dutch oven - Essential for making the roux and cheese sauce without burning
- 3-quart baking dish - Or a 9×13 inch pan
- Box grater or rotary cheese grater - For freshly grating cheese; pre-shredded cheese has anti-caking agents that affect melting
- Whisk - For making a lump-free roux and sauce
- Wooden spoon or silicone spatula - For stirring and folding the pasta into the sauce
- Colander - For draining the pasta
- Measuring cups and spoons
- Small mixing bowl - For preparing the breadcrumb topping
Method
- Preheat your oven to 375°F (190°C). Lightly grease a 3-quart baking dish or 9×13 inch pan with butter or cooking spray and set aside.
- Bring a large pot of generously salted water to a boil, add the elbow macaroni, and cook for 2 minutes less than the package directions (the pasta will finish cooking in the oven). Drain well without rinsing and set aside.
- Melt 4 tablespoons of butter in a large heavy-bottomed saucepan over medium heat, then add the flour all at once and whisk constantly for 1 to 2 minutes until the mixture is pale golden and no longer smells of raw flour.
- Slowly pour in the whole milk in a thin stream while whisking constantly, then add the heavy cream, garlic powder, onion powder, dry mustard powder, smoked paprika, salt, and pepper. Whisk until smooth and simmer over medium heat for 3 to 4 minutes until the sauce thickens enough to coat the back of a spoon.
- Remove the saucepan completely from heat, then add the grated cheddar and Gruyère in small handfuls, stirring after each addition until fully melted and the sauce is smooth and glossy. Taste and adjust seasoning.
- Add the drained macaroni to the cheese sauce and stir until every piece of pasta is evenly coated, then pour the mixture into the prepared baking dish and spread into an even layer.
- In a small bowl, toss the panko breadcrumbs with the melted butter and grated cheddar until evenly coated, then sprinkle the topping evenly over the mac and cheese.
- Bake uncovered at 375°F (190°C) for 25 to 30 minutes until the breadcrumb topping is deeply golden and the cheese sauce is bubbling around the edges. Let rest for 5 minutes before serving.
Nutrition
Notes
- Always grate your own cheese from a block — pre-shredded cheese contains anti-caking agents that prevent smooth melting and can make the sauce grainy.
- Cook the pasta 2 minutes less than the package directions; it will finish cooking in the oven and fully cooked pasta will turn mushy after baking.
- Remove the saucepan completely from heat before adding cheese — active heat causes cheese proteins to seize up and turn grainy.
- Add the cheese in small handfuls and stir each addition until melted before adding more to prevent clumping.
- Don’t skip the dry mustard powder — it doesn’t make the dish taste like mustard, it amplifies the cheesiness and is a classic mac and cheese technique.
- Make-ahead tip: Assemble the dish through adding the breadcrumb topping, cover tightly, and refrigerate up to 24 hours. Let sit at room temperature for 20 to 30 minutes before baking, then bake covered for 20 minutes and uncovered for 15 to 20 more minutes.
- Leftovers keep in the refrigerator for up to 4 days in an airtight container, or frozen for up to 2 months.
- When reheating, always add a splash of milk (2 to 3 tablespoons) to restore the creamy consistency — the pasta absorbs moisture as it sits.
- For a spicier version, add a pinch of cayenne pepper to the cheese sauce or stir in 2 tablespoons of pickled jalapeños before baking.
- Gruyère can be swapped for fontina, Gouda, or Monterey Jack — all melt smoothly and complement sharp cheddar well.
Private Notes
Tried this recipe?
Let us know how it was!Final Thoughts
This baked mac and cheese recipe is the one I come back to again and again, for holidays, potlucks, cold weeknights, and every occasion in between. It’s a dish that genuinely makes people happy.
Once you make this from scratch, the boxed version honestly just doesn’t compare. I hope you give it a try and make it your own.
If you make this recipe, I’d love to hear how it turned out! Drop a comment below with any tweaks you made, or share a photo — seeing your versions always makes my day.
Recommended:
- Best Bacon Mac and Cheese
- Best Lobster Mac and Cheese
- Baked Ziti Recipe
- Stuffed Shells Recipe
- Lasagna Recipe
- Chicken Spaghetti Recipe
- Broccoli Cheese Potato Soup
- Cheese Sauce Recipe
- Bechamel Sauce Recipe
- Hashbrown Casserole Recipe
