
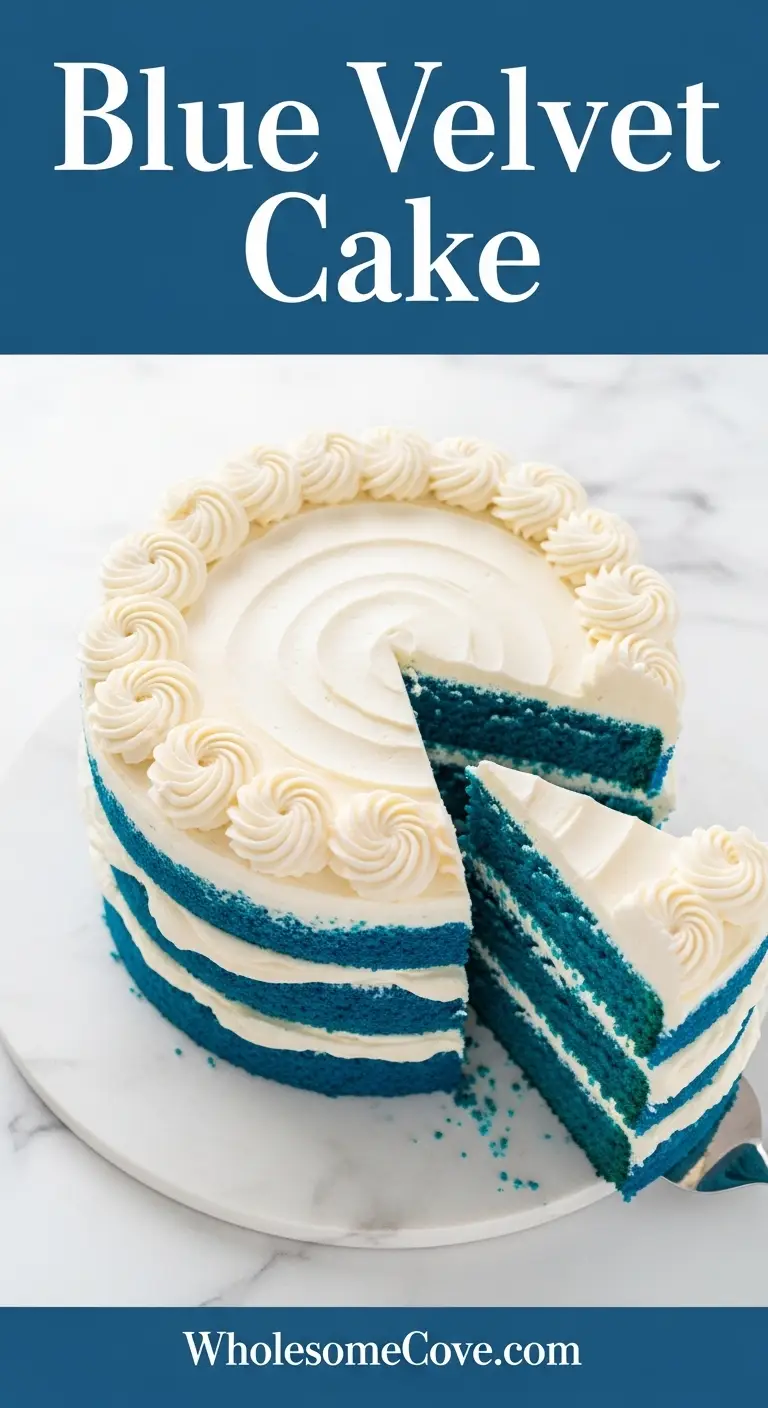
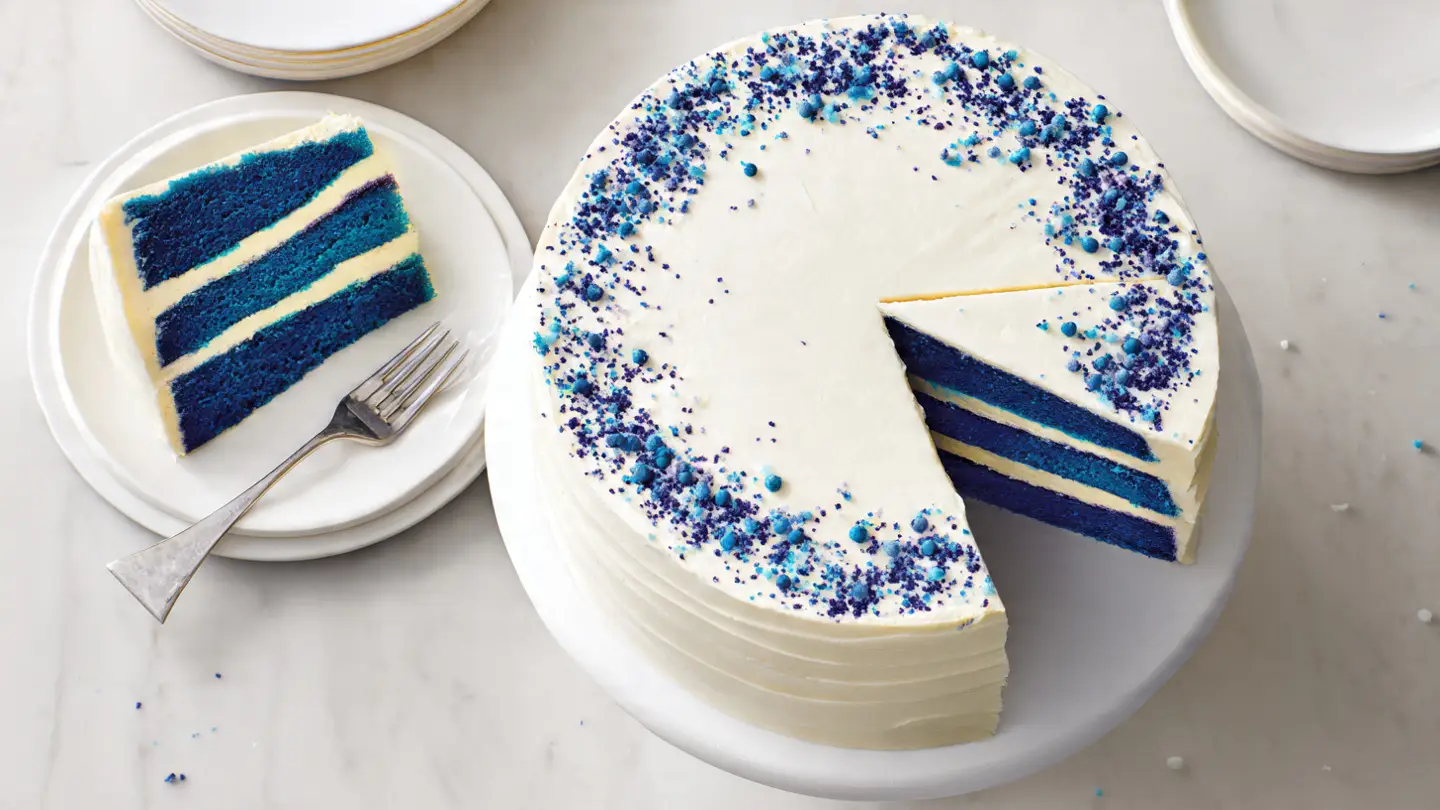
When my niece asked for a “princess cake that’s blue like Elsa’s dress” for her sixth birthday, I knew exactly what I was making. I’d seen Blue Velvet Cake at a trendy dessert shop in LA years ago and never forgot how gorgeous it looked when sliced open. That vibrant blue interior paired with snowy white cream cheese frosting felt like pure magic.

After testing this recipe about eight times to get the color and texture just right, I can confidently say this is the best Blue Velvet Cake you’ll find. It has that signature velvety crumb texture, subtle cocoa flavor, and the most stunning sapphire blue color that’ll make everyone gasp when you cut into it. My family requests this cake for every celebration now, from baby showers to birthday parties to summer cookouts.
| Quick Recipe Summary | |
|---|---|
| Prep Time | 25 minutes |
| Cook Time | 28 minutes |
| Total Time | 53 minutes (plus cooling time) |
| Servings | 12 slices |
| Difficulty Level | Intermediate |
If you love this recipe, you’ll also enjoy my Red Velvet Cake Recipe, which is the classic version that inspired this beautiful blue variation.
Why You’ll Love This Blue Velvet Cake Recipe
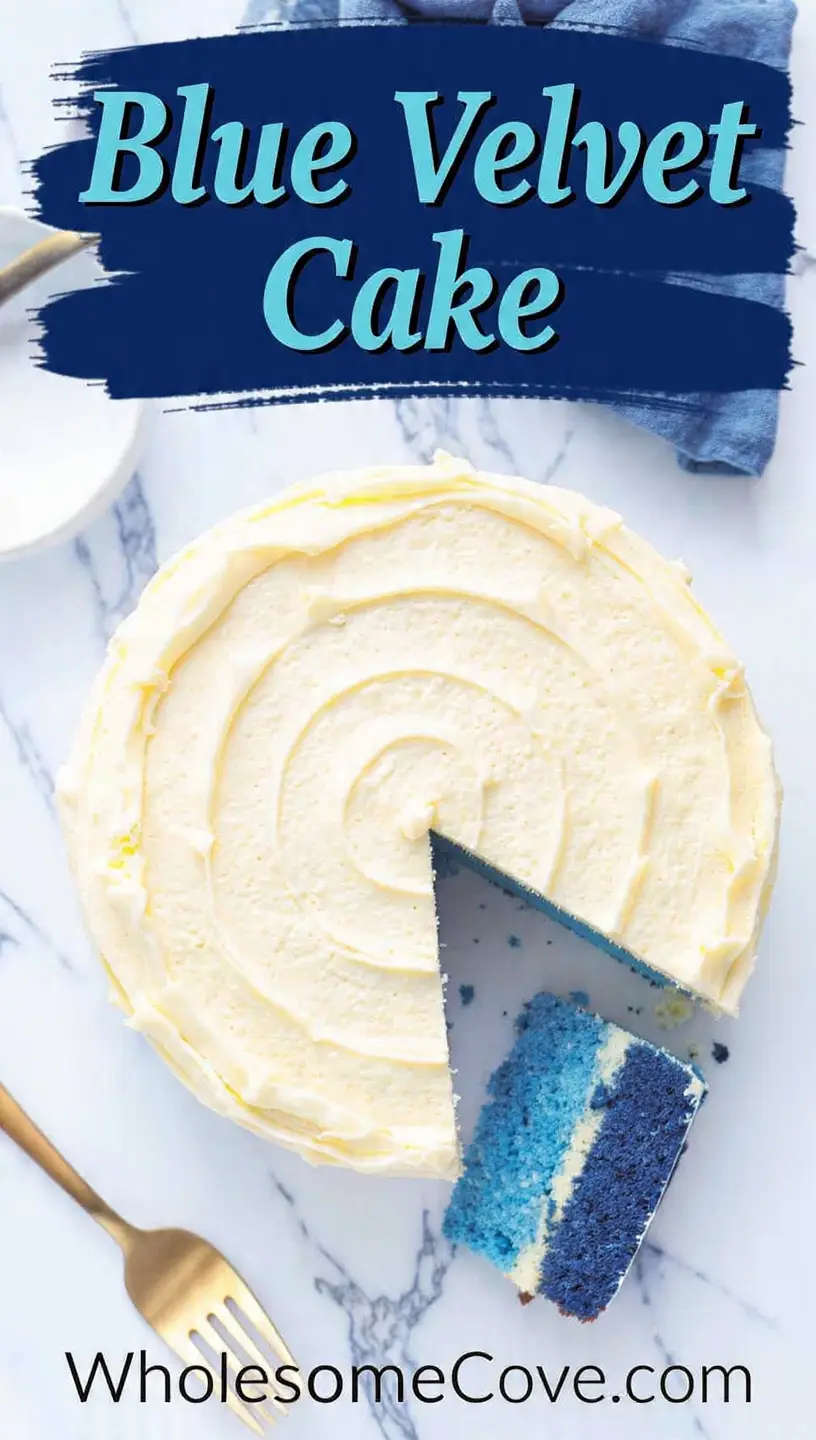
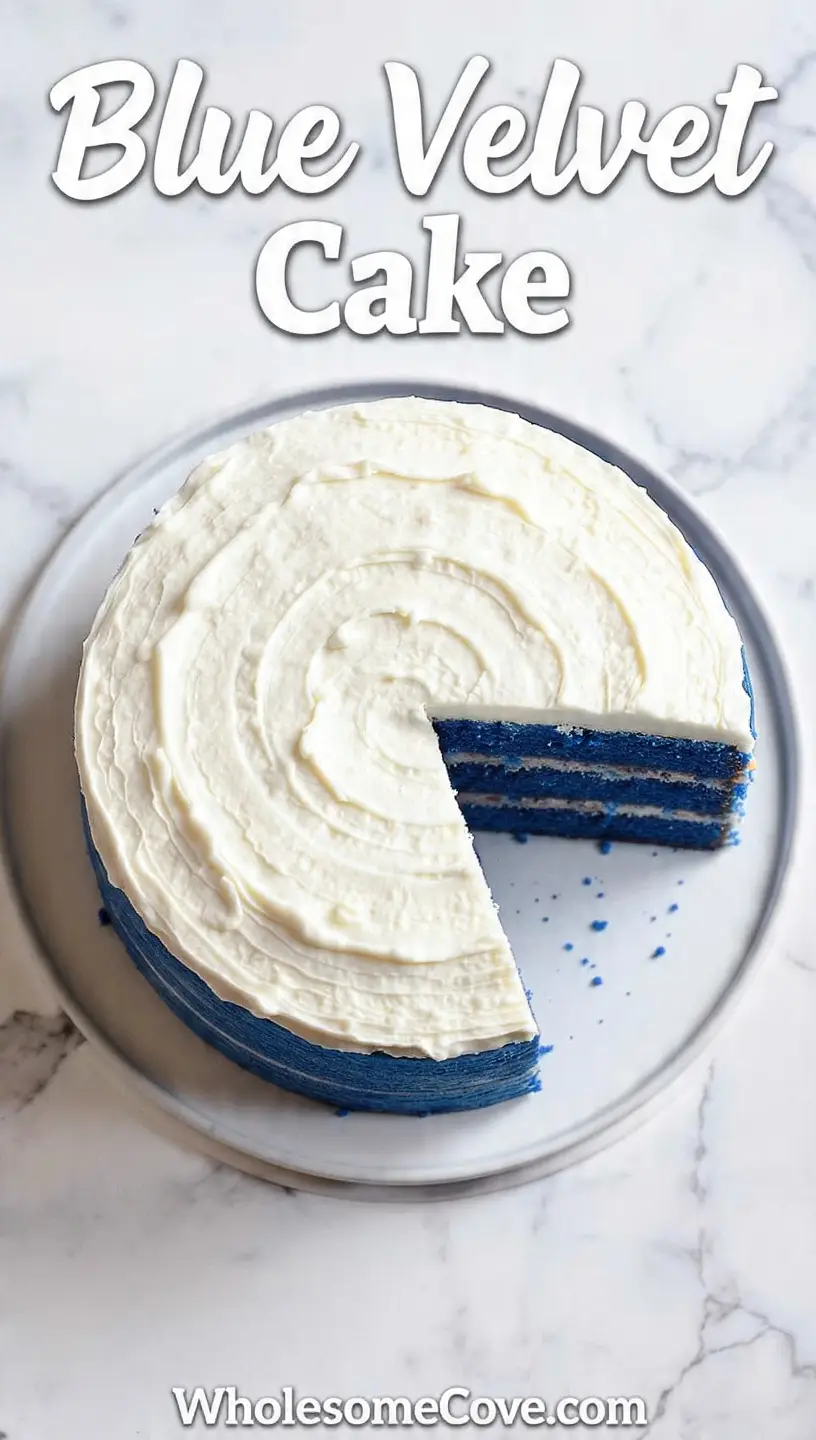
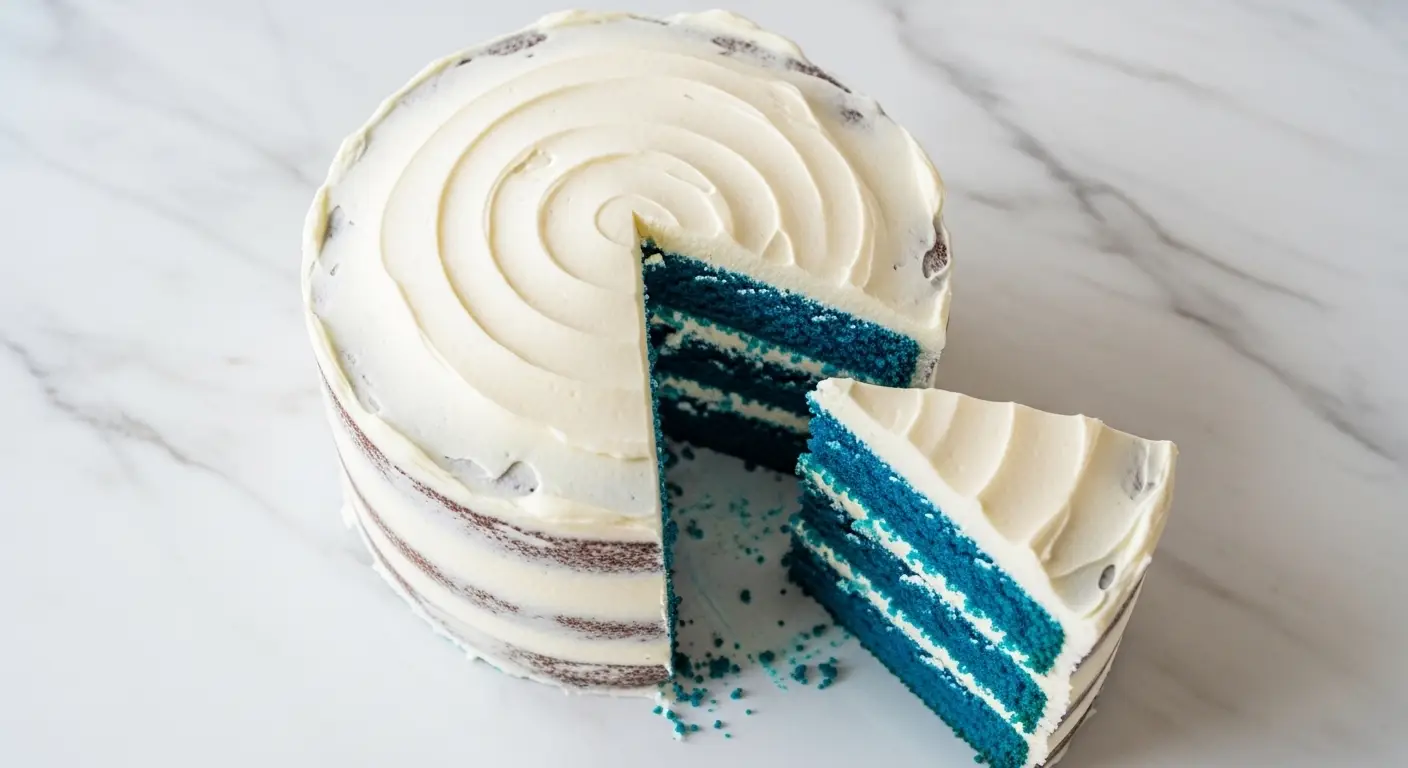
This Blue Velvet Cake is hands down one of the most show stopping desserts you can make. The moment you slice into those vibrant blue layers, everyone at the table will be absolutely mesmerized.
The texture is incredibly tender and moist thanks to the buttermilk and a special trick of adding vinegar and baking soda at just the right moment. I love that it’s not overly sweet, with just a hint of cocoa that gives it depth without making it taste like chocolate cake.
Here’s what makes this recipe a winner:
- Stunning visual impact that makes it perfect for baby showers, birthday parties, or any celebration where you want to wow your guests
- Velvety smooth texture that literally melts in your mouth, achieved through the buttermilk and the chemical reaction between acidic ingredients and baking soda
- Easy to customize with different frosting colors or decorations to match any theme or occasion
- Surprisingly simple to make despite looking like it came from a fancy bakery
- Crowd pleasing flavor that appeals to both kids and adults, with subtle cocoa notes and tangy cream cheese frosting
Read Also: Pumpkin Cheesecake Recipe
Ingredients
This recipe calls for simple pantry staples plus one special ingredient to achieve that gorgeous blue color. I’ve tested this with different brands of food coloring, and gel paste gives the most vibrant, consistent results without affecting the flavor.
For the Blue Velvet Cake:
- 2½ cups (300g) cake flour, sifted
- 1½ cups (300g) granulated sugar
- 1 tablespoon (10g) unsweetened cocoa powder
- 1 teaspoon (5g) baking soda
- 1 teaspoon (6g) salt
- 2 large eggs, room temperature
- 1½ cups (360ml) vegetable oil or canola oil
- 1 cup (240ml) buttermilk, room temperature
- 2 teaspoons (10ml) pure vanilla extract
- 1 tablespoon (15ml) white vinegar
- 2 tablespoons (30ml) blue gel food coloring (I recommend Wilton Sky Blue)
- ½ teaspoon (2.5ml) purple gel food coloring (optional, for a deeper blue)
For the Cream Cheese Frosting:
- 16 ounces (450g) cream cheese, softened to room temperature
- 1 cup (226g) unsalted butter, softened to room temperature
- 5 cups (600g) powdered sugar, sifted
- 2 teaspoons (10ml) pure vanilla extract
- ¼ teaspoon (1.5g) salt
For a different take on velvet cakes, try my Eggnog Cake Recipe during the holiday season.
Kitchen Equipment Needed
Having the right tools makes all the difference when baking a layer cake. I learned this the hard way after my first attempt resulted in uneven layers and a wobbly cake tower.
- Three 8-inch (20cm) round cake pans
- Parchment paper circles for lining pans
- Large mixing bowls (at least two)
- Stand mixer or hand mixer
- Measuring cups and spoons
- Rubber spatula
- Wire cooling racks
- Offset spatula for frosting
- Cake leveler or serrated knife
- Cake turntable (optional but extremely helpful)
- Toothpicks for testing doneness
Another favorite dessert that uses similar techniques is my Fruit Cocktail Cake Recipe.
Recommended Products for This Recipe
After making this cake dozens of times, I’ve discovered that certain products truly make a difference in achieving bakery quality results. These are my tried and true favorites that I reach for every single time.
1. Wilton Sky Blue Gel Food Coloring
This is the exact gel paste I use to get that perfect sapphire blue without any green or purple undertones. Liquid food coloring just doesn’t give you the same intensity, and you’d need to use so much that it would affect the batter consistency. This gel paste is concentrated, so a little goes a long way.
2. Fat Daddio’s Anodized Aluminum Cake Pans
I switched to these pans three years ago and haven’t looked back. They conduct heat incredibly evenly, which means no burnt edges or undercooked centers. The anodized aluminum won’t react with acidic ingredients like buttermilk and vinegar, and my cakes release perfectly every time without sticking.
3. Ateco Offset Spatula Set
Frosting a layer cake used to intimidate me until I invested in a good offset spatula. The angled blade gives you so much control, and you can create that smooth, professional looking finish that makes people think you ordered it from a bakery. I use the 4.5-inch for between layers and the 9-inch for the sides.
4. Philadelphia Cream Cheese
Not all cream cheese is created equal, and I learned this the hard way when my frosting turned out grainy and separated. Philadelphia brand has the perfect consistency and tang that makes cream cheese frosting irresistible. Make sure to use the brick style, not the spreadable kind.
5. Cake Strips for Even Baking
These are game changers if you want perfectly flat cake layers without having to trim off domed tops. You soak them in water, wrap them around your cake pans, and they insulate the sides so the edges don’t set faster than the center. No more cake waste from trimming!
If you’re looking for more special occasion cakes, my Pumpkin Roll Recipe is another stunning dessert that always impresses.
Step-by-Step Instructions: How to Make Blue Velvet Cake
Making this cake is easier than you might think. I’ll walk you through each step in detail so even if this is your first layer cake, you’ll achieve beautiful results.
1. Prepare Your Pans and Preheat the Oven
- Preheat your oven to 350°F (175°C) and position the racks in the center of the oven.
- Cut three circles of parchment paper to fit the bottoms of your 8-inch round cake pans by tracing the pan bottom onto the paper.
- Grease the bottom and sides of each pan generously with butter or nonstick spray, then place the parchment circles in the bottom.
- Give the parchment another light spray or brush of butter to ensure nothing sticks.
- Lightly dust each pan with flour, tapping out any excess, which creates a double layer of release insurance.
2. Mix the Dry Ingredients
- In a large mixing bowl, sift together the cake flour, granulated sugar, cocoa powder, baking soda, and salt.
- Whisk everything together for about 30 seconds to make sure the ingredients are evenly distributed.
- Sifting is crucial for cake flour because it’s already very fine and can clump easily, plus it aerates the flour for a lighter texture.
- Set this bowl aside while you prepare the wet ingredients.
3. Combine the Wet Ingredients
- In a separate large bowl or the bowl of your stand mixer, whisk together the eggs until they’re lightly beaten and slightly frothy.
- Add the vegetable oil and whisk vigorously for about 1 minute until the mixture is smooth and emulsified.
- Pour in the buttermilk and vanilla extract, whisking until everything is well combined.
- The mixture should look smooth and creamy at this point, not separated or curdled.
4. Add the Food Coloring
- Add the blue gel food coloring to the wet ingredients and whisk thoroughly until the color is completely uniform with no streaks.
- If you’re using purple food coloring for a deeper blue, add it now and mix until you achieve your desired shade.
- I like to start with less and add more if needed, because once it’s in there, you can’t take it back.
- The batter will look very vibrant at this stage, but don’t worry, it’ll bake to a slightly softer shade.
5. Combine Wet and Dry Ingredients
- Make a well in the center of your dry ingredients and pour in all the wet ingredients.
- Using a hand mixer on low speed or a stand mixer fitted with the paddle attachment, beat the mixture for about 30 seconds just until the flour is moistened.
- Increase the speed to medium and beat for exactly 2 minutes, scraping down the sides of the bowl halfway through.
- The batter should be smooth, glossy, and pourable, with no lumps of flour remaining.
- Don’t overmix or your cake will be tough, but make sure everything is fully incorporated.
6. Add the Vinegar
- In the final step of making the batter, add the white vinegar and give it one last quick mix on low speed for just 10-15 seconds.
- The vinegar reacts with the baking soda to create tiny air bubbles that give the cake its signature velvet texture.
- You might see the batter puff up slightly and become even more fluffy, which is exactly what you want.
- Work quickly now because this reaction starts immediately.
7. Pour and Bake
- Divide the batter evenly among your three prepared pans, using a kitchen scale if you want perfect layers (each pan should have about 450-480g of batter).
- Tap each pan firmly on the counter 3-4 times to release any large air bubbles.
- Place all three pans in the preheated oven, spacing them evenly so air can circulate around each one.
- Bake for 25-28 minutes, or until a toothpick inserted in the center comes out with just a few moist crumbs.
- The tops should spring back when gently pressed, and the edges will just barely start to pull away from the sides of the pans.
- Don’t open the oven door for at least the first 20 minutes or the cakes might collapse.
8. Cool the Cakes
- Remove the pans from the oven and let them cool on wire racks for exactly 10 minutes.
- Run a thin knife or offset spatula around the edge of each pan to loosen the cakes.
- Invert each cake onto a wire rack, peel off the parchment paper, then flip them right-side up onto another rack.
- Let the cakes cool completely to room temperature, which will take about 1 hour.
- For best results, wrap the cooled cakes in plastic wrap and refrigerate for at least 2 hours or overnight, as cold cakes are much easier to frost and less likely to crumble.
9. Make the Cream Cheese Frosting
- In the bowl of your stand mixer fitted with the paddle attachment (or using a hand mixer), beat the softened cream cheese on medium speed for 2-3 minutes until it’s completely smooth and creamy with no lumps.
- Add the softened butter and beat for another 2 minutes until the mixture is light and fluffy.
- Reduce the speed to low and gradually add the sifted powdered sugar, one cup at a time, beating well after each addition.
- Add the vanilla extract and salt, then increase the speed to medium-high and beat for 3-4 minutes until the frosting is light, fluffy, and spreadable.
- If the frosting is too soft, refrigerate it for 15-20 minutes; if it’s too stiff, add 1 tablespoon of heavy cream or milk.
10. Level the Cakes
- Use a cake leveler or a long serrated knife to trim off any domed tops from each cake layer so they’re perfectly flat.
- Save these scraps in a bowl, as you can use them to coat the sides of the cake later for decoration.
- Leveling ensures your cake stacks evenly and doesn’t lean or slide.
11. Assemble and Frost the Cake
- Place the first cake layer on your serving plate or cake stand, cut side up.
- Spread about ⅔ cup of cream cheese frosting evenly over the top of this layer, going all the way to the edges.
- Place the second cake layer on top, again with the cut side facing up, and press down gently to adhere.
- Spread another ⅔ cup of frosting on this layer.
- Place the final cake layer on top, this time with the cut side down so you have a flat, smooth surface on top.
- Apply a thin layer of frosting all over the entire cake (this is called a crumb coat) and refrigerate for 30 minutes to set.
- Once the crumb coat is firm, apply the remaining frosting in a thicker, final coat, using your offset spatula to create smooth sides and a flat top.
- If you saved cake scrumbs, gently press them around the sides of the frosted cake for a decorative finish.
You might also enjoy my Chocolate Chip Cookies Recipe to serve alongside this stunning cake.
Tips for The Best Blue Velvet Cake
Over the years of making this cake, I’ve picked up some tricks that really make a difference. These tips will help you avoid the mistakes I made when I was first learning.
- Bring all ingredients to room temperature before you start mixing. Cold eggs and buttermilk won’t emulsify properly with the oil, and cold cream cheese will create a lumpy frosting. I set everything out on the counter about 1-2 hours before I begin.
- Use gel food coloring, not liquid for the most vibrant blue color without adding excess moisture to your batter. Liquid coloring can make the cake batter too thin and you’ll need to use so much that it affects the flavor.
- Don’t skip the vinegar as it’s essential for creating that signature velvety texture through its reaction with the baking soda. I tried making this without it once and the cake was dense and heavy.
- Measure your flour correctly by spooning it into the measuring cup and leveling it off with a knife, never scooping directly from the bag. Too much flour is the number one reason cakes turn out dry.
- Refrigerate the cake layers before assembling and frosting to prevent them from crumbling and to make them easier to handle. I learned this after getting cake crumbs all throughout my frosting on my first attempt.
- Use an offset spatula for frosting instead of a regular butter knife, as it gives you much better control and helps you achieve smooth, professional looking results.
- Keep your frosting cool by refrigerating it for 15 minutes if it starts to get too soft while you’re working, especially on hot days.
- Crumb coat is your friend even though it feels like an extra step. That thin first layer traps all the crumbs so your final coat of frosting is pristine and smooth.
- Add the vinegar last and mix it in quickly just before baking to maximize the leavening reaction for the lightest, fluffiest texture.
- Don’t overbake as the cakes will continue cooking from residual heat after you remove them from the oven. They should still be slightly soft in the center when you take them out.
Another cake recipe that benefits from these same techniques is my Fruit Tart Recipe.
What to Serve with Blue Velvet Cake
This stunning cake is a star on its own, but it pairs beautifully with complementary flavors and textures. Here are my favorite accompaniments.
Beverages:
- Hot coffee or espresso to balance the sweetness
- Cold milk (especially popular with kids)
- Sparkling wine or champagne for celebrations
- Hot chocolate for a decadent dessert experience
- Sweet iced tea for Southern style serving
Side Dishes and Accompaniments:
- Fresh berries like blueberries, raspberries, or strawberries scattered around the plate
- Vanilla ice cream or whipped cream on the side
- Deviled Eggs for a savory contrast at parties
- Broccoli Salad as a refreshing side at summer gatherings
- Mexican Street Corn for outdoor celebrations
Variations of Blue Velvet Cake
Once you’ve mastered the basic recipe, have fun experimenting with these delicious variations. I love how versatile this cake is!
- Cupcake version: Divide the batter among 24 lined cupcake tins and bake at 350°F for 18-20 minutes. Perfect for birthday parties or baby showers where individual servings are more convenient.
- Pink Velvet Cake: Swap the blue food coloring for pink to create a gorgeous rose hued cake that’s perfect for Valentine’s Day, Mother’s Day, or baby showers for girls.
- Purple Velvet Cake: Use purple gel food coloring instead of blue for a royal purple cake that’s stunning for milestone birthdays or themed parties.
- Natural blue color: For a more natural approach, use butterfly pea flower powder (about 2 tablespoons) mixed with the dry ingredients, though the color won’t be as vibrant.
- Sheet cake style: Pour all the batter into a greased 9×13 inch pan and bake for 35-40 minutes for easier serving at large gatherings.
- Blueberry filling: Add a layer of blueberry jam or fresh blueberry compote between the cake layers for extra fruitiness.
- Different frostings: Try vanilla buttercream, marshmallow frosting, or even white chocolate ganache instead of cream cheese frosting.
- Ombre effect: Make three batches of batter with varying amounts of blue food coloring (light, medium, dark) for graduated blue layers.
- Funfetti addition: Fold in ½ cup of white or blue sprinkles to the batter just before baking for a fun, festive twist.
- Chocolate ganache drip: After frosting with cream cheese frosting, add a white chocolate ganache drip around the edges for an elegant finish.
For another creative variation, try my Creme Brulee Cheesecake Recipe.
Storage and Reheating
Proper storage is key to keeping this cake fresh and delicious. Since it has cream cheese frosting, refrigeration is essential.
- Room temperature: This cake should not be left at room temperature for more than 2 hours due to the cream cheese frosting, which is perishable.
- Refrigerator storage: Store the cake in an airtight container or cover it tightly with plastic wrap and refrigerate for up to 5 days. The cake actually tastes even better the next day once the flavors have melded.
- Freezer storage: Wrap individual slices tightly in plastic wrap, then in aluminum foil, and freeze for up to 3 months. You can also freeze unfrosted cake layers wrapped well for up to 2 months.
- Thawing frozen cake: Transfer frozen slices to the refrigerator and let them thaw overnight, or leave them at room temperature for 2-3 hours before serving.
- Serving temperature: For the best flavor and texture, remove the cake from the refrigerator about 30 minutes before serving to take the chill off.
- Preventing drying out: If storing a cut cake, press a piece of plastic wrap directly against the cut surfaces to prevent them from drying out.
- Frosting ahead: You can make the cream cheese frosting up to 3 days in advance and store it in the refrigerator in an airtight container. Bring it to room temperature and re-whip it before using.
If you love make ahead desserts, check out my Hot Chocolate Bombs Recipe.
Nutritional Facts
Per Slice (1/12 of cake):
- Calories: 685
- Total Fat: 42g
- Saturated Fat: 16g
- Cholesterol: 105mg
- Sodium: 380mg
- Total Carbohydrates: 73g
- Dietary Fiber: 1g
- Sugars: 58g
- Protein: 6g
Note: Nutritional information is approximate and will vary based on specific brands used and portion sizes.
For a lighter dessert option, try my Healthy Tiramisu Recipe.
Health Benefits of Key Ingredients
While this is definitely an indulgent dessert, some of the ingredients do offer nutritional benefits. Everything in moderation!
Eggs:
- Excellent source of high quality protein and essential amino acids
- Rich in choline, which supports brain health and function
- Contains vitamins A, D, E, and B12
Buttermilk:
- Good source of calcium for strong bones and teeth
- Contains probiotics that support digestive health
- Lower in fat than regular milk while providing protein
Cream Cheese:
- Provides calcium and phosphorus for bone health
- Contains vitamin A which supports eye health and immune function
- Source of conjugated linoleic acid which may have health benefits
Cocoa Powder:
- Rich in antioxidants called flavonoids that may support heart health
- Contains minerals like iron, magnesium, and zinc
- May help improve mood through compounds that affect neurotransmitters
You can also explore my Healthy Carrot Cake Recipe for a lighter cake option.
FAQs About Blue Velvet Cake
1. Can I make Blue Velvet Cake without food coloring?
Yes, you can make this cake without any food coloring and it’ll simply be a light cocoa colored cake with the same delicious flavor and texture. You could also use natural alternatives like butterfly pea flower powder or blue spirulina, though these won’t give you the same vibrant blue as gel food coloring. The butterfly pea powder works best, but you’ll need about 2 tablespoons mixed into the dry ingredients, and the final color will be more muted.
2. Why is my Blue Velvet Cake dense instead of fluffy?
Dense cake usually results from overmixing the batter after adding the flour, which develops too much gluten and makes the cake tough. Make sure you’re only mixing until the ingredients are just combined.
Other culprits include using expired baking soda, not bringing ingredients to room temperature, or measuring flour incorrectly by packing it into the cup. Always spoon flour into your measuring cup and level it off.
3. Can I use regular all purpose flour instead of cake flour?
You can substitute all purpose flour, but your cake won’t be quite as tender and light. Cake flour has less protein than all purpose flour, which creates a more delicate crumb.
If you need to substitute, use this trick: for every cup of cake flour called for, measure 1 cup of all purpose flour, remove 2 tablespoons, and replace those 2 tablespoons with cornstarch. Sift this mixture several times.
4. How do I prevent my cake layers from sticking to the pans?
The key is proper pan preparation using both grease and parchment paper. Butter or spray the pans generously, line the bottoms with parchment paper circles, then butter the parchment too.
Some bakers also dust with flour after greasing. Let the cakes cool in the pans for exactly 10 minutes before inverting, this gives them time to set but prevents them from steaming and becoming soggy.
5. Can I make this cake ahead of time?
Absolutely! In fact, I prefer making the cake layers a day ahead because they’re easier to frost when they’ve been refrigerated overnight. You can bake the layers, let them cool completely, wrap them tightly in plastic wrap, and refrigerate for up to 2 days before frosting.
The frosted cake can be made up to 2 days ahead and stored in the refrigerator. You can also freeze unfrosted layers for up to 2 months.
For more special occasion recipes, check out my Eggnog Pie Recipe.
Blue Velvet Cake
Ingredients
- 2½ cups cake flour - 300g, sifted
- 1½ cups granulated sugar - 300g
- 1 tablespoon unsweetened cocoa powder - 10g
- 1 teaspoon baking soda - 5g
- 1 teaspoon salt - 6g
- 2 large eggs - room temperature
- 1½ cups vegetable oil or canola oil - 360ml
- 1 cup buttermilk - 240ml, room temperature
- 2 teaspoons pure vanilla extract - 10ml
- 1 tablespoon white vinegar - 15ml
- 2 tablespoons blue gel food coloring - 30ml, Wilton Sky Blue recommended
- ½ teaspoon purple gel food coloring - 2.5ml, optional for deeper blue
- 16 ounces cream cheese - 450g, softened to room temperature
- 1 cup unsalted butter - 226g, softened to room temperature
- 5 cups powdered sugar - 600g, sifted
- 2 teaspoons pure vanilla extract - 10ml
- ¼ teaspoon salt - 1.5g
Equipment
- Three 8-inch round cake pans
- Parchment paper
- Large mixing bowls - At least two
- Stand mixer or hand mixer
- Measuring cups and spoons
- Rubber spatula
- Wire cooling racks
- Offset spatula - For frosting
- Cake leveler or serrated knife
- Toothpicks - For testing doneness
- Cake turntable - optional but extremely helpful
Method
- Preheat oven to 350°F (175°C). Grease three 8-inch round cake pans, line bottoms with parchment paper circles, and grease the parchment.
- In a large bowl, sift together cake flour, sugar, cocoa powder, baking soda, and salt. Whisk to combine evenly.
- In another bowl, whisk eggs until frothy, then add oil and whisk for 1 minute. Add buttermilk and vanilla, whisking until smooth and creamy.
- Add blue gel food coloring (and purple if using) to wet ingredients and whisk until color is completely uniform with no streaks.
- Pour wet ingredients into dry ingredients and beat on low for 30 seconds, then on medium for 2 minutes until smooth and glossy.
- Add vinegar and mix on low for 10-15 seconds just until incorporated. The batter will become slightly fluffy from the reaction.
- Divide batter evenly among three prepared pans (about 450-480g each). Tap pans on counter to release air bubbles, then bake for 25-28 minutes until toothpick comes out with moist crumbs.
- Cool cakes in pans for 10 minutes, then invert onto wire racks, remove parchment, and flip right-side up. Cool completely (about 1 hour), then refrigerate for easier frosting.
- Beat softened cream cheese for 2-3 minutes until smooth. Add butter and beat 2 minutes until fluffy, then gradually add powdered sugar one cup at a time.
- Add vanilla and salt to frosting, then beat on medium-high for 3-4 minutes until light and fluffy. Refrigerate if too soft.
- Level cake tops with cake leveler or serrated knife to create flat surfaces for stacking.
- Place first layer cut-side up, spread ⅔ cup frosting to edges. Add second layer, spread ⅔ cup frosting. Top with final layer cut-side down, apply thin crumb coat, and refrigerate 30 minutes.
- Apply final thick coat of frosting over chilled crumb coat, smoothing with offset spatula. Decorate as desired and refrigerate until ready to serve.
Nutrition
Notes
- Bring all ingredients to room temperature 1-2 hours before baking for best results and proper emulsification.
- Use gel food coloring, not liquid, for vibrant blue color without adding excess moisture to the batter.
- Don’t skip the vinegar as it creates the signature velvety texture through its reaction with baking soda.
- Measure flour correctly by spooning into measuring cup and leveling off, never scooping directly from the bag.
- Refrigerate cake layers before assembling to prevent crumbling and make them easier to handle.
- Apply a crumb coat first and refrigerate 30 minutes before final frosting for smooth, professional results.
- Store frosted cake covered in refrigerator for up to 5 days. The cake tastes even better the next day.
- Freeze unfrosted layers wrapped tightly for up to 2 months, or freeze individual frosted slices for up to 3 months.
- For cupcakes, divide batter among 24 lined cups and bake at 350°F for 18-20 minutes.
- Substitute pink or purple gel food coloring for different colored velvet cakes perfect for themed parties.
Private Notes
Tried this recipe?
Let us know how it was!Final Thoughts
This Blue Velvet Cake has become my go to showstopper dessert for every special occasion. The gorgeous blue layers never fail to make people smile, and that first bite of velvety soft cake with tangy cream cheese frosting is pure bliss.
I hope you’ll give this recipe a try for your next celebration. Once you see the looks on your guests’ faces when you slice into those sapphire blue layers, you’ll understand why this cake has such a special place in my heart.
Let me know in the comments how your Blue Velvet Cake turned out! I’d love to hear about any creative variations you tried or special occasions where you served it. Don’t forget to snap a photo and share it with me on social media.
Recommended:
- Chocolate Chip Bread Recipe
- Amish Apple Cake Recipe
- Cannoli Poke Cake Recipe
- Coffee Cake Recipe Using Cake Mix
- Cheesecake Ice Cream Cake Recipe
- Are You Kidding Me Cake Recipe
- Mastros Butter Cake Recipe
- Easy Carrot Cake Recipe
- Easy Carrot Cake Recipe with Cake Mix
- Creme Brulee Cookies Recipe