
Last summer, my niece asked me to make something special for her birthday. She couldn’t decide between cheesecake and ice cream cake, so I decided to combine both into one glorious dessert.

That experiment turned into this Cheesecake Ice Cream Cake Recipe, and it’s been requested at every family gathering since. The best part is that you don’t need any fancy equipment or baking skills to pull this off.
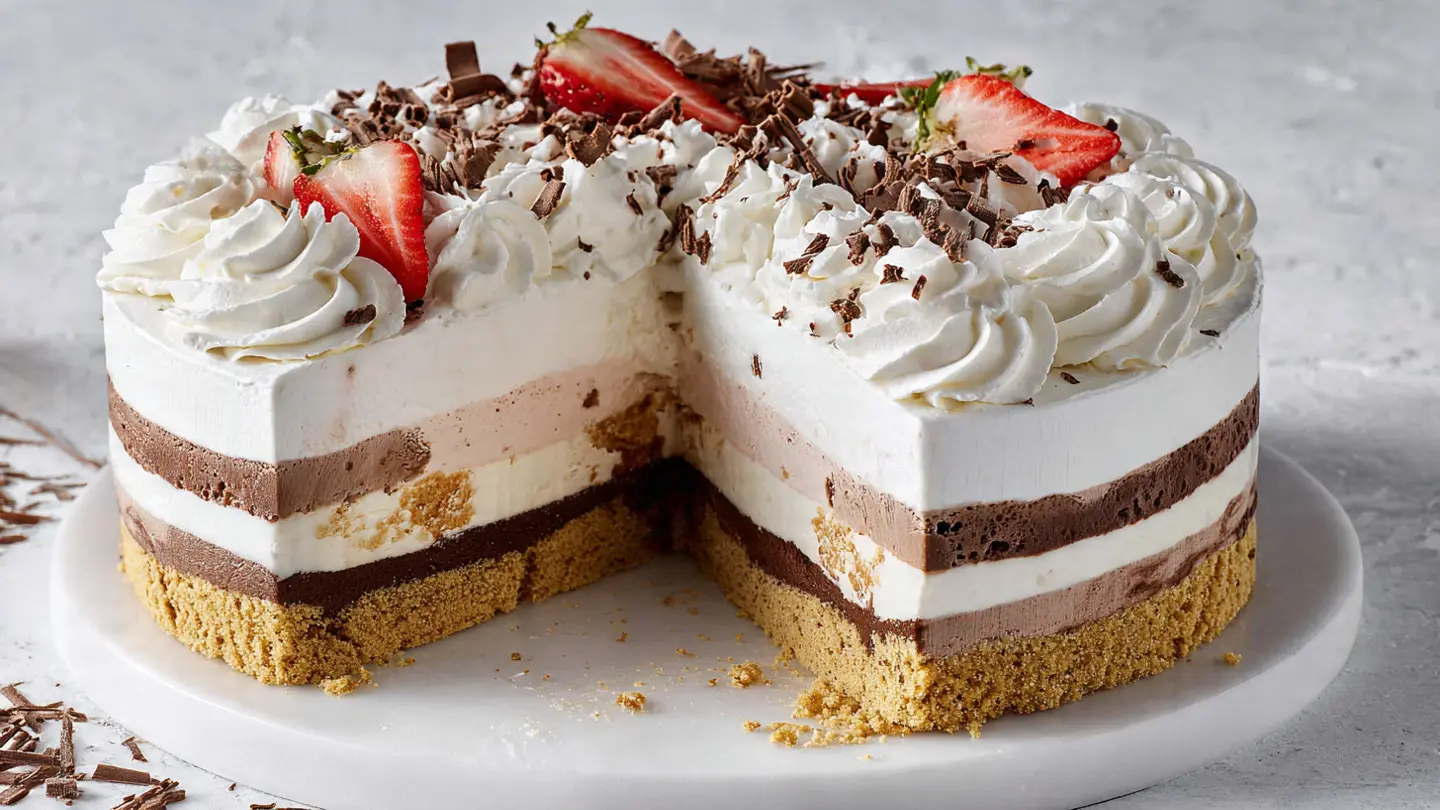
This frozen treat layers creamy cheesecake filling with your favorite ice cream flavors, all sitting on a crunchy graham cracker crust. It’s perfect for summer birthdays, holiday celebrations, or any time you want to impress your guests with minimal effort.
| Quick Recipe Summary | |
|---|---|
| Prep Time | 30 minutes |
| Cook Time | 0 minutes |
| Total Time | 6 hours 30 minutes (includes freezing) |
| Servings | 12 slices |
| Difficulty Level | Easy |
If you’re looking for more frozen treats, check out my No Bake Cookies Recipe for another simple dessert option.
_result.jpg "Simple Cheesecake Ice Cream Cake Recipe Anyone Can Make")
Why You’ll Love This Cheesecake Ice Cream Cake Recipe
This dessert combines the rich, tangy flavor of classic cheesecake with the refreshing coolness of ice cream. The contrast in textures is absolutely divine.
You can customize it with any ice cream flavor you love, making it perfect for picky eaters and adventurous dessert lovers alike. I’ve made versions with everything from classic vanilla to salted caramel pretzel.
Here’s what makes this recipe special:
- No baking required: Perfect for hot summer days when you don’t want to turn on the oven
- Make-ahead friendly: Prepare it days in advance and keep it frozen until serving time
- Endlessly customizable: Mix and match ice cream flavors, cookie crusts, and toppings
- Impressive presentation: Looks like you spent hours in the kitchen when it only took 30 minutes of hands-on time
- Crowd-pleaser: Appeals to both cheesecake lovers and ice cream enthusiasts
Ingredients
This recipe uses simple ingredients that you can find at any grocery store. I’ve included options for customization so you can make it your own.
For the Crust:
- 2 cups (200g) graham cracker crumbs (about 16 full crackers, crushed)
- 6 tablespoons (85g) unsalted butter, melted
- 3 tablespoons (38g) granulated sugar
- 1/4 teaspoon (1.5g) salt
For the Cheesecake Layer:
- 16 ounces (450g) cream cheese, softened to room temperature
- 3/4 cup (150g) granulated sugar
- 1 cup (240ml) heavy cream, cold
- 2 teaspoons (10ml) pure vanilla extract
- 1/4 teaspoon (1.5g) salt
- 2 tablespoons (30ml) fresh lemon juice
For the Ice Cream Layers:
- 1.5 quarts (1.4L) ice cream of your choice, slightly softened (I recommend vanilla, chocolate, or strawberry)
- Optional: 1 pint (475ml) additional ice cream in a complementary flavor
For Topping:
- 1 cup (240ml) heavy cream, whipped
- Fresh berries, chocolate shavings, or caramel sauce for garnish
Pro tip: Let your cream cheese sit at room temperature for at least 2 hours before starting. Cold cream cheese will create lumps in your cheesecake layer that are nearly impossible to smooth out.
Another favorite dessert that requires no baking is my Coconut Cream Pie.
Kitchen Equipment Needed
Having the right tools makes this recipe even easier to assemble. Here’s what you’ll need for success.
Essential Equipment:
- 9-inch (23cm) springform pan
- Electric mixer (hand mixer or stand mixer)
- Large mixing bowls (at least 2)
- Measuring cups and spoons
- Rubber spatula
- Offset spatula or butter knife for smoothing
- Plastic wrap or aluminum foil
- Food processor or rolling pin (for crushing graham crackers)
Nice to Have:
- Ice cream scoop with a release mechanism
- Cake decorating turntable
- Piping bag with decorating tips
Note: The springform pan is really essential here. I tried making this in a regular cake pan once and had to serve it directly from the pan because I couldn’t get it out cleanly.
For similar desserts that require special equipment, try my Pumpkin Cheesecake Recipe.
Recommended Products for This Recipe
I’ve made this cheesecake ice cream cake dozens of times, and these specific products have made the biggest difference in my results.
1. Nordic Ware Leakproof Springform Pan
This is hands down the best springform pan I’ve ever used. The seal is completely watertight, which means you won’t have any melted ice cream leaking out during freezing. I had issues with cheaper pans where the sides would come apart slightly, creating a mess in my freezer.
2. Philadelphia Cream Cheese Brick
While any cream cheese works, Philadelphia consistently gives me the smoothest, creamiest cheesecake layer without any graininess. The full-fat version is essential here as the low-fat varieties don’t whip up as nicely and can taste slightly chalky.
3. KitchenAid Hand Mixer with Whisk Attachment
Whipping the cream cheese mixture to the right consistency is crucial, and this hand mixer gives you complete control. The whisk attachment incorporates air perfectly, creating that light and fluffy texture that makes the cheesecake layer so special.
4. Zeroll Original Ice Cream Scoop
When you’re spreading softened ice cream over the cheesecake layer, this scoop makes it so much easier to portion out evenly. The heat-conductive fluid inside helps the ice cream release cleanly, and it never requires batteries or awkward squeezing mechanisms.
_result.jpg "Best Cheesecake Ice Cream Cake Recipe for Birthdays")
Step-by-Step Instructions: How to Make Cheesecake Ice Cream Cake
Follow these detailed steps to create your perfect frozen dessert. Take your time with each layer for the best results.
1. Prepare the Springform Pan and Crust Base
- Line the bottom of your 9-inch springform pan with parchment paper, cutting it to fit precisely
- Wrap the outside of the pan with two layers of plastic wrap or aluminum foil to prevent any leaks
- Secure the springform clasp tightly and double-check that it’s completely closed
- In a food processor, pulse the graham crackers until they form fine crumbs (or place them in a sealed plastic bag and crush with a rolling pin)
- Transfer the graham cracker crumbs to a medium mixing bowl
- Add the melted butter, sugar, and salt to the crumbs
- Stir with a fork until the mixture resembles wet sand and holds together when pressed
- Pour the crumb mixture into the prepared springform pan
- Use the bottom of a measuring cup or glass to press the crumbs firmly and evenly across the bottom of the pan
- Press some of the mixture about 1 inch up the sides of the pan for a thicker crust edge
- Place the pan in the freezer for at least 20 minutes while you prepare the cheesecake layer
2. Make the Cheesecake Filling
- Remove the cream cheese from the refrigerator if you haven’t already and ensure it’s at room temperature (it should be soft enough to easily press your finger into)
- In a large mixing bowl, beat the softened cream cheese with an electric mixer on medium speed for 2-3 minutes until completely smooth and fluffy
- Scrape down the sides of the bowl with a rubber spatula to ensure no lumps remain
- Gradually add the sugar, about 1/4 cup at a time, beating well after each addition
- Add the vanilla extract, lemon juice, and salt, then beat for another minute until fully incorporated
- In a separate chilled bowl, whip the cold heavy cream with clean beaters on high speed until stiff peaks form (about 3-4 minutes)
- Gently fold one-third of the whipped cream into the cream cheese mixture using a rubber spatula, using a gentle circular motion
- Add the remaining whipped cream and fold until just combined with no white streaks remaining
- Be careful not to overmix or you’ll deflate the airy texture
3. Assemble the First Cheesecake Layer
- Remove the springform pan with the crust from the freezer
- Pour half of the cheesecake mixture (about 2 cups) over the frozen crust
- Use an offset spatula or the back of a spoon to spread the mixture evenly, working from the center outward
- Gently tap the pan on the counter 2-3 times to release any air bubbles
- Smooth the top as much as possible to create an even surface
- Return the pan to the freezer for 30 minutes to firm up before adding the ice cream layer
4. Add the First Ice Cream Layer
- Remove your ice cream from the freezer and let it sit at room temperature for 5-10 minutes to soften slightly (it should be spreadable but not melted)
- Remove the springform pan from the freezer
- Scoop the softened ice cream over the cheesecake layer, distributing it evenly
- Use an offset spatula to spread the ice cream in an even layer, working quickly before it melts
- Smooth the top surface as much as possible
- Tap the pan gently on the counter to eliminate air pockets
- If desired, add a second flavor of ice cream in a thin layer on top for variation
- Return the pan to the freezer for at least 1 hour until the ice cream is completely firm
5. Add the Final Cheesecake Layer
- Remove the remaining cheesecake mixture from the refrigerator (if it has firmed up, let it sit at room temperature for 10 minutes)
- Take the springform pan out of the freezer
- Carefully spoon the remaining cheesecake mixture over the frozen ice cream layer
- Spread it gently and evenly with an offset spatula, being careful not to disturb the ice cream layer below
- Create decorative swirls on top with the spatula if desired
- Smooth the edges where the cheesecake meets the sides of the pan
- Cover the top of the pan tightly with plastic wrap, pressing it directly onto the surface to prevent ice crystals from forming
6. Freeze and Set the Cake
- Place the covered cake back in the freezer on a flat surface
- Freeze for at least 4-6 hours, but preferably overnight for the best texture
- The cake is ready when it’s completely solid and firm to the touch
- For best results, let it freeze for a full 24 hours before serving
7. Unmold and Decorate
- Remove the cake from the freezer 10 minutes before serving to make slicing easier
- Run a thin knife or offset spatula around the inside edge of the springform pan to loosen the cake
- Release the springform clasp and carefully remove the outer ring
- If desired, whip 1 cup of heavy cream with 2 tablespoons of powdered sugar until stiff peaks form
- Pipe or spread the whipped cream decoratively on top of the cake
- Garnish with fresh berries, chocolate shavings, crushed cookies, or a drizzle of caramel or chocolate sauce
- Use a sharp knife dipped in hot water and wiped dry between cuts to slice clean pieces
- Serve immediately and return any leftover cake to the freezer
For another impressive layered dessert, try my Authentic Italian Tiramisu.
_result.jpg "Cheesecake Ice Cream Cake Recipe")
Tips for The Best Cheesecake Ice Cream Cake
These tips come from my many attempts at perfecting this recipe. Learn from my mistakes to get perfect results every time.
Key Success Factors:
- Use full-fat ingredients: Low-fat cream cheese and light whipped cream don’t freeze as well and can become icy or grainy. The fat content is what keeps everything smooth and creamy.
- Don’t skip the room temperature cream cheese step: I learned this the hard way when I tried to rush it. Cold cream cheese creates lumps that never fully smooth out, even with extended mixing.
- Work quickly with the ice cream layers: Once the ice cream starts to soften, you have about 10-15 minutes to spread it before it becomes too melted and loses structure.
- Let each layer freeze completely: I once got impatient and added the second cheesecake layer before the ice cream was fully frozen. The layers mixed together and created a slushy mess.
- Wrap the springform pan well: Any gaps will let in freezer air, which creates ice crystals and freezer burn on your beautiful cake.
- Use a hot knife for clean slices: Dip your knife in hot water, wipe it dry, then make your cut. Repeat for each slice. This was a tip from my pastry chef friend and it completely changed the presentation.
- Don’t refreeze melted portions: Once a slice has been at room temperature for more than 30 minutes, eat it or discard it. Refrozen ice cream cake develops an unpleasant icy texture.
- Consider your ice cream flavors carefully: Some flavors with lots of mix-ins (like cookie dough) can be harder to spread evenly. Smoother ice creams work best.
Looking for more dessert tips? Check out my Sugar Cookies Recipe for another crowd-pleasing treat.
What to Serve with Cheesecake Ice Cream Cake

This decadent dessert pairs wonderfully with both beverages and complementary side treats. Here are my favorite serving suggestions.
Perfect Pairings:
- Fresh Coffee or Espresso: The rich, creamy cake pairs beautifully with a strong coffee. I especially love serving this with Hot Chocolate in the winter months.
- Champagne or Prosecco: For adult celebrations, the bubbles cut through the richness perfectly
- Fresh Fruit Salad: A light, refreshing fruit salad provides a nice contrast to the dense, creamy cake
- Chocolate Sauce: Warm chocolate sauce drizzled over each slice adds an extra layer of decadence
- Caramel Drizzle: Homemade or store-bought caramel sauce complements the tangy cheesecake flavor beautifully
- Whipped Cream: Extra whipped cream on the side never hurts
- Berry Compote: A warm mixed berry compote provides a lovely temperature contrast and cuts the sweetness
Variations of Cheesecake Ice Cream Cake
One of my favorite things about this recipe is how versatile it is. Here are variations I’ve tried and loved.
Flavor Combinations to Try:
- Chocolate Lover’s Version: Use Oreo cookie crust, chocolate ice cream, and top with chocolate ganache and chocolate shavings
- Strawberry Cheesecake: Layer strawberry ice cream with fresh strawberry pieces mixed into the cheesecake layer, top with strawberry sauce
- Cookies and Cream: Use crushed Oreo crust, cookies and cream ice cream, and fold mini Oreo pieces into the cheesecake mixture
- Salted Caramel Pretzel: Use pretzel crust, salted caramel ice cream, and drizzle with extra caramel sauce and crushed pretzels
- Peanut Butter Cup: Use chocolate graham cracker crust, peanut butter ice cream mixed with chopped peanut butter cups, topped with chocolate sauce
- Mint Chocolate Chip: Layer mint chocolate chip ice cream with chocolate cookie crust and garnish with fresh mint leaves
- Coffee Toffee: Use coffee ice cream with toffee bits mixed into the cheesecake layer and crushed on top
- Tropical Paradise: Use coconut or mango ice cream with a macadamia nut crust and top with toasted coconut
- Red Velvet: Use red velvet cake crumbs for the base, cream cheese ice cream, and white chocolate shavings
- Lemon Blueberry: Use lemon zest in the cheesecake layer with blueberry ice cream and fresh blueberry topping
For more creative dessert variations, try my Creme Brulee Cheesecake.
Storage and Reheating
Proper storage keeps your cheesecake ice cream cake fresh and delicious for weeks. Here’s everything you need to know.
Storage Guidelines:
- Freezer Storage: Store the whole cake or individual slices in an airtight container or wrapped tightly in plastic wrap and aluminum foil for up to 2 months
- Prevent Freezer Burn: Press plastic wrap directly onto any exposed surfaces before wrapping with foil
- Label and Date: Always write the date on your storage container so you know how long it’s been frozen
- Don’t Store Near Strong Odors: Ice cream and cheesecake both absorb flavors easily, so keep away from pungent foods like fish or garlic
- Slice Before Refreezing: If you’ve taken the whole cake out, slice what you need and immediately return the rest to the freezer
- Individual Portions: For easier serving, pre-slice the cake and wrap individual pieces separately. They’ll be ready to grab for quick desserts.
- Thawing: Remove from freezer 10-15 minutes before serving for easiest slicing. Don’t leave at room temperature for more than 30 minutes or it will become too soft.
- Never Refreeze: Once thawed, don’t refreeze as this creates ice crystals and ruins the texture
Note: Unlike regular baked goods, this doesn’t need “reheating.” It’s meant to be served frozen or slightly softened.
Another great make-ahead dessert is my Fruit Cocktail Cake.
Nutritional Facts
Here’s the approximate nutritional information per slice (based on 12 servings):
- Calories: 485
- Total Fat: 32g
- Saturated Fat: 19g
- Cholesterol: 95mg
- Sodium: 280mg
- Total Carbohydrates: 45g
- Dietary Fiber: 1g
- Sugars: 35g
- Protein: 6g
Note: These values are approximate and will vary based on the specific ice cream flavor and toppings you choose. Using lower-fat ice cream or light cream cheese will reduce the calorie and fat content but may affect texture.
For a lighter dessert option, consider my Healthy Apple Pie Recipe.
Health Benefits of Key Ingredients
While this is definitely an indulgent treat, some ingredients do offer nutritional benefits. Everything in moderation, right?
Nutritional Highlights:
- Cream Cheese: Provides calcium for bone health and contains vitamin A for eye health. Full-fat dairy also contains conjugated linoleic acid (CLA), which has been studied for its potential health benefits.
- Heavy Cream: Rich in fat-soluble vitamins A, D, E, and K. The fat content helps your body absorb these important nutrients.
- Eggs (if using egg-based ice cream): Excellent source of high-quality protein and contain choline, important for brain health.
- Vanilla Extract: Contains small amounts of antioxidants and has been traditionally used to reduce stress and anxiety.
- Lemon Juice: Provides vitamin C and helps balance the sweetness while aiding in digestion.
- Graham Crackers: Made from whole wheat, they provide small amounts of fiber and B vitamins.
Of course, this is a dessert and should be enjoyed as an occasional treat rather than a health food. The joy it brings is worth the indulgence.
If you’re looking for healthier dessert options, check out my Healthy Chocolate Chip Cookies Recipe.
FAQs About Cheesecake Ice Cream Cake
1. Can I make this cake without a springform pan?
You can use a regular cake pan, but you’ll need to line it completely with plastic wrap, leaving enough overhang to lift the cake out. Press the plastic wrap into all the corners and up the sides. Once frozen, you can use the overhang to lift the entire cake out before removing the plastic wrap and transferring to a serving plate.
2. How far in advance can I make this cake?
This cake can be made up to 2 weeks in advance if stored properly. In fact, I find it tastes even better after sitting in the freezer for a few days as the flavors meld together. Just make sure it’s wrapped extremely well in plastic wrap and aluminum foil to prevent freezer burn.
3. Why is my cheesecake layer grainy instead of smooth?
This usually happens for one of two reasons: the cream cheese wasn’t at room temperature when you mixed it, or you didn’t beat it long enough before adding other ingredients. Cold cream cheese doesn’t incorporate smoothly and creates lumps. Always let your cream cheese sit at room temperature for at least 2 hours, and beat it for a full 2-3 minutes until it’s completely fluffy before adding anything else.
4. Can I use store-bought cheesecake for the layers instead?
Absolutely! If you’re short on time, you can buy pre-made cheesecake from the store, slice it into thin layers, and use those between your ice cream layers. Just make sure the cheesecake is completely frozen before adding the ice cream layers on top.
5. What’s the best way to cut clean slices?
The secret is a hot knife. Fill a tall glass with very hot water, dip your knife in, then wipe it completely dry with a clean towel. Make one clean cut all the way through the cake without any sawing motion. Rinse the knife, dip it in hot water again, dry it, and repeat for each slice.
Final Thoughts
This Cheesecake Ice Cream Cake has become one of my most-requested desserts, and I hope it becomes a favorite in your home too. The combination of tangy cheesecake and creamy ice cream is simply irresistible.
The best part is that once you master the basic technique, you can customize it endlessly to suit any occasion or preference. I’d love to hear what flavor combinations you try and how your cake turns out.
Please leave a comment below sharing your results, and don’t forget to rate this recipe if you loved it!
Recommended:
- Pumpkin Pie Recipe
- Apple Pie Recipe
- Pecan Pie Recipe
- Fruit Tart Recipe
- Fudge Recipe
- Peanut Butter Fudge Recipe
- Fudge Brownie Recipe
- Chocolate Chip Cookies Recipe
- Pumpkin Roll Recipe
- Eggnog Pie Recipe
