
I’ll never forget the night my husband proposed at Mastro’s Steakhouse. The evening was perfect, but honestly, what I remember just as vividly as that magical moment was the dessert we shared afterward: their legendary butter cake.

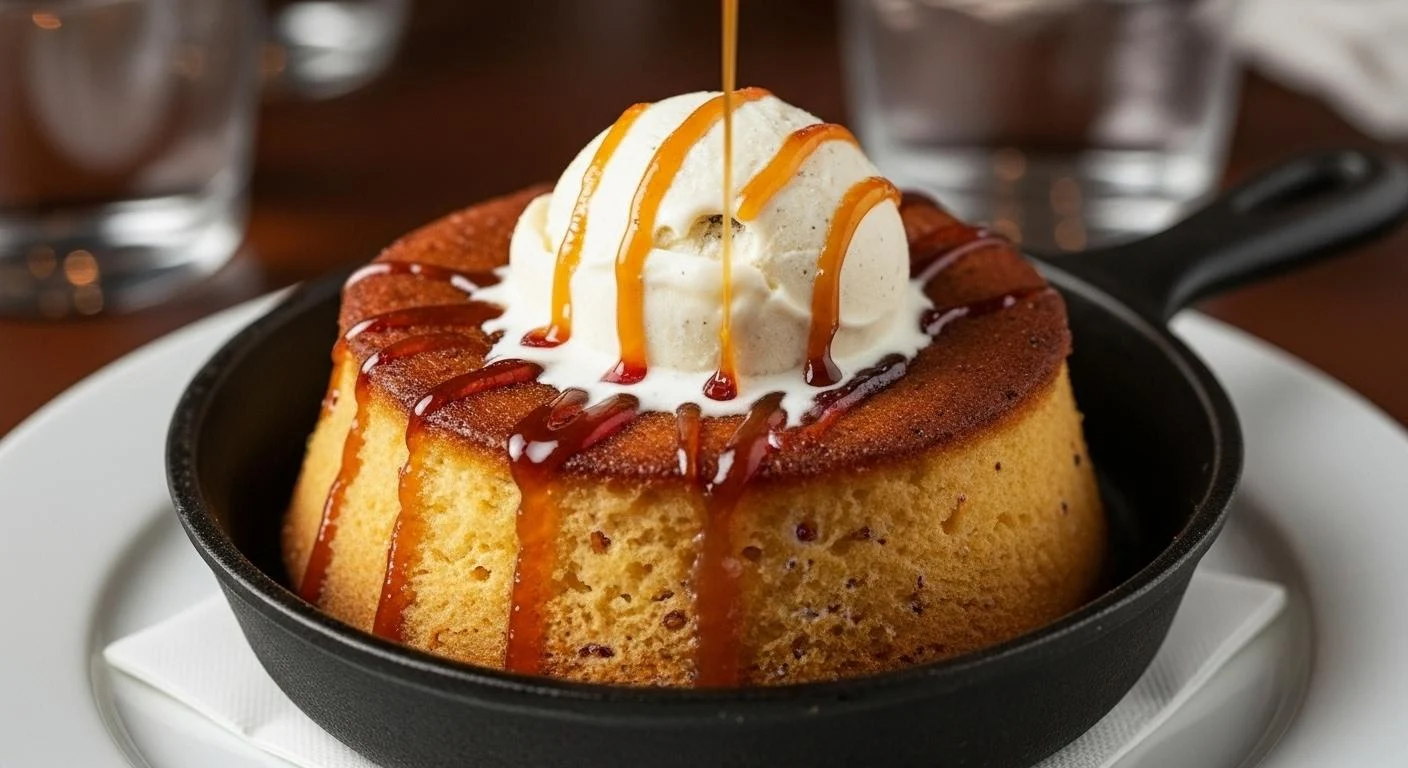
That warm, rich cake with its buttery, caramelized edges and pillowy center became something I obsessed over. I knew I had to recreate this Mastro’s Butter Cake Recipe at home.
After countless attempts (and a few kitchen disasters), I finally cracked the code. This isn’t just any butter cake. It’s the kind of dessert that makes you close your eyes with each bite, where the exterior is crispy and caramelized while the inside stays impossibly moist.
The secret lies in the cooking method and a few key ingredients that most recipes overlook.
| Quick Recipe Summary | |
|---|---|
| Prep Time | 20 minutes |
| Cook Time | 45 minutes |
| Total Time | 65 minutes |
| Servings | 8 slices |
| Difficulty Level | Medium |
_result.jpg "Mastro's Butter Cake Recipe | Easy Indulgent Baking for Beginners")
Why You’ll Love This Mastro’s Butter Cake Recipe
This dessert delivers that restaurant-quality experience right in your own kitchen. The combination of a caramelized butter crust and tender crumb is absolutely irresistible.
You’ll love how this cake strikes the perfect balance between elegance and comfort. It’s fancy enough to impress dinner guests but cozy enough to enjoy on a quiet Tuesday night.
- Restaurant-quality results: Captures the exact flavor and texture of the iconic steakhouse dessert
- Buttery caramelized crust: The edges get golden and crispy while the center stays soft
- Surprisingly simple: Despite its impressive presentation, the technique is straightforward
- Make-ahead friendly: Can be prepared earlier in the day and reheated before serving
- Perfect for special occasions: This is the dessert that makes birthdays, anniversaries, and celebrations memorable
- Crowd-pleaser guaranteed: I’ve never served this to someone who didn’t ask for seconds
If you’re looking for another show-stopping dessert, you might enjoy my authentic Italian tiramisu.
Ingredients
The magic of this butter cake lies in using premium ingredients. I learned the hard way that skimping on butter quality makes a noticeable difference in both flavor and texture.
For the Cake:
- 1 cup (226g) unsalted butter, softened, plus extra for greasing
- 1¾ cups (350g) granulated sugar
- 4 large eggs, room temperature
- 2 teaspoons pure vanilla extract
- 2 cups (240g) all-purpose flour
- 1 teaspoon baking powder
- ½ teaspoon salt
- ¾ cup (180ml) whole milk
- 2 tablespoons heavy cream
For the Butter Glaze:
- ½ cup (113g) unsalted butter
- ¾ cup (150g) granulated sugar
- ¼ cup (60ml) heavy cream
- 1 teaspoon vanilla extract
For Serving:
- Vanilla ice cream or whipped cream
- Fresh berries (optional)
- Powdered sugar for dusting
Kitchen Equipment Needed
Having the right tools makes this recipe significantly easier. I initially tried making this in a regular cake pan, and it just didn’t create that signature caramelized crust.
- 9-inch round springform pan or deep cake pan
- Stand mixer or hand mixer
- Large mixing bowls
- Whisk
- Rubber spatula
- Medium saucepan for the glaze
- Measuring cups and spoons
- Cooling rack
- Pastry brush
- Parchment paper
- Toothpick or cake tester
Recommended Products for This Recipe
Over the years of perfecting this recipe, I’ve found specific products that genuinely make a difference in achieving that authentic Mastro’s quality.
1. European-Style Butter
European-style butter has a higher fat content (around 82% versus 80% in American butter), which creates that luxuriously rich flavor and tender crumb. I use Kerrygold or Plugrá, and the difference is noticeable. The cake tastes more decadent, and the butter glaze has a silkier consistency.
2. Nordic Ware Leakproof Springform Pan
This pan is a kitchen workhorse. The leakproof design means you can pour that butter glaze without worrying about it seeping out, and the nonstick coating ensures the caramelized edges release perfectly every time. I’ve had mine for five years, and it still looks brand new.
3. Nielsen-Massey Madagascar Bourbon Vanilla Extract
Pure vanilla extract is non-negotiable in this recipe. Nielsen-Massey has a complex, rich flavor that artificial vanilla just can’t match. You’re using it in both the cake and the glaze, so that quality really shines through.
4. KitchenAid Stand Mixer
While you can make this with a hand mixer, a stand mixer makes the process so much easier. The butter and sugar need to be creamed for a full 5 minutes to incorporate enough air, and your arm will thank you for having a stand mixer. It also ensures even mixing without overmixing.
Another favorite: Carrot Cake Recipe
_result.jpg "Mastro's Butter Cake Recipe | Crowd-Pleasing Party Dessert")
Step-by-Step Instructions: How to Make Mastro’s Butter Cake
Take your time with each step, especially the creaming process. This is where many home bakers rush, but patience here creates that light, airy texture.
1. Prepare Your Pan and Preheat the Oven
- Preheat your oven to 325°F (165°C).
- Generously butter the bottom and sides of your 9-inch springform pan, making sure to get into all the corners.
- Line the bottom with parchment paper, then butter the parchment as well.
- Lightly dust the entire pan with flour, tapping out any excess.
- This double layer of butter and flour is crucial for getting those caramelized edges that release cleanly.
2. Cream the Butter and Sugar
- In your stand mixer fitted with the paddle attachment, beat the softened butter on medium speed for about 2 minutes until it’s light and fluffy.
- Add the granulated sugar and increase the speed to medium-high.
- Cream the butter and sugar together for 5 full minutes, stopping to scrape down the bowl halfway through.
- The mixture should become noticeably paler in color and increase in volume.
- This extended creaming time incorporates air that creates the cake’s tender texture, so don’t skip it.
3. Add the Eggs and Vanilla
- Reduce the mixer speed to medium-low.
- Add the eggs one at a time, beating well after each addition (about 30 seconds per egg).
- After all eggs are incorporated, add the vanilla extract and mix until combined.
- The mixture might look slightly curdled at this point, but don’t worry, it will come together when you add the flour.
Read Also: Coconut Cream Pie Recipe
4. Combine the Dry Ingredients
- In a separate medium bowl, whisk together the flour, baking powder, and salt.
- Whisking ensures the baking powder is evenly distributed, which helps the cake rise uniformly.
- Set this aside while you prepare the wet ingredients.
5. Mix the Milk and Cream
- In a small bowl or measuring cup, combine the whole milk and heavy cream.
- Having these at room temperature helps them incorporate smoothly into the batter without deflating the air you’ve whipped in.
6. Alternate Adding Dry and Wet Ingredients
- With the mixer on low speed, add about one-third of the flour mixture to the butter mixture.
- Mix just until you can no longer see dry flour (about 10 seconds).
- Pour in half of the milk mixture and mix until just combined.
- Add another third of the flour mixture, mix briefly, then add the remaining milk mixture.
- Finish with the final third of flour, mixing only until just combined.
- Use your rubber spatula to scrape down the bowl and fold a few times to ensure everything is evenly incorporated.
- Be careful not to overmix at this stage, as it can make the cake tough.
7. Bake the Cake
- Pour the batter into your prepared pan, using your spatula to spread it evenly.
- Tap the pan gently on the counter a few times to release any air bubbles.
- Place in the center of your preheated oven and bake for 45-50 minutes.
- The cake is done when the top is golden brown, the edges pull away slightly from the pan, and a toothpick inserted in the center comes out clean or with just a few moist crumbs.
- Start checking at 40 minutes, as oven temperatures can vary.
You might also enjoy: Pumpkin Pie Recipe
8. Prepare the Butter Glaze
- While the cake bakes, make your glaze (you want it ready right when the cake comes out).
- In a medium saucepan over medium heat, melt the butter.
- Add the sugar and heavy cream, stirring constantly with a whisk.
- Bring the mixture to a gentle boil, then reduce heat to medium-low.
- Let it simmer for 3-4 minutes, stirring frequently, until it thickens slightly and becomes glossy.
- Remove from heat and stir in the vanilla extract.
- The glaze should coat the back of a spoon but still be pourable.
9. Apply the Glaze While Hot
- As soon as the cake comes out of the oven, use a toothpick or skewer to poke holes all over the surface (about 20-30 holes).
- While both the cake and glaze are still hot, slowly pour the glaze over the cake.
- Use your pastry brush to spread it evenly and work it into the holes.
- The hot glaze will soak into the cake while also creating that signature caramelized top.
- Let the cake cool in the pan on a wire rack for at least 30 minutes.
10. Release and Serve
- Run a thin knife around the edge of the pan to loosen any stuck bits.
- Release the springform clasp and carefully remove the outer ring.
- If serving immediately, you can leave the cake on the springform base or carefully slide it onto a serving plate.
- Slice with a sharp knife, wiping it clean between cuts for neat slices.
- Serve warm with a scoop of vanilla ice cream or whipped cream.
_result.jpg "Homemade Mastro's Butter Cake Recipe | Rich & Golden Dessert")
Tips for The Best Mastro’s Butter Cake
These tips come from my many trials (and errors) perfecting this recipe. Some of them saved me from complete disasters.
- Use room temperature ingredients: Cold eggs and butter won’t incorporate properly and can result in a dense cake. Set everything out 1-2 hours before baking.
- Don’t skimp on the creaming time: Those full 5 minutes of creaming butter and sugar are essential for texture. I set a timer so I’m not tempted to rush.
- Measure flour correctly: Spoon flour into your measuring cup and level it off with a knife. Scooping directly from the bag can add up to 25% more flour, making your cake dry.
- Work quickly with the glaze: Both the cake and glaze need to be hot for proper absorption. If your glaze cools too much, gently rewarm it.
- Poke enough holes: I make about 30 holes in the cake surface so the glaze can really penetrate throughout.
- Line the pan with parchment: This makes releasing the finished cake foolproof, even if a few edges stick.
- Watch your oven temperature: An oven thermometer is worth the investment. My oven runs 15°F hot, which I learned after several overbaked cakes.
- Let it cool slightly: Serving it warm is ideal, but if you try to cut it immediately, it will fall apart. Give it at least 20-30 minutes.
- Store leftovers properly: Cover tightly and refrigerate. The cake actually improves after a day as the flavors meld.
- Reheat individual slices: Microwave for 15-20 seconds before serving to restore that fresh-from-the-oven warmth.
For a lighter dessert option, try my healthy apple pie.
Serving Suggestions
This butter cake is stunning on its own, but here are my favorite ways to elevate it into an unforgettable dessert experience.
The classic Mastro’s presentation is simple but perfect: a warm slice with a generous scoop of vanilla ice cream melting over the top. The temperature contrast between the hot cake and cold ice cream is absolutely divine.
- Serve with premium vanilla bean ice cream for the authentic steakhouse experience
- Top with fresh raspberries or strawberries for a pop of color and tartness that cuts through the richness
- Drizzle with caramel sauce for extra indulgence
- Dust with powdered sugar just before serving for an elegant presentation
- Pair with espresso or Irish coffee for a sophisticated after-dinner combination
- Add a dollop of whipped cream infused with vanilla bean
- Serve alongside fresh whipped cream mixed with a splash of amaretto or Frangelico
- Top with toasted pecans or walnuts for added texture
Read Also: Apple Crisp Recipe
Variations of Mastro’s Butter Cake
Once you master the classic version, these variations let you customize the cake for different occasions or flavor preferences.
- Chocolate butter cake: Add ¼ cup cocoa powder to the dry ingredients and reduce flour by ¼ cup. Fold in ½ cup chocolate chips for extra richness.
- Lemon butter cake: Replace vanilla with lemon extract and add 2 tablespoons lemon zest to the batter. Make a lemon glaze using lemon juice instead of cream.
- Almond butter cake: Substitute 1 teaspoon of the vanilla with almond extract and top with sliced almonds before baking.
- Cinnamon swirl: Mix 2 tablespoons sugar with 1 tablespoon cinnamon and swirl it through the batter with a knife before baking.
- Bourbon butter cake: Add 2 tablespoons bourbon to the glaze for a grown-up twist.
- Berry butter cake: Fold 1 cup fresh blueberries or raspberries into the batter before baking.
- Coffee butter cake: Add 1 tablespoon instant espresso powder to the batter for a subtle coffee flavor.
- Mini butter cakes: Divide the batter among a muffin tin for individual servings (reduce baking time to 20-25 minutes).
- Rum butter cake: Replace the vanilla in the glaze with dark rum for a Caribbean-inspired version.
You might also enjoy: Fudge Brownie Recipe
Storage and Reheating
Proper storage keeps this cake delicious for several days. I actually think it tastes even better the next day after the flavors have had time to meld.
- Room temperature: Cover tightly with plastic wrap and store for up to 2 days. The glaze keeps the cake moist.
- Refrigerator: Wrap the whole cake or individual slices in plastic wrap, then aluminum foil. Keeps for up to 5 days.
- Freezing: Wrap cooled cake slices individually in plastic wrap, then place in a freezer bag. Freeze for up to 3 months.
- Reheating whole cake: Tent loosely with foil and warm in a 300°F oven for 15-20 minutes.
- Reheating individual slices: Microwave for 20-30 seconds until warm, or place in a 325°F oven for 5-7 minutes.
- From frozen: Thaw overnight in the refrigerator, then reheat as directed above.
- Glaze tip: If the top looks dry after refrigeration, brush with a little melted butter before reheating.
- Serving tip: Always serve warm for the best texture and flavor. Cold butter cake loses much of its appeal.
_result.jpg "Mastro's Butter Cake Recipe | Classic Dessert with a Gourmet Touch")
Nutritional Facts
Per serving (1 slice, based on 8 servings):
- Calories: 585
- Total Fat: 32g
- Saturated Fat: 19g
- Cholesterol: 165mg
- Sodium: 245mg
- Total Carbohydrates: 69g
- Dietary Fiber: 1g
- Sugars: 50g
- Protein: 6g
Note: Nutritional values are approximate and will vary based on specific ingredients used and portion sizes.
Another decadent option: Pecan Pie Recipe
Health Benefits of Key Ingredients
While this is definitely an indulgent dessert, some of the ingredients do offer nutritional benefits.
Let me be honest: this is a treat, not health food. However, enjoying special desserts as part of a balanced diet is totally fine.
- Eggs: Provide high-quality protein and essential vitamins like B12, riboflavin, and selenium that support metabolism and immune function.
- Butter: Contains fat-soluble vitamins A, D, E, and K, plus conjugated linoleic acid (CLA) which may have health benefits. Choose grass-fed butter for higher omega-3 content.
- Milk: Offers calcium for bone health, vitamin D, and protein. The whole milk in this recipe also helps with vitamin absorption.
- Vanilla extract: Contains small amounts of antioxidants and has been shown to have calming properties.
- Flour: While refined, all-purpose flour provides energy and some B vitamins and iron (if enriched).
FAQs About Mastro’s Butter Cake
1. Can I make this cake ahead of time?
Absolutely! This cake actually improves when made a day ahead. Bake and glaze it as directed, then let it cool completely before covering tightly. Store at room temperature for up to 24 hours or refrigerate for up to 3 days. Reheat individual slices just before serving for that fresh-from-the-oven experience.
2. Why is my butter cake dense instead of light and fluffy?
The most common cause is not creaming the butter and sugar long enough. You need a full 5 minutes of creaming to incorporate enough air. Another culprit is adding cold ingredients, which can deflate the batter. Finally, overmixing after adding the flour develops too much gluten, making the cake tough.
3. Can I use salted butter instead of unsalted?
You can, but I don’t recommend it. Salted butter varies widely in salt content between brands, making it hard to control the overall saltiness. If you must use salted butter, omit the salt called for in the recipe and taste the batter before baking to see if it needs adjustment.
4. What if I don’t have a springform pan?
You can use a regular 9-inch round cake pan, but line the bottom with parchment and butter the sides very generously. After cooling for 30 minutes, run a knife around the edge and carefully invert onto a plate, then flip right-side-up onto your serving plate. The presentation won’t be quite as neat, but it will still taste amazing.
5. How do I know when the cake is done?
The top should be golden brown and spring back when lightly pressed. A toothpick inserted in the center should come out clean or with just a few moist crumbs (not wet batter). The edges will pull away slightly from the pan. If the top is browning too quickly but the center isn’t done, tent loosely with foil and continue baking.
Final Thoughts
This Mastro’s Butter Cake has become one of my signature desserts, the one everyone requests for birthdays and celebrations. There’s something magical about recreating a restaurant favorite at home, especially one as beloved as this.
The first time you pull this cake from the oven, pour that warm glaze over top, and watch it soak in, you’ll understand why people pay premium prices for this dessert at steakhouses. Every bite delivers buttery richness, tender crumb, and those addictive caramelized edges.
Give this recipe a try for your next special dinner. I’d love to hear how it turns out for you and any creative variations you come up with. Drop a comment below and share your experience!
Recommended:
- Apple Pie Recipe
- Sugar Cookies Recipe
- Pumpkin Roll Recipe
- Eggnog Cookies Recipe
- Fruit Cocktail Cake Recipe
- Hot Chocolate Bombs Recipe
- Peanut Butter Fudge Recipe
- Gingerbread Cookie Recipe
- Amish Apple Cake Recipe
- Healthy Chocolate Chip Cookies Recipe