
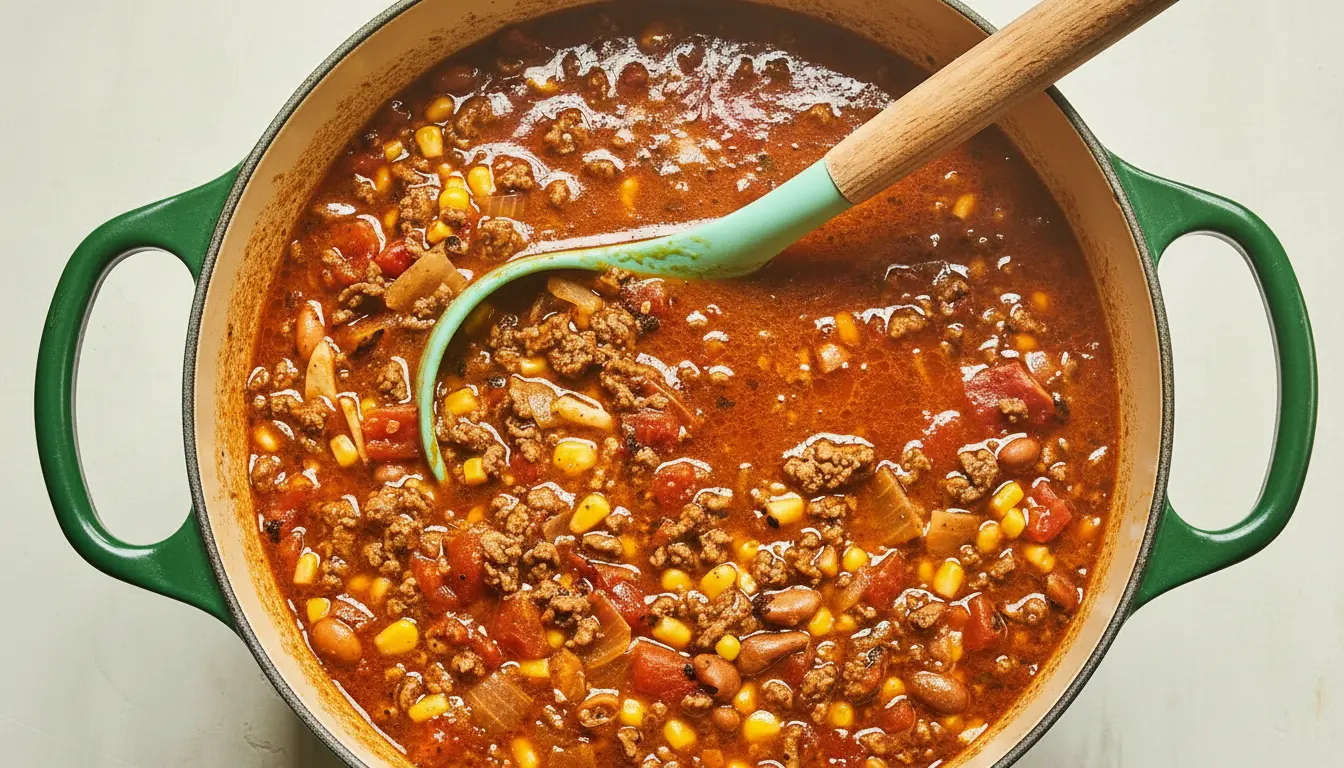
I never planned to become obsessed with taco soup, but here we are. It all started on a chilly October evening when I had a pound of ground beef thawing on the counter and zero motivation to cook anything elaborate.
I remember staring into my pantry, spotting a can of diced tomatoes, some black beans, and a packet of taco seasoning that had been sitting there for months. What if I just threw everything into one pot and called it dinner? That spontaneous decision turned into what’s now my most-requested taco soup recipe, and I’ve been making variations of it at least twice a month ever since.
The beauty of this soup is that it tastes like you’ve been simmering it all day, but it’s actually ready in under 40 minutes. My kids devour it (even the picky one who claims to hate beans), my husband asks for seconds every single time, and I love that I can customize it based on what’s lurking in my fridge and pantry.
| Quick Recipe Summary | |
|---|---|
| Prep Time | 10 minutes |
| Cook Time | 25 minutes |
| Total Time | 35 minutes |
| Servings | 8 servings |
| Difficulty Level | Easy |

Why You’ll Love This Taco Soup Recipe
This isn’t just another soup recipe. It’s the kind of meal that saves weeknight sanity while making you look like a kitchen rockstar.
First, it’s ridiculously forgiving. Forgot to buy corn? Leave it out. Only have kidney beans instead of black beans? Throw them in. The flavor base is so robust that substitutions barely make a dent in the final result.
You might also enjoy: Slow Cooker Chili Recipe
Here’s why this soup has earned its spot in my regular rotation:
- One-pot wonder: Everything cooks in a single pot, which means minimal cleanup. On busy nights, that’s a huge win.
- Budget-friendly: Most ingredients are pantry staples, and you can easily feed a crowd for under $15.
- Meal prep champion: This soup actually tastes better the next day, making it perfect for Sunday meal prep.
- Customizable toppings: The real magic happens when everyone gets to build their own bowl with toppings. It turns dinner into an interactive experience that even reluctant eaters enjoy.
- Freezer-friendly: I always make a double batch and freeze half for those nights when cooking feels impossible.
- Nutritious and filling: Packed with protein, fiber, and vegetables, this soup keeps you satisfied for hours without feeling heavy.
Ingredients
This soup comes together with simple, everyday ingredients that you probably already have on hand. I’ve learned through trial and error which brands and types work best, so I’m sharing those insights here.
- 1 ½ pounds (680g) ground beef: I use 85/15 for the best flavor without too much grease. Ground turkey or chicken works too, but beef gives that authentic taco taste.
- 1 medium yellow onion, diced (about 1 cup/150g): Don’t skip this. The onion adds essential depth and sweetness.
- 3 cloves garlic, minced: Fresh is best here. That 30 seconds of mincing makes a real difference.
- 1 packet (1 oz/28g) taco seasoning: Store-bought is fine, but homemade is even better if you have time.
- 1 packet (1 oz/28g) ranch dressing mix: This is my secret weapon. It adds a creamy, tangy undertone that people can never quite identify but always love.
- 1 can (15 oz/425g) black beans, drained and rinsed: I prefer black beans for their texture, but pinto beans work beautifully too.
- 1 can (15 oz/425g) pinto beans, drained and rinsed: Using two types of beans adds textural variety.
- 1 can (15 oz/425g) corn, drained: Frozen corn (about 1 ½ cups) works just as well and sometimes tastes even sweeter.
- 1 can (14.5 oz/411g) diced tomatoes: Fire-roasted adds smoky depth, but regular works fine.
- 1 can (10 oz/283g) diced tomatoes with green chilies: Rotel is my go-to brand. Use mild if you’re feeding kids, original for a bit of kick.
- 1 can (8 oz/227g) tomato sauce: This thickens the broth and adds richness.
- 4 cups (960ml) beef broth: Low-sodium gives you control over the salt level. Chicken broth works in a pinch.
- 1 cup (240ml) water: Adjust this based on how thick or thin you like your soup.
- Salt and black pepper to taste: Start with ½ teaspoon of each and adjust after simmering.
- Optional toppings: Shredded cheddar cheese, sour cream, tortilla chips, diced avocado, sliced jalapeños, chopped cilantro, lime wedges, sliced green onions
Kitchen Equipment Needed
Having the right tools makes this recipe even easier. You don’t need anything fancy, but these items will streamline the process.
- Large Dutch oven or soup pot (at least 6 quarts/5.7 liters): A heavy-bottomed pot distributes heat evenly and prevents scorching. My Le Creuset gets used for this soup at least twice a week.
- Wooden spoon or sturdy spatula: For breaking up the ground beef and stirring without scratching your pot.
- Sharp chef’s knife: Makes chopping the onion quick and safe.
- Cutting board: I prefer a large one so the chopped onion doesn’t fall off the sides.
- Can opener: Unless you’re buying cans with pull tabs.
- Measuring cups and spoons: For accuracy, especially with the seasoning packets.
- Ladle: Makes serving so much easier than trying to pour soup from the pot.
- Storage containers: For leftovers and meal prep. Glass containers with tight lids are my favorite.
Recommended Products for This Recipe
After making this soup countless times, I’ve found a few products that genuinely make the process easier and the results better. These aren’t necessary, but they’re worth considering if you make soup regularly.
1. Le Creuset Enameled Cast Iron Dutch Oven
This pot has become my absolute workhorse in the kitchen. The heavy cast iron distributes heat perfectly, which means your ground beef browns evenly and nothing sticks to the bottom. The enameled interior makes cleanup incredibly easy, even with tomato-based soups that usually stain everything. I’ve had mine for seven years, and it still looks nearly new.
2. Fire-Roasted Diced Tomatoes
Once I discovered fire-roasted tomatoes, I never went back to regular. The smoky depth they add to this soup is subtle but noticeable. Muir Glen makes my favorite organic version, and the quality is consistently excellent. That extra dollar or two per can is absolutely worth it for the flavor boost.
3. Better Than Bouillon Beef Base
While canned or boxed broth works fine, Better Than Bouillon has changed my soup game. You can control the strength of the flavor, it takes up way less storage space, and it adds a richer, more concentrated beef flavor than standard broth. One jar lasts me months and costs less than buying multiple cartons of broth.
4. OXO Good Grips 3-Piece Wooden Utensil Set
I burned through several cheap wooden spoons before investing in this set. The angled edges help you scrape up all those flavorful brown bits from the bottom of the pot, and they’re comfortable to hold during the entire cooking process. They won’t scratch your cookware and can handle high heat without any issues.
This pairs beautifully with my crockpot beef stew for meal prepping hearty winter dinners.

Step-by-Step Instructions: How to Make Taco Soup
I’ve walked several friends through making this soup over video calls, so I know exactly where people get confused. These detailed instructions will help you nail it on your first try.
1. Brown the Ground Beef
- Heat your Dutch oven or large pot over medium-high heat. You don’t need to add oil since the beef will release its own fat.
- Add the ground beef to the hot pot, breaking it up with your wooden spoon or spatula as it cooks.
- Continue breaking the meat into small crumbles as it browns. I aim for pieces about the size of a dime. This takes about 7-8 minutes.
- The beef is done when no pink remains and it’s nicely browned. Some darker, caramelized bits are actually good because they add flavor.
- If there’s more than 2 tablespoons of fat in the pot, drain the excess. I usually tilt the pot and spoon out the extra grease. Too much fat will make your soup greasy, but a little adds flavor.
2. Sauté the Aromatics
- Without cleaning the pot (those browned bits are flavor gold), add the diced onion to the cooked beef.
- Reduce heat to medium and cook the onion for about 4-5 minutes, stirring occasionally. You want it softened and translucent, not browned.
- The onion will release moisture that helps loosen those flavorful browned bits stuck to the bottom of the pot. Scrape them up with your spoon.
- Add the minced garlic and cook for just 30-60 seconds, stirring constantly. Garlic burns easily, so don’t walk away during this step.
- You’ll know it’s ready when you can smell the garlic, it’s fragrant and slightly golden.
3. Add the Seasoning
- Sprinkle the taco seasoning and ranch dressing mix over the beef and onion mixture.
- Stir everything together thoroughly, making sure the seasonings coat all the meat. This should take about 30 seconds.
- Let the seasonings cook with the meat for about 1 minute. This step, called “blooming” the spices, intensifies their flavors and removes any raw, powdery taste.
- The mixture will look dry and the spices will smell incredibly fragrant. That’s exactly what you want.
4. Add the Canned Ingredients
- Pour in both types of beans (black and pinto), making sure they’re well drained and rinsed. Rinsing removes excess sodium and that thick bean liquid that can make soup cloudy.
- Add the corn, drained as well. If using frozen corn, no need to thaw it first.
- Open all three tomato products: diced tomatoes, diced tomatoes with green chilies, and tomato sauce. Pour them in with all their juices.
- Don’t stir yet. Just let everything layer in the pot for now.
Read Also: Cheeseburger Soup Recipe
5. Add the Liquids and Simmer
- Pour in the beef broth and water. The liquid should just about cover all the ingredients. If it doesn’t, add a bit more water.
- Now give everything a good stir, making sure to scrape the bottom of the pot again to release any stuck bits.
- Increase the heat to medium-high and bring the soup to a boil. This usually takes 5-7 minutes depending on your stove.
- Once it’s boiling (you’ll see large bubbles breaking the surface), reduce the heat to low or medium-low.
- Let the soup simmer gently, uncovered, for 15-20 minutes. You want small bubbles occasionally breaking the surface, not a rolling boil.
- Stir every 5 minutes or so to prevent sticking and ensure even cooking.
- The soup is done when all the flavors have melded together and it’s heated through completely. The vegetables should be tender and the broth should have thickened slightly.
6. Season to Taste
- Taste the soup carefully (it will be hot). This is the most important step that many people skip.
- Add salt and black pepper as needed. I usually start with ½ teaspoon of salt and ¼ teaspoon of pepper, then adjust.
- Remember that the taco seasoning and ranch mix already contain salt, so you might not need much additional salt.
- If the soup tastes a bit flat, a squeeze of fresh lime juice can brighten everything up. I learned this trick from a Mexican restaurant cook.
- If it’s too spicy for your kids, stir in a dollop of sour cream to mellow the heat.
7. Serve with Toppings
- Ladle the hot soup into bowls. I like to fill them about three-quarters full to leave room for toppings.
- Set out all your toppings in small bowls so everyone can customize their bowl.
- My personal favorite combination is shredded cheddar, a dollop of sour cream, crushed tortilla chips, diced avocado, and a squeeze of lime.
- The toppings aren’t just garnish. They add textural contrast and fresh flavors that make each bite interesting.

Tips for The Best Taco Soup
I’ve made this soup dozens of times and learned these lessons the hard way so you don’t have to. These tips will take your soup from good to absolutely phenomenal.
- Don’t skip draining and rinsing the beans: That viscous liquid in canned beans contains excess sodium and can make your soup cloudy and starchy. Taking 2 minutes to rinse them makes a noticeable difference in the final appearance and taste.
- Brown the beef properly: Patience here pays off. Let the beef get nice and brown before moving on. Those caramelized bits add incredible depth of flavor. If you stir it too frequently, it’ll steam instead of brown.
- Use low-sodium broth: This gives you complete control over the salt level. Between the taco seasoning, ranch mix, and canned ingredients, there’s already plenty of sodium in this recipe.
- Let it simmer: Don’t rush the simmering time. Those 15-20 minutes allow the flavors to meld together in a way that just doesn’t happen if you serve it immediately after adding the liquids.
- Make it ahead: This soup tastes even better the next day after the flavors have had time to marry. I often make it in the morning and reheat it for dinner.
- Adjust the consistency: Like it thicker? Simmer it longer uncovered or mash some of the beans against the side of the pot. Prefer it brothier? Add more beef broth or water.
- Fresh lime juice is key: A squeeze of fresh lime right before serving brightens all the flavors. Bottled lime juice doesn’t have the same effect.
- Toast your tortilla chips: If you’re using tortilla strips or chips as a topping, toast them in the oven for a few minutes. They’ll stay crispier in the soup.
- Save your cheese rinds: If you have a Parmesan rind, toss it in while the soup simmers for extra umami depth. Fish it out before serving.
- Double the batch: This freezes beautifully, so there’s no reason not to make extra. Your future self will thank you.
Another favorite: Lasagna Soup Recipe
Serving Suggestions
Taco soup is incredibly versatile and pairs well with all sorts of sides. I’ve served it at casual family dinners, game day parties, and even packed it in thermoses for soccer games.
The soup is hearty enough to serve as a main course, but these accompaniments take it to the next level:
- Cornbread or Jiffy Spoon Bread: The slight sweetness complements the savory, spicy soup perfectly. I brush mine with butter and honey for extra indulgence.
- Tortilla chips or strips: Beyond just using them as a topping, serve a big bowl on the side for scooping and dipping. The contrast of crunchy and hot soup is addictive.
- Fresh Coleslaw: The cool, crunchy slaw cuts through the richness of the soup beautifully. It also adds freshness and vegetables.
- Quesadillas: Make simple cheese quesadillas on the side for dipping. Kids especially love this combination.
- Mexican rice or cilantro lime rice: If you want to make the meal more substantial, serve the soup over a scoop of rice in each bowl.
- Fresh salad: A simple green salad with lime vinaigrette keeps the meal feeling light despite the hearty soup.
- Warm flour tortillas: For a more casual presentation, serve warm tortillas on the side for tearing and dipping.
Variations of Taco Soup
One of my favorite things about this recipe is how adaptable it is. I’ve experimented with countless variations based on dietary needs, what’s in the pantry, and different flavor profiles.
- Slow Cooker Taco Soup: Brown the beef and sauté the onion and garlic as directed. Transfer to your slow cooker with all remaining ingredients. Cook on low for 6-8 hours or high for 3-4 hours. This method makes the soup even more hands-off.
- Instant Pot Taco Soup: Use the sauté function to brown the beef and aromatics right in the pot. Add remaining ingredients (using only 3 cups of broth), seal the lid, and cook on high pressure for 10 minutes. Quick release and adjust seasoning.
- White Chicken Taco Soup: Replace beef with 1 ½ pounds diced chicken breasts or thighs. Use white beans (cannellini or great northern) instead of black and pinto. Swap beef broth for chicken broth. Add a can of diced green chilies for extra flavor.
- Vegetarian/Vegan Version: Skip the meat entirely or substitute with plant-based ground meat. Use vegetable broth. Add an extra can of beans and some diced bell peppers for substance. Omit the ranch packet or use a vegan version.
- Spicy Version: Use hot taco seasoning and Rotel tomatoes with habaneros. Add diced jalapeños with the onion. Include a diced chipotle pepper in adobo sauce for smoky heat.
- Low-Carb/Keto: Skip the beans and corn. Double the meat and add riced cauliflower, diced zucchini, and bell peppers. Serve with cheese crisps instead of tortilla chips.
- Turkey Taco Soup: Substitute ground turkey for the beef. Add an extra tablespoon of oil when browning since turkey is so lean. The flavor is lighter but equally delicious.
- Green Chili Version: Add two cans of diced green chilies and use white beans instead of black beans. Top with Monterey Jack cheese and sour cream.
- Smoky Version: Add a teaspoon of smoked paprika with the seasonings and use fire-roasted tomatoes. A few drops of liquid smoke can also add depth.
- Loaded Version: Add diced bell peppers with the onions and throw in a diced poblano pepper for complexity. Stir in some cream cheese during the last 5 minutes for extra creaminess.
This works wonderfully alongside my Brunswick Stew for a Southern-inspired soup night.
Storage and Reheating
Proper storage makes this recipe even more convenient. I always make a double batch specifically so I have leftovers for the week.
Refrigerator Storage:
- Let the soup cool to room temperature before storing, but don’t leave it out for more than 2 hours for food safety.
- Transfer to airtight containers. Glass containers are my preference because they don’t absorb odors or stains.
- Store in the refrigerator for up to 5 days. The flavors actually improve over the first few days.
- Keep toppings separate and add them fresh when serving. Chips get soggy and cheese gets weird if stored with the soup.
Freezer Storage:
- Cool the soup completely before freezing.
- Portion into individual or family-sized freezer-safe containers or heavy-duty freezer bags. I like using bags because they stack flat and save space.
- Leave about an inch of headspace in containers since soup expands when frozen.
- Label with the date and contents. Frozen taco soup looks a lot like frozen chili after a few weeks.
- Freeze for up to 3 months. After that, the quality starts to decline, though it’s still safe to eat.
- For best results, freeze without the toppings. Add those fresh when serving.
Reheating Instructions:
- From refrigerator: Reheat on the stovetop over medium heat, stirring occasionally, until heated through (about 10 minutes). You can also microwave individual portions for 2-3 minutes, stirring halfway through.
- From frozen: Thaw overnight in the refrigerator for best results, then reheat as above. In a hurry? Reheat frozen soup over low heat on the stovetop, stirring frequently to prevent scorching. This takes about 20-25 minutes.
- Add a splash of broth or water when reheating if the soup has thickened too much during storage.
- Don’t refreeze previously frozen soup. The texture and quality suffer significantly.
Read Also: Pasta Fagioli Recipe

Nutritional Facts
These nutritional values are approximate and based on one serving (1/8 of the recipe) without toppings. Adding cheese, sour cream, tortilla chips, and avocado will increase the calories, fat, and sodium.
Per Serving (approximately 1 ½ cups):
- Calories: 320
- Total Fat: 12g
- Saturated Fat: 4g
- Cholesterol: 55mg
- Sodium: 950mg
- Total Carbohydrates: 28g
- Dietary Fiber: 7g
- Sugars: 6g
- Protein: 25g
- Vitamin A: 15% DV
- Vitamin C: 20% DV
- Calcium: 8% DV
- Iron: 25% DV
The high protein and fiber content make this soup particularly satisfying and filling. The beans contribute significant fiber, which supports digestive health and helps keep you full longer. Using lean ground beef keeps the saturated fat moderate while still delivering plenty of protein.
You can reduce sodium by using no-salt-added canned goods and making your own taco seasoning and ranch mix. This can cut the sodium by nearly half.
Health Benefits of Key Ingredients
Beyond just tasting incredible, this soup actually packs some serious nutritional benefits. I love that I can feel good about serving this to my family regularly.
Ground Beef:
Ground beef is an excellent source of complete protein, containing all nine essential amino acids your body needs. It’s rich in iron, particularly heme iron which is more easily absorbed than the iron found in plant sources. Beef also provides vitamin B12, zinc, and selenium. Choosing 85/15 ground beef balances flavor with a moderate fat content.
Beans:
Both black and pinto beans are nutritional powerhouses. They’re loaded with fiber, which supports digestive health and helps stabilize blood sugar levels. Beans provide plant-based protein and are rich in folate, magnesium, and potassium. The combination of protein and fiber makes them incredibly satiating.
Tomatoes:
Tomatoes are rich in lycopene, a powerful antioxidant that has been linked to reduced risk of heart disease and certain cancers. They’re also a good source of vitamin C, potassium, and vitamin K. Cooking tomatoes actually increases the bioavailability of lycopene, making canned tomatoes in this soup particularly beneficial.
Corn:
While often overlooked, corn provides lutein and zeaxanthin, antioxidants that support eye health. It contains B vitamins and is a source of fiber. The natural sweetness of corn also balances the acidity of the tomatoes in this soup.
Garlic and Onions:
These aromatics aren’t just about flavor. They contain compounds with potential antimicrobial and anti-inflammatory properties. Garlic is particularly rich in allicin, which may support heart health and immune function. Onions provide quercetin, an antioxidant with anti-inflammatory effects.
This hearty meal pairs well with my Italian Wedding Soup for a complete Italian-inspired dinner.
FAQs About Taco Soup
1. Can I make taco soup in advance?
Absolutely, and I actually recommend it. Taco soup tastes even better the next day after the flavors have had time to meld together. Make it up to 3 days ahead and store it in the refrigerator in an airtight container. Reheat gently on the stovetop or in the microwave, adding a splash of broth if it’s thickened too much. Just keep the toppings separate and add them fresh when serving.
2. What can I substitute for the ranch dressing mix?
If you don’t have ranch mix or prefer to skip it, you can make your own blend using dried herbs. Combine 1 tablespoon dried parsley, 1 teaspoon dried dill, 1 teaspoon garlic powder, 1 teaspoon onion powder, ½ teaspoon dried chives, and ¼ teaspoon black pepper. You could also simply omit it, though the soup will be missing that subtle tangy depth that makes people ask for your secret ingredient.
3. How can I make this soup thicker?
There are several easy ways to thicken taco soup. The simplest method is to simmer it longer uncovered, allowing some liquid to evaporate. You can also mash some of the beans against the side of the pot with your spoon, which releases their starches and naturally thickens the broth. For a quick fix, mix 2 tablespoons of cornstarch with 2 tablespoons of cold water to create a slurry, then stir it into the simmering soup and cook for another 5 minutes.
4. Can I freeze taco soup with all the toppings mixed in?
I don’t recommend freezing the soup with toppings already added. Cheese becomes grainy and separates when frozen and thawed. Sour cream can curdle. Tortilla chips will turn to mush. Avocado browns and loses its fresh texture. Always freeze the soup base only and add fresh toppings after reheating for the best taste and texture.
5. What’s the best way to reduce the sodium in this recipe?
The easiest way to cut sodium is using no-salt-added canned tomatoes, beans, and corn. Choose low-sodium or sodium-free beef broth. Make your own taco seasoning (combine chili powder, cumin, paprika, garlic powder, onion powder, and a small amount of salt to your taste). Look for reduced-sodium ranch dressing mix, or make your own using the herb blend I mentioned earlier. These simple swaps can reduce the sodium content by nearly 50%.
Read Also: Zuppa Toscana Recipe
Final Thoughts
This taco soup recipe has become more than just a meal in my house. It’s comfort in a bowl, it’s the dinner I turn to when I need something reliable and satisfying.
I hope it brings the same warmth and joy to your table that it brings to mine. Give it a try, make it your own with your favorite toppings and variations, and don’t be surprised when it becomes a regular request in your household too. I’d love to hear how it turns out for you and what creative variations you come up with!
Recommended:
- Chicken Gnocchi Soup Recipe
- Creamy Tomato Basil Soup Recipe
- Beef Barley Soup Recipe
- Lentil and Vegetable Soup Recipe
- Easy Chicken Noodle Soup Recipe
- Carrot Ginger Soup Recipe
- Roasted Butternut Squash Soup Recipe
- Panera Broccoli Cheddar Soup Recipe
- Avgolemono Soup Recipe
- Matzo Ball Soup Recipe


