
Making sourdough bread from scratch doesn’t have to be a multi-day marathon. This Same Day Sourdough Bread Recipe proves that you can enjoy a crusty, golden loaf with that signature tangy flavor in just one day.
I discovered this method about two years ago during one of those frantic Sunday mornings when I realized I’d forgotten to start my usual sourdough the day before. My kids had been begging for fresh bread with dinner, and panic set in until I remembered reading about faster sourdough techniques.
After some trial and error (including one memorable flat loaf that became excellent croutons), I finally nailed down this recipe that delivers bakery-quality bread without the overnight wait.
| Quick Recipe Summary | |
|---|---|
| Prep Time | 30 minutes |
| Cook Time | 45 minutes |
| Total Time | 7 hours |
| Servings | 1 large loaf (about 12 slices) |
| Difficulty Level | Moderate |
This recipe pairs perfectly with my Healthy Hummus Recipe for an amazing snack board.
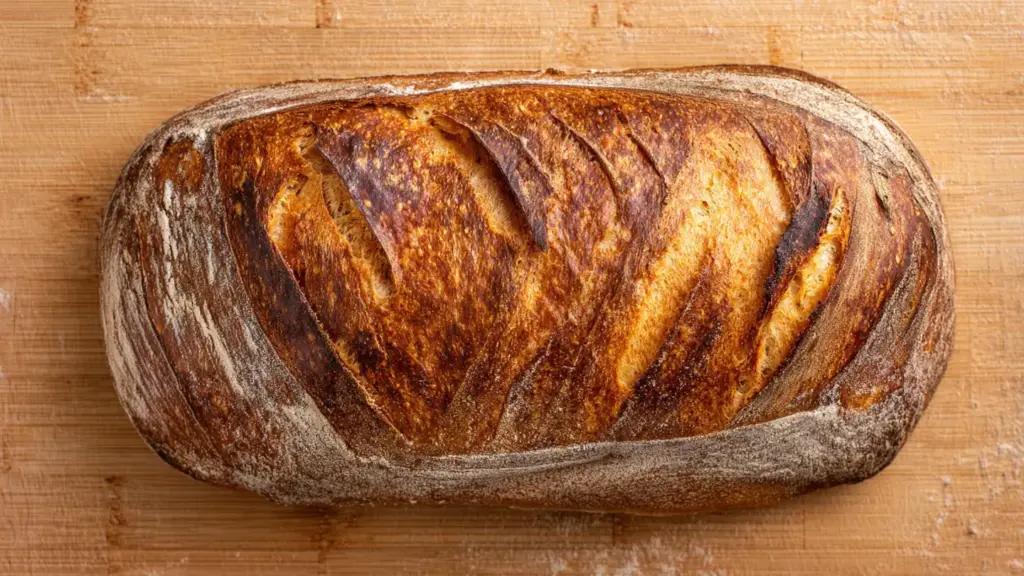
_result.jpg "Same Day Sourdough Bread Recipe - Beginner Friendly Homemade Bread")
Why You’ll Love This Same Day Sourdough Bread Recipe
You can have fresh, homemade sourdough on the table in time for dinner without sacrificing that authentic flavor and texture. No more planning your baking schedule two days in advance.
The crust develops that beautiful golden-brown color and satisfying crunch while the inside stays soft and airy with those coveted irregular holes. My family says the texture rivals any overnight sourdough they’ve tasted.
This method is perfect for beginner bakers who find traditional sourdough schedules intimidating. You’ll actually see and understand each stage of fermentation happening in real time, which makes the whole process less mysterious and more manageable.
The recipe uses a higher ratio of starter to flour, which speeds up fermentation without requiring commercial yeast. You’re still getting all the probiotic benefits and easier digestibility that make sourdough so healthy.
What makes this recipe special:
- Achieves proper fermentation in just 4-5 hours instead of 12-18
- Creates a crispy crust and chewy interior with beautiful air pockets
- Works with standard kitchen equipment (no banneton basket required)
- Forgiving enough for beginners but impressive enough for experienced bakers
- Produces a mild, slightly tangy flavor that even sourdough skeptics love
- Uses simple ingredients you probably already have in your pantry
You might also enjoy: Einkorn Bread Recipe
Ingredients
This recipe relies on just four simple ingredients, but the quality of your sourdough starter and bread flour will make a noticeable difference in your final loaf. I learned this the hard way when I tried using all-purpose flour and ended up with a denser, less structured bread.
- 150g (3/4 cup) active sourdough starter, bubbly and doubled in size
- 350g (1 1/2 cups) warm water (around 80-85°F/27-29°C)
- 500g (4 cups) bread flour
- 10g (2 teaspoons) sea salt
Read Also: Healthy Banana Bread Recipe
Kitchen Equipment Needed
Having the right tools makes this process smoother, though you can absolutely make do with what you have. I started with just a mixing bowl and my hands before gradually adding specialized equipment over time.
- Large mixing bowl
- Kitchen scale (highly recommended for accuracy)
- Bench scraper or dough scraper
- Clean kitchen towel or plastic wrap
- Dutch oven with lid (5-7 quart size)
- Parchment paper
- Sharp knife or bread lame for scoring
- Instant-read thermometer (optional but helpful)
- Cooling rack
Another favorite: Vasilopita Bread Recipe
Recommended Products for This Recipe
Over the years of making sourdough weekly, I’ve found a few products that genuinely improve the final result and make the process more enjoyable. These aren’t essential, but they’ve become staples in my kitchen.
1. Lodge Enameled Cast Iron Dutch Oven
This is the single most important investment for home sourdough baking. The heavy lid traps steam during the first half of baking, creating that crispy, bakery-style crust that’s impossible to achieve in a regular oven. Mine has survived hundreds of loaves and still looks nearly new.
2. King Arthur Bread Flour
Not all bread flours are created equal, and this one consistently gives me the best oven spring and crumb structure. The higher protein content (around 12.7%) creates a stronger gluten network that holds those beautiful air pockets.
3. OXO Good Grips Dough Scraper
I resisted buying a bench scraper for months, thinking my hands were good enough. This inexpensive tool changed everything about how I handle dough. It makes shaping cleaner, helps with stretch and folds, and scrapes your work surface spotless.
4. Professional Bread Lame
Scoring with a regular knife gave me jagged, uneven cuts that affected how my loaf expanded. A proper lame with a curved blade creates those beautiful ear formations that make sourdough look professionally made.
This pairs beautifully with my Healthy Guacamole Recipe for a delicious snack.
_result.jpg "Same Day Sourdough Bread Recipe | Cozy Comfort Food at Home")
Step-by-Step Instructions: How to Make Same Day Sourdough Bread
The key to success with this recipe is maintaining a warm environment and paying attention to dough development rather than watching the clock too closely. Every kitchen is different, so learn to read your dough.
1. Feed Your Starter the Night Before
- The evening before baking day (around 8-10 PM), feed your sourdough starter with equal parts flour and water.
- Use a 1:1:1 ratio if your starter is at room temperature (50g starter + 50g flour + 50g water).
- If pulling from the refrigerator, you may need two feedings to ensure it’s active enough.
- Place the jar in a warm spot (around 70-75°F/21-24°C) and let it ferment overnight.
- By morning, your starter should have doubled in size, smell pleasantly tangy, and be full of bubbles.
- Test readiness by dropping a small spoonful into water – it should float (the float test).
2. Mix the Dough
- In a large mixing bowl, combine the warm water and active sourdough starter.
- Whisk together until the starter is fully dissolved into the water (this helps it distribute evenly).
- Add the bread flour on top of the liquid.
- Sprinkle the salt over the flour (don’t add salt directly to the starter as it can inhibit fermentation).
- Using your hands or a wooden spoon, mix everything together until no dry flour remains.
- The dough will look shaggy and rough at this stage – that’s completely normal.
- Cover the bowl with a damp kitchen towel or plastic wrap.
3. Autolyse Rest
- Let the dough rest covered for 30-60 minutes at room temperature.
- During this rest period, the flour absorbs the water and gluten begins developing on its own.
- This passive hydration makes the dough easier to work with and creates better texture.
- Don’t skip this step – it makes a significant difference in the final crumb.
4. Perform Stretch and Folds
- After the autolyse, you’ll perform a series of stretch and folds to build gluten structure.
- Wet your hands slightly to prevent sticking.
- Grab one edge of the dough and stretch it upward, then fold it over to the opposite side.
- Rotate the bowl 90 degrees and repeat the stretch and fold.
- Continue rotating and folding until you’ve worked all four sides of the dough.
- This constitutes one set of stretch and folds.
- Perform 3-4 sets total, spacing them 30 minutes apart.
- After each set, you’ll notice the dough becoming smoother, stronger, and more elastic.
5. Bulk Fermentation
- After your final stretch and fold, cover the dough and let it rise in a warm spot.
- Aim for a temperature around 75-78°F (24-26°C) – I use my oven with just the light on.
- The dough should increase in volume by about 50-75% and develop a smooth, slightly domed surface.
- Look for bubbles forming on the surface and around the edges.
- This typically takes 3-4 hours, but watch the dough, not the clock.
- The dough should feel lighter, airier, and jiggle slightly when you move the bowl.
- If you have a clear bowl, check the bottom for large air bubbles.
6. Shape the Dough
- Lightly flour your work surface and turn the dough out onto it.
- The dough should release easily and hold its shape somewhat.
- Using a bench scraper, gently pull the edges toward the center, creating a round shape.
- Flip the dough seam-side down.
- Cup your hands around the dough and use circular motions to create tension on the surface.
- The dough should tighten into a smooth ball with good surface tension.
- Don’t overwork it or you’ll deflate all those beautiful air bubbles.
7. Final Proof
- Line a bowl with a clean kitchen towel and dust it generously with flour (rice flour works best).
- Carefully transfer your shaped dough seam-side up into the bowl.
- Cover with the towel edges or plastic wrap.
- Let it proof for 1-2 hours at room temperature until puffy and increased in size.
- For the float test, gently press a floured finger into the dough – it should spring back slowly, leaving a slight indent.
- If you prefer a more sour flavor or need to delay baking, you can refrigerate it for 30 minutes to 1 hour.
8. Preheat the Dutch Oven
- About 30 minutes before baking, place your Dutch oven with the lid on in the oven.
- Preheat to 450°F (232°C).
- This high heat is crucial for achieving good oven spring.
- Make sure both the pot and lid get fully heated.
9. Score and Bake
- Cut a piece of parchment paper and place it on your work surface.
- Carefully turn your proofed dough out onto the parchment, seam-side down.
- Using a sharp knife or bread lame, score the top of the dough quickly and decisively.
- I usually make one long slash at a 45-degree angle, about 1/2 inch deep.
- Carefully remove the hot Dutch oven from the oven.
- Lift the parchment paper with the dough and lower it into the pot.
- Cover with the lid and place back in the oven.
- Bake covered for 30 minutes.
- Remove the lid and continue baking for 15-20 minutes until deeply golden brown.
- The internal temperature should reach 205-210°F (96-99°C).
10. Cool and Enjoy
- Using oven mitts, carefully remove the loaf from the Dutch oven.
- Transfer to a cooling rack immediately.
- Resist the temptation to cut into it right away – the interior is still cooking from residual heat.
- Let it cool for at least 1 hour before slicing (I know it’s hard!).
- Listen for the crackling sound as the crust cools – that’s the sign of a perfect bake.
For a lighter option, try: Healthy Coleslaw Recipe
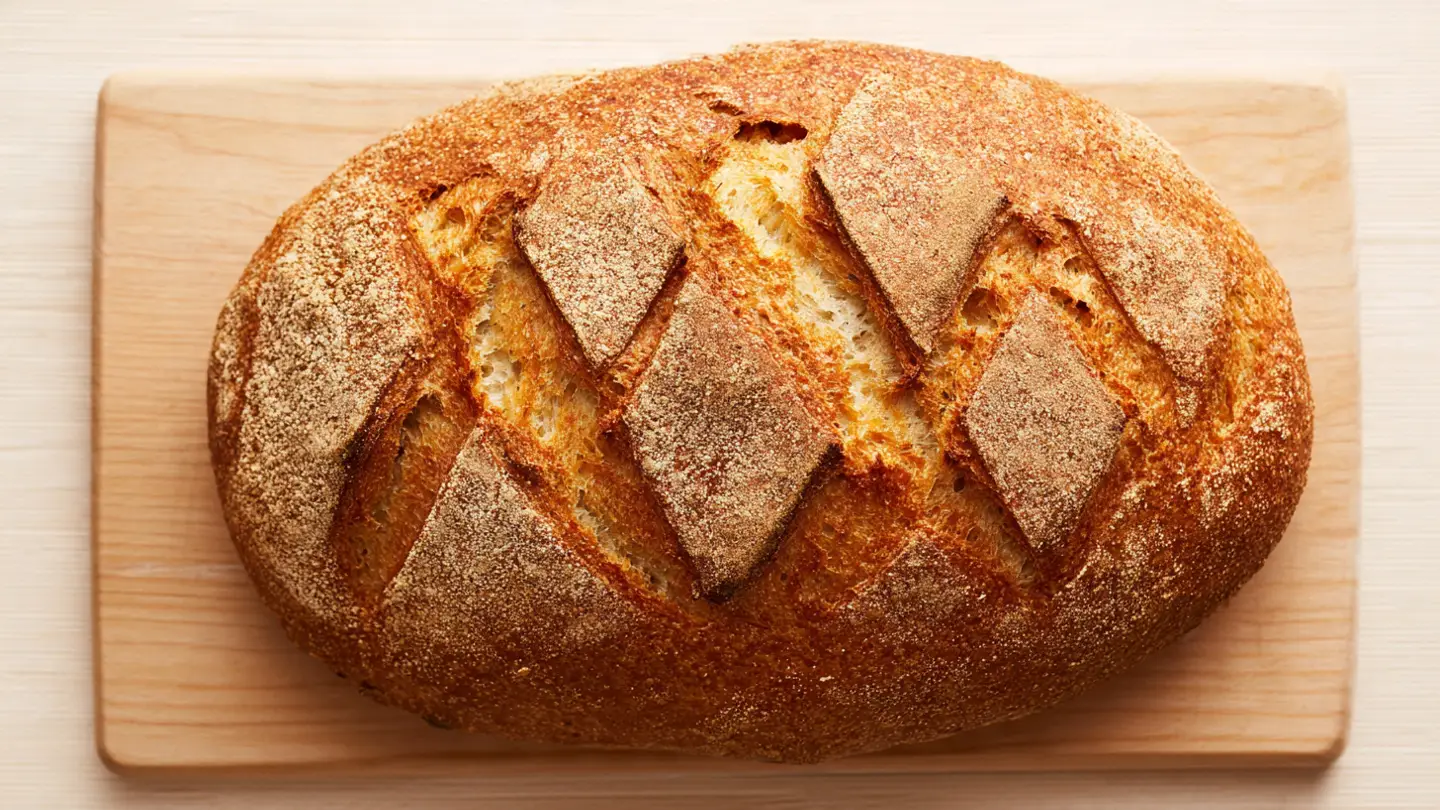
_result.jpg "Same Day Sourdough Bread Recipe - Quick & Easy Artisan Baking")
Tips for The Best Same Day Sourdough Bread
These tips come from countless batches and plenty of learning experiences. Following them will help you avoid the mistakes I made along the way.
Starter preparation tips:
- Always use your starter at peak activity when it’s bubbly and has doubled – using it too early or after it’s collapsed will result in poor rise
- Keep your starter at room temperature the day before baking for more predictable timing
- If your starter is sluggish, try two feedings 12 hours apart before baking day
- A healthy starter should smell pleasantly tangy and yeasty, never overly sour or acetone-like
Temperature control:
- Dough temperature is everything in same-day sourdough – aim to keep it between 75-78°F throughout bulk fermentation
- Use warm (not hot) water to help maintain ideal temperature
- Find warm spots in your home: oven with light on, near (not on) a heating vent, or inside a turned-off microwave with a cup of just-boiled water
- In cold weather, I wrap my bowl in a kitchen towel for extra insulation
- Check dough temperature with an instant-read thermometer if you have one
Shaping and handling:
- Don’t add too much flour during shaping – just enough to prevent sticking
- Wet hands work better than floured hands for stretch and folds
- Handle the dough gently after bulk fermentation to preserve air bubbles
- Good surface tension during shaping helps the bread rise upward instead of spreading
Baking perfection:
- Score decisively and quickly – hesitation leads to jagged cuts
- Don’t open the oven door during the covered baking phase
- If your crust is browning too quickly, reduce oven temperature to 425°F for the final uncovered bake
- For an extra-crispy crust, turn off the oven and leave the bread inside with the door cracked for 5 minutes after baking
You might also enjoy: Sweet Potato Bread Recipe
What to Serve with Same Day Sourdough Bread
Fresh sourdough is incredibly versatile and pairs beautifully with both sweet and savory dishes. Here are my family’s favorite pairings.
This bread shines at breakfast toasted with butter and jam, or used for French toast that’s crispy on the outside and custardy inside. The tangy flavor balances sweet toppings perfectly.
For lunch or dinner, slice it thick for sandwiches, serve it alongside soups and stews, or tear it into chunks for dipping in olive oil and balsamic vinegar. The sturdy crust holds up to hearty toppings without getting soggy.
Perfect accompaniments:
- Asparagus Soup with a thick slice for dipping
- Roasted Tomato Soup for the ultimate comfort meal
- Healthy Bruschetta piled high on toasted slices
- Deviled Eggs for an elegant appetizer spread
- Lentil Soup for a satisfying, protein-rich lunch
- Any of my chicken salad variations for hearty sandwiches
- Grilled cheese sandwiches with the ultimate crispy exterior
- Avocado toast with everything bagel seasoning
- Bread pudding or panzanella salad using day-old slices
Read Also: Old Fashioned Pumpkin Bread Recipe
Variations of Same Day Sourdough Bread
Once you’ve mastered the basic recipe, these variations keep things interesting without adding complexity. I rotate through them depending on what I’m serving the bread with.
Flavor additions:
- Herbs and garlic: Add 2 tablespoons chopped fresh rosemary and 3 minced garlic cloves during the final stretch and fold
- Everything bagel: Brush the scored loaf with an egg wash and sprinkle generously with everything bagel seasoning before baking
- Cheese and jalapeño: Fold in 1 cup shredded sharp cheddar and 2 diced jalapeños after bulk fermentation
- Olive and sun-dried tomato: Mix in 1/2 cup chopped olives and 1/3 cup chopped sun-dried tomatoes during shaping
- Cinnamon raisin: Add 1 tablespoon cinnamon to the flour and fold in 1 cup raisins after the autolyse
Whole grain versions:
- Replace up to 100g of bread flour with whole wheat flour for a nuttier flavor (may need 10-20g more water)
- Try 50g rye flour for authentic artisan flavor and a denser crumb
- Substitute 75g bread flour with whole grain spelt for easier digestibility
Shape variations:
- Divide dough into 6 portions for individual sourdough rolls (reduce baking time to 25-30 minutes)
- Shape into a batard (oval) instead of a boule for easier sandwich slicing
- Make focaccia by pressing the dough into an oiled baking sheet and dimpling the surface before the final proof
For more bread inspiration, try: Cracklin Bread Recipe
Storage and Reheating
Proper storage is crucial for maintaining that perfect crust and soft interior. Here’s what I’ve learned works best.
Store completely cooled bread at room temperature in a paper bag or bread box for up to 3 days. Never store sourdough in plastic bags at room temperature – the moisture gets trapped and turns the crust soft and chewy instead of crispy.
For longer storage, slice the bread and freeze it in a freezer-safe bag for up to 3 months. I like to separate slices with parchment paper so I can grab just what I need without thawing the entire loaf.
Storage guidelines:
- Day 1-2: Keep cut-side down on a cutting board at room temperature for the crispiest crust
- Day 2-3: Transfer to a paper bag or bread box to prevent excessive drying
- Never refrigerate sourdough – it accelerates staling and ruins the texture
- Freeze slices individually on a baking sheet before transferring to bags to prevent them from sticking together
- Wrap whole loaves tightly in plastic wrap, then aluminum foil before freezing
Reheating methods:
- Toast individual slices directly from frozen for breakfast
- Refresh a whole loaf by sprinkling with water and heating at 350°F for 10 minutes
- Thaw frozen slices at room temperature for 15 minutes before using in sandwiches
- For day-old bread, slice and toast it or make croutons, bread pudding, or panzanella
- Revive stale bread by wrapping it in a damp kitchen towel and microwaving for 10-15 seconds
This pairs beautifully with my Shrimp Chowder Recipe for a complete meal.
_result.jpg "Same Day Sourdough Bread Recipe | Fresh & Flavorful Loaf in Hours")
Nutritional Facts
Per slice (1/12 of loaf):
- Calories: 182
- Carbohydrates: 38g
- Protein: 6g
- Fat: 0.5g
- Saturated Fat: 0.1g
- Sodium: 390mg
- Fiber: 2g
- Sugar: 0.2g
- Calcium: 10mg
- Iron: 2mg
Nutritional highlights:
Sourdough’s fermentation process breaks down gluten and phytic acid, making nutrients more bioavailable and the bread easier to digest compared to regular bread. The natural fermentation also creates beneficial probiotics and prebiotics that support gut health.
The longer fermentation time (even in this faster version) reduces the glycemic index compared to commercial bread, meaning it won’t spike your blood sugar as dramatically. This makes it a better choice for maintaining steady energy levels throughout the day.
You might also enjoy: Healthy Chocolate Chip Cookies Recipe
Health Benefits of Key Ingredients
Each ingredient in this bread contributes specific health benefits beyond just great taste. Understanding these benefits helps you appreciate why homemade sourdough is worth the effort.
The fermentation process is where the magic happens. Wild yeast and beneficial bacteria break down complex carbohydrates and proteins, making the bread more digestible than commercially yeasted bread.
Key benefits:
- Sourdough starter: Contains beneficial probiotics that support digestive health and may improve nutrient absorption, reduce inflammation, and strengthen immune function
- Bread flour: Provides high-quality protein (about 6g per slice) essential for muscle repair and satiety, plus B vitamins for energy metabolism
- Natural fermentation: Reduces phytic acid by up to 70%, allowing your body to absorb more minerals like iron, zinc, and magnesium from the flour
- Lower glycemic index: The acetic acid produced during fermentation slows down the rate at which glucose enters the bloodstream, helping maintain stable blood sugar
- Easier on gluten sensitivity: While not safe for celiacs, many people with mild gluten sensitivity tolerate sourdough better because fermentation partially breaks down gluten proteins
- Increased antioxidants: The fermentation process actually increases the antioxidant content compared to unfermented bread
- Prebiotic fiber: Feeds beneficial gut bacteria and supports overall digestive health
- No preservatives or additives: Unlike store-bought bread, you control exactly what goes into your loaf
For a lighter option, try: Healthy Carrot Cake Recipe
FAQs About Same Day Sourdough Bread
1. Can I make this recipe without a Dutch oven?
Yes, though the results won’t be quite as good. A Dutch oven creates a steamy environment that helps develop that crispy, golden crust.
If you don’t have one, bake the bread on a preheated baking stone or heavy baking sheet and create steam by placing a metal pan on the bottom oven rack and adding boiling water to it when you put the bread in. Cover the loaf loosely with aluminum foil for the first 20 minutes.
2. Why didn’t my bread rise properly?
The most common reason is an inactive or weak starter. Make sure your starter has doubled in size and passes the float test before using it.
Other factors include dough temperature that’s too cold (below 70°F slows fermentation dramatically), under-fermentation during bulk rise, or old flour with low protein content. Environmental temperature makes a huge difference in same-day sourdough.
3. How can I make my sourdough more or less sour?
For less sour flavor, use a higher ratio of starter (which shortens fermentation time), maintain warmer dough temperatures, and skip the cold proofing step. Feed your starter more frequently to keep it mild.
For more tang, reduce the starter amount slightly, use cooler water, and refrigerate the shaped loaf for several hours before baking. A more mature, less frequently fed starter also creates more sour flavor.
4. Can I use all-purpose flour instead of bread flour?
You can, but bread flour is strongly recommended because its higher protein content (12-14% vs 9-11%) creates better gluten structure and oven spring. If using all-purpose flour, reduce the water by about 25g as it absorbs less liquid.
Your bread will have a softer, less chewy crumb and may not rise quite as dramatically. For best results, stick with bread flour or add 1 tablespoon vital wheat gluten per cup of all-purpose flour.
5. How do I know when bulk fermentation is complete?
Look for these signs: the dough has increased in volume by 50-75%, the surface looks smooth and slightly domed, you can see bubbles on the surface and sides, and when you tilt the bowl, the dough jiggles gently. The dough should feel lighter and airier than when you started.
If you have a clear bowl, check the bottom and sides for large, irregular bubbles. The poke test isn’t reliable during bulk fermentation, so focus on volume increase and bubble development instead.
Another favorite: Chocolate Chip Bread Recipe
Same Day Sourdough Bread
Ingredients
- 150 g active sourdough starter - 3/4 cup, bubbly and doubled in size
- 350 g warm water - 1 1/2 cups, 80-85°F or 27-29°C
- 500 g bread flour - 4 cups
- 10 g sea salt - 2 teaspoons
Equipment
- Large mixing bowl
- Kitchen scale - For accurate measurements
- Bench scraper or dough scraper
- Clean kitchen towel or plastic wrap
- Dutch oven with lid - 5-7 quart size
- Parchment paper
- Sharp knife or bread lame - For scoring
- Cooling rack
Method
- The evening before baking (8-10 PM), feed your sourdough starter using a 1:1:1 ratio (50g starter + 50g flour + 50g water). Place in a warm spot and let ferment overnight until doubled, bubbly, and passing the float test.
- In a large bowl, whisk together warm water and active starter until dissolved. Add bread flour and sprinkle salt over top, then mix until no dry flour remains.
- Cover bowl and let dough rest for 30-60 minutes at room temperature to allow flour to absorb water and gluten to begin developing.
- With wet hands, perform stretch and folds by grabbing one edge, stretching upward, and folding to opposite side. Rotate bowl 90 degrees and repeat. Complete 3-4 sets total, spacing them 30 minutes apart.
- Cover dough and let rise in a warm spot (75-78°F) for 3-4 hours until increased by 50-75% in volume with bubbles on surface and smooth, domed appearance.
- Turn dough onto lightly floured surface, gently pull edges toward center, flip seam-side down, and use circular motions to create surface tension into a tight ball.
- Place shaped dough seam-side up in a floured towel-lined bowl. Cover and proof for 1-2 hours at room temperature until puffy and slightly increased in size.
- About 30 minutes before baking, place Dutch oven with lid in oven and preheat to 450°F (232°C).
- Turn dough onto parchment paper seam-side down and score quickly with sharp knife at 45-degree angle, about 1/2 inch deep. Lower into hot Dutch oven using parchment, cover with lid, and bake 30 minutes. Remove lid and bake 15-20 minutes more until deeply golden (internal temp 205-210°F).
- Transfer bread to cooling rack immediately and let cool for at least 1 hour before slicing to allow interior to finish cooking.
Nutrition
Notes
- Starter must be at peak activity (doubled, bubbly, passing float test) for best results. If pulling from refrigerator, feed twice 12 hours apart before using.
- Dough temperature is critical – maintain 75-78°F throughout bulk fermentation. Use oven with light on, near heating vent, or microwave with cup of hot water.
- Watch the dough, not the clock. Rising times vary based on room temperature and starter strength.
- For less sour flavor, use warmer temperatures and skip cold proofing. For more tang, use cooler water and refrigerate shaped loaf 30 minutes to 1 hour.
- Rice flour works best for dusting proofing bowl as it prevents sticking better than wheat flour.
- Score decisively and quickly – hesitation leads to jagged cuts that affect oven spring.
- Store at room temperature in paper bag or bread box for 2-3 days. Never refrigerate as it accelerates staling.
- Freeze sliced bread for up to 3 months. Toast directly from frozen or thaw at room temperature.
- Day-old bread makes excellent croutons, bread pudding, or panzanella salad.
- Can substitute up to 100g bread flour with whole wheat or 50g with rye flour for different flavors (may need 10-20g more water).
Private Notes
Tried this recipe?
Let us know how it was!Final Thoughts
This Same Day Sourdough Bread Recipe has completely changed how I approach bread baking. Gone are the days of trying to remember what day I started my dough or frantically rearranging my schedule around baking times.
The first time you pull a perfectly golden, crusty loaf from your oven after just one day, you’ll understand why this recipe has become my go-to. The satisfaction of slicing into bread you made from four simple ingredients never gets old.
Give this recipe a try and experience the joy of fresh sourdough without the wait. I’d love to hear how your bake turns out – drop a comment below with your results or any questions!
Recommended:
- Air Fryer Banana Bread Recipe
- Starbucks Banana Bread Recipe
- Keto Banana Bread Recipe
- Banana Bread Recipe With No Eggs
- Sourdough Waffle Recipe
- Chicken Chowder Recipe
- Fish Chowder Recipe
- Manhattan Clam Chowder Recipe
- Shepherds Pie Recipe
- Baked Ziti Recipe

