
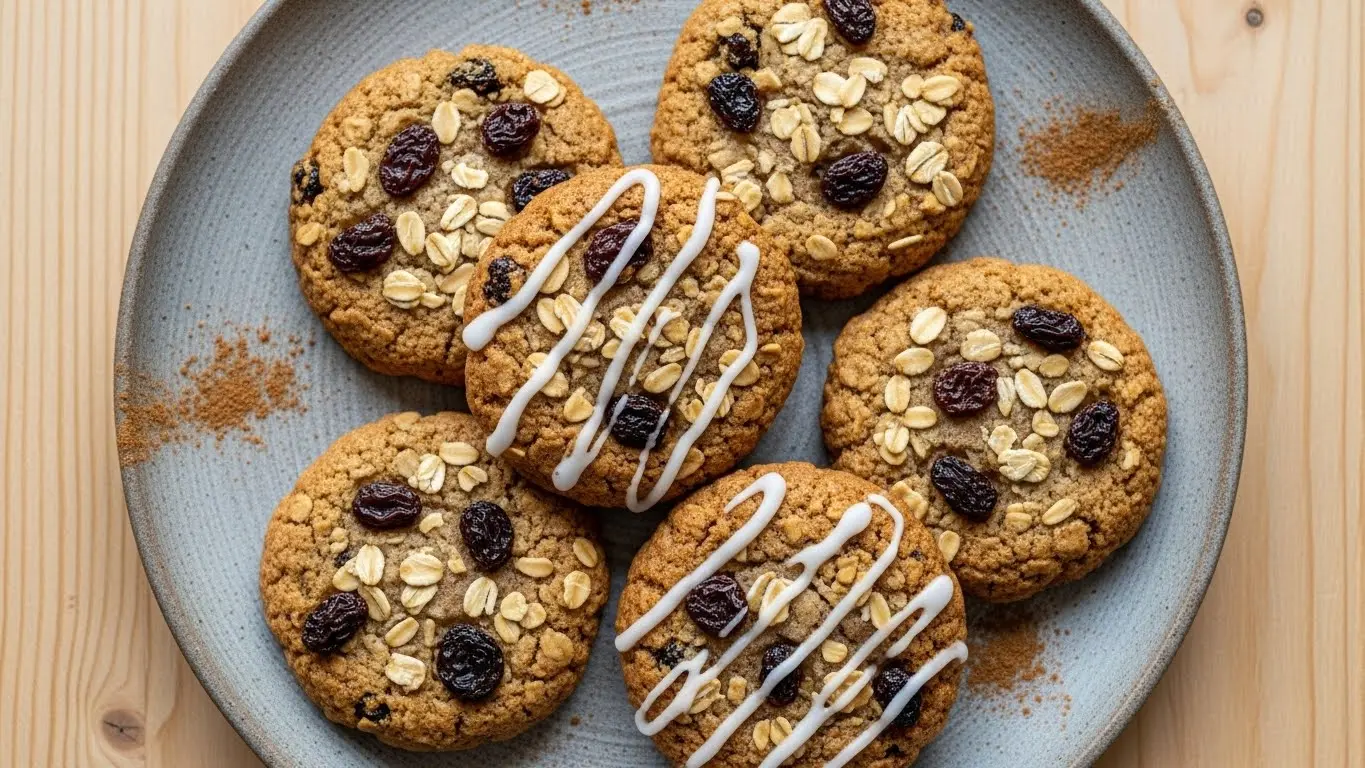
I’ll never forget the first time I attempted making oatmeal cookies from scratch. I was twelve years old, standing on a wobbly step stool in my grandmother’s kitchen, and I accidentally dumped in twice the amount of brown sugar the recipe called for.
Instead of panicking, my grandmother just smiled and said, “Well, we’ll call them extra sweet cookies.” Those cookies turned out to be the chewiest, most delicious things I’d ever tasted, and that happy accident taught me that the best oatmeal cookies recipe comes from understanding how each ingredient works together.
Fast forward twenty years, and I’ve baked these cookies hundreds of times. I’ve tweaked the ratios, tested different types of oats, and finally perfected a recipe that delivers chewy centers with slightly crisp edges every single time.
This oatmeal cookies recipe has become my go-to for everything from after-school snacks to holiday cookie exchanges.
| Quick Recipe Summary | |
|---|---|
| Prep Time | 15 minutes |
| Cook Time | 12 minutes |
| Total Time | 27 minutes |
| Servings | 24 cookies |
| Difficulty Level | Easy |

Why You’ll Love This Oatmeal Cookies Recipe
This isn’t just another cookie recipe. It’s the culmination of years of baking experiments, family feedback, and a deep love for the humble oat cookie.
The texture is absolutely perfect with chewy centers that stay soft for days and edges that have just enough crispness to provide contrast. The balance of sweetness is spot-on, not too sugary but enough to satisfy your sweet tooth without overwhelming the nutty oat flavor.
These cookies are incredibly versatile and forgiving. You can mix in raisins, chocolate chips, nuts, or dried cranberries, and they always turn out beautifully.
The ingredients are simple pantry staples. You probably have everything you need right now, which makes this recipe perfect for spontaneous baking sessions.
They stay fresh for over a week when stored properly. I’ve tested this extensively because my family tends to sneak cookies throughout the day, and they’re just as delicious on day seven as they are fresh from the oven.
Here’s what makes this recipe stand out:
- Perfect chewiness: The combination of butter, brown sugar, and the right amount of flour creates that ideal texture
- Customizable: Add your favorite mix-ins or keep them plain
- Beginner-friendly: Clear instructions that work every time
- Make-ahead option: The dough freezes beautifully for up to three months
- Crowd-pleaser: I’ve never met anyone who doesn’t love these cookies
Another favorite recipe of mine is peanut butter cookies, which pairs wonderfully with these oatmeal cookies for a classic cookie plate.
Ingredients
Before you start baking, gather all your ingredients and bring the butter and eggs to room temperature. This simple step makes a huge difference in how the dough comes together.
Cold butter won’t cream properly with the sugar, and room temperature eggs incorporate more smoothly.
Dry Ingredients
- 1 ½ cups (190g) all-purpose flour
- 1 teaspoon baking soda
- 1 teaspoon ground cinnamon
- ½ teaspoon salt
- 3 cups (270g) old-fashioned rolled oats
Wet Ingredients
- 1 cup (226g) unsalted butter, softened to room temperature
- 1 cup (200g) packed light brown sugar
- ½ cup (100g) granulated sugar
- 2 large eggs, room temperature
- 2 teaspoons pure vanilla extract
Optional Mix-Ins
- 1 cup (150g) raisins or dried cranberries
- 1 cup (175g) chocolate chips
- ¾ cup (85g) chopped walnuts or pecans
Kitchen Equipment Needed
Having the right tools makes baking so much easier and more enjoyable. I’ve learned this the hard way after many years of making do with subpar equipment.
A good stand mixer or hand mixer is worth its weight in gold because properly creamed butter and sugar is the foundation of great cookies. Don’t skip this investment if you bake regularly.
Essential Equipment
- Stand mixer or hand mixer with paddle attachment
- Large mixing bowls (at least 2)
- Measuring cups and spoons
- Cookie scoops (1.5 tablespoon size for uniform cookies)
- Baking sheets (2-3 sheets recommended)
- Parchment paper or silicone baking mats
- Wire cooling racks
- Rubber spatula for scraping down the bowl
- Whisk for combining dry ingredients
Recommended Products for This Recipe
After years of baking these cookies, I’ve discovered a few products that truly make a difference in the final result. These aren’t just nice to have; they genuinely improve your baking experience.
1. Bob’s Red Mill Old Fashioned Rolled Oats
The quality of your oats directly impacts the texture and flavor of these cookies. I’ve tested many brands, and Bob’s Red Mill consistently delivers plump, hearty oats that create the perfect chewy texture. Cheap oats tend to be thin and dusty, which results in cookies that lack substance.
2. OXO Good Grips Cookie Scoop Set
These cookie scoops changed my baking life completely. They ensure every cookie is the exact same size, which means they all bake evenly and look professional. The spring-loaded release makes portioning dough quick and mess-free. I use the medium size (1.5 tablespoon) for perfectly sized cookies every time.
3. Nielsen-Massey Madagascar Bourbon Pure Vanilla Extract
I know vanilla extract seems like a minor ingredient, but high-quality vanilla makes a noticeable difference in the final flavor. Nielsen-Massey has a rich, complex flavor that cheap imitation vanilla just can’t match. It’s especially important in recipes like this where vanilla is one of the few flavor enhancers.
4. Nordic Ware Natural Aluminum Commercial Baker’s Half Sheet
If you’re serious about baking, invest in commercial-grade baking sheets. These Nordic Ware sheets heat evenly, won’t warp in the oven, and will last for decades. I’ve had mine for over ten years, and they still perform like new. The natural aluminum finish ensures perfect browning without hot spots.
You might also enjoy: Sugar Cookies

Step-by-Step Instructions: How to Make Oatmeal Cookies
I’m going to walk you through every single step of this process because I want you to feel confident even if this is your first time making cookies. Pay attention to the small details here as they make all the difference between good cookies and exceptional ones.
1. Prepare Your Workspace and Preheat the Oven
- Clear your counter space and gather all ingredients and equipment before you begin
- Preheat your oven to 350°F (175°C) and position racks in the upper and lower thirds
- Line 2-3 baking sheets with parchment paper or silicone mats
- If using parchment paper, make sure it lies flat and doesn’t curl at the edges
- Take your butter and eggs out of the refrigerator if you haven’t already; they should feel cool but not cold to the touch
- Verify your baking soda and baking powder are fresh (they lose potency after 6 months)
2. Combine the Dry Ingredients
- In a medium bowl, whisk together the flour, baking soda, cinnamon, and salt
- Whisk vigorously for about 30 seconds to ensure everything is evenly distributed
- This step is more important than it seems; proper mixing of dry ingredients prevents pockets of baking soda that can create an unpleasant taste
- Add the oats to the flour mixture and stir with a spoon or spatula to coat them lightly
- Set this bowl aside while you work on the wet ingredients
3. Cream the Butter and Sugars
- Place the softened butter in your stand mixer bowl (or large mixing bowl if using a hand mixer)
- Add both the brown sugar and granulated sugar to the butter
- Beat on medium speed for 3-4 minutes until the mixture is light, fluffy, and pale in color
- The mixture should increase in volume and look almost whipped
- Stop the mixer occasionally to scrape down the sides and bottom of the bowl with a rubber spatula
- This creaming process incorporates air into the dough, which contributes to the cookie’s texture
- If your butter is too cold, it won’t cream properly; if it’s too warm, it won’t hold air
4. Add Eggs and Vanilla
- Add the eggs one at a time, beating well after each addition for about 30 seconds
- Make sure the first egg is fully incorporated before adding the second one
- Add the vanilla extract and beat for another 15 seconds until combined
- The mixture should look smooth and homogeneous with no streaks of egg visible
- If the mixture looks slightly curdled, don’t worry; it will come together when you add the flour
5. Incorporate the Dry Ingredients
- With the mixer on low speed, gradually add the flour-oat mixture to the wet ingredients
- Add it in three additions, mixing just until combined after each addition
- Stop mixing as soon as you no longer see streaks of flour
- Overmixing at this stage develops gluten, which makes cookies tough instead of tender
- Use your spatula to scrape the bottom and sides of the bowl to ensure everything is incorporated
- The dough will be thick and slightly sticky
6. Add Optional Mix-Ins
- If using raisins, chocolate chips, or nuts, add them now
- Gently fold them into the dough with a spatula or mix on the lowest speed for just 5-10 seconds
- Make sure mix-ins are evenly distributed throughout the dough
- I like to reserve a small handful of chocolate chips or raisins to press into the tops of cookies before baking for a prettier presentation
Another favorite: Gingerbread Cookies
7. Portion the Cookie Dough
- Use a cookie scoop or two spoons to portion dough into 1.5 tablespoon sized balls
- Roll each portion between your palms to create smooth balls
- This step is optional but makes the cookies look more professional
- Place dough balls on prepared baking sheets, spacing them about 2 inches (5cm) apart
- Each sheet should hold about 12 cookies; don’t overcrowd them as they will spread
- If you’re not baking all the cookies at once, refrigerate the remaining dough or freeze it for later
8. Flatten the Cookies (Optional but Recommended)
- Use the bottom of a glass or your palm to gently flatten each dough ball to about ½ inch (1.25cm) thick
- This helps them bake more evenly and creates a nice round shape
- If the dough sticks to your hand or the glass, lightly flour it first
- Cookies that start thicker will have chewier centers, while flatter ones will be crisper
9. Bake the Cookies
- Place one baking sheet on the upper rack and one on the lower rack of your preheated oven
- Set a timer for 10 minutes for the first check
- The cookies are done when the edges are golden brown and the centers look slightly underdone
- They will continue to cook on the hot baking sheet after you remove them from the oven
- Total baking time is typically 11-13 minutes, depending on your oven and desired texture
- If baking two sheets at once, rotate them halfway through baking (swap racks and turn 180 degrees) for even browning
- Watch them carefully during the last few minutes; the difference between perfect and overdone is just 1-2 minutes
10. Cool and Store
- Let the cookies cool on the baking sheet for 5 minutes; they will be too soft to move immediately
- During this time, they will firm up and finish cooking from residual heat
- Use a thin spatula to transfer cookies to a wire rack to cool completely
- If cookies stick to the parchment, slide the entire sheet of parchment off the baking sheet onto the counter to cool
- Store completely cooled cookies in an airtight container at room temperature
- Never store cookies while they’re still warm; trapped steam will make them soggy

Tips for The Best Oatmeal Cookies
I’ve made every mistake possible with these cookies over the years, so learn from my experiences. These tips are the difference between cookies that are just okay and cookies that people ask you to make again and again.
Here are my hard-won tips for perfect cookies every time:
- Use old-fashioned rolled oats, not quick oats or instant oats: Quick oats absorb too much moisture and create cookies that are dry and crumbly instead of chewy
- Don’t skip the room temperature butter: Cold butter won’t cream properly with the sugar, and melted butter will make your cookies spread too thin
- Measure flour correctly: Spoon flour into your measuring cup and level it off with a knife; scooping directly from the bag packs in too much flour
- Chill the dough if it’s too soft: If your kitchen is warm or your butter was slightly too soft, refrigerate the dough for 15-30 minutes before baking
- Use parchment paper or silicone mats: They prevent sticking and ensure even browning; greased pans make cookies spread too much
- Rotate baking sheets halfway through: This ensures even browning, especially if your oven has hot spots
- Don’t overbake: Underbaking slightly is better than overbaking; cookies continue to firm up as they cool
- Press extra mix-ins on top: Before baking, press a few extra chocolate chips or raisins onto the surface for a prettier presentation
- Let baking sheets cool between batches: Placing dough on a hot sheet causes cookies to spread before they start to bake
- Use a cookie scoop for uniform size: This ensures all cookies bake at the same rate and look professional
Read Also: Eggnog Cookies
Serving Suggestions
These oatmeal cookies are delicious on their own, but there are so many creative ways to enjoy them. I love pairing them with different beverages and using them in desserts.
They’re perfect alongside a cold glass of milk, which is the classic combination my kids request every time. The cookies soften slightly when dunked, which is absolutely heavenly.
Serve them with coffee or tea for an afternoon snack. The subtle spice of cinnamon complements both beverages beautifully.
Here are my favorite ways to serve these cookies:
- Classic milk and cookies: Ice-cold whole milk is traditional, but almond milk or oat milk works wonderfully too
- Ice cream sandwiches: Place a scoop of vanilla ice cream between two cookies and roll the edges in mini chocolate chips
- Crumbled over yogurt: Break cookies into chunks and layer them with Greek yogurt and fresh berries for breakfast
- Cookie butter: Pulse cookies in a food processor with a bit of milk and honey to make a spreadable cookie butter
- With Hot Chocolate: Dunk them in homemade hot chocolate for the ultimate cozy treat
- Breakfast parfait: Layer with vanilla yogurt and Baked Oatmeal for a hearty morning meal
- Cookie plate: Combine with Pumpkin Cookies and Peanut Butter Cookies for variety
- Gift boxes: Pack them in decorative tins or boxes tied with ribbon for homemade gifts
- Dessert topping: Crumble over vanilla ice cream or pudding for added texture
Variations of Oatmeal Cookies
One of the best things about this recipe is how adaptable it is to different flavor preferences. I’ve tried dozens of variations over the years, and all of them have been delicious.
Feel free to mix and match these suggestions to create your perfect cookie.
Here are my favorite tested variations:
- Chocolate chip oatmeal cookies: Add 1 cup of semi-sweet chocolate chips or use a mix of dark and milk chocolate
- Oatmeal raisin cookies: Stir in 1 cup of plump raisins; soak them in warm water for 10 minutes first if they’re dry
- Cranberry walnut: Use 1 cup of dried cranberries and ¾ cup of chopped walnuts for a sophisticated flavor
- Peanut butter oatmeal: Replace ½ cup of butter with ½ cup of creamy peanut butter and reduce brown sugar to ¾ cup
- Apple cinnamon: Add 1 cup of finely diced dried apples and increase cinnamon to 1 ½ teaspoons
- Double cinnamon: Add ½ cup of cinnamon chips to the dough for extra cinnamon flavor
- Coconut oatmeal: Mix in 1 cup of sweetened shredded coconut and ½ cup of white chocolate chips
- Maple pecan: Reduce vanilla to 1 teaspoon, add 1 teaspoon of maple extract, and fold in ¾ cup of chopped pecans
- Trail mix cookies: Add ½ cup each of chocolate chips, raisins, and chopped nuts for a hearty cookie
- Espresso oatmeal: Dissolve 2 teaspoons of instant espresso powder in the vanilla extract for coffee-flavored cookies
- Butterscotch: Swap chocolate chips for butterscotch chips and add ¾ cup of chopped pecans
Storage and Reheating
Proper storage is key to keeping these cookies fresh and delicious. I’ve tested every storage method imaginable because my family takes their cookie freshness very seriously.
Follow these guidelines and your cookies will stay perfect for over a week.
Room Temperature Storage
- Store completely cooled cookies in an airtight container or resealable plastic bag
- Layer cookies between sheets of parchment paper to prevent sticking
- Keep at room temperature for up to 10 days
- Place a slice of bread in the container to help maintain moisture; replace the bread slice every 2-3 days
- Keep containers away from heat sources and direct sunlight
Refrigerator Storage
- Refrigeration is not necessary and can actually dry out the cookies faster
- If you must refrigerate (in very hot, humid climates), store in an airtight container
- Let cookies come to room temperature before serving for best texture
- Refrigerated cookies will last up to 2 weeks
Freezer Storage
- Freeze baked cookies in a single layer on a baking sheet until solid (about 1 hour)
- Transfer frozen cookies to a freezer-safe bag or container, layering with parchment paper
- Label with the date and type of cookie
- Frozen baked cookies will keep for up to 3 months
- Thaw at room temperature for about 30 minutes before eating
- For warm cookies, reheat frozen cookies in a 300°F (150°C) oven for 5-7 minutes
Freezing Cookie Dough
- Portion dough into balls and freeze on a baking sheet until solid
- Transfer frozen dough balls to a freezer bag
- Label and date the bag; dough keeps for up to 3 months
- Bake from frozen, adding 2-3 minutes to the baking time
- No need to thaw; this method is perfect for fresh cookies anytime
Reheating Tips
- Microwave individual cookies for 10-15 seconds for a warm, soft cookie
- Reheat multiple cookies in a 300°F (150°C) oven for 5 minutes
- Cover with foil if you want to warm them without crisping the edges
- A few seconds of reheating can make day-old cookies taste freshly baked
Read Also: Pumpkin Oatmeal Cookies

Nutritional Facts
Here’s the approximate nutritional information per cookie (based on 24 cookies, without optional mix-ins):
- Calories: 165
- Total Fat: 8g
- Saturated Fat: 5g
- Cholesterol: 30mg
- Sodium: 115mg
- Total Carbohydrates: 22g
- Dietary Fiber: 1.5g
- Sugars: 12g
- Protein: 2.5g
Note: These values are estimates and will vary based on specific brands used and optional add-ins. Adding chocolate chips, raisins, or nuts will increase calories and change the nutritional profile.
Health Benefits of Key Ingredients
While these are definitely a treat, they do contain some nutritious ingredients that offer real health benefits. I appreciate that I can feel slightly less guilty about eating three cookies in one sitting.
The oats are the star ingredient nutritionally speaking.
Oats are rich in beta-glucan fiber, which helps lower cholesterol levels and supports heart health. Studies have shown that eating oats regularly can reduce the risk of cardiovascular disease.
They also provide sustained energy without the blood sugar spike you get from refined carbohydrates. This makes these cookies a better choice than many other desserts.
Here are the key health benefits:
- Oats: Excellent source of soluble fiber that aids digestion, helps control blood sugar levels, and keeps you feeling full longer
- Cinnamon: Contains powerful antioxidants and has anti-inflammatory properties; may help regulate blood sugar
- Eggs: Provide high-quality protein and essential nutrients like vitamin D, vitamin B12, and choline for brain health
- Butter: Contains fat-soluble vitamins A, D, E, and K; using real butter instead of margarine avoids trans fats
- Brown sugar: Contains trace minerals like calcium, potassium, iron, and magnesium that refined white sugar lacks
Another great breakfast option is Overnight Oats, which offers even more nutritional benefits.
FAQs About Oatmeal Cookies
1. Can I use quick oats instead of old-fashioned oats?
I don’t recommend it. Quick oats are cut into smaller pieces and absorb moisture differently than rolled oats.
When I tested this recipe with quick oats, the cookies turned out dry and crumbly instead of chewy. The texture just wasn’t right, and they lacked the hearty bite that makes these cookies so satisfying.
2. Why are my cookies spreading too much or too little?
Cookie spreading issues usually come down to butter temperature or dough temperature. If your butter was too warm or melted, cookies will spread excessively and turn out thin and crispy.
If the dough is too cold or the butter was too firm, cookies won’t spread enough and will be thick and cakey. Make sure your butter is softened to room temperature (it should give slightly when pressed but not be greasy) and consider chilling the dough for 15-30 minutes if your kitchen is warm.
3. Can I make these cookies without eggs?
Yes, you can use egg substitutes, though the texture will be slightly different. For each egg, you can use 1 tablespoon of ground flaxseed mixed with 3 tablespoons of water (let it sit for 5 minutes to thicken) or ¼ cup of unsweetened applesauce.
I’ve tested both options, and the flaxseed version produces chewier cookies while the applesauce makes them slightly cake-like but still delicious.
4. How do I make my cookies chewier or crispier?
For chewier cookies, slightly underbake them by 1-2 minutes and use more brown sugar (you can replace all the granulated sugar with brown sugar). Also, make the cookies thicker by not flattening the dough balls before baking.
For crispier cookies, bake them an extra 1-2 minutes, use more granulated sugar, and flatten the dough balls before baking. You can also reduce the flour by 2 tablespoons.
5. Can I reduce the sugar in this recipe?
You can reduce the sugar by up to ¼ cup total, but it will affect both the texture and flavor. I tested this extensively and found that reducing sugar below that threshold makes cookies that don’t spread properly and have a bland taste.
If you’re looking for a healthier option, I’d recommend making my Healthy Chocolate Chip Cookies instead, which are formulated with less sugar from the start.
Oatmeal Cookies
Ingredients
- 1 ½ cups all-purpose flour - 190g; spoon into cup and level off
- 1 tsp baking soda
- 1 tsp ground cinnamon
- ½ tsp salt
- 3 cups old-fashioned rolled oats - 270g; do not substitute quick oats or instant oats
- 1 cup unsalted butter - 226g; softened to room temperature
- 1 cup packed light brown sugar - 200g
- ½ cup granulated sugar - 100g
- 2 large eggs - room temperature
- 2 tsp pure vanilla extract
- 1 cup raisins or dried cranberries - 150g; optional
- 1 cup chocolate chips - 175g; optional
- ¾ cup chopped walnuts or pecans - 85g; optional
Equipment
- Stand mixer or hand mixer with paddle attachment
- Large mixing bowls - At least 2 needed
- Measuring cups and spoons
- Cookie scoop - 1.5 tablespoon size for uniform cookies
- Baking sheets - 2–3 sheets recommended
- Parchment paper or silicone baking mats
- Wire cooling racks
- Rubber spatula - For scraping down the bowl
- Whisk - For combining dry ingredients
Method
- Preheat your oven to 350°F (175°C) and position racks in the upper and lower thirds. Line 2–3 baking sheets with parchment paper or silicone mats, and ensure butter and eggs are at room temperature.
- In a medium bowl, whisk together the flour, baking soda, cinnamon, and salt for about 30 seconds until evenly combined. Stir in the oats, then set the bowl aside.
- Beat the softened butter with both sugars on medium speed for 3–4 minutes until the mixture is light, fluffy, and pale. Scrape down the sides of the bowl as needed.
- Add the eggs one at a time, beating well after each addition, then mix in the vanilla extract until fully combined and smooth.
- With the mixer on low, add the flour-oat mixture in three additions, mixing just until no streaks of flour remain. Do not overmix.
- If using raisins, chocolate chips, or nuts, gently fold them into the dough with a spatula until evenly distributed.
- Scoop dough into 1.5-tablespoon balls, roll between your palms, and place 2 inches apart on the prepared baking sheets (about 12 per sheet).
- Use the bottom of a glass or your palm to gently flatten each dough ball to about ½ inch (1.25cm) thick for more even baking and a rounder shape.
- Bake for 11–13 minutes, rotating sheets halfway through, until edges are golden brown and centers look slightly underdone. They will firm up as they cool.
- Let cookies cool on the baking sheet for 5 minutes, then transfer to a wire rack to cool completely. Store in an airtight container at room temperature for up to 10 days.
Nutrition
Notes
- Use old-fashioned rolled oats only — quick or instant oats absorb moisture differently and produce dry, crumbly cookies.
- Room temperature butter is essential; cold butter won’t cream properly, and melted butter causes excessive spreading.
- Measure flour correctly: spoon into the measuring cup and level off with a knife rather than scooping directly from the bag.
- If your kitchen is warm or the dough feels too soft, refrigerate it for 15–30 minutes before baking to prevent over-spreading.
- Use parchment paper or silicone mats — greased pans cause too much spread and uneven browning.
- Slightly underbake the cookies; they continue cooking on the hot sheet and will firm up perfectly as they cool.
- Let baking sheets cool between batches so dough doesn’t start spreading before baking begins.
- For chewier cookies, replace all granulated sugar with brown sugar and skip flattening the dough balls.
- Freeze portioned dough balls for up to 3 months and bake from frozen, adding 2–3 minutes to baking time.
- Place a slice of bread in the storage container to maintain moisture; replace every 2–3 days.
Private Notes
Tried this recipe?
Let us know how it was!Final Thoughts
These oatmeal cookies have been a constant in my kitchen for years now, and I hope they become a staple in yours too. There’s something deeply satisfying about pulling a tray of golden, fragrant cookies from the oven and watching them disappear within hours.
The beauty of this recipe is its reliability and versatility. Once you master the basic version, you can customize it endlessly to suit your preferences or use whatever mix-ins you have on hand.
I encourage you to make these cookies this weekend and see for yourself why they’ve earned their place as my most-requested recipe. Don’t be surprised when your family starts asking you to make them weekly.
I’d love to hear how your cookies turn out! Drop a comment below with your favorite variation or any questions you might have. And if you love them as much as we do, please share this recipe with your friends and family.
Recommended:
- Pumpkin Chocolate Chip Cookies
- Pumpkin Snickerdoodle Cookies
- Fudge Brownie
- Apple Crisp
- Pumpkin Pie
- Fruit Tart
- Dinner Rolls
- French Toast
- Easy Pancake
- Breakfast Burrito