
I’ll never forget the first time I attempted lobster mac and cheese. It was for my anniversary dinner, and I thought combining two comfort food classics would be foolproof. Wrong!

I ended up with a grainy, watery mess that cost me a small fortune in lobster meat.
After that disaster, I spent months experimenting with different cheese combinations, cooking techniques, and lobster preparations until I finally cracked the code.
This best lobster mac and cheese recipe is the result of all those trials, errors, and eventual triumphs – and now it’s yours to enjoy without the learning curve I went through.
What makes this dish so special is the balance. The sweet, delicate lobster doesn’t get overpowered by the cheese sauce, and the pasta stays perfectly creamy without any graininess.
I’ve tested this recipe on everyone from my pickiest family members to dinner party guests who claim they don’t like seafood, and it wins them over every single time.
The secret lies in using a blend of three cheeses, cooking the lobster just right, and knowing exactly when to combine everything so nothing gets rubbery or separated.
| Quick Recipe Summary | |
|---|---|
| Prep Time: | 20 minutes |
| Cook Time: | 25 minutes |
| Total Time: | 55 minutes |
| Servings: | 6-8 servings |
| Difficulty Level: | Intermediate |

Why You’ll Love This Best Lobster Mac and Cheese Recipe
This isn’t your average mac and cheese – it’s an elevated, restaurant-quality dish that you can master in your own kitchen.
After making this recipe dozens of times for various occasions, I’ve found it consistently delivers that “wow” factor that makes people think you spent hours in the kitchen (when really, it comes together in under an hour).
The combination of Gruyère, sharp cheddar, and Parmesan creates a sauce that’s both sophisticated and comforting, while the lobster adds that luxurious touch that transforms this from a weeknight dinner into celebration-worthy fare.
- Rich and creamy without being heavy – The cheese sauce is perfectly balanced and never feels too thick or cloying
- Sweet lobster chunks in every bite – I learned to fold the lobster in at just the right moment to keep it tender
- Golden, crispy breadcrumb topping – This adds textural contrast that elevates the entire dish
- Perfect for special occasions – Impressive enough for holidays, anniversaries, or when you want to treat yourself
- Surprisingly manageable – Despite the fancy ingredients, the technique is straightforward once you know the tricks
- Customizable to your taste – You can adjust the cheese blend, add vegetables, or make it spicier
You might also enjoy: Lobster Rolls Recipe
Ingredients
Getting the ingredients right is half the battle with this dish. I learned this the hard way when I tried to substitute pre-shredded cheese (it contains anti-caking agents that make the sauce grainy) and used imitation lobster (just don’t).
Quality ingredients make a massive difference here, especially since the flavors are so prominent.
Here’s exactly what you’ll need:
- 1 pound (450g) elbow macaroni – I prefer elbow, but cavatappi or shells work beautifully too
- 1½ pounds (680g) cooked lobster meat, cut into bite-sized chunks – Fresh or frozen works; if using frozen, thaw completely
- 4 tablespoons (57g) unsalted butter, divided
- 3 tablespoons (24g) all-purpose flour
- 3 cups (720ml) whole milk, warmed
- 1 cup (240ml) heavy cream
- 2 cups (200g) Gruyère cheese, freshly shredded
- 1½ cups (150g) sharp cheddar cheese, freshly shredded
- ½ cup (50g) Parmesan cheese, freshly grated
- 1 teaspoon Dijon mustard – This adds depth without making it taste mustardy
- ½ teaspoon garlic powder
- ¼ teaspoon cayenne pepper – Adjustable based on your heat preference
- 1 teaspoon salt, plus more to taste
- ½ teaspoon black pepper
- 1 teaspoon Old Bay seasoning – Essential for that classic seafood flavor
- 1 cup (60g) panko breadcrumbs
- 2 tablespoons melted butter for topping
- 2 tablespoons fresh parsley, chopped for garnish
- 1 tablespoon fresh chives, chopped for garnish
Kitchen Equipment Needed
Having the right tools makes this recipe so much easier. I used to struggle with lumpy cheese sauce until I invested in a proper whisk, and the right baking dish ensures everything cooks evenly with that perfect golden top.
Don’t worry if you don’t have everything – I’ll note which items are essential versus nice-to-have.
- Large pot (at least 6 quarts) – For boiling the pasta with plenty of room
- 9×13 inch baking dish or similar casserole dish – I prefer ceramic or enameled cast iron for even heating
- Medium saucepan – For making the cheese sauce
- Whisk – A balloon whisk works best for keeping the sauce smooth
- Wooden spoon or silicone spatula – For folding in the lobster and combining everything
- Box grater – Essential for freshly shredding cheese; pre-shredded won’t melt properly
- Colander – For draining the pasta
- Measuring cups and spoons
- Small bowl – For mixing the breadcrumb topping
- Sharp knife and cutting board – For chopping the lobster and herbs
Read Also: Baked Salmon with Asparagus and Lemon Recipe
Recommended Products for This Recipe
After making this recipe countless times and trying various products, I’ve found a few items that genuinely make the process easier and the results better.
These aren’t must-haves, but they’re investments that have improved my cooking significantly.
Maine Lobster Meat, Wild Caught
Using high-quality, pre-cooked lobster meat saves you so much time and hassle. I used to buy whole lobsters and cook them myself, but honestly, the pre-cooked frozen lobster meat from Maine is just as good and eliminates all the work.
It’s already perfectly cooked, so you just need to thaw it and fold it into your mac and cheese. Look for chunks rather than claw meat for the best texture.
Le Creuset Enameled Cast Iron Baking Dish
I’ve been using this baking dish for years, and it distributes heat so evenly that your mac and cheese gets that perfect golden crust without any burnt edges.
The enameled interior makes cleanup a breeze, even with all that baked-on cheese. It’s an investment, but it’ll last you a lifetime and works for everything from casseroles to roasted vegetables.
Premium Gruyère Cheese Wheel
The quality of your cheese makes or breaks this recipe. I tried using grocery store pre-packaged Gruyère for months before splurging on a proper aged Gruyère wheel, and the difference was night and day.
Real Gruyère has those nutty, slightly sweet notes that perfectly complement the lobster. Buy a block and shred it yourself – it melts so much better than pre-shredded.
OXO Good Grips Box Grater
This might seem like an odd recommendation, but a quality box grater changed my cheese sauce game completely.
The sharp blades shred cheese effortlessly, which means you’ll actually want to shred your own cheese instead of taking shortcuts.
The non-slip base keeps it stable while you work, and it has different grating sizes for various cheeses.

Step-by-Step Instructions: How to Make Lobster Mac and Cheese
I’m going to walk you through this process exactly as I make it, including all the little details that prevent common mistakes. Take your time with the cheese sauce especially – rushing it is what caused my first few attempts to fail.
1. Prepare Your Lobster and Ingredients
Before you start cooking anything, get everything ready. This is what chefs call “mise en place,” and it prevents you from scrambling mid-recipe.
- Remove your lobster meat from the refrigerator about 15 minutes before you start cooking so it comes closer to room temperature
- If using frozen lobster meat, thaw it completely in the refrigerator overnight, then pat it very dry with paper towels – excess moisture will water down your sauce
- Cut the lobster into bite-sized chunks, roughly 1-inch pieces, keeping any claw meat slightly larger since it’s more tender
- Shred all your cheeses and keep them in separate bowls – don’t mix them yet because they’ll be added at different stages
- Warm your milk in the microwave or in a small pot until it’s just hot to the touch but not boiling – this prevents the sauce from breaking
- Measure out all your seasonings so they’re ready to add when needed
- Chop your fresh herbs and set them aside for garnish
2. Cook the Pasta
The pasta needs to be cooked al dente since it’ll continue cooking in the oven. I learned this after ending up with mushy pasta in my first few attempts.
- Fill your large pot with water (at least 4 quarts) and add 1 tablespoon of salt – the water should taste like the sea
- Bring to a rolling boil over high heat
- Add the macaroni and stir immediately to prevent sticking
- Cook for 2 minutes LESS than the package directions suggest – if it says 8 minutes, cook for 6 minutes
- While it’s cooking, set a timer and stir occasionally to ensure even cooking
- The pasta should still have a slight firmness in the center when you bite into it
- Drain in a colander but DO NOT rinse – the starch on the pasta helps the sauce cling better
- Drizzle with a tiny bit of olive oil if you’re not using it immediately to prevent sticking
- Set aside while you make the cheese sauce
3. Make the Cheese Sauce (Mornay Sauce)
This is the most crucial step. A perfect cheese sauce is silky, smooth, and coats the back of a spoon. Here’s how I finally mastered it after many grainy disasters.
- In your medium saucepan, melt 3 tablespoons of butter over medium heat – don’t let it brown
- Once the butter is fully melted and foaming slightly, add the flour all at once
- Whisk constantly for about 2 minutes to create a roux – it should smell slightly nutty and turn a light golden color
- This cooking time is essential because it removes the raw flour taste
- Slowly pour in the warm milk while whisking continuously – add it in a steady stream, not all at once
- The mixture will be lumpy at first but keep whisking; it will smooth out
- Continue whisking until the mixture thickens enough to coat the back of a spoon, about 5-7 minutes
- Reduce heat to medium-low and add the heavy cream, stirring to combine
- Add the Dijon mustard, garlic powder, cayenne pepper, salt, black pepper, and Old Bay seasoning
- Stir everything together and let it simmer gently for 2 minutes to let the flavors meld
- Remove from heat and add your cheeses in three additions, stirring after each addition until completely melted
- Start with the Gruyère, then add the cheddar, and finally the Parmesan
- If the sauce seems too thick, add a splash more milk; if it’s too thin, let it simmer another minute or two
- Taste and adjust seasoning – I usually add a pinch more salt and pepper at this stage
Another favorite: Creamy Tomato Basil Soup Recipe
4. Combine Pasta, Sauce, and Lobster
This is where timing matters. You want everything warm but not so hot that the lobster overcooks and becomes rubbery.
- Preheat your oven to 375°F (190°C) while you’re combining everything
- In a large mixing bowl or the pot you used for pasta, combine the cooked, drained macaroni with the cheese sauce
- Stir gently but thoroughly to ensure every piece of pasta is coated
- Reserve about one-third of your lobster meat for topping
- Fold the remaining two-thirds of the lobster chunks into the mac and cheese mixture gently – don’t stir vigorously or you’ll break up the lobster
- Use a folding motion with your spatula, bringing the mixture from the bottom up and over
- The residual heat from the pasta and sauce will warm the lobster without cooking it further
- Taste a piece of the mac and cheese – this is your last chance to adjust seasoning before baking
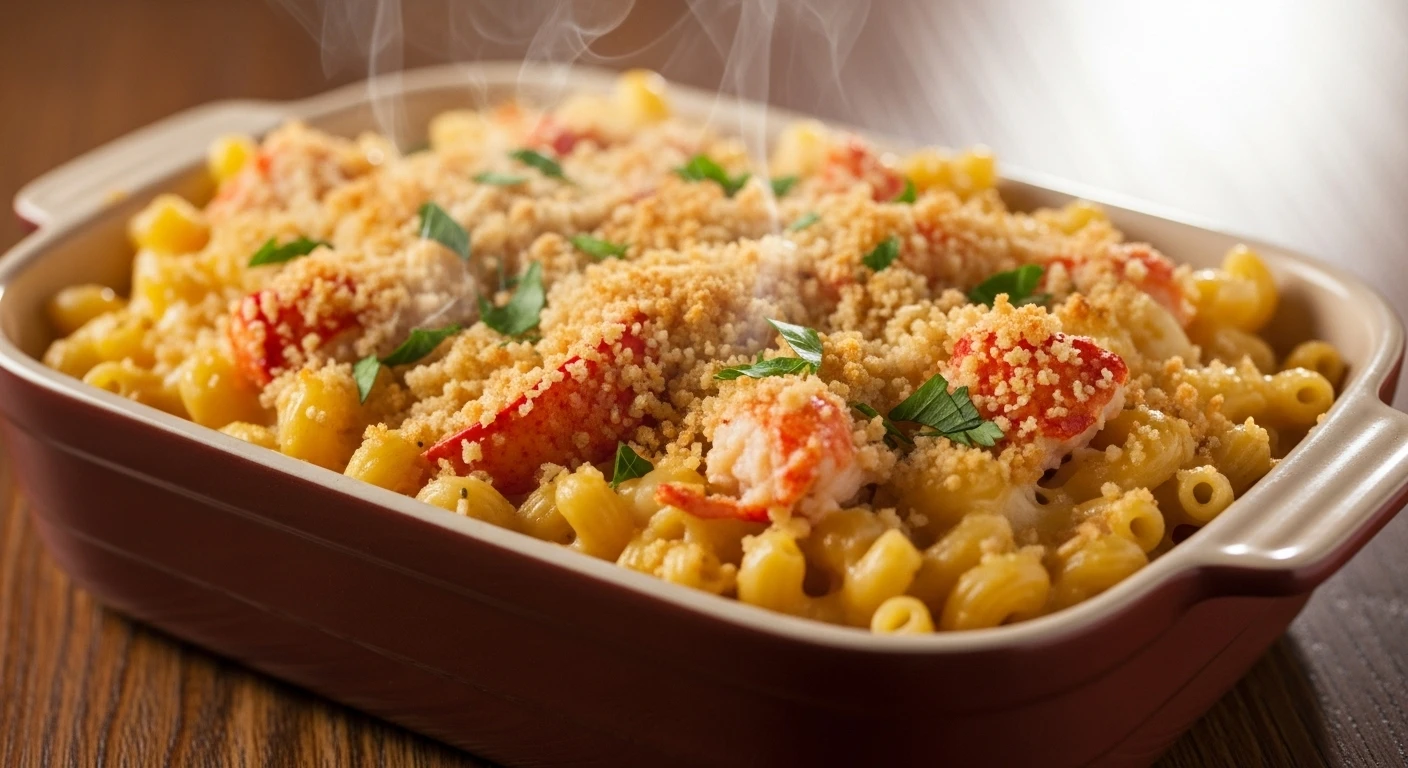
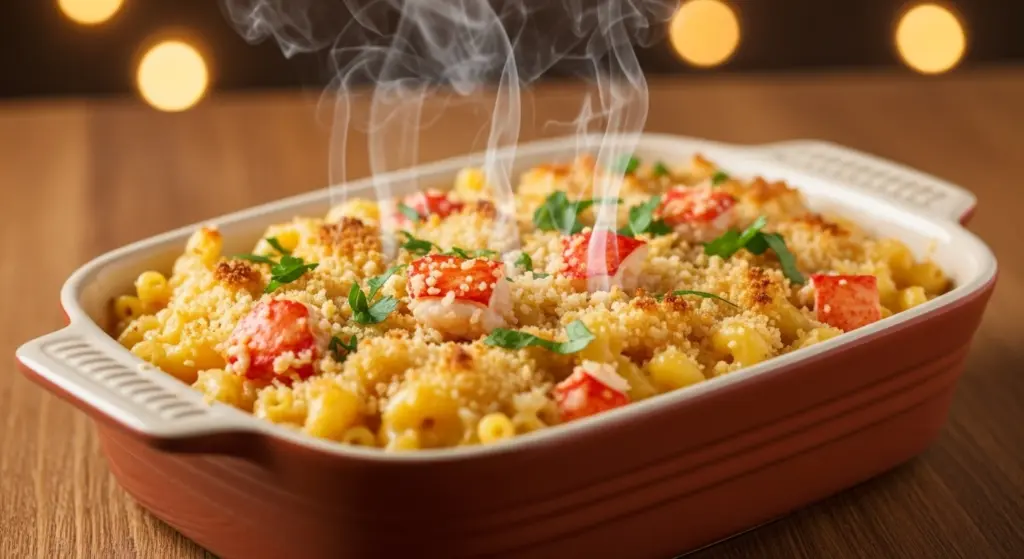
5. Transfer to Baking Dish and Add Topping
The breadcrumb topping adds crucial textural contrast, and placing extra lobster on top ensures every serving gets visible chunks.
- Butter your 9×13 inch baking dish lightly with the remaining tablespoon of butter
- Transfer the mac and cheese mixture into the prepared dish, spreading it evenly
- Use your spatula to smooth the top into an even layer
- Distribute the reserved lobster chunks evenly across the top – press them slightly into the mac and cheese so they don’t dry out
- In a small bowl, mix the panko breadcrumbs with 2 tablespoons of melted butter until the crumbs are evenly coated
- Sprinkle the buttered breadcrumbs evenly over the entire surface
- Make sure the coverage is complete but not too thick – you want a nice crispy layer, not a bread crust
6. Bake to Golden Perfection
The baking time is crucial for getting that crispy top while keeping the inside creamy. I use visual cues more than exact time since ovens vary.
- Place the baking dish on the middle rack of your preheated 375°F (190°C) oven
- Bake for 25-30 minutes, checking at the 20-minute mark
- You’re looking for the sauce to be bubbling around the edges
- The breadcrumbs should turn a beautiful golden brown color
- If the breadcrumbs are browning too quickly but the dish isn’t bubbling yet, tent loosely with aluminum foil
- If the breadcrumbs aren’t browning enough after 30 minutes, turn on the broiler for 1-2 minutes – but watch it like a hawk because it can burn quickly
- The dish is done when the top is golden, the edges are bubbling, and a fork inserted into the center comes out hot
- Remove from the oven and let it rest for 5-10 minutes before serving – this allows the sauce to thicken slightly
7. Garnish and Serve
The final touches make this dish look as impressive as it tastes.
- Sprinkle the freshly chopped parsley and chives over the top for a pop of color and fresh flavor
- The herbs add a bright note that cuts through the richness
- Serve immediately while it’s hot and creamy – this dish is best enjoyed fresh from the oven
- Use a large serving spoon to scoop portions, making sure each serving gets lobster from both inside and the top
- Have extra napkins ready because this is deliciously messy eating
This pairs beautifully with my Grilled Vegetable Skewers Recipe for a complete seafood feast.
Tips for The Best Lobster Mac and Cheese
After making this recipe more times than I can count, I’ve learned some tricks that consistently produce perfect results.
These tips address the most common mistakes I see people make.
- Always shred your own cheese – Pre-shredded cheese contains cellulose (an anti-caking agent) that prevents smooth melting and creates a grainy sauce; I learned this the hard way
- Don’t overcook the lobster – Since you’re using pre-cooked lobster, you’re really just warming it through; overcooking makes it rubbery and tough
- Use warm milk for the sauce – Cold milk added to the roux can cause the sauce to seize up and become lumpy; warm milk incorporates smoothly
- Undercook your pasta slightly – It continues cooking in the oven, so pasta cooked to perfect al dente before baking will end up mushy
- Let the roux cook properly – Those 2 minutes of cooking the flour and butter eliminate the raw flour taste and create the proper base for your sauce
- Add cheese off heat – If the sauce is too hot when you add cheese, the proteins can separate and make the sauce grainy
- Don’t skip the Old Bay seasoning – It adds that classic seafood flavor without being overpowering; I’ve tried making this without it and it just tastes like regular mac and cheese
- Reserve some lobster for the top – This ensures every serving looks impressive with visible lobster chunks
- Use a mix of cheeses – The Gruyère adds nuttiness, cheddar provides sharpness, and Parmesan gives saltiness; using just one cheese results in a one-dimensional flavor
- Pat lobster meat dry – Excess moisture from thawed lobster will water down your beautiful cheese sauce
- Don’t crowd the baking dish – If your dish is too small and the mac and cheese is too deep, the top will burn before the center heats through
- Let it rest before serving – Those 5-10 minutes after baking allow the sauce to thicken to the perfect consistency
Read Also: Air Fryer Salmon Recipe
Serving Suggestions
This lobster mac and cheese is rich enough to be the star of the meal, but I’ve found it pairs wonderfully with lighter sides that cut through the richness. Here’s how I typically serve it based on different occasions.
After dozens of dinner parties, I’ve learned that simple, fresh sides work best to balance the decadence of this dish.
A crisp green salad with a bright vinaigrette is my go-to – the acidity cuts through the cheese beautifully.
I also love serving it with roasted asparagus or green beans that have been simply seasoned with lemon and garlic.
For more casual meals, steamed broccoli works perfectly and adds some color to the plate.
- Simple arugula salad with lemon vinaigrette and shaved Parmesan – the peppery greens contrast nicely with the creamy pasta
- Roasted asparagus with garlic and lemon – the bright, fresh flavors complement the rich lobster
- Garlic bread for those who don’t mind carbs on carbs – perfect for sopping up any extra cheese sauce
- Grilled Portobello Mushrooms add an earthy element that pairs wonderfully with seafood
- Steamed green beans with toasted almonds provide a nice textural contrast
- Watermelon Feta Salad with Mint offers a refreshing palate cleanser
- Crusty sourdough bread for serving alongside, especially if you have extra cheese sauce
- A light white wine like Chardonnay or Sauvignon Blanc – I prefer something crisp to cut through the richness

Variations of Lobster Mac and Cheese
One of the things I love about this recipe is how adaptable it is. Once you master the basic technique, you can customize it to your taste or dietary needs. Here are variations I’ve successfully tried over the years.
The beauty of this recipe is its flexibility. While I think the classic version is perfect, I understand that everyone has different preferences and dietary requirements.
I’ve experimented with countless variations during my testing phase, and these are the ones that actually worked well.
- Truffle lobster mac and cheese – Add 1-2 teaspoons of truffle oil to the cheese sauce for an extra layer of luxury; drizzle a bit more on top before serving
- Spicy version – Increase the cayenne to 1 teaspoon and add diced jalapeños or a few dashes of hot sauce to the cheese sauce
- Lobster and shrimp combo – Replace half the lobster with cooked shrimp for a mixed seafood mac that’s slightly more budget-friendly
- Lighter version – Use half-and-half instead of heavy cream and reduce the amount of cheese by one-third; it’s not quite as indulgent but still delicious
- Gluten-free adaptation – Use gluten-free pasta and replace the flour with a gluten-free blend; use gluten-free breadcrumbs for the topping
- Add vegetables – Fold in 1 cup of peas or chopped asparagus with the lobster for added nutrition and color
- Three-cheese version – Skip the Gruyère and use all cheddar and Parmesan if Gruyère isn’t available in your area
- Bacon lobster mac – Add ½ cup of crispy, crumbled bacon to the breadcrumb topping for a smoky element
- Individual servings – Divide the mixture among ramekins for elegant single-serve portions; reduce baking time to 15-20 minutes
- Stovetop version – Skip the baking step and breadcrumb topping for a quicker stovetop mac and cheese; just fold in all the lobster and serve immediately
For a lighter option, try: Zucchini Noodles with Pesto and Shrimp Bowls Recipe
Storage and Reheating
Proper storage makes a huge difference in how well this dish keeps. I’ve tested various methods and can tell you what works and what doesn’t.
Honestly, this is best eaten fresh, but leftovers are still pretty great if stored correctly.
Here’s what I’ve learned through trial and error about keeping leftover lobster mac and cheese.
The key is preventing it from drying out while also not making it watery when reheated.
- Refrigerator storage – Transfer cooled mac and cheese to an airtight container and refrigerate for up to 3 days; the breadcrumb topping will soften but the dish remains delicious
- Freezing instructions – I don’t recommend freezing this dish because the lobster texture suffers and the cheese sauce can separate when thawed; if you must freeze, do so before baking, wrap tightly in plastic wrap and foil, and freeze for up to 1 month
- Reheating in the oven – Preheat oven to 350°F (175°C), add a splash of milk over the top, cover with foil, and bake for 20-25 minutes until heated through; remove foil for the last 5 minutes to crisp up the top
- Microwave reheating – Add a tablespoon of milk, cover loosely, and microwave in 1-minute intervals, stirring between each, until hot; the texture won’t be quite as good but it works for a quick lunch
- Stovetop reheating – Add to a saucepan with a splash of milk or cream, heat over medium-low, stirring frequently until warmed through; this is my preferred method for small portions
- Don’t refreeze – Once thawed, never refreeze lobster mac and cheese as the texture will be completely compromised
- Portion control – If you know you’ll have leftovers, store in individual portions so you only reheat what you need
- Reviving the breadcrumb topping – If reheating in the oven, sprinkle fresh panko on top during the last 5 minutes for renewed crunch
Nutritional Facts
Per serving (based on 8 servings):
- Calories: 620
- Total Fat: 38g
- Saturated Fat: 22g
- Cholesterol: 165mg
- Sodium: 780mg
- Total Carbohydrates: 42g
- Dietary Fiber: 2g
- Sugars: 6g
- Protein: 32g
Note: These values are approximate and can vary based on specific ingredients used and portion sizes. This is a rich, indulgent dish meant for special occasions, not everyday eating. The high protein content from the lobster and cheese makes it quite satisfying despite being calorie-dense.
Read Also: Shrimp Macaroni Salad Recipe
Health Benefits of Key Ingredients
While this isn’t exactly a health food, some of the ingredients do offer nutritional benefits beyond just tasting amazing.
I like to focus on the quality of ingredients rather than trying to make this something it’s not – it’s a treat, and that’s perfectly okay.
Even though lobster mac and cheese is an indulgent dish, several key ingredients provide genuine nutritional value.
Lobster is an excellent source of lean protein and minerals, while the dairy provides calcium and vitamin D.
I’m not going to pretend this is diet food, but there are legitimate health benefits hiding in this delicious comfort meal.
- Lobster provides high-quality protein – A 3-ounce serving contains about 20g of protein with minimal fat, supporting muscle health and keeping you satisfied
- Rich in selenium and zinc – Lobster is packed with these trace minerals that support immune function and cell health
- Calcium from cheese and milk – Essential for bone health, one serving provides a significant portion of your daily calcium needs
- Vitamin B12 – Both lobster and dairy products are excellent sources, crucial for nerve function and red blood cell formation
- Omega-3 fatty acids – Lobster contains modest amounts of heart-healthy omega-3s
- Phosphorus for strong bones – The dairy in this recipe contributes to bone density and cellular function

FAQs About Lobster Mac and Cheese
1. Can I use frozen lobster tails instead of pre-cooked lobster meat?
Absolutely! I’ve done this many times when I find good quality frozen lobster tails on sale.
Here’s what you need to do: thaw the tails completely in the refrigerator overnight, then either steam them for 8-10 minutes or boil them for 5-7 minutes until the meat is opaque.
Let them cool, remove the meat from the shells, and cut into chunks. The key is not to overcook them during this initial cooking since they’ll warm through again when baked with the mac and cheese.
One pound of frozen tails will yield approximately 8-10 ounces of meat once cooked and shelled.
2. Why did my cheese sauce turn grainy or separated?
This happened to me so many times before I figured out the issue! There are three main culprits: using pre-shredded cheese (the anti-caking agents prevent smooth melting), adding cheese to sauce that’s too hot (high heat causes the proteins to separate), or not making a proper roux first.
Always shred your own cheese, remove the sauce from heat before adding cheese, and make sure you cook your flour-and-butter roux for the full 2 minutes.
If your sauce does break, you can sometimes save it by whisking in a tablespoon of cold milk or running an immersion blender through it.
3. Can I make this ahead of time for a dinner party?
Yes, with some modifications! I’ve successfully made this several hours ahead for dinner parties. Prepare everything through combining the pasta, sauce, and lobster, then transfer to your baking dish but don’t add the breadcrumb topping yet.
Cover tightly with plastic wrap and refrigerate for up to 6 hours. When ready to bake, let it sit at room temperature for 30 minutes, then add the breadcrumb topping and bake at 375°F for 35-40 minutes (a bit longer since it’s cold).
The texture is almost as good as making it fresh. Don’t make it more than 6 hours ahead though, as the pasta absorbs too much sauce and becomes mushy.
4. What’s the best way to tell if lobster is cooked properly?
Great question, since overcooked lobster is rubbery and unpleasant. Properly cooked lobster meat should be opaque white with some red or pink tones, firm but tender, and should spring back slightly when pressed.
If you’re cooking raw lobster for this recipe, the internal temperature should reach 140°F.
However, since most people use pre-cooked lobster meat for this recipe, you’re really just warming it through in the mac and cheese, which is why I recommend folding it in at the end rather than cooking it with the pasta or sauce.
5. Can I substitute the Gruyère cheese with something more affordable?
I understand that Gruyère can be expensive! While it does provide a unique nutty, slightly sweet flavor that’s perfect with lobster, you can substitute it with other cheeses.
Swiss cheese is the closest substitute and works well. Fontina is another good option that melts beautifully.
In a pinch, you could use all sharp white cheddar, though the flavor profile will be different – more straightforward and less complex.
Avoid using American cheese or any processed cheese products as they’ll make the sauce too soft and won’t have the right flavor for a dish this elegant.
Final Thoughts
There’s something truly special about serving homemade lobster mac and cheese – it shows people you care enough to put in the effort for something extraordinary.
After all the trials, burnt tops, grainy sauces, and rubber lobster I endured to perfect this recipe, I can confidently say this is the version worth making.
It strikes that perfect balance between being impressive enough for special occasions yet approachable enough that you don’t need to be a professional chef to pull it off.
I hope this recipe brings as much joy to your table as it has to mine. The first time you pull that golden, bubbling dish from the oven and see everyone’s faces light up, you’ll understand why I spent so much time perfecting it.
Give it a try for your next celebration, date night, or whenever you want to treat yourself to something truly decadent.
I’d love to hear how it turns out for you – drop a comment below with your results, any variations you tried, or questions you might have. Happy cooking!
Recommended:
- Baked Cod with Mango Salsa Recipe
- Lemon Garlic Shrimp Over Couscous Recipe
- Old Fashioned Salmon Patties Recipe
- Mediterranean Quinoa Salad with Grilled Chicken Recipe
- Shrimp and Avocado Salad Recipe
- Chickpea and Spinach Curry Recipe
- Grilled Peach and Burrata Salad Recipe
- Blackened Fish with Pineapple Salsa Recipe