
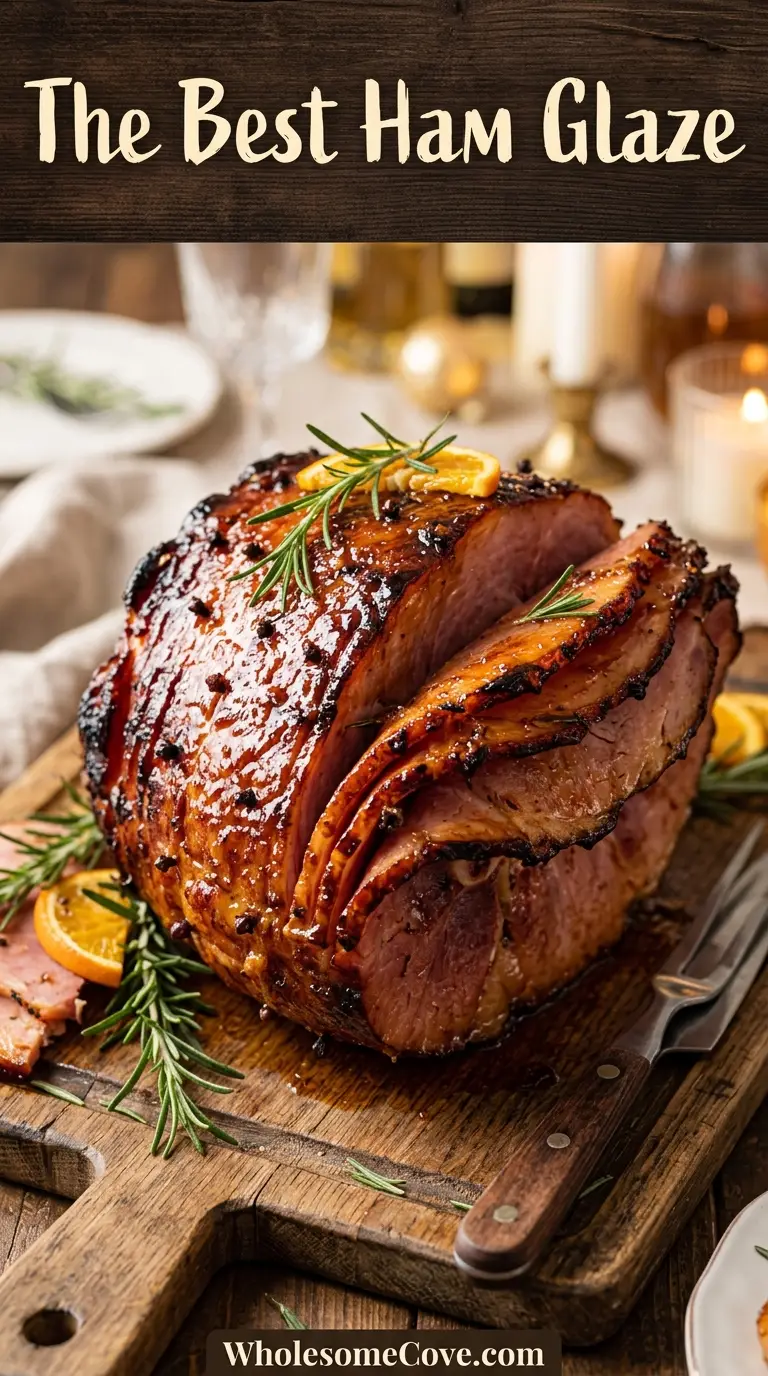
Every year, when the holidays roll around, the one thing my family asks for is my ham glaze recipe. It’s that glossy, deeply caramelized coating that turns a simple baked ham into the centerpiece everyone remembers.
I’ll be honest, I used to buy those little glaze packets that come with the ham. I thought that was just how it was done.
Then one Easter Sunday, I ran out of packets and had to figure something out fast. I raided the pantry, grabbed some brown sugar, honey, Dijon mustard, and apple cider vinegar, whisked it all together, and brushed it on in layers.
That accident became the recipe I’ve made every single holiday since.
The key difference between a good glaze and a great one? Layers. You don’t just brush it on once and walk away. You build it up every 20 minutes, letting each coat caramelize before adding the next. That’s what gives you that deep mahogany color and sticky-sweet crust that makes people go back for seconds.
This glaze comes together in under 10 minutes, uses pantry staples, and works beautifully on any style of ham.
| Quick Recipe Summary | |
|---|---|
| Prep Time | 5 minutes |
| Cook Time | 10 minutes |
| Total Time | 15 minutes |
| Servings | Enough for one 8–10 lb ham |
| Difficulty Level | Easy |
If you love a glazed ham, you’ll also want to try my Honey Baked Ham Recipe for another show-stopping holiday centerpiece.

Why You’ll Love This Ham Glaze Recipe
This glaze hits every note: sweet, tangy, savory, and just a little smoky from the mustard.
It takes less than 15 minutes to make, including simmer time.
You probably already have every ingredient in your kitchen right now. No specialty store trips required.
It’s incredibly versatile. I’ve used this same glaze on spiral hams, bone-in hams, and smoked hams, and it works beautifully every time.
The glaze thickens as it bakes, creating that gorgeous lacquered finish that looks like you spent hours on it.
Kids and adults both love it. The sweetness makes it approachable for picky eaters while the mustard and vinegar keep it interesting for grown-up palates.
- Simple pantry ingredients: Brown sugar, honey, Dijon mustard, apple cider vinegar, and a few spices are all you need for a deeply complex flavor profile.
- Works on any ham: Bone-in, boneless, spiral-cut, smoked, or fresh ham, this glaze adapts to whatever you have.
- Builds in layers: Applying the glaze in multiple rounds creates a caramelized crust that’s sticky, rich, and absolutely addictive.
- Make-ahead friendly: The glaze can be prepared up to a week in advance and stored in the fridge, which is a huge time-saver during busy holiday prep.
- Crowd-pleasing flavor: The brown sugar and honey bring sweetness, the Dijon adds a subtle kick, and the apple cider vinegar balances everything with a bright tang.
- Minimal cleanup: One small saucepan and a pastry brush are all the tools you need beyond a roasting pan.
You might also enjoy: Spiral Ham Recipe
Ingredients
This glaze uses simple ingredients that work together to create something truly special. I always use dark brown sugar here because it has more molasses than light brown, which deepens the caramel flavor and gives the glaze a richer color. Don’t swap it for white sugar unless you have no other option.
- 1 cup (200g) packed dark brown sugar: The molasses in dark brown sugar is what creates that deep, caramel-like sweetness and gorgeous mahogany color on the ham’s surface.
- 1/3 cup (80ml) honey: Adds floral sweetness and helps the glaze stick and caramelize beautifully. Use a good quality honey for the best flavor.
- 3 tablespoons (45ml) Dijon mustard: Provides a gentle, tangy heat that balances the sweetness. Whole grain mustard also works wonderfully here for added texture.
- 2 tablespoons (30ml) apple cider vinegar: Cuts through the richness of the sugar and honey, preventing the glaze from tasting one-dimensionally sweet. This is the ingredient I almost always forget and always notice when it’s missing.
- 1 tablespoon (15ml) Worcestershire sauce: Adds a deep, savory, umami note that makes the glaze taste complex without any identifiable flavor. Trust me, don’t skip it.
- 1 teaspoon (2g) ground cinnamon: Adds warm spice that complements the sweetness without making the glaze taste like dessert.
- 1/2 teaspoon (1g) ground cloves: A classic ham spice. A little goes a long way, so measure carefully.
- 1/2 teaspoon (1g) garlic powder: Adds a subtle savory depth that rounds out the flavor profile.
- 1/4 teaspoon (0.5g) black pepper: A small amount adds just enough warmth to keep things interesting.
- Pinch of cayenne pepper (optional): If you like a little heat on the back end, add just a pinch. It won’t make the glaze spicy, just more interesting.
For a cozy use of those leftover ham bones, make a big pot of Ham and Potato Soup.
Kitchen Equipment Needed
You don’t need anything fancy for this recipe. A small saucepan and a good pastry brush are the two most important tools. I do recommend using a silicone pastry brush over a natural bristle brush because it’s easier to clean and won’t shed bristles into your glaze.
- Small saucepan (2-quart): For simmering the glaze ingredients together. A small saucepan gives you better control over the heat than a large one.
- Silicone pastry brush: For applying the glaze in even layers onto the ham. Silicone brushes are easier to clean and more heat-resistant than bristle brushes.
- Roasting pan with rack: Elevating the ham on a rack allows hot air to circulate underneath and prevents the bottom from steaming in its own juices.
- Wooden spoon or silicone spatula: For stirring the glaze as it simmers.
- Measuring cups and spoons: Accuracy matters here, especially with the spices.
- Instant-read meat thermometer: Essential for knowing when your ham is fully cooked and safe to eat. You want an internal temperature of 140°F (60°C) for pre-cooked ham.
- Aluminum foil: For tenting the ham during the first portion of cooking to prevent drying out before the glazing begins.
- Small bowl and spoon: Handy for holding the glaze near the oven during the basting process.
Read Also: Baked Ham Recipe
Recommended Products for This Recipe
After years of making glazed ham every holiday season, I’ve found a few products that genuinely make a difference. These are the items I personally reach for, and they’ll help you get the best results too.
1. Dark Brown Sugar (Bulk Pack)
Using high-quality packed dark brown sugar makes a noticeable difference in the depth of flavor and color of your glaze. I always buy it in bulk around the holidays because I use it in everything from this glaze to sweet potato casserole.
2. Dijon Mustard (Maille or Grey Poupon)
A good Dijon mustard has more complexity than the store brand version. I’ve found that premium Dijon adds a more nuanced heat and better overall flavor to the glaze without making it taste strongly of mustard.
3. Silicone Basting Brush Set
I switched to a silicone basting brush years ago and never went back. They’re easy to clean, hold plenty of glaze, and they won’t shed bristles into your food. A set is a great investment for any home cook.
4. Heavy-Duty Roasting Pan with Rack
A sturdy roasting pan with a rack is genuinely worth having for holiday cooking. The rack elevates the ham for even heat circulation, and a heavy-duty pan won’t warp in a hot oven. This is the piece of equipment that makes the biggest difference in the final result.
5. Worcestershire Sauce (Lea & Perrins Original)
Worcestershire sauce is the secret umami ingredient in this glaze, and the original Lea & Perrins is the gold standard. The flavor is noticeably more complex than store brands, and a single bottle lasts for many batches.
Another great use of your holiday cooking skills: Cranberry Sauce Recipe
Step-by-Step Instructions: How to Make Ham Glaze
Step 1: Gather and Measure All Ingredients
- Measure out 1 cup (200g) packed dark brown sugar and set it aside. Pack the sugar firmly into the measuring cup by pressing it down with the back of a spoon until level.
- Measure 1/3 cup (80ml) honey into a small bowl or measuring cup. If your honey has crystallized, place the container in warm water for a few minutes until it becomes pourable again.
- Measure 3 tablespoons (45ml) Dijon mustard, 2 tablespoons (30ml) apple cider vinegar, and 1 tablespoon (15ml) Worcestershire sauce, setting each aside.
- Measure out the spices into a small bowl: 1 teaspoon (2g) ground cinnamon, 1/2 teaspoon (1g) ground cloves, 1/2 teaspoon (1g) garlic powder, 1/4 teaspoon (0.5g) black pepper, and a pinch of cayenne if using. Having everything ready before you start the heat prevents any risk of burning.
Step 2: Combine Ingredients in the Saucepan
- Add the dark brown sugar to a small 2-quart saucepan. Use a pan that’s larger than you think you need because the glaze can bubble up.
- Pour in the honey, Dijon mustard, apple cider vinegar, and Worcestershire sauce. Stir everything together briefly with a wooden spoon or silicone spatula before applying heat.
- Add all of the measured spices (cinnamon, cloves, garlic powder, black pepper, and cayenne if using) directly into the saucepan with the other ingredients.
- Give the mixture a good stir to combine everything. It will look a bit clumpy at this stage because the cold ingredients haven’t melted together yet. That’s completely normal.
Step 3: Simmer the Glaze
- Place the saucepan over medium heat. Stir constantly as the mixture begins to warm up to prevent the sugar from sticking to the bottom.
- Watch for the sugar to fully dissolve, which will take about 2 to 3 minutes. You’ll see the glaze transform from grainy and thick to smooth and shiny.
- Once the sugar has dissolved and the glaze is smooth, reduce the heat to medium-low and allow it to simmer gently for 3 to 5 minutes, stirring occasionally.
- The glaze is ready when it coats the back of a spoon and looks thick, glossy, and slightly syrupy. It will thicken more as it cools and even more as it bakes on the ham, so don’t over-reduce it on the stovetop.
- Remove from heat and set aside to cool slightly, about 5 minutes, before using. If the glaze thickens too much while cooling, simply reheat it gently over low heat with a splash of water to loosen it.
Step 4: Prepare the Ham for Glazing
- If you have a bone-in ham or spiral ham, score the surface by using a sharp knife to make shallow diagonal cuts across the top of the ham in a crosshatch or diamond pattern. The cuts should be about 1/4 inch (6mm) deep and spaced about 1 inch (2.5cm) apart. Scoring creates more surface area for the glaze to cling to and allows it to seep into the meat slightly.
- If you’re using a pre-cooked spiral ham, you can skip the scoring step since the spiral cuts already create plenty of surface texture.
- Place the ham cut-side down on a rack inside your roasting pan. If you don’t have a rack, you can use a few stalks of celery or a bed of onion slices to keep the ham elevated.
- If your ham is raw or partially cooked, follow the cooking time on the packaging. If it’s fully cooked (most store-bought hams are), preheat your oven to 325°F (165°C) and plan for about 15 to 18 minutes per pound.
- For the first portion of cooking, tent the ham loosely with aluminum foil to prevent the surface from drying out before you start applying the glaze. Remove the foil tent during the final 45 to 60 minutes of cooking when you begin applying the glaze.
Step 5: Apply the Glaze in Layers
- Remove the foil tent from the ham when there is about 45 to 60 minutes of cooking time remaining. This is when the glazing process begins.
- Using your silicone pastry brush, apply a generous layer of glaze over the entire surface of the ham, making sure to get the glaze down into the scores or between the spiral cuts.
- Return the ham to the oven, uncovered, and bake for 20 minutes. The glaze will bubble and begin to caramelize on the surface.
- After 20 minutes, remove the ham from the oven and apply a second layer of glaze over the first. This is where the magic starts to happen: you’re building up layers of caramelized sweetness that create depth and texture.
- Return to the oven for another 20 minutes. Repeat this glazing process one final time for a total of three glaze applications, ending with the last one applied during the final 5 to 10 minutes of cooking for maximum stickiness and shine.
- Watch the glaze carefully during the last 10 minutes. The high sugar content means it can go from perfectly caramelized to burnt very quickly. If it’s browning too fast, loosely tent the ham with foil and lower the oven temperature slightly to 300°F (150°C).
Step 6: Rest and Serve
- When the ham reaches an internal temperature of 140°F (60°C) for pre-cooked ham (or 145°F / 63°C for fresh ham), remove it from the oven. Insert the thermometer into the thickest part of the meat, away from the bone.
- Tent the finished ham loosely with foil and allow it to rest for at least 15 to 20 minutes before slicing. This resting period allows the juices to redistribute throughout the meat, resulting in juicier, more flavorful slices.
- While the ham rests, pour any drippings from the roasting pan into a small saucepan. You can reduce these drippings over medium heat for 3 to 5 minutes to create a simple pan sauce to serve alongside the ham.
- Slice and serve with any remaining glaze on the side for extra dipping. Every person at the table will want more.
Read Also: Smoked Ham Recipe
Tips for The Best Ham Glaze
Over many holiday seasons and more than a few batches of glazed ham, I’ve collected these tips that make a real difference between a good glaze and an exceptional one.
- Always use dark brown sugar: Light brown sugar works in a pinch, but dark brown sugar has more molasses, which gives the glaze a deeper, richer, more complex flavor and a deeper mahogany color on the ham’s surface. It’s worth seeking out specifically.
- Don’t skip the simmer: Taking the 3 to 5 minutes to simmer the glaze on the stovetop before applying it is crucial. It dissolves the sugar completely and allows the flavors to meld, which means a smoother, more cohesive glaze on the ham.
- Apply at room temperature: If you made the glaze ahead of time and refrigerated it, bring it back to room temperature (or gently reheat it) before applying. Cold glaze won’t spread as easily and won’t penetrate into the scored surface as effectively.
- Score deeply enough: Make sure your scoring cuts go at least 1/4 inch (6mm) deep. Shallow surface scratches won’t open up enough to allow the glaze to penetrate the meat, and you’ll end up with just a thin coating on the very top surface instead of glaze worked into every crevice.
- Three glazing rounds minimum: I know it’s tempting to just brush it all on at once, but patience here is rewarded. Each layer builds on the last, creating a thicker, stickier, more intensely caramelized crust. Three applications is the sweet spot.
- Watch the last 10 minutes closely: Sugar burns fast. If the glaze starts looking very dark during the final minutes of cooking, tent the ham loosely with foil to protect the glaze while the interior finishes cooking through.
- Rest before slicing: I know the smell is unbearable and everyone is hungry, but give the ham a full 15 to 20 minutes to rest under a foil tent before slicing. Cutting too early lets all the flavorful juices run out onto the cutting board instead of staying in the meat where they belong.
- Save the drippings: The pan drippings are liquid gold. They’re loaded with ham flavor and caramelized glaze bits. Reduce them briefly on the stovetop and serve them as a simple sauce or save them for adding to soups.
- Taste the glaze before applying: Before you brush it on, taste it. You want a good balance of sweet, tangy, and savory. If it tastes too sweet, add a splash more vinegar. If it needs more warmth, add a pinch more cinnamon or black pepper.
For another sweet-savory holiday side, the Maple Glazed Carrots Recipe pairs perfectly with this glazed ham.
What to Serve with Ham Glaze

A beautifully glazed ham is already the star of the table, but the right sides turn it into a proper feast.
- Mashed Potatoes: Creamy, buttery mashed potatoes are the ultimate pairing for glazed ham. The richness of the potatoes balances the sweet and tangy glaze perfectly.
- Scalloped Potatoes: Layered with cream and cheese, scalloped potatoes are an elevated holiday side that makes the whole meal feel extra special.
- Green Bean Casserole: The creamy, savory flavors of green bean casserole provide a beautiful contrast to the sweetness of the ham glaze.
- Sweet Potato Casserole: Sweet potato casserole with a pecan topping is a holiday classic that complements the warm spiced notes in this glaze beautifully.
- Dinner Rolls: Soft, pillowy dinner rolls are essential for mopping up any extra glaze left on the plate and building mini ham sliders.
- Deviled Eggs: A classic Easter and holiday appetizer, deviled eggs are a crowd-pleasing starter that keeps guests happy while the ham finishes resting.
- Broccoli Salad: A crisp, tangy broccoli salad with bacon and a creamy dressing provides a refreshing contrast to the richness of the glazed ham.
- Thanksgiving Stuffing: Savory herb stuffing isn’t just for turkey. It pairs wonderfully with ham and soaks up any extra glaze on the plate.
- Cranberry Sauce: The bright, tart flavor of cranberry sauce is a natural complement to the sweetness of the ham glaze and cuts through the richness of the meat.
- Roasted Brussels Sprouts with Bacon: The caramelized, slightly bitter Brussels sprouts with smoky bacon pair beautifully with the sweet glaze and create a more balanced plate.
You might also enjoy: Au Gratin Potatoes Recipe
Variations of Ham Glaze
Once you’ve mastered the classic brown sugar and honey version, there’s a whole world of variations to explore. Each of these tweaks to the base recipe creates a genuinely different flavor experience, so pick the one that matches your menu or your mood.
- Maple Bourbon Ham Glaze: Replace the honey with real maple syrup and add 2 tablespoons (30ml) of bourbon to the saucepan. The bourbon adds a smoky, oaky depth that is absolutely extraordinary. Allow the bourbon to cook off for a minute or two before using.
- Pineapple Brown Sugar Glaze: Add 1/4 cup (60ml) of pineapple juice and 2 tablespoons (30ml) of crushed pineapple to the base glaze. The tropical sweetness of the pineapple is a classic partner for ham and adds a bright, fruity note to the caramelized crust.
- Orange Marmalade Glaze: Replace the honey with 1/3 cup (100g) of orange marmalade. The citrus flavor and slight bitterness of the marmalade create a sophisticated glaze that feels elegant without requiring any extra effort.
- Spicy Honey Sriracha Glaze: Add 1 to 2 tablespoons of Sriracha or your favorite hot sauce to the base recipe. The heat builds slowly in each bite and provides a genuinely addictive contrast to the sweetness of the brown sugar and honey.
- Apple Cider and Cinnamon Glaze: Replace the apple cider vinegar with 1/3 cup (80ml) of fresh apple cider and double the cinnamon. This creates a warmer, more autumnal flavor profile that’s especially good for Thanksgiving.
- Ginger and Soy Glaze: Add 1 tablespoon (6g) of freshly grated ginger and 2 teaspoons (10ml) of low-sodium soy sauce to the base recipe. The ginger adds brightness and heat while the soy sauce deepens the savory notes for an Asian-inspired twist.
- Cherry Cola Glaze: Replace the apple cider vinegar with 1/4 cup (60ml) of cherry cola. This sounds unusual but creates a deeply caramelized, fruity glaze that’s a massive hit with kids and adults alike.
I also love using a similar sweet and tangy profile on my Apple Cider Glazed Pork Chops.
Storage and Reheating
The good news about this glaze is that it stores and reheats beautifully, making it perfect for prepping ahead of a big holiday meal.
- Refrigerating the glaze (before use): Store the prepared glaze in an airtight jar or container in the refrigerator for up to 1 week. The glaze will firm up when cold because of the sugar content, so plan to reheat it before using.
- Reheating the glaze: Reheat refrigerated glaze in a small saucepan over low heat, stirring frequently, until it’s smooth and fluid again. This usually takes 2 to 3 minutes. Add a small splash of water (about 1 teaspoon) if needed to loosen it. Alternatively, microwave it in 15-second bursts, stirring between each, until warmed through.
- Freezing the glaze: This glaze can be frozen in a freezer-safe container for up to 3 months. Thaw overnight in the refrigerator and reheat gently on the stovetop before using.
- Storing leftover glazed ham: Slice leftover ham and store it in an airtight container or wrapped tightly in aluminum foil in the refrigerator for up to 5 days. The glaze on the ham slices will remain intact but will firm up when cold.
- Reheating glazed ham slices: Arrange ham slices in a single layer in an oven-safe dish. Add a splash of water or chicken broth (about 2 tablespoons) to the bottom of the dish to prevent drying out. Cover tightly with foil and heat in a 325°F (165°C) oven for 10 to 15 minutes, or until warmed through. For a single slice, the microwave works well: cover with a damp paper towel and heat for 30 to 60 seconds.
- Whole glazed ham storage: If you have a significant portion of the whole ham remaining, keep it on the bone, wrap it tightly in plastic wrap and then foil, and refrigerate for up to 5 days. The bone helps keep the meat moist.
- Do not refreeze previously frozen glaze: Once you’ve thawed the glaze, don’t refreeze it. The repeated freeze-thaw cycle can affect the texture and cause the sugar to crystallize unevenly.
Read Also: Slow Cooker Ham Recipe
Nutritional Facts
The following values are approximate for the full batch of glaze (enough for one 8–10 lb ham), and represent the glaze only, not the ham itself. Actual values per serving will depend on how much glaze is applied and consumed.
| Nutritional Facts (Full Batch of Glaze) | |
|---|---|
| Calories | ~720 kcal |
| Total Fat | 0.5g |
| Saturated Fat | 0g |
| Cholesterol | 0mg |
| Sodium | ~480mg |
| Total Carbohydrates | ~188g |
| Dietary Fiber | 1g |
| Total Sugars | ~180g |
| Protein | 1g |
| Vitamin C | ~2% DV |
| Calcium | ~8% DV |
| Iron | ~10% DV |
| Potassium | ~4% DV |
Values are estimates. Nutritional content will vary based on specific brands and exact quantities used.
For another way to use this beautiful ham, make a comforting bowl of Potato Soup with the leftovers.
Health Benefits of Key Ingredients
This is a glaze, so it’s definitely a treat rather than a health food. That said, several of the key ingredients do bring genuine nutritional benefits to the table beyond just flavor.
- Honey: Raw honey contains antioxidants including flavonoids and phenolic acids, which help protect the body from cellular damage. It also has antimicrobial properties and has been used for centuries as a natural remedy. A small amount goes a long way both for flavor and for these health benefits.
- Dijon Mustard: Mustard seeds are a good source of selenium and omega-3 fatty acids. They also contain glucosinolates, compounds that have been studied for potential anti-inflammatory properties. Dijon is also very low in calories, making it a smart way to add bold flavor without much fat or sugar.
- Apple Cider Vinegar: Apple cider vinegar has been linked to blood sugar regulation in several studies. It also contains a small amount of potassium and amino acids. The acidity helps activate digestive enzymes that support a healthy gut.
- Cinnamon: Ground cinnamon is one of the most antioxidant-rich spices available. It has been shown in studies to help improve insulin sensitivity and has anti-inflammatory properties. Even the small amount used in this glaze adds meaningful nutritional value.
- Worcestershire Sauce: A traditional Worcestershire sauce contains tamarind, molasses, anchovies, and spices, providing a small amount of B vitamins, calcium, and iron. It’s a low-calorie way to add significant depth of flavor and a bit of trace mineral nutrition.
- Cloves: Ground cloves are exceptionally high in antioxidants, particularly eugenol, which has been studied for its potential anti-inflammatory and antimicrobial effects. They also contain manganese, an important trace mineral for bone health and metabolism.
- Dark Brown Sugar (in moderation): Unlike white sugar, dark brown sugar retains some molasses, which contains trace amounts of calcium, iron, and potassium. While it’s still primarily sugar and should be enjoyed in moderation, the molasses content makes it a slightly more complex choice than refined white sugar.
Another great way to enjoy the flavors of this season: try my Honey Mustard Sauce Recipe as a dipping sauce alongside your ham platter.
FAQs About Ham Glaze
1. Can I make ham glaze ahead of time?
Absolutely. This glaze keeps beautifully in the refrigerator for up to one week in an airtight jar or container. When you’re ready to use it, reheat it gently over low heat on the stovetop, stirring until it’s smooth and fluid again.
2. What type of ham works best with this glaze?
This glaze works on virtually any type of ham. Spiral-cut bone-in hams are especially great because the cuts create lots of surface area for the glaze to soak into. It also works wonderfully on smoked hams, bone-in half hams, and boneless hams. The key factor is making sure you score the surface if the ham isn’t already cut, to allow the glaze to penetrate.
3. My glaze burned on the ham. What went wrong?
The high sugar content in this glaze means it caramelizes quickly, and it can go from beautifully bronzed to burnt in just a few minutes. The most common cause is applying the glaze too early or baking at too high a temperature. Start glazing during only the final 45 to 60 minutes of cooking time, watch closely during the last 10 minutes, and tent loosely with foil if it’s getting very dark.
4. How much glaze does this recipe make?
This recipe makes approximately 1 to 1.25 cups (240 to 300ml) of glaze, which is plenty for one 8 to 10 lb (3.6 to 4.5 kg) ham with enough for three or more generous applications. If you’re making a larger ham (over 12 lbs), consider making 1.5 times the recipe to ensure you have enough for full coverage in every round of glazing.
5. Can I use this glaze on other meats besides ham?
Yes, and I highly recommend it. This brown sugar and honey glaze is excellent on pork tenderloin, pork ribs, chicken thighs, and even salmon. Adjust the cooking time and glazing process based on the specific protein, and always monitor closely since thinner cuts will caramelize much faster than a large ham.
Read Also: Sweet Potato Casserole Recipe

Ham Glaze
Ingredients
- 1 cup dark brown sugar - 200g; packed firmly; dark brown sugar preferred over light for deeper flavor and color
- 1/3 cup honey - 80ml; use good quality honey; if crystallized, warm in hot water until pourable
- 3 tablespoons Dijon mustard - 45ml; whole grain mustard also works for added texture
- 2 tablespoons apple cider vinegar - 30ml; balances the sweetness and adds brightness
- 1 tablespoon Worcestershire sauce - 15ml; adds deep savory umami depth
- 1 teaspoon ground cinnamon - 2g; adds warm spice without making the glaze taste like dessert
- 1/2 teaspoon ground cloves - 1g; a classic ham spice; measure carefully as a little goes a long way
- 1/2 teaspoon garlic powder - 1g; adds subtle savory depth
- 1/4 teaspoon black pepper - 0.5g; freshly ground preferred
- cayenne pepper - pinch; optional; adds heat on the back end without making the glaze spicy
Equipment
- Small saucepan (2-quart) - For simmering the glaze; a small saucepan gives better heat control
- Silicone pastry brush - For applying glaze in even layers; easier to clean than bristle brushes
- Roasting pan with rack - Elevates the ham for even heat circulation and prevents steaming
- Wooden spoon or silicone spatula - For stirring the glaze as it simmers
- Measuring cups and spoons - For accuracy, especially with spices
- Instant-read meat thermometer - To verify ham reaches 140°F (60°C) internal temperature
- Aluminum foil - For tenting the ham during the first portion of cooking
- Small bowl - (optional) For holding glaze near the oven during the basting process
Method
- Measure out all ingredients before starting: pack 1 cup (200g) dark brown sugar firmly into a measuring cup, pour 1/3 cup (80ml) honey into a small bowl, and measure the Dijon mustard, apple cider vinegar, and Worcestershire sauce. Combine the spices (cinnamon, cloves, garlic powder, black pepper, and cayenne if using) together in a small bowl.
- Add the dark brown sugar, honey, Dijon mustard, apple cider vinegar, Worcestershire sauce, and all measured spices into a small 2-quart saucepan. Stir briefly to combine; the mixture will look clumpy at this stage, which is normal.
- Place the saucepan over medium heat, stirring constantly until the sugar fully dissolves and the glaze turns smooth and shiny, about 2 to 3 minutes. Reduce heat to medium-low and simmer for 3 to 5 more minutes, until the glaze coats the back of a spoon; remove from heat and cool for 5 minutes before using.
- Score the surface of the ham with a sharp knife in a crosshatch diamond pattern, making cuts about 1/4 inch (6mm) deep and 1 inch (2.5cm) apart to help the glaze penetrate. Place the ham cut-side down on a rack in a roasting pan, tent loosely with foil, and bake at 325°F (165°C) for the first portion of cooking time.
- Remove the foil tent when 45 to 60 minutes of cooking time remain, then brush a generous layer of glaze over the entire ham surface including into the score marks. Return to the oven and repeat the glazing process every 20 minutes for a total of three applications, watching closely during the final 10 minutes to prevent burning.
- Remove the ham from the oven when it reaches an internal temperature of 140°F (60°C) for pre-cooked ham, then tent loosely with foil and rest for 15 to 20 minutes before slicing. Optionally, reduce the pan drippings in a small saucepan over medium heat for 3 to 5 minutes to create a simple pan sauce for serving.
Nutrition
Notes
- Always use dark brown sugar in this glaze. It has more molasses than light brown sugar, which creates a deeper flavor and richer mahogany color on the ham’s surface.
- Simmer the glaze on the stovetop before applying it. This step fully dissolves the sugar and allows the flavors to meld for a smoother, more cohesive result.
- Apply the glaze in a minimum of three rounds, every 20 minutes during the final 45 to 60 minutes of cooking. Layering builds a thicker, stickier, more caramelized crust.
- Watch the ham closely during the last 10 minutes. High sugar content means the glaze can go from perfectly caramelized to burnt quickly. Tent loosely with foil and lower the oven to 300°F (150°C) if browning too fast.
- Make ahead: The glaze keeps in an airtight jar in the refrigerator for up to 1 week. Reheat gently on the stovetop with a splash of water to loosen before using.
- Freeze extra glaze in a freezer-safe container for up to 3 months. Thaw overnight in the fridge and reheat gently before use. Do not refreeze once thawed.
- Variations: Try replacing honey with pure maple syrup and adding 2 tablespoons of bourbon for a Maple Bourbon Glaze, or add 1/4 cup pineapple juice for a tropical twist.
- This glaze works on virtually any ham: bone-in, boneless, spiral-cut, or smoked. Score the surface on non-spiral hams to allow the glaze to penetrate deeper into the meat.
- Rest the ham for a full 15 to 20 minutes under a foil tent before slicing. Cutting too early allows the juices to run out, resulting in drier meat.
- Save the pan drippings. They are loaded with caramelized glaze flavor and can be reduced into a pan sauce or added to soups and stews.
Private Notes
Tried this recipe?
Let us know how it was!Final Thoughts
This ham glaze recipe is proof that the most memorable holiday dishes don’t have to be complicated. A handful of pantry ingredients, a small saucepan, and a little patience is all it takes.
The moment that glaze hits the hot oven and starts to caramelize is one of my favorite cooking smells in the whole world. It fills the kitchen with something that just says “celebration.”
I hope this recipe becomes a staple in your holiday rotation the way it has in mine.
Give it a try this year and let me know what you think. Drop a comment below and tell me which variation you made, or share a photo of your beautiful glazed ham. I love hearing how it turns out for you!
Recommended:
- Roasted Potatoes Recipe
- Funeral Potatoes Recipe
- Potato Salad Recipe
- Roasted Sweet Potato Recipe
- Velveeta Mac and Cheese Recipe
- Healthy Cornbread Recipe
- BBQ Sauce Recipe
- Honey Butter Recipe
- Sweet and Sour Sauce Recipe
- Caramel Sauce Recipe