
I’ll never forget my first Thanksgiving as the designated turkey cook. My grandmother handed me her well-worn roasting pan and said, “Just follow your instincts.” Well, my instincts led to a bird that was simultaneously dry and undercooked in spots.
That disaster sent me on a years-long quest to master the perfect thanksgiving turkey recipe. I’ve tried brining, dry-brining, butter-basting, and every temperature combination imaginable. What I’m sharing today is the result of countless holiday dinners, plenty of learning moments, and finally, consistent success.
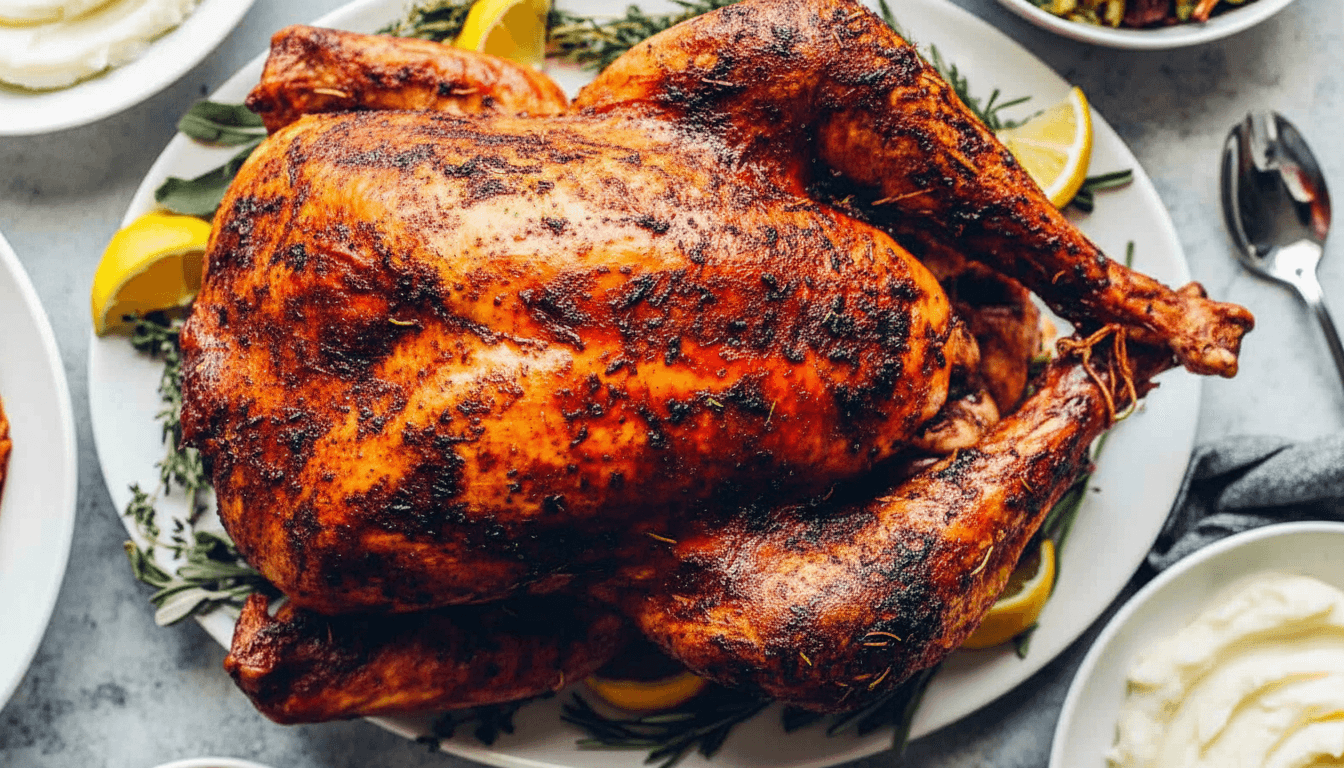
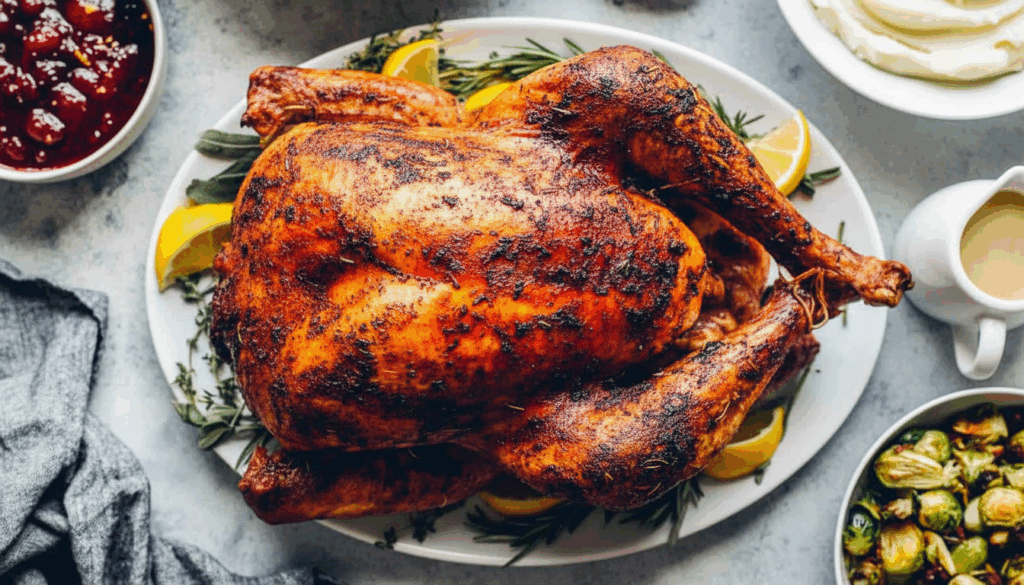
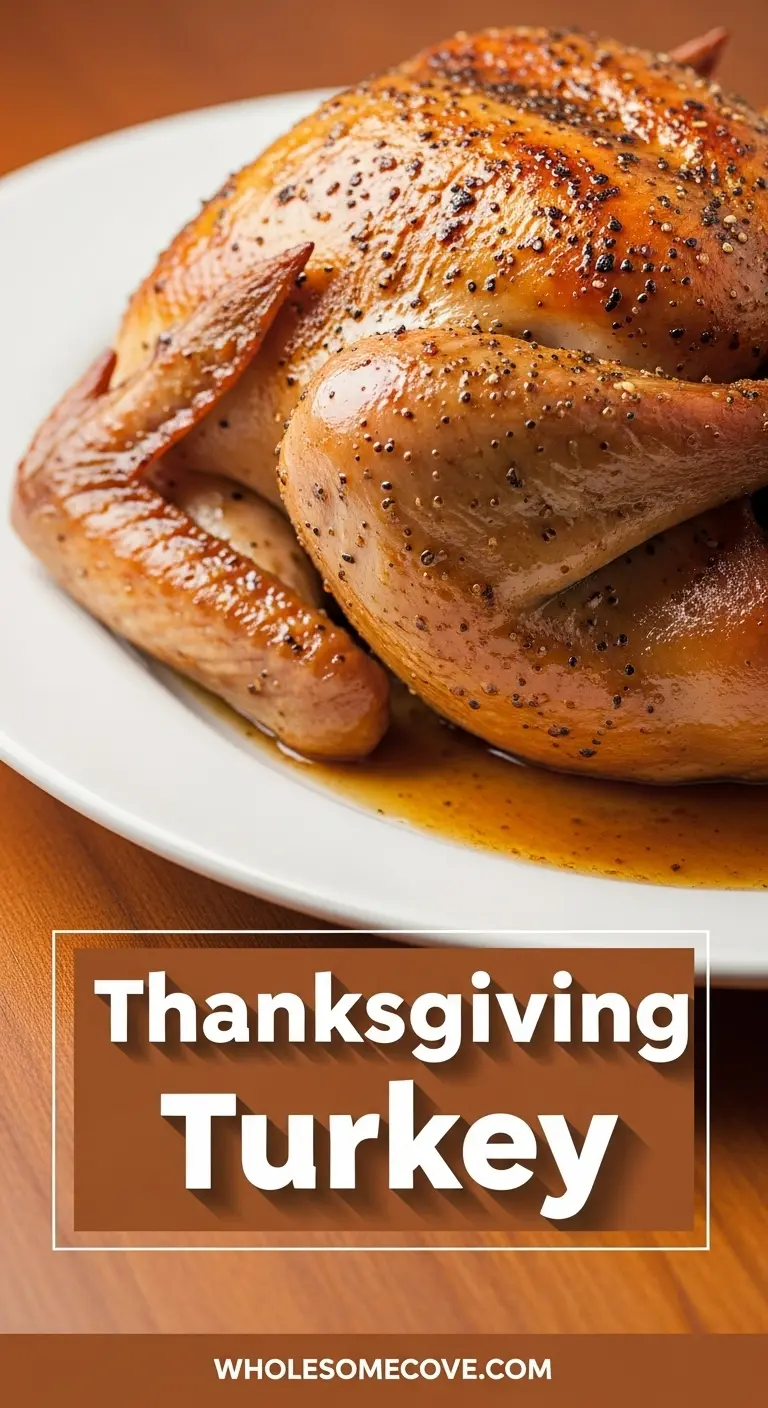
This method combines a dry brine for incredibly flavorful, juicy meat with a butter herb mixture that creates the most gorgeous golden-brown skin. The turkey roasts at two different temperatures, which sounds fussy but actually guarantees even cooking from breast to thigh.
| Quick Recipe Summary | |
|---|---|
| Prep Time | 30 minutes (plus 24 hours dry-brining) |
| Cook Time | 3 hours 30 minutes |
| Total Time | 4 hours (plus brining time) |
| Servings | 12-14 |
| Difficulty Level | Intermediate |
Why You’ll Love This Thanksgiving Turkey Recipe
This recipe has saved my Thanksgiving more times than I can count. The dry-brining technique seasons the meat all the way through while helping the skin crisp up beautifully, and you don’t need to deal with gallons of liquid brine taking up fridge space.
The two-temperature roasting method is borrowed from restaurant kitchens. Starting high gives you that gorgeous color, then dropping the temperature lets everything cook through gently without drying out the breast meat.
- Consistently juicy meat: The dry brine and careful temperature control mean every slice is moist and flavorful
- Crispy, golden skin: High initial heat renders the fat and creates that crackling texture everyone fights over
- Minimal hands-on time: Once it’s in the oven, you’re mostly just basting occasionally
- Make-ahead friendly: The dry-brining happens the day before, so Thanksgiving morning is much calmer
- Perfect for beginners: Clear steps and built-in insurance against overcooking
- Crowd-pleaser: Even picky eaters who “don’t like turkey” ask for seconds
The beauty of this approach is that it’s forgiving. I’ve learned to make perfect poultry through years of trial and error, and those lessons are baked into every step here.
Ingredients
This recipe uses straightforward ingredients, but quality matters. I always spring for a fresh turkey rather than frozen when possible, though frozen works fine if you thaw it properly.
For the Turkey and Dry Brine:
- 1 whole turkey (12-14 lbs/5.4-6.4 kg) – fresh or fully thawed
- 1/4 cup kosher salt (60g) – Diamond Crystal preferred
- 2 tablespoons black pepper (12g), freshly ground
- 2 tablespoons fresh thyme (6g), chopped
- 1 tablespoon fresh rosemary (3g), finely chopped
- 1 tablespoon fresh sage (3g), finely chopped
- 2 teaspoons garlic powder (6g)
- 1 teaspoon onion powder (3g)
For the Herb Butter:
- 1 cup unsalted butter (226g), softened
- 6 cloves garlic, minced
- 3 tablespoons fresh parsley (12g), chopped
- 2 tablespoons fresh thyme (6g), chopped
- 1 tablespoon fresh rosemary (3g), chopped
- 1 tablespoon lemon zest (from 1 large lemon)
- 1 teaspoon salt (6g)
- 1/2 teaspoon black pepper (1g)
For Roasting:
- 2 large onions, quartered
- 3 carrots, cut into large chunks
- 3 celery stalks, cut into large chunks
- 1 lemon, halved
- 6 sprigs fresh thyme
- 4 sprigs fresh rosemary
- 6 fresh sage leaves
- 4 cups low-sodium chicken broth (946ml)
- 1/2 cup dry white wine (120ml) – optional
Kitchen Equipment Needed
Having the right tools makes this process so much smoother. I learned this the hard way when I tried roasting without a proper rack and ended up with soggy bottom skin.
- Large roasting pan with a sturdy rack (at least 16 inches long)
- Instant-read meat thermometer – absolutely essential, no guessing
- Kitchen twine for trussing
- Large mixing bowl for herb butter
- Basting brush or spoon
- Heavy-duty aluminum foil
- Cutting board (preferably with a juice groove)
- Sharp carving knife and fork
- Paper towels for patting dry
- Small saucepan for warming basting liquid
Recommended Products for This Recipe
After years of making Thanksgiving turkeys, I’ve discovered a few products that genuinely make a difference. These aren’t just nice-to-haves; they solve real problems that come up during the cooking process.
1. ThermoPro Digital Meat Thermometer
This thermometer has saved me from countless turkey disasters. It gives you an instant, accurate reading so you’re never guessing whether the bird is done, and it’s accurate to within one degree. The long probe means you can check temperature without burning your hands on the hot oven.
2. All-Clad Stainless Steel Roasting Pan with Rack
I upgraded to this pan three years ago and it’s been a revelation. The heavy construction distributes heat evenly so you don’t get hot spots, and the included V-rack holds the turkey securely while letting air circulate underneath. It’s also large enough that the vegetables don’t crowd, which means better browning.
3. Kerrygold Unsalted Butter
The herb butter is what makes this turkey special, and using high-quality European-style butter with higher fat content creates a richer flavor and better browning. Kerrygold is my go-to because it has that deep, creamy taste that regular butter just can’t match.
4. Morton Coarse Kosher Salt
The dry brine is the foundation of juicy turkey, and kosher salt is essential for getting the seasoning right. The coarse crystals stick to the skin better than table salt and dissolve slowly for even penetration. I keep a dedicated container of this just for dry-brining.

Step-by-Step Instructions: How to Make Thanksgiving Turkey
I’m walking you through this exactly as I do it on Thanksgiving Eve and morning. Take your time with each step, especially if this is your first turkey.
1. Prepare and Dry-Brine the Turkey (24 Hours Before Roasting)
- Remove the turkey from its packaging and take out the neck and giblets from both the main cavity and the neck cavity (save these for gravy if desired)
- Pat the entire turkey completely dry with paper towels, inside and out, getting into all the crevices
- Place the turkey on a wire rack set over a rimmed baking sheet or directly in the roasting pan
- In a small bowl, combine the kosher salt, black pepper, thyme, rosemary, sage, garlic powder, and onion powder
- Rub the dry brine mixture all over the turkey, including inside the main cavity and under the skin of the breast (gently loosen the skin with your fingers and spread some of the mixture directly on the meat)
- Make sure to season the drumsticks, wings, and back thoroughly as these areas are often forgotten
- Leave the turkey uncovered in the refrigerator for 24 hours (uncovered is key for crispy skin as it allows moisture to evaporate)
2. Prepare the Herb Butter (Can Be Done the Day Before)
- In a medium bowl, combine the softened butter, minced garlic, parsley, thyme, rosemary, lemon zest, salt, and pepper
- Mix thoroughly with a spatula or wooden spoon until all ingredients are evenly distributed throughout the butter
- Cover and refrigerate if making ahead, but bring back to room temperature 30 minutes before using so it spreads easily
3. Prepare the Turkey for Roasting
- Remove the turkey from the refrigerator 1 hour before roasting to bring it to room temperature (this helps it cook more evenly)
- Pat the turkey dry again with paper towels (even though it’s been in the fridge, some moisture will have accumulated)
- Spread about 2/3 of the herb butter all over the turkey, including under the breast skin (gently separate the skin from the meat and spread butter directly on the breast meat)
- Massage butter into the drumsticks and wings
- Stuff the main cavity with the lemon halves, thyme sprigs, rosemary sprigs, and sage leaves (these aromatics add subtle flavor and moisture from the inside)
- Tuck the wing tips behind the turkey’s back to prevent them from burning
- Tie the drumsticks together with kitchen twine to help the turkey cook evenly and maintain a nice shape
You might also enjoy: Roasted Brussels Sprouts with Bacon
4. Prepare the Roasting Pan
- Scatter the quartered onions, carrot chunks, and celery pieces in the bottom of the roasting pan (these form an aromatic roasting rack and will flavor your pan drippings)
- Pour the chicken broth and white wine (if using) into the bottom of the pan around the vegetables
- Place the roasting rack over the vegetables
- Set the prepared turkey breast-side up on the rack
5. Start the High-Temperature Roast
- Preheat your oven to 450°F (232°C)
- Once preheated, place the turkey in the oven uncovered
- Roast at 450°F (232°C) for 45 minutes (this initial blast creates that beautiful golden-brown skin)
- The skin should be starting to turn a deep golden color by the end of this period
6. Continue Roasting at Lower Temperature
- After 45 minutes, reduce the oven temperature to 325°F (163°C) without opening the oven door
- Continue roasting, basting every 30-45 minutes with the pan juices and remaining herb butter (melt the reserved herb butter and mix it with pan drippings for basting)
- If any parts of the turkey (especially wing tips or breast) are browning too quickly, tent them loosely with aluminum foil
- Total roasting time will be approximately 3 to 3.5 hours for a 12-14 pound turkey (about 13-15 minutes per pound at the lower temperature)
Read Also: Maple Glazed Carrots
7. Check for Doneness
- Start checking the temperature after about 2.5 hours total cooking time
- Insert an instant-read thermometer into the thickest part of the thigh without touching bone (this should read 165°F/74°C)
- Check the thickest part of the breast as well (should also be 165°F/74°C)
- The juices should run clear when you pierce the thigh with a knife
- If the turkey isn’t done yet, continue roasting and check every 15 minutes
8. Rest the Turkey
- Once the turkey reaches 165°F (74°C) in both the breast and thigh, carefully remove it from the oven
- Tent the entire turkey loosely with aluminum foil
- Let it rest for at least 30 minutes before carving (this is crucial as it allows juices to redistribute throughout the meat)
- During this resting time, the internal temperature will actually rise another 5-10 degrees
- Use this time to make gravy from the pan drippings and finish any side dishes
9. Carve and Serve
- Place the rested turkey on a large cutting board with a juice groove
- Remove the twine from the drumsticks
- Cut the skin between the thigh and breast, then pull the leg away from the body and cut through the joint to remove it
- Separate the drumstick from the thigh by cutting through the joint
- Make a long horizontal cut just above the wing along the bottom of the breast
- Slice the breast meat downward in thin, even slices, letting each slice fall away from the bird
- Remove the wings by cutting through the joints
- Arrange all carved meat on a serving platter and serve immediately
Tips for The Best Thanksgiving Turkey
These tips come from years of making turkeys, including plenty of mistakes that taught me what really matters.
- Don’t skip the dry brine: This is what transforms the turkey from bland to flavorful. The 24-hour timing isn’t arbitrary; it takes that long for the salt to penetrate deep into the meat.
- Bring the turkey to room temperature: Cold turkey going into a hot oven cooks unevenly. That hour on the counter makes a real difference in how evenly everything roasts.
- Use a thermometer, not timing alone: Ovens vary wildly, and turkeys cook at different rates depending on their shape and starting temperature. The thermometer is your only reliable guide.
- Baste efficiently: Open the oven door quickly, baste fast, and close it again. Every minute the door is open adds cooking time.
- Don’t stuff the cavity with dressing: Aromatics are fine, but actual stuffing makes the turkey cook unevenly and is a food safety risk. Make your dressing separately.
- Tent with foil strategically: If wings or breast are browning too fast, cover just those areas rather than the whole bird.
- Save those drippings: The pan drippings make incredible gravy. Strain them through a fine-mesh sieve to remove vegetable bits.
- Let it rest: I know it’s tempting to carve right away when everyone’s hungry, but rushing this step guarantees dry turkey.
- Keep the oven closed: Resist the urge to peek constantly. Every time you open the door, you lose heat and add cooking time.
- Start checking early: Better to check temperature early and often than to let it overcook. You can always put it back in; you can’t undo dry meat.
Serving Suggestions
This turkey is the star of the Thanksgiving table, but it shines even brighter with the right accompaniments. I’ve found these pairings work beautifully together.
The classic setup is what I return to year after year. Serve sliced turkey with warm gravy made from the pan drippings alongside traditional sides that complement without competing.
- Creamed Spinach adds a rich, velvety element that contrasts with the turkey’s texture
- Homemade Biscuits are perfect for sopping up gravy and turkey juices
- Roasted Brussels Sprouts with Bacon brings a smoky, caramelized flavor
- Sweet Potato Bread offers a slightly sweet counterpoint
- Stuffed Acorn Squash makes an elegant vegetarian option for the table
- Honey Butter is divine spread on warm bread or even dabbed on turkey slices
- Cranberry sauce (homemade or canned) provides that essential tart sweetness
- Classic mashed potatoes are non-negotiable in my family
- Green bean casserole or simple roasted green beans add color and crunch
Another favorite: Maple Glazed Carrots
Variations of Thanksgiving Turkey
Once you’ve mastered the basic technique, these variations let you customize the turkey to your family’s preferences or dietary needs.
- Citrus herb turkey: Replace half the butter with orange zest and juice, add orange slices to the cavity along with the aromatics. The bright citrus flavor is wonderful with the rich meat.
- Spiced turkey: Add 2 tablespoons smoked paprika, 1 tablespoon cumin, and 1 teaspoon cayenne to the dry brine for a Southwestern spin.
- Maple glazed turkey: Brush the turkey with a mixture of maple syrup, Dijon mustard, and melted butter during the last hour of roasting for a sweet-savory crust.
- Garlic-intensive version: Double the garlic in the herb butter and add 10 whole garlic cloves to the roasting pan. The roasted garlic becomes sweet and spreadable.
- Herb-forward turkey: Triple the fresh herbs in both the dry brine and butter, and stuff the cavity completely full of herb sprigs.
- Wine-based basting: Replace the chicken broth with dry white wine and baste frequently for a more complex flavor.
- Asian-inspired turkey: Use a dry brine with five-spice powder, ginger, and star anise, then baste with a mixture of soy sauce, honey, and sesame oil.
- Smoked turkey adaptation: Follow the dry brine, then smoke at 250°F (121°C) for 4-5 hours instead of roasting, basting with the herb butter mixture.
Storage and Reheating
Proper storage means you can enjoy turkey sandwiches and leftovers for days without sacrificing quality. I’ve learned some tricks for keeping that just-roasted flavor.
- Refrigerator storage: Once the turkey has cooled to room temperature, carve any remaining meat off the bones and store separately from the carcass. Place carved meat in airtight containers or wrap tightly in plastic wrap and aluminum foil. It will keep for 3-4 days in the refrigerator.
- Freezer storage: For longer storage, wrap carved turkey tightly in plastic wrap, then in aluminum foil, then place in freezer bags with as much air removed as possible. Frozen turkey keeps for 2-3 months. Label with the date.
- Store with gravy: Turkey stored with a bit of gravy poured over it stays much moister during storage and reheating.
- Separate light and dark meat: They reheat differently, so storing them separately gives you more control.
- Reheating sliced turkey: Place slices in a baking dish with a few tablespoons of broth or gravy, cover with foil, and reheat at 325°F (163°C) for 15-20 minutes until warmed through. This keeps the meat from drying out.
- Microwave method: Place turkey slices on a microwave-safe plate, add a few drops of broth, cover with a damp paper towel, and microwave in 30-second intervals until warm. Don’t overheat or it will toughen.
- Use the carcass: Don’t throw away the bones! Simmer them with vegetables, herbs, and water for 3-4 hours to make incredible turkey stock for soups.
- Best leftover use: Cold turkey sandwiches the day after Thanksgiving are a time-honored tradition, but I also love using leftovers in turkey soup, turkey pot pie, or turkey salad.
Nutritional Facts
Per serving (based on 12 servings of turkey with skin, approximately 6 oz/170g):
- Calories: 385
- Total Fat: 18g
- Saturated Fat: 8g
- Cholesterol: 165mg
- Sodium: 520mg
- Total Carbohydrates: 2g
- Dietary Fiber: 0g
- Sugars: 0g
- Protein: 52g
- Vitamin A: 8% DV
- Vitamin C: 3% DV
- Calcium: 4% DV
- Iron: 15% DV
Note: Nutritional values vary based on turkey size, how much skin you eat, and specific ingredient brands used. These numbers include the herb butter and dry brine seasonings.
Health Benefits of Key Ingredients
Beyond being delicious, this turkey recipe includes ingredients that offer genuine nutritional benefits. I appreciate that our Thanksgiving centerpiece can also be nourishing.
Turkey is an excellent source of lean protein, providing all the essential amino acids your body needs. Dark meat contains more iron and zinc than white meat, while white meat is lower in fat if you remove the skin.
- Turkey meat: High in protein, B vitamins (especially B6 and niacin), selenium, and phosphorus. The tryptophan in turkey supports serotonin production.
- Fresh herbs: Thyme, rosemary, and sage are loaded with antioxidants and have anti-inflammatory properties. They also aid digestion, which is helpful for a big meal.
- Garlic: Contains allicin, which has antimicrobial and heart-protective properties. It may help lower blood pressure and cholesterol.
- Black pepper: The piperine in black pepper enhances nutrient absorption and has antioxidant and anti-inflammatory effects.
- Lemon: High in vitamin C, which supports immune function and helps your body absorb the iron from turkey.
- Onions, carrots, celery: These aromatic vegetables contain fiber, vitamins A and C, and various antioxidants. They add nutrients to the pan drippings.
Read Also: Slow Cooker Pot Roast
FAQs About Thanksgiving Turkey
1. Can I use a frozen turkey for this recipe?
Yes, absolutely, but you must thaw it completely first. The safest method is in the refrigerator, allowing 24 hours of thawing time for every 4-5 pounds of turkey. A 12-14 pound turkey needs about 3 days to thaw fully. Never thaw turkey at room temperature, as this creates food safety risks.
2. What if I don’t have 24 hours for dry-brining?
While 24 hours is ideal, you can get away with as little as 12 hours if you’re pressed for time. The results won’t be quite as deeply seasoned, but you’ll still have crispy skin and reasonably flavorful meat. Just make sure the turkey is completely dry before applying the brine, and really work it under the breast skin for maximum impact.
3. How do I know when my turkey is actually done?
The only reliable method is using an instant-read thermometer. Insert it into the thickest part of the thigh (not touching bone) and look for 165°F (74°C). Check the breast too, which should also read 165°F (74°C). Color and juice clarity can be misleading, so trust the thermometer over visual cues.
4. My turkey is browning too quickly. What should I do?
This is common with the high-heat start method. Simply tent the areas that are browning too fast (usually the breast and wing tips) with aluminum foil. You can tent just those specific areas rather than the whole bird, which lets the rest continue browning. Keep the foil loose rather than pressed tight against the skin.
5. Can I cook stuffing inside the turkey cavity?
I strongly recommend against it for both food safety and cooking quality reasons. Stuffing inside the cavity prevents heat from circulating properly, leading to uneven cooking and potential food safety issues if the stuffing doesn’t reach 165°F (74°C). Plus, aromatics in the cavity add more flavor with less risk than bread stuffing would.
Final Thoughts
This thanksgiving turkey recipe has become my non-negotiable method after years of trial, error, and finally getting it right. The dry brine transformed everything for me, turning what used to be a stressful guessing game into a reliable process that delivers juicy, flavorful turkey every single time.
I love that this method gives you that beautiful magazine-worthy bird without requiring any special equipment beyond a good thermometer and roasting pan. The herb butter under the skin infuses incredible flavor while keeping everything moist, and the two-temperature roasting creates that perfect combination of crispy skin and tender meat.
Give yourself the gift of a stress-free Thanksgiving by trying this approach. Once you’ve made it this way, you’ll wonder why you ever did it differently.
I’d love to hear how your turkey turns out! Leave a comment below with your results, any creative variations you tried, or questions you have. And if this recipe saves your Thanksgiving like it’s saved mine, please share it with anyone else who’s been struggling with dry turkey blues.
Recommended:
- Mississippi Pot Roast
- Swedish Meatball
- Zuppa Toscana
- Chicken Gnocchi Soup
- Homemade Cinnamon Applesauce
- Beef Barley Soup
- Apple Crisp
- Potato Leek Soup
- Baked Oatmeal
- Crockpot Beef Stew
