
I first made this Healthy Tiramisu Recipe on a whim after realizing I had Greek yogurt, cream cheese, and a bag of ladyfingers just sitting in my fridge. I’d been craving tiramisu for weeks but didn’t want the heaviness of the full-fat traditional version.
This lighter take uses thick Greek yogurt and cream cheese in place of mascarpone, skips the raw egg yolks entirely, and cuts back on sugar without sacrificing a single bit of that creamy, coffee-soaked magic. It still tastes completely indulgent.
Honestly, the first time I served this at a dinner party, nobody even guessed it was a healthier version. My friend Tina actually asked me for the recipe twice before I told her the secret ingredient swap.
I’ve made this probably a dozen times now, and each batch has only gotten better. The key, I learned early on, is not to oversoak the ladyfingers.
| Quick Recipe Summary | |
|---|---|
| Prep Time | 25 minutes |
| Cook Time | 0 minutes (No-Bake) |
| Chill Time | 6 hours (overnight preferred) |
| Total Time | 6 hours 25 minutes |
| Servings | 9 servings |
| Difficulty Level | Easy |
If you love Italian-inspired desserts, you might also enjoy my Authentic Italian Tiramisu Recipe for a comparison with the classic version.
Why You’ll Love This Healthy Tiramisu Recipe
This dessert hits every note you want from a tiramisu, without the post-dessert guilt. It’s creamy, deeply coffee-flavored, and layered in that beautiful classic way.
The swap from mascarpone to Greek yogurt and cream cheese actually works brilliantly. You get a lovely tang that plays off the bittersweet espresso beautifully.
It’s a no-bake recipe, which means no oven, no stress, and virtually no cleanup. All you need is a hand mixer, a baking dish, and a little patience while it chills.
The recipe is also naturally egg-free, which makes it safer for anyone nervous about raw eggs in traditional versions. It’s genuinely beginner-friendly.
You can prep it entirely the night before. It actually gets better the longer it sits in the fridge.
- No mascarpone needed – Greek yogurt and cream cheese make a beautiful, lighter filling that’s just as creamy and satisfying
- No raw eggs – completely egg-free, making it safe for everyone including pregnant women and young children
- Lower in calories and fat – significantly lighter than traditional tiramisu without compromising on flavor or texture
- Make-ahead friendly – in fact, this dessert is best when chilled overnight, making it perfect for entertaining
- No-bake – requires zero cooking or baking, just mixing, layering, and refrigerating
- Crowd-pleaser – even dedicated tiramisu fans won’t notice the healthy swaps; my dinner guests never do
- Customizable sweetness – you can reduce the maple syrup or honey even further if you prefer a less sweet dessert
- Coffee-forward flavor – the espresso soak on the ladyfingers delivers all the bold, beautiful coffee punch the classic is known for
Read Also: Healthy Carrot Cake Recipe
Ingredients
A short, focused ingredient list makes this recipe totally approachable. The real magic is in the quality of your espresso and in not oversoaking the ladyfingers (trust me, I learned that lesson the sticky, soggy way the first time around).
- 24 ladyfinger cookies (Savoiardi) – the classic sponge biscuits used in traditional tiramisu; look for them in the international or baking aisle
- 1 cup (240 ml) strong brewed espresso or very strong coffee, cooled to room temperature
- 1 tablespoon (15 ml) dark rum or coffee liqueur (optional) – adds depth of flavor; skip if making alcohol-free
- 8 oz (225 g) full-fat cream cheese, softened to room temperature
- 1 cup (240 g) full-fat plain Greek yogurt – the healthier mascarpone replacement; use thick, strained yogurt for best results
- 3 tablespoons (45 ml) pure maple syrup or honey – the natural sweetener; adjust to taste
- 1 teaspoon (5 ml) pure vanilla extract
- 1 cup (240 ml) heavy whipping cream, well chilled
- 2 tablespoons (16 g) powdered sugar (confectioners’ sugar) – for sweetening the whipped cream layer
- 3 tablespoons (21 g) unsweetened cocoa powder – for dusting generously over the top
You might also love my GAPS Cream Cheese Dessert Recipe if you enjoy cream cheese-based treats.
Kitchen Equipment Needed
You don’t need anything fancy for this recipe. Most of these items are probably already sitting in your kitchen drawers. The most essential tool is a good hand mixer or stand mixer; trying to whip the cream by hand is possible, but it’s a real workout and takes much longer.
- Electric hand mixer or stand mixer – essential for whipping the cream to the right peaks
- Large mixing bowl – you’ll need at least two; one for the cream cheese mixture, one for the whipped cream
- Shallow dish or wide bowl – for dipping the ladyfingers into the espresso mixture
- 9×9 inch (23×23 cm) square baking dish or 11×8 inch (28×20 cm) rectangular dish – for assembling the tiramisu layers
- Rubber spatula – for folding the creamy layers gently together
- Fine mesh sieve or sifter – for dusting the cocoa powder evenly over the top
- Plastic wrap or lid – to cover the dish while it chills in the refrigerator
Another favorite: Cannoli Poke Cake Recipe
Recommended Products for This Recipe
These are my personal go-to picks after making this recipe many times. They’ve genuinely made a difference in the results.
1. Balocco Savoiardi Ladyfinger Cookies
These are the gold standard ladyfingers for tiramisu. They have just the right density to absorb the espresso without falling apart, and they give you those beautiful defined layers when sliced. I’ve tried off-brand versions and always come back to Balocco.
2. KitchenAid Hand Mixer
A reliable hand mixer makes whipping the heavy cream so effortless. I used to do this by hand and honestly, having this tool changed my no-bake dessert game entirely. It gets the cream to perfect stiff peaks every single time.
3. Valrhona Unsweetened Cocoa Powder
The cocoa dusting on top is the finishing touch that ties everything together. Using a high-quality cocoa powder like Valrhona makes a real, noticeable difference – the bitterness is smooth rather than harsh, which balances the sweetness of the cream layer perfectly.
4. OXO Good Grips Fine Mesh Strainer
Dusting cocoa powder evenly over tiramisu is tricky without the right tool. This fine mesh strainer gives you a perfectly even, light layer every time. No clumps, no uneven patches.
For another easy, light dessert idea, try my Healthy Apple Pie Recipe.
Step-by-Step Instructions: How to Make Healthy Tiramisu
Step 1: Brew and Cool the Espresso Mixture
- Brew 1 cup (240 ml) of strong espresso or very strong black coffee; you want it bold and deeply flavored, not watery
- Pour the hot espresso into a shallow dish or wide bowl that’s large enough to dip the ladyfingers
- If using, stir in 1 tablespoon (15 ml) of dark rum or coffee liqueur
- Set the dish aside and allow the espresso to cool completely to room temperature before using it; dipping ladyfingers in hot liquid will make them dissolve rather than just soak
Step 2: Prepare the Cream Cheese and Greek Yogurt Filling
- Take the 8 oz (225 g) of cream cheese out of the fridge at least 30 minutes ahead of time so it’s fully softened; cold cream cheese will clump and won’t blend smoothly
- Place the softened cream cheese in a large mixing bowl
- Beat the cream cheese with an electric hand mixer on medium speed for about 60 seconds until it becomes smooth and fluffy with no lumps
- Add the 1 cup (240 g) of full-fat Greek yogurt and beat again on medium speed for another 30 seconds until fully incorporated and the mixture is creamy and uniform
- Add 3 tablespoons (45 ml) of maple syrup or honey and 1 teaspoon (5 ml) of vanilla extract
- Beat everything together on medium-low for another 30 seconds, scraping down the sides of the bowl as needed
- Taste the mixture and adjust sweetness to your preference by adding a little more maple syrup if desired
- Set this bowl aside
Step 3: Whip the Heavy Cream
- Pour 1 cup (240 ml) of well-chilled heavy whipping cream into a clean, cold mixing bowl; a cold bowl helps the cream whip up faster and hold its shape better
- Begin beating on medium speed with your electric mixer, then gradually increase to high speed
- When the cream starts to thicken and leave tracks, add 2 tablespoons (16 g) of powdered sugar
- Continue whipping until stiff peaks form; this means when you lift the beaters, the peaks stand up firmly without flopping over
- Be careful not to overwhip at this stage, or you risk turning the cream grainy
Step 4: Fold the Whipped Cream into the Filling
- Using a rubber spatula, gently transfer the whipped cream into the bowl with the cream cheese and Greek yogurt mixture
- Fold the two together using a gentle over-and-under motion; do not stir aggressively or you will deflate all the air you just whipped into the cream
- Continue folding until the mixture is fully combined and no white streaks of cream remain; the result should be light, airy, and mousse-like
- Set the combined filling aside in the fridge while you prep the ladyfingers
Step 5: Dip the Ladyfingers
- Take one ladyfinger at a time and dip it into the cooled espresso mixture
- The dip should be quick, about 1 to 2 seconds per side; you want the ladyfinger to absorb just enough coffee to be flavorful but not so much that it becomes soggy and falls apart
- This was my biggest mistake the first time I made tiramisu; I left them in far too long and ended up with a mushy bottom layer
- Shake off any excess espresso gently before placing the ladyfinger in the baking dish
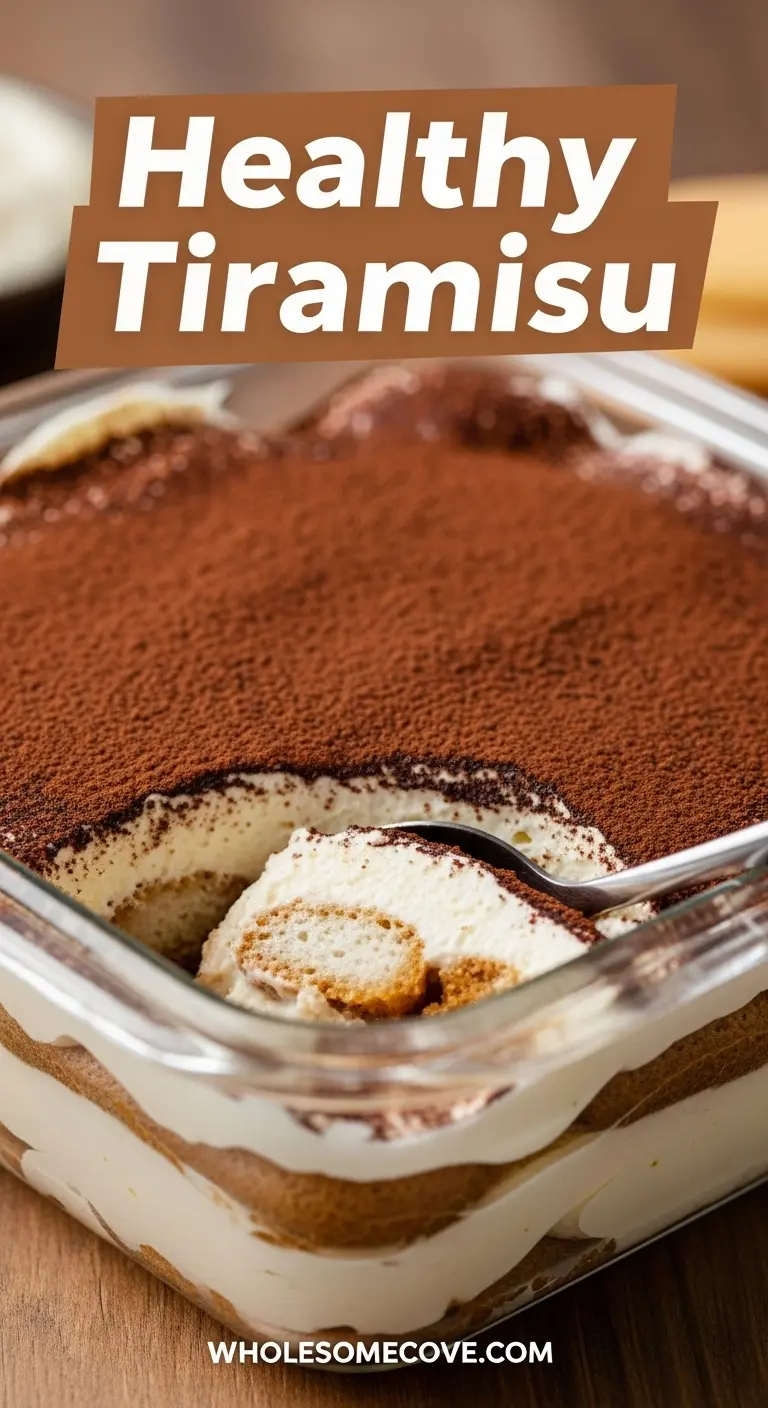
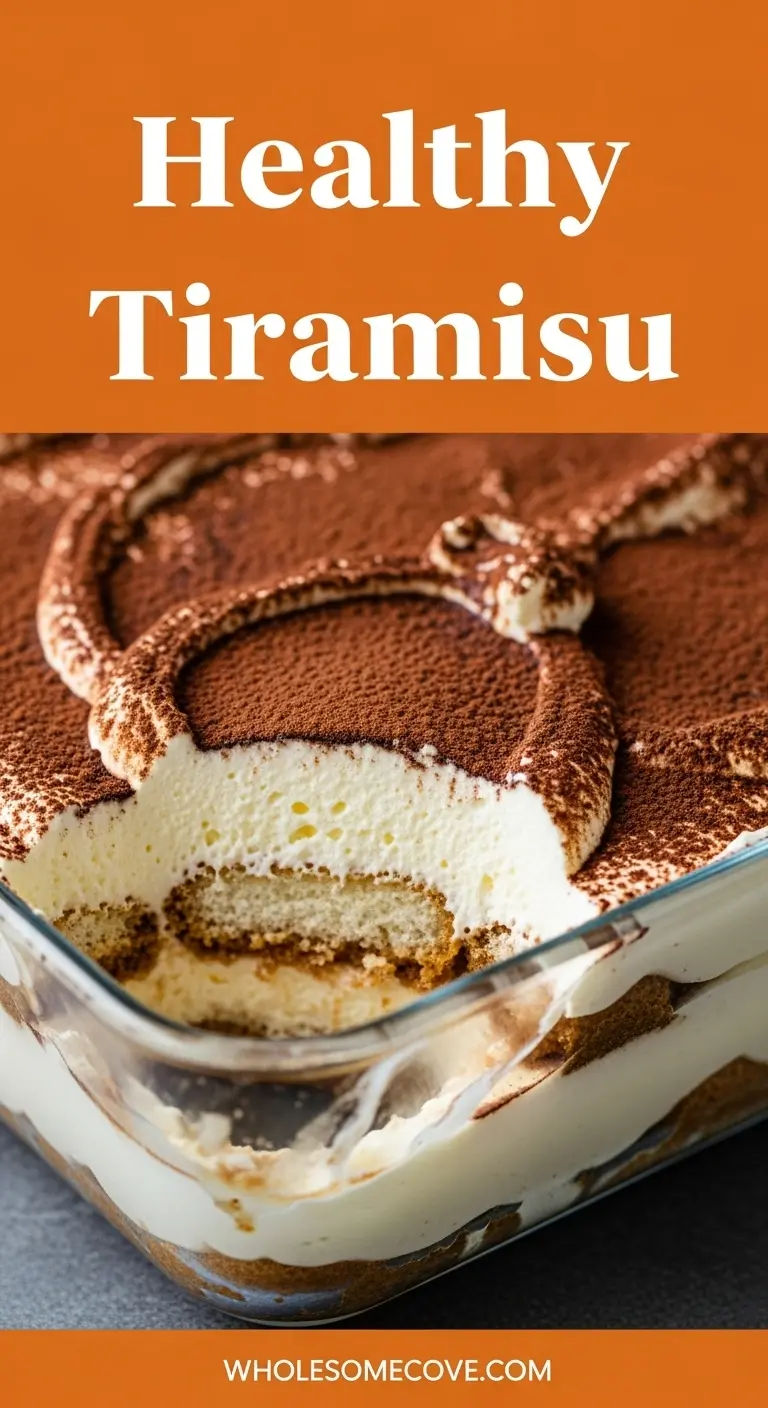
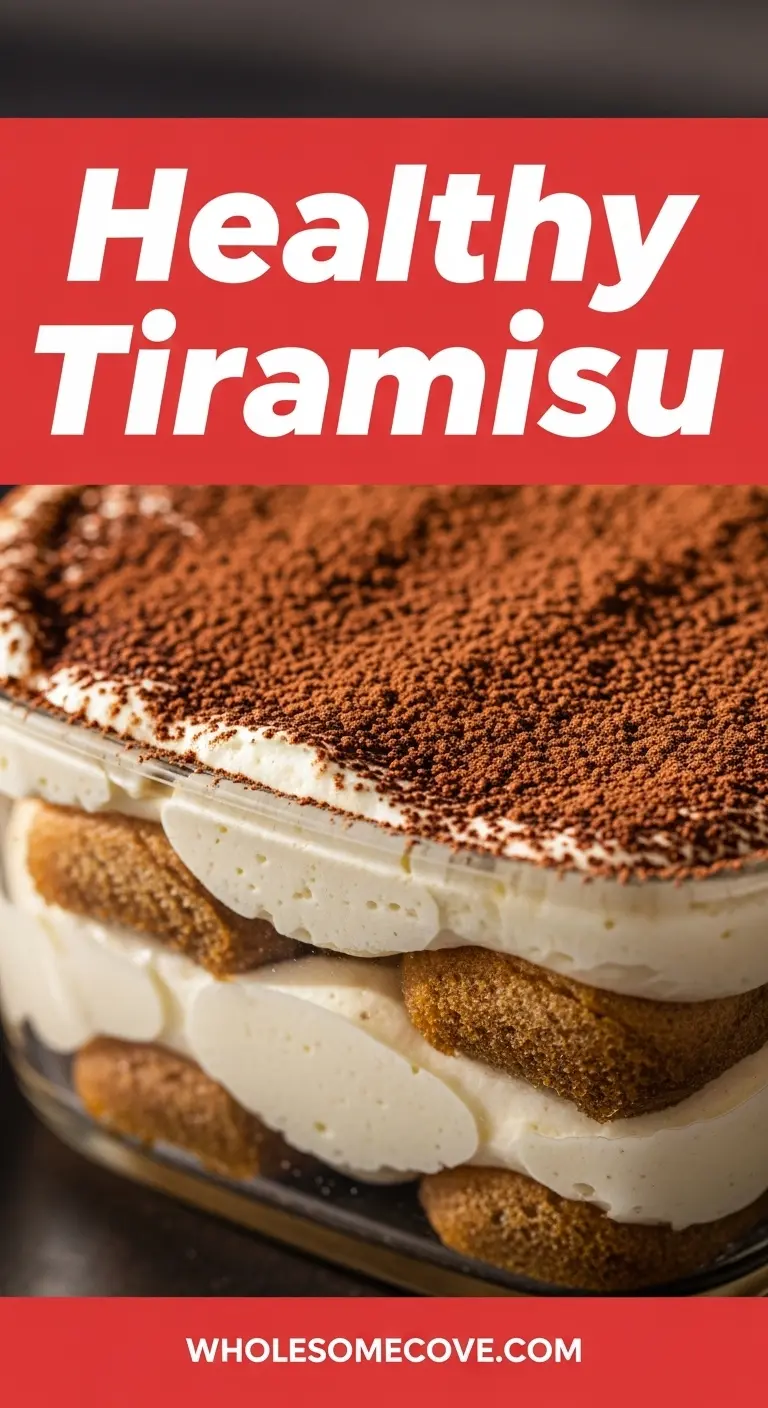
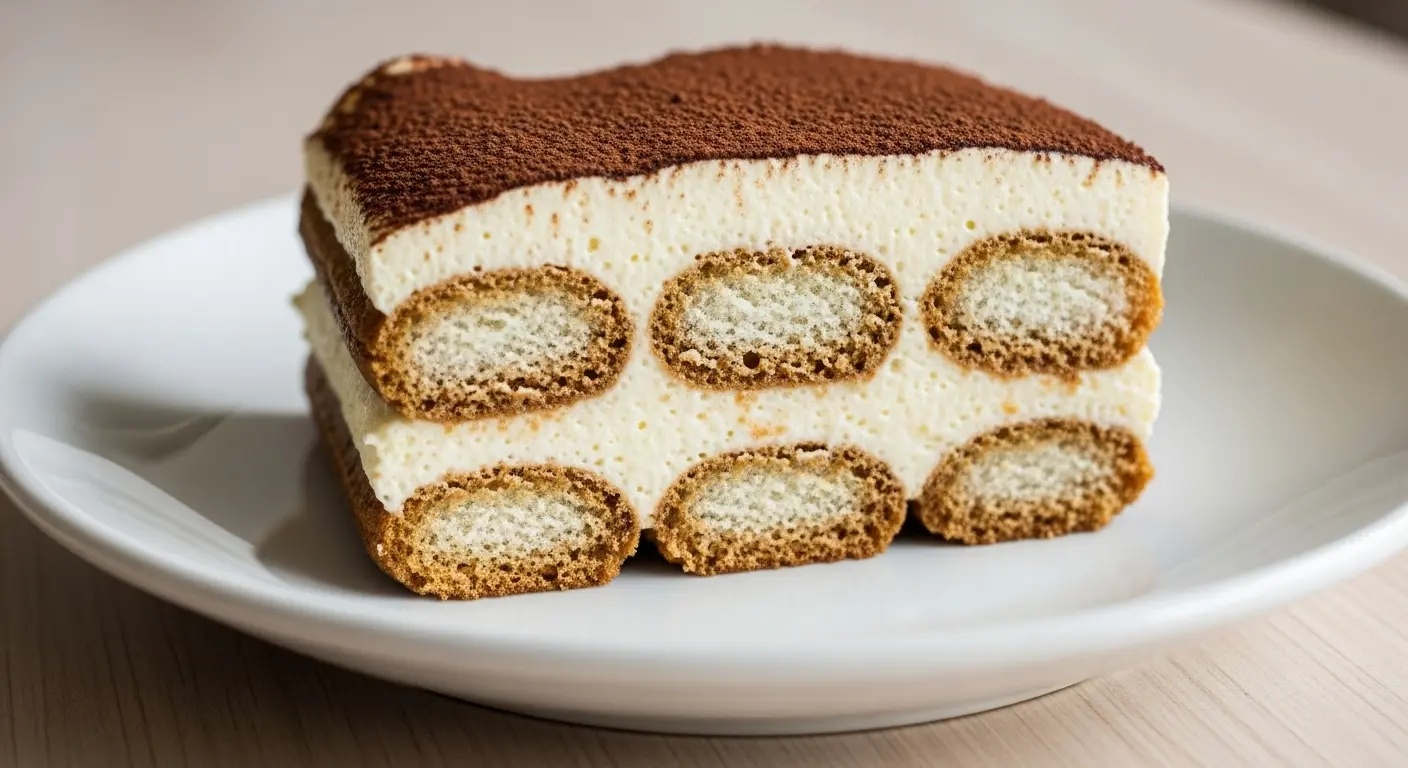
Step 6: Assemble the First Layer
- Arrange the espresso-dipped ladyfingers side by side in a single, snug layer across the bottom of your 9×9 inch (23×23 cm) or 11×8 inch (28×20 cm) baking dish
- Break ladyfingers as needed to fill any gaps; don’t leave large empty spaces as the cream needs something to rest on
- Spoon half of the cream cheese and yogurt filling over the ladyfinger layer
- Use your spatula to spread the filling in an even, smooth layer all the way to the edges of the dish
Step 7: Assemble the Second Layer
- Repeat the dipping process with the remaining ladyfingers
- Place the second layer of soaked ladyfingers on top of the cream filling, again arranging them neatly in a single even layer and breaking pieces as needed to fill gaps
- Spoon the remaining cream filling over the top
- Smooth the surface with your spatula to create an even, flat top layer; this makes for a beautiful presentation when dusted with cocoa
Step 8: Dust with Cocoa and Chill
- Place the unsweetened cocoa powder into a fine mesh sieve or sifter
- Hold it over the dish and tap gently to dust an even, generous layer of cocoa powder over the entire surface of the tiramisu
- Cover the dish tightly with plastic wrap, being careful not to press the wrap into the surface of the cream
- Refrigerate for a minimum of 6 hours, though overnight is strongly recommended; the chilling time allows the ladyfingers to soften fully and the flavors to meld together beautifully
- Slice and serve cold, dusting with a little more fresh cocoa powder just before serving if desired
Read Also: Fruit Tart Recipe
Tips for The Best Healthy Tiramisu
Getting a healthy tiramisu to taste as indulgent as the real thing comes down to a few important details. After a dozen batches (and a few soggy disasters in the early days), here’s everything I’ve learned.
- Use full-fat Greek yogurt – low-fat or non-fat yogurt is too watery and will make your filling loose and runny; you need that thick, strained consistency
- Bring the cream cheese to room temperature – if it’s cold, it won’t blend smoothly with the yogurt and you’ll end up with lumps in your filling
- Don’t oversoak the ladyfingers – a quick 1-2 second dip on each side is all you need; I cannot stress this enough because soggy ladyfingers are the number one reason tiramisu fails
- Use strong coffee – watery coffee won’t deliver the bold flavor the dessert needs; use espresso or brew your coffee extra strong
- Chill the bowl before whipping cream – pop your mixing bowl in the freezer for 10 minutes before whipping; cold equipment helps the cream whip up faster and hold its peaks longer
- Fold, don’t stir – when combining the whipped cream with the yogurt filling, use gentle folding motions to preserve the airiness; aggressive stirring will deflate the cream
- Let it chill overnight – the texture and flavor both improve dramatically with time; 6 hours is the minimum, overnight is ideal, and two days is even better
- Fresh cocoa dusting before serving – the cocoa can absorb moisture during chilling and get a little dark and damp; a light additional dusting right before serving keeps it looking picture-perfect
- Use high-quality cocoa – because the cocoa is the finishing flourish and the only real “topping” on this dessert, use the best cocoa you can find; it makes a noticeable difference
- Add more espresso to the layers – if you find your ladyfingers are still a bit dry after chilling, you can spoon a tiny extra drizzle of espresso over each layer during assembly
You might also enjoy: Creme Brulee Recipe
What to Serve with Healthy Tiramisu

This tiramisu is rich and creamy enough to stand alone as the star dessert. But there are some lovely things to serve alongside it if you’re building a full dinner party spread or weekend brunch.
A strong cup of espresso or freshly brewed coffee is the most natural pairing imaginable, amplifying the coffee notes in every bite.
- Fresh berries – a simple bowl of fresh strawberries or raspberries on the side cuts through the creaminess beautifully and adds a lovely pop of color and acidity
- Espresso or cappuccino – nothing complements tiramisu like a strong cup of coffee served alongside; it’s the classic Italian ending to a meal
- Whipped cream on the side – even though there’s already cream in the tiramisu, a small extra dollop of lightly sweetened whipped cream never goes amiss for those who love extra richness
- Healthy Crepes – serve thin, delicate crepes alongside for a beautiful dessert spread; the contrast of textures is wonderful
- Dark chocolate shavings – a few curls of high-quality dark chocolate sprinkled over individual servings add a lovely visual and a slightly bitter counterpoint to the sweet cream
- Biscotti – crunchy almond biscotti for dipping in the coffee is a classic Italian touch that makes the dessert experience feel even more special
- Sparkling water with citrus – a glass of sparkling water with a squeeze of lemon or orange cleanses the palate between bites and keeps things refreshing
Read Also: Healthy Pumpkin Pie Recipe
Variations of Healthy Tiramisu
The base recipe is wonderfully flexible. Once you’ve made it once, it’s easy to riff on it in creative ways. All of the variations below use the same basic cream filling and assembly method.
Here are some of my favorite ways to change it up depending on the season or the occasion.
- Chocolate Tiramisu – add 2 tablespoons (16 g) of cocoa powder directly into the cream filling and use chocolate milk or chocolate espresso for soaking the ladyfingers; dust generously with extra cocoa on top
- Berry Tiramisu – replace the espresso soak with a mixture of strong hibiscus tea and a little honey; layer fresh blueberries or raspberries between the cream and ladyfinger layers for a fruity, summery version
- Lemon Tiramisu – use lemon juice and zest in the cream filling in place of the espresso soak; steep the ladyfingers in lemon simple syrup instead; this makes a bright, refreshing alternative
- Pumpkin Spice Tiramisu – stir 3 tablespoons (45 g) of pumpkin puree and a pinch of pumpkin spice into the cream filling; this is a cozy fall version that pairs beautifully with warm spiced coffee
- Mocha Tiramisu – stir 1 tablespoon (8 g) of cocoa powder into the espresso soak for a deeper chocolate-coffee flavor throughout
- Individual Cup Tiramisu – instead of assembling in a large dish, layer the components in individual dessert glasses or wide-mouthed mason jars for a beautiful single-serve presentation that’s perfect for parties
- Dairy-Free Version – use thick coconut cream in place of the whipped cream and a dairy-free cream cheese alternative; the coconut adds a subtle tropical note that works surprisingly well with the coffee flavor
Another favorite: Healthy Chocolate Chip Cookies Recipe
Storage and Reheating
This tiramisu stores beautifully in the fridge, which makes it one of the best make-ahead desserts around. The flavor actually deepens over time, so don’t worry if you make it a day or two ahead.
- Refrigerator storage – cover the dish tightly with plastic wrap or transfer individual slices to an airtight container; it will keep well in the fridge for up to 4 days; the texture is best in the first 2-3 days before the ladyfingers get too soft
- Freezer storage – this tiramisu can be frozen whole or in individual portions; wrap tightly in plastic wrap and then in aluminum foil; it will keep in the freezer for up to 1 month
- Thawing from frozen – move the frozen tiramisu to the refrigerator the night before you plan to serve it and let it thaw slowly overnight; do not thaw at room temperature as this can affect the texture of the cream layers
- Do not reheat – tiramisu is always served cold; there is no reheating involved with this recipe
- Dust fresh cocoa before serving – after storing, the cocoa powder on top can absorb moisture and darken; dust a fresh layer of cocoa powder just before serving for the best appearance
- Slice while cold – the tiramisu slices most cleanly when it’s fully chilled; if it’s been sitting out for more than 20 minutes, the cream layer softens and doesn’t cut as neatly
You might also enjoy: Pumpkin Cheesecake Recipe

Nutritional Facts
These values are approximate per serving based on 9 servings per recipe. Actual values may vary slightly based on specific brands of ingredients used.
| Nutrient | Per Serving (approx.) |
|---|---|
| Calories | 230 kcal |
| Total Fat | 13 g |
| Saturated Fat | 7 g |
| Cholesterol | 45 mg |
| Sodium | 130 mg |
| Total Carbohydrates | 22 g |
| Dietary Fiber | 0.5 g |
| Total Sugars | 11 g |
| Added Sugars | 6 g |
| Protein | 6 g |
| Calcium | 80 mg |
Note: Using full-fat Greek yogurt instead of mascarpone reduces the fat content considerably. Traditional tiramisu typically contains around 350-400 calories per serving.
Read Also: Coffee Cake Recipe Using Cake Mix
Health Benefits of Key Ingredients
This dessert earns its “healthy” label not just from what it leaves out, but from what it includes. Several of the core ingredients bring real nutritional value to the table.
Swapping mascarpone for Greek yogurt and cream cheese doesn’t just cut calories; it actually adds meaningful nutritional benefits that the original recipe lacks entirely.
- Greek yogurt – packed with protein (typically 15-20 grams per cup), probiotics for gut health, calcium for strong bones, and B vitamins; using it as the base of the cream filling gives the dessert a meaningful protein boost compared to the traditional version
- Espresso and coffee – rich in antioxidants called polyphenols that help fight inflammation; moderate coffee consumption has been linked in multiple studies to improved cognitive function and reduced risk of certain chronic diseases
- Cream cheese (in moderation) – provides calcium and small amounts of vitamin A; full-fat versions are more satiating, which means you’re less likely to over-eat
- Maple syrup or honey – while still sugar, these natural sweeteners contain trace minerals like manganese and zinc (maple syrup) or antioxidants and enzymes (raw honey) that refined sugar completely lacks
- Cocoa powder – unsweetened cocoa is genuinely good for you; it’s high in flavonoids which are antioxidants associated with improved heart health, blood pressure reduction, and mood-boosting effects; it also provides magnesium and iron
- Ladyfinger biscuits (Savoiardi) – lighter and lower in fat than most cookies or cakes; they provide the structure and carbohydrates needed for energy without the heavy butter content of pastry-based desserts
For more delicious and nutritious ideas, check out these Easy Healthy Dinner Recipes for Family.
FAQs About Healthy Tiramisu
1. Can I make healthy tiramisu without ladyfinger cookies?
Yes, absolutely. If you can’t find ladyfingers, sponge cake cut into strips is a great substitute. You can also use thin slices of angel food cake, or even plain digestive biscuits if you want a crunchier base.
The texture will be slightly different, but the flavor will still be delicious.
2. Can I make this tiramisu completely dairy-free?
You can! Replace the cream cheese with a dairy-free alternative (like Violife or Kite Hill cream cheese style spread) and use full-fat canned coconut cream in place of the whipping cream.
The Greek yogurt can be swapped for a thick, plain coconut yogurt. The result will have a subtle coconut note, but it works beautifully.
3. How long does healthy tiramisu need to chill before serving?
The minimum chilling time is 6 hours. But overnight, or even two full days in the fridge, produces by far the best results.
The longer it chills, the more the ladyfingers soften and the flavors meld together into that perfect, cohesive tiramisu texture.
4. Can I use instant coffee instead of espresso?
Yes. Dissolve 2 teaspoons (6 g) of a good-quality instant espresso powder in 1 cup (240 ml) of hot water for the soaking liquid. This is actually my go-to shortcut on busy days.
Just make sure it’s a strong espresso-style instant coffee rather than regular instant coffee, which tends to be more watery and less bold in flavor.
5. Is there a way to make this tiramisu even lower in calories?
You can use reduced-fat cream cheese and light whipping cream to further cut calories. You can also reduce the maple syrup to just 2 tablespoons (30 ml).
Keep in mind that the texture will be slightly less rich and creamy if you reduce the fat content significantly, but it will still be absolutely delicious.
For more light baking inspiration, try my Healthy Banana Bread Recipe.
Healthy Tiramisu
Ingredients
- 1 cup strong brewed espresso or very strong coffee - 240 ml; cooled to room temperature
- 1 tbsp dark rum or coffee liqueur - 15 ml; optional — omit for alcohol-free version
- 8 oz full-fat cream cheese - 225 g; softened to room temperature
- 1 cup full-fat plain Greek yogurt - 240 g; thick, strained yogurt works best
- 3 tbsp pure maple syrup or honey - 45 ml; adjust to taste
- 1 tsp pure vanilla extract - 5 ml
- 1 cup heavy whipping cream - 240 ml; well chilled
- 2 tbsp powdered sugar - 16 g; confectioners’ sugar
- 24 ladyfinger cookies - Savoiardi biscuits; approximately one 7 oz / 200 g package
- 3 tbsp unsweetened cocoa powder - 21 g; for dusting generously over the top; plus extra for serving
Equipment
- Electric hand mixer or stand mixer - Essential for whipping cream to stiff peaks
- Large mixing bowl - You will need at least two — one for the cream cheese mixture, one for the whipped cream
- Shallow dish or wide bowl - For dipping the ladyfingers into the espresso mixture
- 9×9 inch baking dish - 23×23 cm; or an 11×8 inch (28×20 cm) rectangular dish works equally well
- Rubber spatula - For gently folding the cream layers together
- Fine mesh sieve or sifter - For dusting cocoa powder evenly over the top
- Plastic wrap or lid - To cover the dish while chilling in the refrigerator
Method
- Brew 1 cup (240 ml) of strong espresso or very strong black coffee, then pour it into a shallow dipping dish. Stir in the rum or coffee liqueur if using, and allow the mixture to cool completely to room temperature before proceeding.
- Beat the softened cream cheese in a large bowl with an electric mixer on medium speed for about 60 seconds until smooth and lump-free. Add the Greek yogurt, maple syrup, and vanilla extract, then beat again for 30 seconds until fully combined and creamy.
- In a separate cold bowl, whip the chilled heavy cream on high speed, gradually adding the powdered sugar, until stiff peaks form. Be careful not to overwhip.
- Using a rubber spatula, gently fold the whipped cream into the cream cheese and yogurt mixture using slow over-and-under strokes until fully combined with no white streaks remaining. Refrigerate while you prepare the ladyfingers.
- Working one at a time, dip each ladyfinger into the cooled espresso for just 1–2 seconds per side — a quick dip only, not a soak. Shake off any excess before placing in the dish.
- Arrange the dipped ladyfingers in a single snug layer across the bottom of your baking dish, breaking pieces as needed to fill gaps. Spread half of the cream filling evenly over the top all the way to the edges.
- Repeat the dipping process with the remaining ladyfingers and arrange them in a second even layer on top of the cream. Spoon the remaining filling over the top and smooth it flat with a spatula.
- Sift the unsweetened cocoa powder evenly over the entire surface using a fine mesh sieve. Cover tightly with plastic wrap and refrigerate for a minimum of 6 hours, or overnight for best results. Dust with additional cocoa powder just before serving.
Nutrition
Notes
- Use full-fat Greek yogurt only — low-fat or non-fat versions are too watery and will make the filling loose and runny.
- Bring cream cheese to room temperature before mixing; cold cream cheese will create lumps that won’t blend out properly.
- A quick 1–2 second dip per side is all the ladyfingers need — oversaturating them is the most common reason tiramisu falls apart.
- Chill your mixing bowl in the freezer for 10 minutes before whipping the cream; cold equipment produces faster, more stable peaks.
- The tiramisu improves significantly with time — overnight chilling produces the best flavor and texture, and it keeps well for up to 2 days after that.
- For a completely alcohol-free version, simply omit the rum or coffee liqueur with no other changes needed.
- For a dairy-free version, use a thick coconut yogurt, dairy-free cream cheese, and full-fat canned coconut cream in place of the whipping cream.
- Instant espresso powder (2 tsp dissolved in 1 cup hot water) is a convenient substitute for brewed espresso and works excellently.
- Dust a fresh layer of cocoa powder just before serving — the original dusting can absorb moisture during chilling and darken slightly.
- Store covered in the refrigerator for up to 4 days, or freeze individual portions for up to 1 month; thaw overnight in the fridge before serving.
Private Notes
Tried this recipe?
Let us know how it was!Final Thoughts
This Healthy Tiramisu Recipe has honestly become one of my most-made desserts. It’s the one I reach for when I want to impress guests without spending hours in the kitchen or feeling like I’ve completely blown my healthy eating goals.
What I love most is how forgiving and flexible this recipe is. Once you know the basic formula, it’s easy to adapt it to whatever ingredients you have on hand.
I really hope you give this a try. Make it for your next dinner party, family gathering, or just because it’s Tuesday and you deserve something wonderful.
If you make it, I’d love to hear how it turned out! Drop a comment below and let me know if you added your own twist, or snap a photo and share it with me.
Recommended:
- Authentic Italian Tiramisu Recipe
- Creme Brulee Cheesecake Recipe
- Healthy Waffle Recipe
- Overnight Oats Recipe
- Healthy Egg Salad Recipe
- Easy Healthy Homemade Granola Recipe
- Healthy Homemade Pesto Recipe
- Healthy Nachos Recipe
- Healthy Coleslaw Recipe
- Healthy Bruschetta Recipe
