
I’ve been using my air fryer to make eggs for about six months now, and honestly, I can’t imagine going back to my old cooking methods.
The air fryer has completely transformed how I approach breakfast prep. No more standing over a hot stove, no more oil splatters on my clothes, and definitely no more scorched pans to scrub.
What makes air fryer eggs so special is the consistency. Every single time, they come out exactly how I want them – perfectly cooked whites, beautifully runny yolks (when I want them), and zero guesswork involved.
Plus, the cleanup is ridiculously easy. Just a quick wipe of the basket or a simple rinse of whatever container you used, and you’re done.
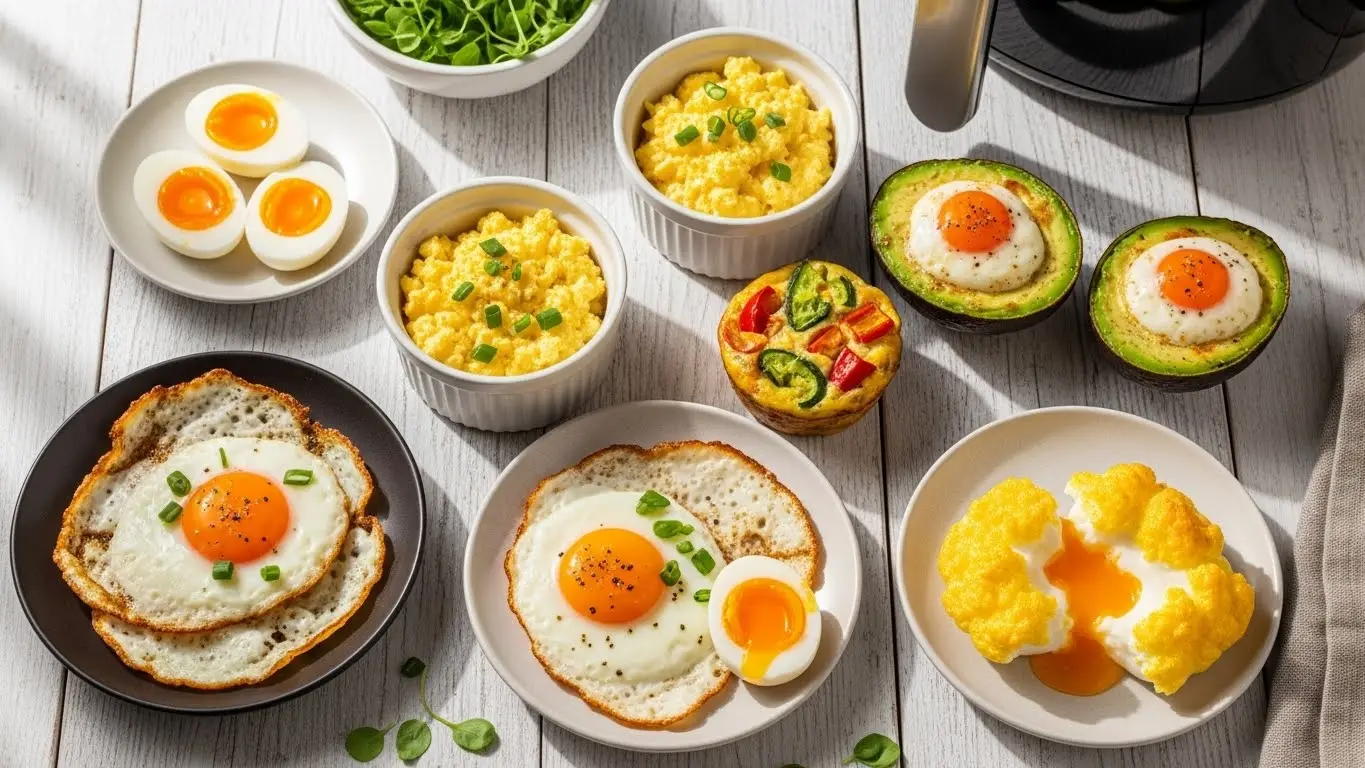
I’m sharing seven of my go-to air fryer egg recipes that have become staples in my kitchen. From simple hard-boiled eggs to more elaborate baked eggs with vegetables, these recipes cover everything you need for a satisfying breakfast, brunch, or even a quick dinner.
Quick Recipes Summary
| Aspect | Details |
|---|---|
| Prep Time | 2-10 minutes (varies by recipe) |
| Cook Time | 6-15 minutes (varies by recipe) |
| Total Time | 8-25 minutes |
| Servings | 1-4 servings per recipe |
| Difficulty | Easy |
| Main Ingredients | Eggs, various seasonings, optional vegetables and cheese |
Read Also: Air Fryer Morning Frittata
.jpg "Air Fryer Egg Recipes – Easy Recipes to Start Your Day Right")
1. Perfect Air Fryer Hard-Boiled Eggs
These are my absolute favorite for meal prep. I make a batch every Sunday and keep them in the fridge for quick snacks, salads, and breakfast sandwiches throughout the week.
The shells peel off so easily compared to traditional boiled eggs – it’s like magic.
Ingredients
- 6 large eggs (cold from the refrigerator)
- Ice water (for the ice bath)
Kitchen Equipment
- Air fryer
- Large bowl
- Ice
- Tongs or a slotted spoon
Step-by-Step Instructions
Step 1: Preheat Your Air Fryer
Set your air fryer to 250°F (120°C). Let it preheat for about 2-3 minutes. This ensures even cooking from the start.
Step 2: Arrange the Eggs
Place the cold eggs directly in the air fryer basket. Make sure they’re not touching each other too much, but it’s fine if they’re close. You want air to circulate around them.
Step 3: Cook the Eggs
Cook the eggs at 250°F (120°C) for 15-17 minutes. For softer yolks, go with 15 minutes. For completely hard yolks, cook for the full 17 minutes.
Step 4: Prepare the Ice Bath
While the eggs are cooking, fill a large bowl with ice and cold water. This ice bath is crucial for stopping the cooking process and making the eggs easier to peel.
Step 5: Transfer to Ice Bath
When the timer goes off, immediately use tongs or a slotted spoon to carefully transfer the hot eggs to the ice bath. The sudden temperature change makes the shells separate from the eggs.
Step 6: Cool and Peel
Let the eggs sit in the ice bath for at least 5 minutes. Once cooled, tap each egg gently on the counter, roll it to crack the shell all over, and peel under cool running water for easiest removal.
Tips
- Always use eggs straight from the refrigerator – cold eggs work best in the air fryer
- Don’t skip the ice bath; it’s essential for easy peeling
- Store peeled eggs in an airtight container in the refrigerator for up to one week
- If you have an older air fryer model, you might need to adjust the time by a minute or two
- Mark your hard-boiled eggs with a pencil before storing so you don’t confuse them with raw eggs
Serving Suggestions
These hard-boiled eggs are incredibly versatile for any meal.
- Slice them for salads like Chickpea Salad or grain bowls
- Make classic Deviled Eggs for parties
- Chop them for egg salad sandwiches
- Add to ramen or noodle soups
- Enjoy them plain with a sprinkle of salt and pepper as a protein-packed snack
2. Air Fryer Scrambled Eggs in Ramekins
I discovered this method on a busy weekday morning when I needed breakfast for my kids but didn’t want to dirty multiple pans.
Now it’s my go-to for making individual portions with different add-ins for picky eaters. Everyone gets exactly what they want, and I don’t lose my mind.
Ingredients
- 6 large eggs
- 3 tablespoons (45ml) whole milk or heavy cream
- 1/4 teaspoon (1.25ml) salt
- 1/8 teaspoon (0.6ml) black pepper
- 2 tablespoons (30g) unsalted butter, melted
- Optional: 1/4 cup (30g) shredded cheddar cheese
- Optional: 2 tablespoons (20g) diced bell peppers
- Optional: 2 tablespoons (15g) diced onions
- Cooking spray
Kitchen Equipment
- Air fryer
- 3-4 oven-safe ramekins (4-6 oz each)
- Whisk
- Mixing bowl
- Fork or small whisk
Step-by-Step Instructions
Step 1: Prepare the Ramekins
Spray each ramekin generously with cooking spray. Make sure you get the sides and bottom well coated. This prevents sticking and makes cleanup much easier.
Step 2: Mix the Egg Mixture
In a mixing bowl, crack all 6 eggs. Add the milk or heavy cream, salt, and black pepper. Whisk everything together vigorously until the mixture is completely combined and slightly frothy. You should see no streaks of egg white.
Step 3: Add Melted Butter
Pour the melted butter into the egg mixture and whisk again until incorporated. The butter adds richness and helps create a creamy texture.
Step 4: Add Optional Ingredients
If you’re using cheese, bell peppers, or onions, fold them into the egg mixture now using a fork or small whisk. Distribute them evenly.
Step 5: Pour Into Ramekins
Divide the egg mixture evenly among your prepared ramekins. Fill each one about 3/4 full to leave room for the eggs to expand as they cook.
Step 6: Preheat and Arrange
Preheat your air fryer to 320°F (160°C) for 3 minutes. Place the ramekins in the air fryer basket, making sure they’re not touching each other.
Step 7: Cook the Eggs
Cook at 320°F (160°C) for 10-12 minutes. At the 6-minute mark, open the air fryer and use a fork to gently stir each ramekin. This creates fluffy, evenly cooked scrambled eggs.
Step 8: Check for Doneness
The eggs are done when they’re set but still slightly glossy on top. They’ll continue cooking slightly from residual heat, so don’t overcook them or they’ll become rubbery.
Step 9: Serve
Carefully remove the ramekins using oven mitts (they’ll be hot!). Let them cool for 1-2 minutes before serving directly in the ramekin or sliding the eggs onto a plate.
Tips
- For ultra-creamy eggs, use heavy cream instead of milk
- Don’t overfill the ramekins – eggs expand as they cook
- Stir the eggs halfway through for the fluffiest texture
- Experiment with different add-ins like cooked bacon, sausage, or fresh herbs
- If your ramekins are different sizes, adjust cooking time accordingly
- Add a dollop of sour cream or salsa on top before serving for extra flavor
Serving Suggestions
These individual scrambled eggs are perfect for customizable breakfasts.
- Serve alongside Air Fryer French Toast for a complete breakfast
- Top with fresh Avocado Toast crumbles
- Pair with crispy bacon and buttered toast
- Add a side of fresh fruit for a balanced meal
- Serve with Homemade Biscuits for a Southern-style breakfast
You might also enjoy: Healthy Egg Salad
.jpg "Air Fryer Egg Recipes – Simple Recipes for Weight Loss Goals")
3. Air Fryer Baked Eggs in Avocado
This recipe started as an Instagram trend I rolled my eyes at, but then I actually tried it. Now I make it at least twice a week.
The creamy avocado pairs perfectly with the runny yolk, and it’s one of those recipes that looks way fancier than the effort required.
Ingredients
- 2 large ripe avocados
- 4 small eggs (or 2 large eggs)
- 1/4 teaspoon (1.25ml) salt
- 1/4 teaspoon (1.25ml) black pepper
- 1/4 teaspoon (1.25ml) garlic powder
- 2 tablespoons (15g) shredded mozzarella or cheddar cheese
- 1 tablespoon (3g) fresh chopped cilantro or parsley
- Optional: 1/4 teaspoon (1.25ml) red pepper flakes
- Optional: 2 slices cooked bacon, crumbled
- Cooking spray
Kitchen Equipment
- Air fryer
- Sharp knife
- Spoon
- Small bowl (for any excess avocado you scoop out)
- Aluminum foil or small baking dish that fits in your air fryer
Step-by-Step Instructions
Step 1: Prepare the Avocados
Cut each avocado in half lengthwise and remove the pit. Using a spoon, scoop out a bit more flesh from the center of each avocado half to create a larger well for the egg. You want a depression that’s about 1.5 inches wide.
Step 2: Save the Extra Avocado
Place the extra avocado flesh you scooped out in a small bowl. You can use this later for toast or as a topping.
Step 3: Create Stable Bases
If your avocado halves won’t sit flat, slice a tiny bit off the rounded bottom of each half to create a stable base. Be careful not to cut through to the cavity where the egg will go.
Step 4: Prepare the Air Fryer
Line your air fryer basket with aluminum foil or use a small baking dish that fits inside. This prevents any egg spills from making a mess. Spray lightly with cooking spray.
Step 5: Season the Avocados
Place the avocado halves in the prepared air fryer basket, cavity side up. Sprinkle each half with a pinch of salt, pepper, and garlic powder.
Step 6: Add the Eggs
Carefully crack one egg into each avocado half. If using large eggs, you might need to remove a bit of the egg white to prevent overflow. The yolk and most of the white should fit in the cavity.
Step 7: Add Toppings
Sprinkle the shredded cheese over each egg. If using red pepper flakes or crumbled bacon, add them now as well.
Step 8: Air Fry
Set your air fryer to 350°F (175°C) and cook for 10-12 minutes. For runny yolks, aim for 10 minutes. For set yolks, go for 12 minutes.
Step 9: Check for Doneness
The egg whites should be set and opaque, while the yolk should be cooked to your preference. The cheese should be melted and slightly golden.
Step 10: Garnish and Serve
Remove the avocado halves carefully using a spatula or tongs. Garnish with fresh chopped cilantro or parsley. Serve immediately while hot.
Tips
- Choose avocados that are ripe but still firm – too soft and they’ll turn mushy
- Use small eggs or remove excess egg white to prevent overflow
- Create a ring of foil around the base if your avocados are unstable
- Don’t overcook or the avocado will become bitter
- For extra flavor, add a squeeze of lime juice before serving
- If the egg white overflows slightly, don’t worry – it’ll crisp up and taste delicious
Serving Suggestions
This dish is a complete meal on its own, but pairs well with simple sides.
- Serve with whole grain toast for scooping
- Add a side of mixed greens with lemon vinaigrette
- Top with salsa or hot sauce for a Mexican-inspired breakfast
- Pair with fresh tomato slices and cucumber
- Serve alongside Air Fryer Cheddar Hash Browns for a hearty breakfast
Read Also: Air Fryer Turkey Scotch Eggs
4. Air Fryer Egg Muffins with Vegetables
These egg muffins have saved me countless mornings when I’m running late. I make a big batch on Sunday, store them in the fridge, and grab two or three on my way out the door.
They reheat perfectly in the microwave, and they’re packed with vegetables, which makes me feel like I’m winning at adulting.
Ingredients
- 8 large eggs
- 1/4 cup (60ml) whole milk
- 1/2 teaspoon (2.5ml) salt
- 1/4 teaspoon (1.25ml) black pepper
- 1/2 teaspoon (2.5ml) garlic powder
- 1/2 cup (50g) shredded cheddar cheese
- 1/2 cup (75g) diced bell peppers (any color)
- 1/3 cup (50g) diced onions
- 1/2 cup (75g) chopped fresh spinach
- 1/4 cup (40g) diced tomatoes
- 1/4 cup (30g) cooked and crumbled bacon or sausage (optional)
- Cooking spray
Kitchen Equipment
- Air fryer
- Silicone muffin cups or small oven-safe ramekins
- Large mixing bowl
- Whisk
- Cutting board
- Sharp knife
- Measuring cups and spoons
Step-by-Step Instructions
Step 1: Prepare the Vegetables
Wash and dice all your vegetables into small, uniform pieces about 1/4 inch in size. The smaller pieces distribute better throughout the egg muffins and cook more evenly.
Step 2: Prep the Muffin Cups
Spray your silicone muffin cups or ramekins generously with cooking spray. Make sure to get the sides and bottom completely coated. This is crucial for easy removal later.
Step 3: Make the Egg Mixture
In a large mixing bowl, crack all 8 eggs. Add the milk, salt, black pepper, and garlic powder. Whisk vigorously for about 30 seconds until everything is well combined and slightly frothy.
Step 4: Add the Cheese
Add the shredded cheddar cheese to the egg mixture and whisk again to distribute it evenly throughout.
Step 5: Combine with Vegetables
Add all the diced vegetables (bell peppers, onions, spinach, and tomatoes) to the egg mixture. If using cooked bacon or sausage, add it now. Stir everything together with a spoon or whisk until the vegetables are evenly distributed.
Step 6: Fill the Muffin Cups
Pour the egg mixture into your prepared muffin cups, filling each one about 3/4 full. The eggs will puff up as they cook, so leave some room at the top.
Step 7: Distribute Ingredients
Give each muffin cup a quick stir with a fork to ensure the vegetables are evenly distributed. Sometimes they settle to the bottom while pouring.
Step 8: Preheat the Air Fryer
Set your air fryer to 300°F (150°C) and let it preheat for 3 minutes.
Step 9: Arrange in Air Fryer
Place the filled muffin cups in the air fryer basket. Depending on your air fryer size, you might need to cook in batches. Don’t overcrowd – leave space between each cup for air circulation.
Step 10: Cook the Egg Muffins
Cook at 300°F (150°C) for 12-15 minutes. The egg muffins are done when they’re puffed up, golden on top, and a toothpick inserted in the center comes out clean.
Step 11: Cool and Remove
Let the egg muffins cool in the cups for 3-4 minutes before removing. This cooling time helps them set properly and makes them easier to remove from the cups.
Step 12: Serve or Store
Serve immediately while warm, or let them cool completely before storing in an airtight container in the refrigerator for up to 5 days.
Tips
- Pat the spinach and tomatoes dry with paper towels before adding to reduce excess moisture
- Use silicone muffin cups instead of metal for easier removal
- Don’t overfill the cups or they’ll overflow while cooking
- Experiment with different vegetable combinations based on what you have
- Freeze cooked egg muffins for up to 2 months – reheat from frozen in the microwave
- Add different cheeses like feta, pepper jack, or Swiss for variety
Serving Suggestions
These egg muffins work for any meal and are extremely portable.
- Pair with whole wheat toast and fresh fruit
- Serve alongside Air Fryer Simple Baked Potatoes for brunch
- Pack in lunchboxes with crackers and raw vegetables
- Serve with salsa and sour cream for a Mexican-inspired breakfast
- Add to a Breakfast Burrito with salsa and avocado
Another favorite: Shakshuka
.jpg "Air Fryer Egg Recipes – Fast Recipes for Meal Prep Success")
5. Air Fryer Fried Eggs
I was skeptical about making fried eggs in an air fryer until I tried it. The whites get perfectly crispy around the edges while the yolk stays beautifully runny.
It’s like having diner-style eggs without standing over a hot stove or dealing with splattering oil.
Ingredients
- 2-4 large eggs
- 1 tablespoon (15ml) olive oil or melted butter
- Salt to taste
- Black pepper to taste
- Optional: 1/8 teaspoon (0.6ml) paprika
- Optional: fresh herbs like chives or parsley for garnish
- Cooking spray
Kitchen Equipment
- Air fryer
- Small oven-safe dishes or ramekins (one per egg)
- Pastry brush or spoon
- Spatula
Step-by-Step Instructions
Step 1: Prepare the Dishes
Lightly spray your oven-safe dishes or ramekins with cooking spray. Then, use a pastry brush or the back of a spoon to coat the bottom and sides of each dish with olive oil or melted butter. This creates a crispy bottom on the eggs and prevents sticking.
Step 2: Preheat the Air Fryer
Set your air fryer to 350°F (175°C) and preheat for 3-4 minutes. Preheating ensures even cooking from the start.
Step 3: Warm the Dishes
Place the empty, oiled dishes in the preheated air fryer for 1 minute. This warms the oil and helps the eggs start cooking immediately when you add them.
Step 4: Crack the Eggs
Carefully remove the warm dishes from the air fryer using oven mitts. Crack one egg into each dish, being careful not to break the yolk. The warm oil should immediately start setting the bottom of the egg white.
Step 5: Season the Eggs
Sprinkle each egg with a pinch of salt and black pepper. If using paprika, add a light dusting now.
Step 6: Air Fry the Eggs
Place the dishes back in the air fryer basket. Cook at 350°F (175°C) for 5-7 minutes, depending on how you like your yolks. For runny yolks, cook for 5 minutes. For medium yolks, cook for 6 minutes. For firm yolks, cook for 7 minutes.
Step 7: Check for Doneness
The egg whites should be completely set and opaque, with slightly crispy edges. The yolk should be cooked to your desired doneness.
Step 8: Remove and Serve
Using oven mitts, carefully remove the dishes from the air fryer. Let them cool for 30 seconds, then use a spatula to gently slide the eggs out onto plates. If they stick, run a knife around the edge first.
Step 9: Garnish
Add a final sprinkle of salt and pepper if desired, and garnish with fresh herbs if using.
Tips
- Use room temperature eggs for more even cooking
- Don’t skip the preheating step – it makes a big difference
- Watch the eggs closely the first time to learn your air fryer’s timing
- For over-easy eggs, flip them halfway through cooking using a spatula
- Add a teaspoon of water to the dish and cover with foil for steamed eggs
- Butter creates richer flavor than olive oil
Serving Suggestions
These fried eggs are perfect for topping almost anything.
- Serve over Avocado Toast for a classic breakfast
- Top burgers or sandwiches for extra richness
- Place over Healthy Fried Rice for a complete meal
- Serve alongside crispy bacon and hash browns
- Add to grain bowls with roasted vegetables
For a lighter option, try: Healthy Waffle
6. Air Fryer Soft-Boiled Eggs
Soft-boiled eggs used to intimidate me because getting that perfect jammy yolk seemed impossible. The air fryer changed everything.
Now I can make them consistently perfect every single time, and they’re my favorite thing to add to ramen, salads, or just eat with toast soldiers for dipping.
Ingredients
- 4-6 large eggs (cold from the refrigerator)
- Ice water (for the ice bath)
- Salt and pepper for serving
- Optional: everything bagel seasoning
- Optional: soy sauce for serving
Kitchen Equipment
- Air fryer
- Large bowl
- Ice
- Tongs or slotted spoon
- Timer
Step-by-Step Instructions
Step 1: Preheat the Air Fryer
Set your air fryer to 250°F (120°C) and let it preheat for 2-3 minutes. Consistent temperature is key for perfect soft-boiled eggs.
Step 2: Arrange the Cold Eggs
Place the cold eggs directly from the refrigerator into the air fryer basket. Space them slightly apart but they can touch – just ensure air can circulate around them.
Step 3: Set Your Timer
Cook at 250°F (120°C) for exactly 10 minutes for jammy yolks. Set a timer and don’t peek! Opening the air fryer releases heat and affects cooking time.
Step 4: Prepare the Ice Bath
While the eggs cook, fill a large bowl with cold water and add plenty of ice. The ice bath needs to be very cold to stop the cooking process immediately.
Step 5: Transfer Immediately
As soon as the timer goes off, use tongs or a slotted spoon to carefully and quickly transfer each egg to the ice bath. Speed matters here – every second counts for that perfect jammy texture.
Step 6: Cool the Eggs
Let the eggs sit in the ice bath for exactly 5 minutes. This stops the cooking and makes them easier to peel.
Step 7: Peel Carefully
Soft-boiled eggs are more delicate than hard-boiled. Tap the egg gently all over to crack the shell, then peel very carefully under cool running water. The egg will be soft, so handle it gently.
Step 8: Season and Serve
Cut the eggs in half to reveal that gorgeous jammy yolk. Season with salt, pepper, and optional everything bagel seasoning or soy sauce.
Tips
- Timing is critical – use a reliable timer and stick to it exactly
- Always use cold eggs straight from the fridge
- The ice bath must be very cold with lots of ice
- Peel under running water for easiest removal
- For slightly runnier yolks, reduce cooking time to 9 minutes
- For slightly firmer yolks, increase to 11 minutes
- Store unpeeled soft-boiled eggs in the fridge for up to 2 days
Serving Suggestions
Soft-boiled eggs add richness and protein to many dishes.
- Serve halved over ramen or noodle bowls
- Add to grain bowls with vegetables
- Place on top of Asparagus Soup for extra protein
- Serve with toast soldiers for dipping
- Top avocado toast for a luxurious breakfast
- Add to salads like Shrimp and Avocado Salad for extra richness
7. Air Fryer Cloud Eggs
These Instagram-worthy eggs look complicated but they’re surprisingly simple. I make them when I want to impress brunch guests or just treat myself to something special.
The fluffy egg white clouds with a perfectly cooked yolk nestled in the center never fail to get compliments.
Ingredients
- 4 large eggs (at room temperature)
- 1/4 cup (25g) shredded parmesan cheese
- 2 tablespoons (15g) shredded cheddar cheese
- 1/4 teaspoon (1.25ml) salt
- 1/8 teaspoon (0.6ml) black pepper
- 1 tablespoon (3g) chopped fresh chives
- Optional: 2 slices cooked bacon, crumbled
- Optional: 1/8 teaspoon (0.6ml) garlic powder
- Cooking spray or parchment paper
Kitchen Equipment
- Air fryer
- Electric hand mixer or stand mixer
- Two mixing bowls (one must be very clean and dry)
- Spatula
- Spoon
- Parchment paper or silicone mat
Step-by-Step Instructions
Step 1: Separate the Eggs
Carefully separate the egg whites from the yolks. Place all the egg whites in one very clean, dry mixing bowl. Keep each yolk separate in its own small bowl or cup – you’ll need them individually later. Even a tiny bit of yolk in the whites will prevent them from whipping properly.
Step 2: Beat the Egg Whites
Using an electric hand mixer or stand mixer, beat the egg whites on medium-high speed until soft peaks form. This takes about 2-3 minutes. The whites should be fluffy and hold their shape but still look glossy, not dry.
Step 3: Add Seasonings to Whites
Sprinkle the salt, pepper, and garlic powder (if using) over the beaten egg whites. Gently fold in with a spatula using a sweeping motion from the bottom up. Don’t stir vigorously or you’ll deflate the whites.
Step 4: Fold in Cheese and Herbs
Add the parmesan cheese, cheddar cheese, and chopped chives to the egg whites. Fold gently until just combined. If using crumbled bacon, add it now. The mixture should still be light and fluffy.
Step 5: Prepare the Air Fryer
Line your air fryer basket with parchment paper that has been cut to fit and has a few holes poked in it for air circulation. Alternatively, spray the basket generously with cooking spray.
Step 6: Form the Clouds
Using a large spoon, scoop the whipped egg white mixture onto the prepared parchment paper or basket, forming 4 separate mounds. Each mound should be about 4-5 inches wide. Make a deep well in the center of each mound using the back of a spoon – this is where the yolk will go.
Step 7: First Air Frying Stage
Set your air fryer to 350°F (175°C). Cook the egg white clouds for 3 minutes. They should puff up and just start to turn golden on the edges, but still be soft in the center.
Step 8: Add the Yolks
Carefully open the air fryer. Gently place one egg yolk into the well of each cloud. Be careful not to break the yolks.
Step 9: Final Cooking
Cook for an additional 3-4 minutes at 350°F (175°C). For runny yolks, cook for 3 minutes. For slightly firmer yolks, cook for 4 minutes. The egg whites should be golden and set, while the yolks remain soft.
Step 10: Remove and Serve
Using a spatula, carefully transfer each cloud egg to a serving plate. The whites will be delicate, so move slowly and support the bottom.
Step 11: Garnish
Sprinkle with additional chives, a pinch of flaky sea salt, or extra cheese if desired.
Tips
- Room temperature eggs whip better than cold eggs
- Make sure your mixing bowl is completely clean and dry – any grease prevents whipping
- Don’t over-beat the egg whites or they’ll become dry and grainy
- Fold ingredients gently to maintain the fluffy texture
- Work quickly once the whites are whipped – they can deflate if left too long
- Make the wells deep enough so yolks have space to nestle in
- For easier cleanup, always use parchment paper
Serving Suggestions
Cloud eggs are beautiful and work as a centerpiece for any breakfast.
- Serve on toasted sourdough or English muffins
- Pair with crispy prosciutto or Canadian bacon
- Add a side of fresh fruit and mimosas for an elegant brunch
- Serve with mixed greens dressed in lemon vinaigrette
- Place on top of Air Fryer Bikini Ham Cheese Sandwich for a twist
Read Also: Air Fryer Avocado Egg Rolls
FAQs About Air Fryer Egg Recipes
1. Do I Need to Preheat My Air Fryer Before Cooking Eggs?
Yes, preheating is important for most air fryer egg recipes. It ensures even cooking from the start and helps achieve consistent results every time.
For hard-boiled and soft-boiled eggs, preheating to the exact temperature helps the eggs cook evenly throughout. For scrambled eggs, fried eggs, and baked eggs, preheating creates the right environment for proper texture development.
2. Can I Cook Eggs Directly in the Air Fryer Basket Without Any Container?
It depends on the type of eggs you’re making. For hard-boiled and soft-boiled eggs, you can place them directly in the basket with no container needed.
For scrambled eggs, fried eggs, baked eggs, egg muffins, and cloud eggs, you’ll need oven-safe containers, ramekins, or silicone muffin cups. Cooking scrambled or beaten eggs directly in the basket would result in a mess as they’d drip through the holes.
3. How Do I Prevent Eggs From Sticking to My Air Fryer Containers?
Generous application of cooking spray is your best friend when making eggs in the air fryer. Spray the containers thoroughly, making sure to coat both the bottom and sides completely.
Using butter or olive oil works even better than cooking spray for certain recipes like fried eggs, as it adds flavor and creates a non-stick barrier. Silicone muffin cups and containers naturally resist sticking better than metal or ceramic, so they’re worth investing in if you make eggs frequently.
4. Why Do My Air Fryer Eggs Sometimes Come Out Rubbery?
Rubbery eggs are usually the result of overcooking or cooking at too high a temperature. Eggs are delicate proteins that need gentle heat to stay tender.
If your eggs consistently come out rubbery, try reducing the temperature by 10-25°F or decreasing the cooking time by 1-2 minutes. Also, remember that eggs continue cooking slightly from residual heat after you remove them from the air fryer, so pulling them out when they’re just barely done results in perfect texture.
5. Can I Make Multiple Batches of Eggs and Reheat Them Later?
Absolutely! This is one of the best features of air fryer eggs. Hard-boiled and soft-boiled eggs store beautifully in the refrigerator for up to one week when kept in their shells, or up to five days when peeled.
Egg muffins and baked eggs can be refrigerated for up to five days in an airtight container and reheated in the microwave for 30-60 seconds. They also freeze well for up to two months. Scrambled eggs and fried eggs are best eaten fresh but can be refrigerated for 2-3 days and reheated gently.
Final Thoughts
The air fryer has genuinely revolutionized how I cook eggs. What used to feel like a chore that required constant attention now takes just minutes of hands-off cooking time.
I love that I can prep breakfast while getting ready for work, pack lunches for my family, or whip up a quick protein-packed snack without heating up my entire kitchen. The consistency is unbeatable – no more guessing if my hard-boiled eggs are done or worrying about burning scrambled eggs while I’m distracted.
These seven recipes have become regular fixtures in my meal rotation, and I hope they become favorites in your kitchen too. Start with the simple hard-boiled eggs to get comfortable with your air fryer’s timing, then branch out to the fancier options like cloud eggs when you want to impress.
The best part? Once you master the basics, you can customize these recipes endlessly with your favorite ingredients, seasonings, and flavor combinations.
Recommended:
- Air Fryer Chicken Salad
- Air Fryer Lasagna
- Air Fryer Salmon
- Air Fryer Chicken Breast
- Air Fryer Chicken Drumsticks
- Air Fryer Popcorn Chicken
- Air Fryer Mozzarella Cheese Sticks
- Air Fryer Breaded Mushrooms
- Air Fryer Onion Rings
- Air Fryer Zucchini Parmesan Chips