
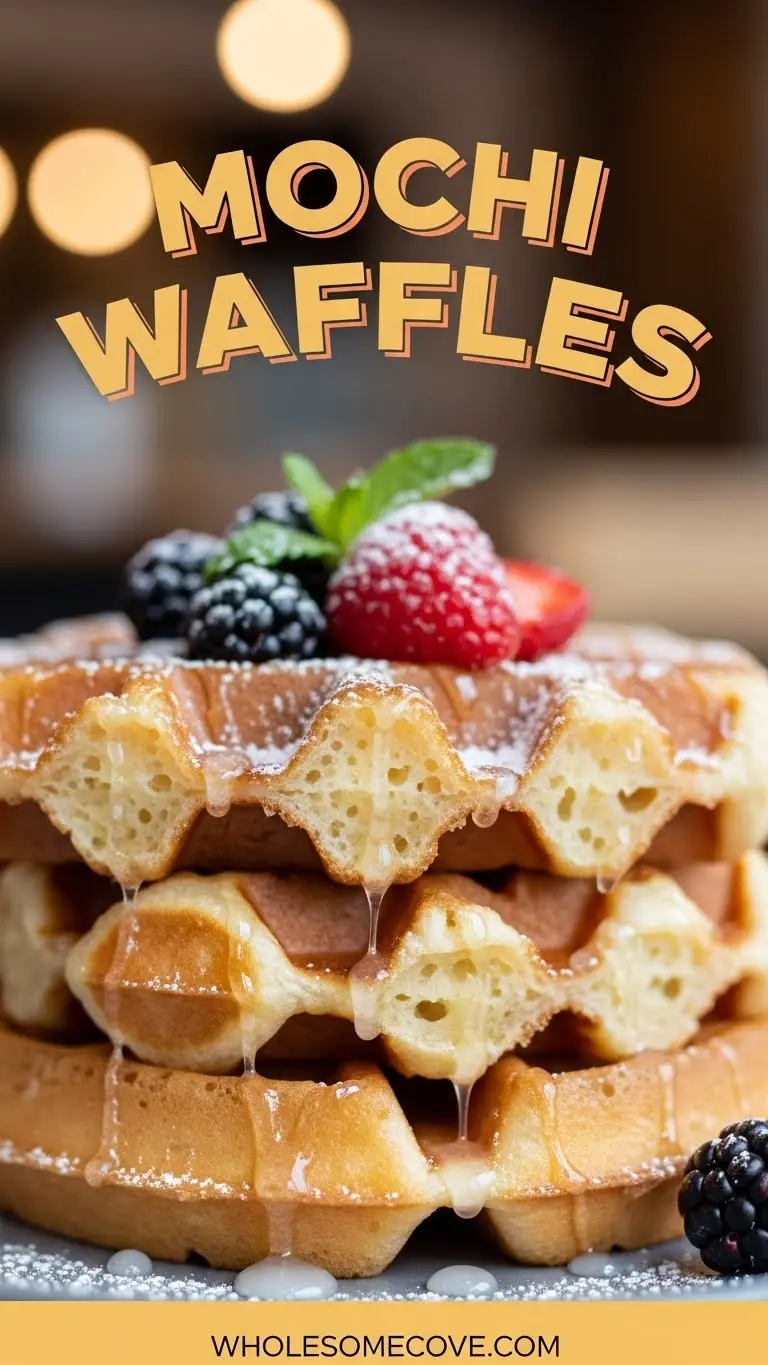
I’ve been making waffles for years, but nothing prepared me for the first time I tried a Mochi Waffle Recipe. My daughter came home from college raving about the mochi waffles she’d had at a local cafe, and I knew I had to recreate them at home.
What started as a simple weekend breakfast experiment turned into our family’s most requested weekend treat. The combination of that signature crispy exterior with the incredibly chewy, almost stretchy interior is unlike anything you’ve experienced with regular waffles.
The best part? You don’t need any special skills or hard-to-find ingredients to make these at home. Just a few pantry staples and a waffle iron, and you’re on your way to breakfast heaven.
| Quick Recipe Summary | |
|---|---|
| Prep Time | 10 minutes |
| Cook Time | 15 minutes |
| Total Time | 25 minutes |
| Servings | 6 waffles |
| Difficulty Level | Easy |
You may also like: Best Waffle Recipe.

Why You’ll Love This Mochi Waffle Recipe
These waffles changed how I think about breakfast. The texture is something you just can’t get from regular waffle recipes.
The crispy golden exterior gives way to a soft, chewy center that’s almost bouncy. It’s the kind of texture that makes you close your eyes and savor each bite.
I love how forgiving this recipe is too. My first batch turned out perfect, even though I was nervous about working with mochi sweet rice flour.
Here’s what makes these waffles so special:
- Unique chewy texture: The mochi flour creates an incredible stretchy, bouncy interior that regular waffles simply can’t match
- Crispy exterior: Despite the soft inside, the outside gets beautifully golden and crispy in your waffle iron
- Naturally gluten-free: Made with sweet rice flour, these are perfect for anyone avoiding gluten without sacrificing flavor or texture
- Simple ingredients: You probably have most of what you need already in your pantry
- Versatile serving options: These work equally well with sweet toppings like fruit and syrup or savory additions like fried chicken
- Make-ahead friendly: The batter keeps well in the fridge, and cooked waffles reheat beautifully
Another favorite breakfast that offers incredible texture is my sourdough waffle recipe, though nothing quite compares to that signature mochi chew.
Ingredients
These mochi waffles come together with just a handful of simple ingredients that create something truly extraordinary. I’ve tested this recipe dozens of times to get the ratios just right.
- Mochiko (sweet rice flour): 1½ cups (210g) – This is the star ingredient that gives these waffles their signature chewy texture. Regular rice flour won’t work here; you need the glutinous sweet rice flour specifically
- All-purpose flour: ½ cup (63g) – This adds structure and helps create that crispy exterior
- Baking powder: 2 teaspoons (10g) – For lift and lightness
- Sugar: ¼ cup (50g) – Adds a touch of sweetness and helps with browning
- Salt: ½ teaspoon (3g) – Enhances all the flavors
- Whole milk: 1¾ cups (420ml) – Creates a smooth, pourable batter
- Eggs: 2 large – Adds richness and helps bind everything together
- Unsalted butter: 4 tablespoons (57g), melted – For flavor and moisture
- Vanilla extract: 1 teaspoon (5ml) – A subtle background flavor that makes everything taste better
- Neutral oil for cooking: For greasing the waffle iron
Read Also: Vegan Waffle Recipe
Kitchen Equipment Needed
Having the right tools makes all the difference when making these waffles. I learned this the hard way after my first few attempts with the wrong equipment.
- Belgian waffle maker: A Belgian-style maker with deep pockets works best for these thick waffles
- Large mixing bowl: For combining dry ingredients
- Medium mixing bowl: For whisking wet ingredients
- Whisk: Essential for getting a smooth, lump-free batter
- Measuring cups and spoons: Accurate measurements are crucial for the right texture
- Silicone spatula: For folding and scraping down the bowl
- Ladle or measuring cup: For portioning batter into the waffle iron
- Pastry brush: Optional, for brushing oil onto the waffle iron
- Wire cooling rack: Keeps waffles crispy while you finish cooking the batch
You might also enjoy: Buttermilk Waffle Recipe
Recommended Products for This Recipe
After making these waffles countless times, I’ve found a few products that really make a difference in the final result. These are my honest recommendations based on what actually works.
1. Koda Farms Mochiko Sweet Rice Flour
The quality of your mochiko makes or breaks this recipe. I’ve tried several brands, and Koda Farms consistently gives me the best texture. Their sweet rice flour is finely milled and creates that perfect chewy consistency without any grittiness.
2. Cuisinart Belgian Waffle Maker
I upgraded to this waffle maker after burning through a cheaper model, and the difference is night and day. The temperature control is consistent, it heats evenly, and the nonstick coating actually works. The deeper pockets are perfect for these thick mochi waffles.
3. OXO Good Grips Silicone Whisk
This whisk has become my go-to for all my waffle batters. The silicone coating won’t scratch your bowls, and the shape is perfect for getting into the corners to eliminate any flour pockets. It makes achieving that smooth batter so much easier.
4. Kerrygold Unsalted Butter
While any butter works, I notice a real difference in flavor when I use Kerrygold. The richness adds an extra layer of deliciousness to these waffles. It’s one of those small upgrades that makes people ask what your secret is.
Step-by-Step Instructions: How to Make Mochi Waffles
I’ll walk you through exactly how I make these waffles every time. The process is straightforward, but there are a few key moments where technique really matters.
1. Prepare Your Ingredients and Equipment
- Take your butter out to melt and let it cool slightly while you prep everything else. You don’t want it hot when it hits the other wet ingredients, or it might scramble the eggs.
- Plug in your waffle iron to preheat. I set mine to medium-high heat, but all waffle irons vary, so you might need to adjust.
- Line up all your ingredients on the counter. This is especially helpful if you’re making these on a busy morning.
- Have your cooling rack ready near the waffle iron so you can transfer the finished waffles immediately.
2. Mix the Dry Ingredients
- In your large mixing bowl, add the 1½ cups (210g) mochiko flour. Make sure to spoon it into your measuring cup and level it off rather than scooping directly from the bag, which can pack it down.
- Add the ½ cup (63g) all-purpose flour, stirring to combine with the mochiko.
- Sprinkle in the 2 teaspoons (10g) baking powder, ¼ cup (50g) sugar, and ½ teaspoon (3g) salt.
- Whisk everything together for about 30 seconds. You want these dry ingredients really well combined so you don’t get pockets of baking powder or salt in your finished waffles.
- Create a well in the center of your dry ingredients. This is where you’ll add the wet mixture in the next step.
Read Also: Belgian Waffle Recipe
3. Combine the Wet Ingredients
- In your medium bowl, crack in both eggs and whisk them until they’re completely broken up and slightly frothy.
- Pour in the 1¾ cups (420ml) whole milk. I’ve tried lower-fat milk, but whole milk really does give the best texture and flavor.
- Add your 1 teaspoon (5ml) vanilla extract and whisk everything together for about 20 seconds.
- Drizzle in your melted butter while whisking constantly. This helps emulsify the butter into the mixture rather than having it separate.
- Your wet ingredients should look smooth and well combined, with no streaks of egg or pools of butter floating on top.
4. Create the Batter
- Pour all of your wet ingredients into the well you created in the dry ingredients.
- Start stirring gently from the center, gradually incorporating the dry ingredients from the edges as you go.
- Switch to your whisk once you’ve got most of the flour incorporated. Whisk steadily but not aggressively for about 1 minute.
- The batter should be smooth but still slightly thick. It will pour slowly rather than running off the spoon. This is exactly what you want.
- Don’t worry if you see a few tiny lumps. Overmixing is worse than a couple of small lumps, which will disappear during cooking.
- Let the batter rest for 5 minutes while your waffle iron finishes preheating. This allows the mochiko flour to fully hydrate and gives you an even better texture.
5. Cook Your First Waffle
- Lightly brush or spray your waffle iron with neutral oil. Even nonstick irons benefit from a light coating, especially with these slightly sticky mochi waffles.
- Ladle about ¾ cup of batter into the center of your waffle iron. The exact amount depends on your iron size, so adjust as needed.
- Close the lid gently and cook for 4 to 5 minutes. These take a bit longer than regular waffles because of the dense mochiko flour.
- Resist the urge to open the waffle iron early. Opening it too soon can tear the waffle in half, and you’ll lose that beautiful crispy exterior.
- You’ll know it’s ready when the steam stops escaping from the sides and the waffle releases easily when you lift the lid slightly.
- Use a fork or wooden chopstick to carefully lift out your waffle. Metal tongs can sometimes tear the delicate edges.
For another twist on classic breakfast, try my pumpkin waffle recipe during fall months.
6. Keep Waffles Warm While Finishing the Batch
- Transfer your first waffle to the wire cooling rack. Don’t stack them on a plate, or they’ll steam and lose their crispiness.
- If you want to keep them warm for serving all at once, you can place the cooling rack in a 200°F (93°C) oven.
- Continue cooking the remaining waffles, adding a light brush of oil to the iron between each one if needed.
- My waffle iron fits about ¾ cup of batter per waffle, and I usually get 6 good-sized waffles from one batch.
- The later waffles sometimes cook a bit faster once your iron is fully heated, so keep an eye on the timing after your first couple.
7. Serve Immediately
- These waffles are absolute perfection when they’re fresh off the iron. The contrast between the crispy outside and chewy inside is at its peak.
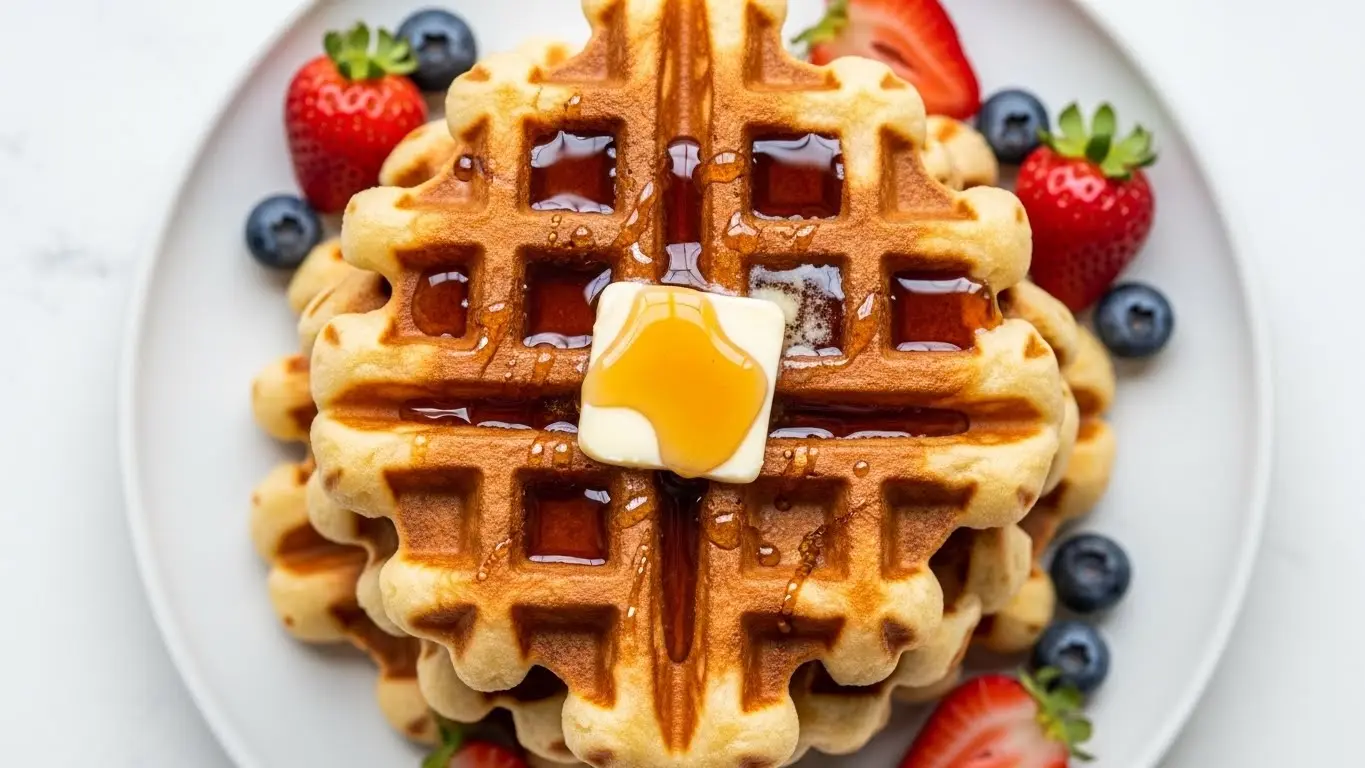
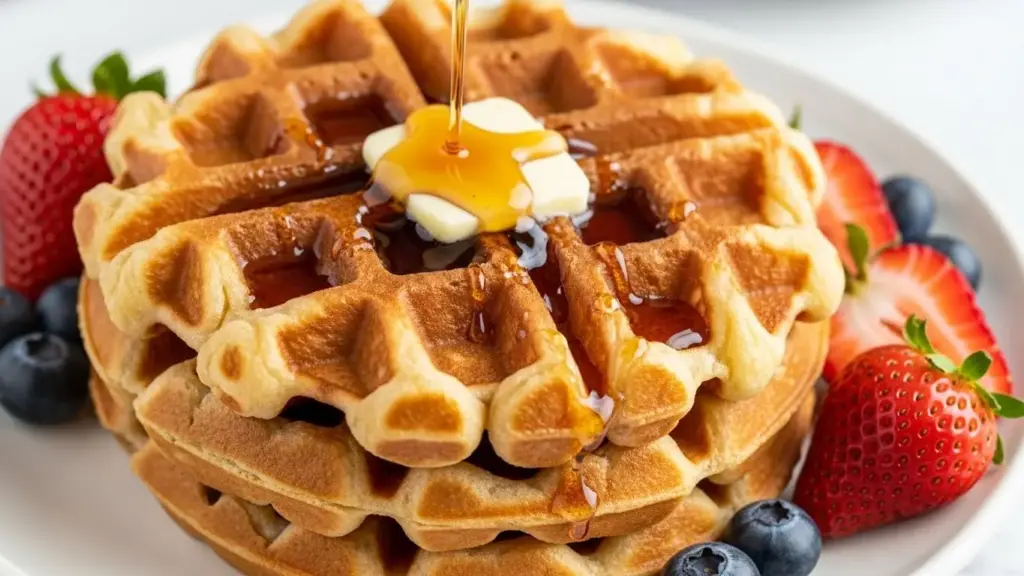
- Transfer to serving plates and add your favorite toppings right away. I love them simply with butter and maple syrup to really appreciate the texture.
- If you’re serving a crowd, you can keep them warm in the oven for up to 15 minutes, though they’re truly best straight from the iron.
- Cut them with a knife or simply pull them apart with your hands to experience that incredible stretchy, chewy quality.

Tips for The Best Mochi Waffles
After making these waffles more times than I can count, I’ve picked up some tricks that consistently produce the best results. These tips have saved me from several potential disasters.
- Don’t skip the resting time: Letting the batter sit for 5 minutes after mixing allows the mochiko flour to fully absorb the liquid. I noticed a significant texture improvement once I started doing this consistently.
- Get the temperature right: Your waffle iron should be hot, but not smoking hot. I learned this after burning several batches. Medium-high heat works perfectly for most irons.
- Don’t over-grease: Too much oil makes the outside greasy rather than crispy. A light brush or spray is all you need.
- Wait for the steam to stop: This is your visual cue that the waffle is done. Opening early results in a torn, undercooked waffle.
- Use fresh baking powder: Old baking powder won’t give you the lift you need. I test mine by adding a spoonful to hot water. It should bubble vigorously.
- Measure mochiko correctly: Spoon and level rather than scooping. Packing too much mochiko makes the waffles dense and gummy instead of chewy.
- Try the toothpick test: If you’re unsure about doneness, insert a toothpick into the center. It should come out with just a few moist crumbs, not wet batter.
- Keep batter consistency consistent: If your batter thickens as it sits, whisk in milk one tablespoon at a time until it’s pourable again.
- Don’t stack hot waffles: This traps steam and makes them soggy. Always use a wire rack.
- Season your waffle iron: If you’re using a new iron, cook one throwaway waffle first to season it properly.
What to Serve with Mochi Waffles
The beauty of these waffles is how well they pair with both sweet and savory toppings. I’ve experimented with countless combinations, and here are my favorites.
These waffles are sturdy enough to handle substantial toppings without falling apart. The slight sweetness in the batter makes them versatile for breakfast, lunch, or even dinner.
Here are the combinations my family requests most often:
- Classic maple butter: Real maple syrup and a pat of butter is still my go-to. The simple sweetness lets the unique mochi texture shine through.
- Fresh berries and whipped cream: Sliced strawberries, blueberries, or mixed berries with freshly whipped cream is perfect for weekend brunch. The fruit’s acidity cuts through the richness beautifully.
- Fried chicken: This sweet and savory combo is incredible. The crispy chicken against the chewy waffle is pure magic.
- Coconut cream and mango: For a tropical twist, warm coconut cream with fresh mango slices brings out the rice flour’s natural flavor.
- Matcha ice cream and red bean paste: This takes me back to the Japanese desserts that inspired these waffles. The earthy matcha and sweet red bean are traditional pairings.
- Nutella and sliced bananas: My kids’ favorite. The chocolate hazelnut spread melts into all those waffle pockets.
- Crispy bacon and eggs: A hearty breakfast plate that satisfies even the biggest appetites.
- Lemon curd and powdered sugar: Bright, tangy lemon curd with a dusting of powdered sugar is elegant enough for entertaining.
- Peanut butter and honey drizzle: Simple, satisfying, and protein-packed for a filling breakfast.
- Caramelized bananas: Slice bananas and cook them in butter and brown sugar until golden. Spoon over the waffles while still warm.
Variations of Mochi Waffles
Once you’ve mastered the basic recipe, these variations let you customize the waffles to your taste. I rotate through these depending on what I’m craving or what season it is.
- Chocolate chip mochi waffles: Fold ½ cup of mini chocolate chips into the finished batter. The chips get melty and delicious, and the combo of chocolate with that chewy texture is addictive.
- Ube mochi waffles: Replace ¼ cup of the mochiko flour with ube powder for stunning purple waffles with a subtle sweet potato flavor. Add an extra tablespoon of milk since ube absorbs more liquid.
- Matcha mochi waffles: Whisk 1 tablespoon of culinary-grade matcha powder into your dry ingredients for earthy, green tea-flavored waffles. These pair wonderfully with sweet toppings.
- Coconut mochi waffles: Substitute coconut milk for the regular milk and add ½ cup sweetened shredded coconut to the batter. Toast them lightly in the waffle iron until the coconut gets golden.
- Lemon poppy seed: Add the zest of one lemon and 2 tablespoons of poppy seeds to the batter. The citrus brightness is perfect for spring and summer.
- Cinnamon sugar: Mix 1 teaspoon of cinnamon into the dry ingredients and increase the sugar to ⅓ cup. Dust the finished waffles with cinnamon sugar while they’re still hot.
- Savory scallion: Omit the sugar and vanilla, and fold in ½ cup of chopped scallions and a pinch of white pepper. These are incredible with Asian-style toppings.
- Banana mochi waffles: Mash one very ripe banana and reduce the milk to 1½ cups. The banana adds natural sweetness and makes them even more tender.
- Pumpkin spice: Add 3 tablespoons of pumpkin puree, 1 teaspoon of pumpkin pie spice, and reduce milk slightly. Perfect for fall mornings.
- Black sesame: Toast 2 tablespoons of black sesame seeds and grind them finely, then fold into the batter for a nutty, slightly bitter flavor that’s very grown-up.
Another breakfast variation I love is my protein waffle recipe for mornings when I need extra fuel.
Storage and Reheating
These waffles store beautifully, which makes them perfect for meal prep or batch cooking on weekends. I often make a double batch and freeze half.
Refrigerator storage: Let waffles cool completely on a wire rack, then stack them with parchment paper between each waffle to prevent sticking. Store in an airtight container for up to 3 days. The texture holds up remarkably well, much better than regular waffles.
Freezer storage: Cooled waffles can be frozen for up to 2 months. I arrange them in a single layer on a baking sheet and freeze until solid, then transfer to a freezer bag. This prevents them from sticking together. No need to thaw before reheating.
Reheating methods: I’ve tested every method, and here’s what works best:
- Toaster: This is my favorite method. Toast on medium heat until crispy and heated through, about 3 to 4 minutes. It restores that crispy exterior perfectly.
- Oven: Preheat to 350°F (175°C) and place waffles directly on the oven rack for 5 to 7 minutes. This method works great for reheating multiple waffles at once.
- Air fryer: 350°F (175°C) for 3 to 4 minutes gives you the crispiest results, almost better than fresh. This is my secret weapon for making frozen waffles taste homemade.
- Microwave: This works in a pinch but makes them soft rather than crispy. Heat for 30 to 45 seconds on high. They’re still chewy but lack that textural contrast.
Storing batter: The raw batter keeps in the fridge for up to 24 hours in an airtight container. Give it a good stir before using, and you might need to thin it slightly with a tablespoon or two of milk. I don’t recommend freezing the raw batter as it affects the texture.

Nutritional Facts
Per serving (1 waffle, without toppings):
- Calories: 245
- Total Fat: 8g
- Saturated Fat: 4.5g
- Cholesterol: 75mg
- Sodium: 285mg
- Total Carbohydrates: 38g
- Dietary Fiber: 1g
- Sugars: 9g
- Protein: 6g
- Calcium: 95mg
- Iron: 1mg
Note: These values are approximate and based on standard ingredient measurements. Actual nutrition will vary based on specific brands used and any toppings added. The mochiko flour is naturally gluten-free but provides similar carbohydrate content to regular flour.
Another favorite: Healthy Waffle Recipe.
Health Benefits of Key Ingredients
While these are definitely a treat, several ingredients do offer some nutritional benefits. I appreciate knowing what I’m feeding my family beyond just how delicious something tastes.
Mochi waffles aren’t health food, but they’re made with real ingredients that have some redeeming qualities.
- Mochiko (sweet rice flour): Naturally gluten-free, making these accessible to those with celiac disease or gluten sensitivity. It’s also easier to digest than wheat flour for some people. Sweet rice flour provides quick energy from simple carbohydrates.
- Eggs: Excellent source of complete protein with all nine essential amino acids. They provide choline for brain health and lutein for eye health. Each waffle contains about half an egg’s worth of nutrition.
- Whole milk: Rich in calcium for bone health and vitamin D for immune function. The fat in whole milk helps your body absorb fat-soluble vitamins and keeps you satisfied longer.
- Butter: Contains vitamin A for vision and skin health, plus vitamin K2 for bone health. Despite its reputation, butter in moderation provides beneficial fatty acids.
- Baking powder: While mostly functional, it does add a small amount of calcium to the recipe.
Read Also: French Toast Recipe
FAQs About Mochi Waffles
1. Can I use regular rice flour instead of mochiko?
No, regular rice flour won’t work for this recipe. Mochiko is made from short-grain glutinous rice (also called sweet rice) that has a much higher starch content. This is what creates that signature chewy, stretchy texture we’re after. Regular rice flour will give you dry, crumbly waffles without any of that mochi character.
2. Why are my mochi waffles turning out gummy instead of chewy?
The most common cause is using too much mochiko flour or not cooking them long enough. Make sure you’re measuring by spooning flour into your cup and leveling off, not scooping directly. Also, these need a full 4 to 5 minutes in the waffle iron to cook through properly. If they’re still gummy, try reducing the mochiko by 2 tablespoons and increasing your cooking time by 30 seconds.
3. Can I make these dairy-free?
Absolutely! I’ve made these with coconut milk and coconut oil instead of regular milk and butter, and they turn out beautifully. The coconut flavor actually complements the rice flour really well. You can also use almond milk and vegan butter, though the coconut milk version has a slightly better texture in my experience.
4. Do mochi waffles taste like mochi?
They have a similar chewy, QQ texture to mochi, but the flavor is much milder and more waffle-like. The rice flour gives them a subtle, slightly sweet base that’s less intense than traditional mochi. Think of them as a hybrid that takes the best textural quality of mochi and applies it to a waffle format.
5. How do I prevent the waffles from sticking to my waffle iron?
Even with nonstick waffle irons, a light coating of neutral oil before each waffle helps ensure easy release. Also make sure your iron is fully preheated before adding batter, and resist opening it too early. The waffle should release easily when it’s fully cooked. If sticking persists, your iron might need reseasoning or the nonstick coating might be worn.
For more breakfast inspiration, check out my breakfast burrito recipe for another satisfying morning meal.
Final Thoughts
Making mochi waffles at home has become one of my favorite weekend traditions. The process is simple enough for busy mornings, yet the results feel special enough for entertaining.
I love how these waffles bring something unexpected to the breakfast table. They’re a conversation starter every time I serve them to guests, and I’ve converted countless friends into mochi waffle believers with this recipe.
Give them a try this weekend. I think you’ll be amazed at how easy it is to achieve that restaurant-quality texture right in your own kitchen. Drop a comment below and let me know what toppings you tried or any fun variations you came up with!
Recommended:
- Sourdough Waffle Recipe
- Protein Waffle Recipe
- Pumpkin Waffle Recipe
- Buttermilk Waffle Recipe
- Belgian Waffle Recipe
- Easy Pancake Recipe
- French Toast Recipe
- Baked Oatmeal Recipe
- Homemade Biscuit Recipe
- Avocado Toast Recipe

