
Sunday mornings at my house used to be pretty standard: scrambled eggs, maybe some toast, and a lot of coffee.
Then I discovered how to make authentic Belgian waffles from scratch, and everything changed. My kids now wake up early on weekends just to claim their spot at the table, and I’ve become the designated waffle maker for every family brunch.
The first time I attempted this Belgian Waffle Recipe, I honestly thought the batter was too thick. I almost added more milk, but something told me to trust the process. I’m so glad I did because that thick, yeast-leavened batter is exactly what gives these waffles their signature deep pockets and incredibly light, airy texture that’s nothing like the flat, dense waffles I grew up with.
| Quick Recipe Summary | |
|---|---|
| Prep Time | 15 minutes (plus 1 hour resting time) |
| Cook Time | 20 minutes |
| Total Time | 1 hour 35 minutes |
| Servings | 8 large waffles |
| Difficulty Level | Easy |
If you’re looking for another delicious breakfast option, you might enjoy my Creme Brulee French Toast Casserole.

Why You’ll Love This Belgian Waffle Recipe
These aren’t your average diner waffles. Belgian waffles are an entirely different experience, and once you’ve had a real one made at home, you’ll understand why they’re worth the extra hour of resting time.
The yeast in the batter creates these incredible pockets that become crispy on the outside while staying tender and custardy on the inside. They’re sturdy enough to hold a mountain of toppings without getting soggy, yet light enough that you can easily eat two without feeling weighed down.
Here’s what makes this Belgian Waffle Recipe stand out:
- Light and airy texture thanks to yeast leavening that creates those signature deep pockets
- Crispy exterior with a tender interior that’s almost custardy in the best way possible
- Pearl sugar option for authentic Liège-style Belgian waffles with caramelized sugar pockets
- Make-ahead friendly because the batter actually improves as it rests
- Freezer-friendly so you can make a double batch and have quick breakfasts ready for busy mornings
- Impressive but simple because your guests will think you spent hours, but the active work is minimal
I particularly love how forgiving this recipe is. The batter can rest anywhere from one to two hours, and I’ve even let it go overnight in the fridge when I got distracted by a good book and completely forgot about it.
You may also like my Buttermilk Waffles.
Ingredients
This Belgian Waffle Recipe uses simple ingredients that you probably already have in your kitchen, with one optional specialty ingredient that takes them to the next level. I’ve tested this recipe with various substitutions, but these specific measurements give the best results.
- 2 ¼ teaspoons (7 grams) active dry yeast (one standard packet)
- ¼ cup (60 ml) warm water at 110°F (43°C), not hotter or you’ll kill the yeast
- 1 ¾ cups (420 ml) whole milk, warmed to room temperature
- ½ cup (113 grams) unsalted butter, melted and slightly cooled
- 3 large eggs, at room temperature for better incorporation
- 2 cups (250 grams) all purpose flour
- 1 tablespoon (12 grams) granulated sugar
- ¾ teaspoon (4 grams) salt
- 1 teaspoon (5 ml) pure vanilla extract
- ½ cup (100 grams) Belgian pearl sugar (optional but highly recommended for authentic Liège waffles)
The Belgian pearl sugar is what creates those pockets of caramelized sweetness that make authentic Belgian waffles so addictive. You can find it at specialty baking stores or online, and one bag will last you through many batches since you only need a small amount per waffle.
This recipe pairs beautifully with my Strawberry Sauce for a classic topping.
Kitchen Equipment Needed
Having the right equipment makes all the difference when making Belgian waffles. Trust me, I tried using a standard waffle maker for my first batch, and the results were disappointing. The shallow pockets just don’t do justice to this batter.
- Belgian waffle maker with deep 1-inch pockets (this is essential, not just a nice-to-have)
- Large mixing bowl for combining ingredients
- Medium mixing bowl for activating the yeast
- Whisk for mixing the batter smooth
- Measuring cups and spoons for accurate measurements
- Kitchen thermometer to check water temperature for yeast activation
- Ladle or ¾-cup measuring cup for portioning batter onto the waffle maker
- Wire cooling rack to keep waffles crispy while you finish the batch
- Pastry brush for greasing the waffle maker (optional but helpful)
I use a Belgian waffle maker with a flip function, which helps distribute the batter evenly and creates those perfect square shapes. However, a non-flip Belgian waffle maker works perfectly fine as long as it has those deep pockets.
Read Also: Easy Pancake Recipe
Recommended Products for This Recipe
After making countless batches of Belgian waffles, I’ve found a few products that genuinely make the process easier and the results better. These aren’t just random suggestions; they’re tools and ingredients I actually use in my own kitchen.
1. Cuisinart Belgian Waffle Maker
I’ve owned three different waffle makers over the years, and this Cuisinart model is the one that’s lasted the longest and produces the most consistent results. The deep pockets are perfectly sized, the temperature control prevents burning, and the non-stick coating still works like new after two years of weekly use.
2. Lars Own Belgian Pearl Sugar
Not all pearl sugar is created equal, and this brand has the perfect size crystals that caramelize without burning. The Lars Own pearl sugar stays crunchy even after the waffles cool, giving you that authentic European waffle shop experience at home.
3. Nielsen-Massey Pure Vanilla Extract
The difference between imitation vanilla and pure extract is noticeable in simple recipes like this. Nielsen-Massey vanilla has a rich, complex flavor that elevates the waffles from good to exceptional. A little goes a long way, so one bottle lasts for months.
4. King Arthur Baking Company All-Purpose Flour
Consistent flour quality matters more than most people realize. King Arthur flour has reliable protein content that creates the perfect waffle structure, neither too dense nor too fragile. I’ve found that generic store brands can be hit or miss, but King Arthur delivers the same results every time.
You might also enjoy: Baked Oatmeal

Step-by-Step Instructions: How to Make Belgian Waffles
The key to perfect Belgian waffles is patience during the resting time. I know it’s tempting to skip this step when you’re hungry, but this is what transforms good waffles into extraordinary ones.
1. Activate the Yeast
- Pour the warm water (110°F/43°C) into a medium bowl.
- Sprinkle the active dry yeast over the water and give it a gentle stir.
- Let it sit for 5 to 10 minutes until it becomes foamy and smells slightly yeasty. If your yeast doesn’t foam, it’s dead and you’ll need to start over with fresh yeast.
- While waiting, I usually prep my other ingredients so everything’s ready when the yeast activates.
2. Warm the Milk and Butter
- Heat the milk in the microwave for about 45 seconds, or on the stovetop until it’s just warm to the touch (around 100°F/38°C).
- Melt the butter in a separate microwave-safe bowl or in a small saucepan on the stove.
- Let the melted butter cool for a few minutes so it’s not hot enough to cook the eggs when you add them. I learned this the hard way when I ended up with scrambled egg bits in my first batch of waffle batter.
3. Combine the Wet Ingredients
- In a large mixing bowl, whisk together the warm milk, melted butter, and eggs until well combined.
- Add the activated yeast mixture and vanilla extract, whisking until everything is evenly incorporated.
- The mixture should look slightly frothy and smell pleasantly yeasty.
Try my Best Waffle Recipe.
4. Mix the Dry Ingredients
- In a separate bowl, whisk together the flour, sugar, and salt until no clumps remain.
- I always sift my flour before measuring to ensure accuracy and prevent lumps in the batter.
5. Combine Wet and Dry Ingredients
- Pour the dry ingredients into the wet ingredients all at once.
- Whisk gently until just combined. The batter will be thick, thicker than regular pancake batter, and that’s exactly what you want.
- Don’t overmix! A few small lumps are fine and will disappear during the resting time. Overmixing will develop too much gluten and make your waffles tough instead of tender.
6. Let the Batter Rest
- Cover the bowl with plastic wrap or a clean kitchen towel.
- Let it rest in a warm spot in your kitchen for 1 hour. I usually place mine near the stovetop or in the oven with just the light on.
- During this time, the yeast will work its magic, creating those beautiful air pockets that give Belgian waffles their characteristic texture. You’ll notice the batter becoming even thicker and rising significantly.
- If using pearl sugar, gently fold it into the batter right before cooking. Don’t add it earlier or it will dissolve.
7. Preheat the Waffle Maker
- About 10 minutes before your batter finishes resting, plug in your Belgian waffle maker and set it to medium-high heat.
- Let it preheat completely until the ready light comes on. A properly preheated waffle maker is crucial for getting that crispy exterior.
- Lightly grease the waffle maker with non stick cooking spray or brush it with melted butter. Even non-stick waffle makers benefit from a light coating.
Another favorite: French Toast
8. Cook the Waffles
- Pour about ¾ cup of batter onto the center of the hot waffle maker, spreading it slightly but not all the way to the edges (it will spread as the lid closes).
- Close the lid and cook according to your waffle maker’s instructions, typically 4 to 5 minutes for Belgian waffles.
- Resist the urge to open the lid early! Opening it prematurely will split your waffle and ruin that crispy exterior. Wait until the steam stops escaping and the waffle maker indicates it’s ready.
- Carefully remove the waffle with a fork or silicone tongs. The waffle should be deep golden brown with crispy edges.
9. Keep Waffles Warm and Crispy
- Place finished waffles on a wire rack set over a baking sheet in a 200°F (93°C) oven to keep them warm.
- Don’t stack them directly on a plate or they’ll steam each other and lose their crispiness. The wire rack allows air to circulate and maintains that perfect crispy texture.
- Alternatively, you can serve them immediately as they come off the waffle maker if you’re cooking for a small group.
For a savory breakfast option, try these alongside my Breakfast Burrito.
Tips for The Best Belgian Waffles
I’ve made hundreds of Belgian waffles at this point, and these tips come from both successful batches and a few spectacular failures. Learn from my mistakes!
- Temperature matters: Make sure your water for activating yeast is between 105°F and 115°F (40°C and 46°C). Too hot kills the yeast, too cold and it won’t activate. I keep an instant-read thermometer handy just for this.
- Don’t skip the resting time: The batter needs that full hour to develop flavor and the right texture. I’ve tried shortcutting it when I was in a hurry, and the waffles were dense and lacked those signature deep pockets.
- Room temperature ingredients work better: Cold eggs and milk can slow down yeast activity. I take my eggs and milk out of the fridge about 30 minutes before I start cooking.
- Pearl sugar timing is crucial: Only fold in the pearl sugar right before cooking. I once added it at the beginning, and it completely dissolved, leaving me with sweet waffles but no caramelized crunch.
- Grease every time: Even with a non-stick waffle maker, I lightly spray or brush with butter between each waffle. It prevents sticking and adds extra crispiness.
- Watch the steam: The waffle is done when the steam stops escaping from the sides of the waffle maker. That’s your most reliable indicator, more so than the timer.
- Don’t overfill: Too much batter will overflow and create a mess. Start with less than you think you need; you can always add more next time.
- Let them crisp: Waffles continue to crisp up during the first minute after removing them from the waffle maker. Give them a moment to set before adding toppings.
Another favorite: Hashbrown Casserole
What to Serve with Belgian Waffles

Belgian waffles are incredibly versatile and pair well with both sweet and savory toppings. My family has different favorites, so I usually set up a topping bar and let everyone customize their own.
Here are our go-to serving suggestions:
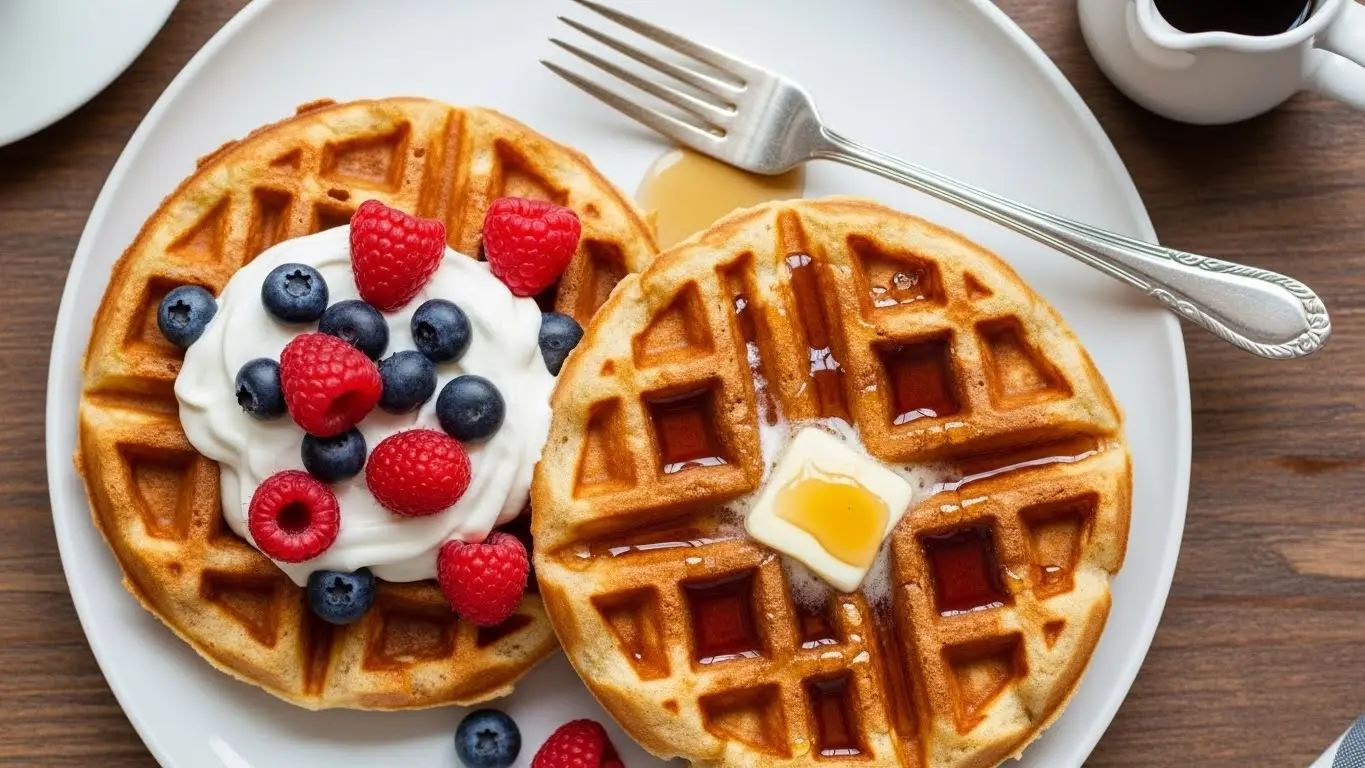
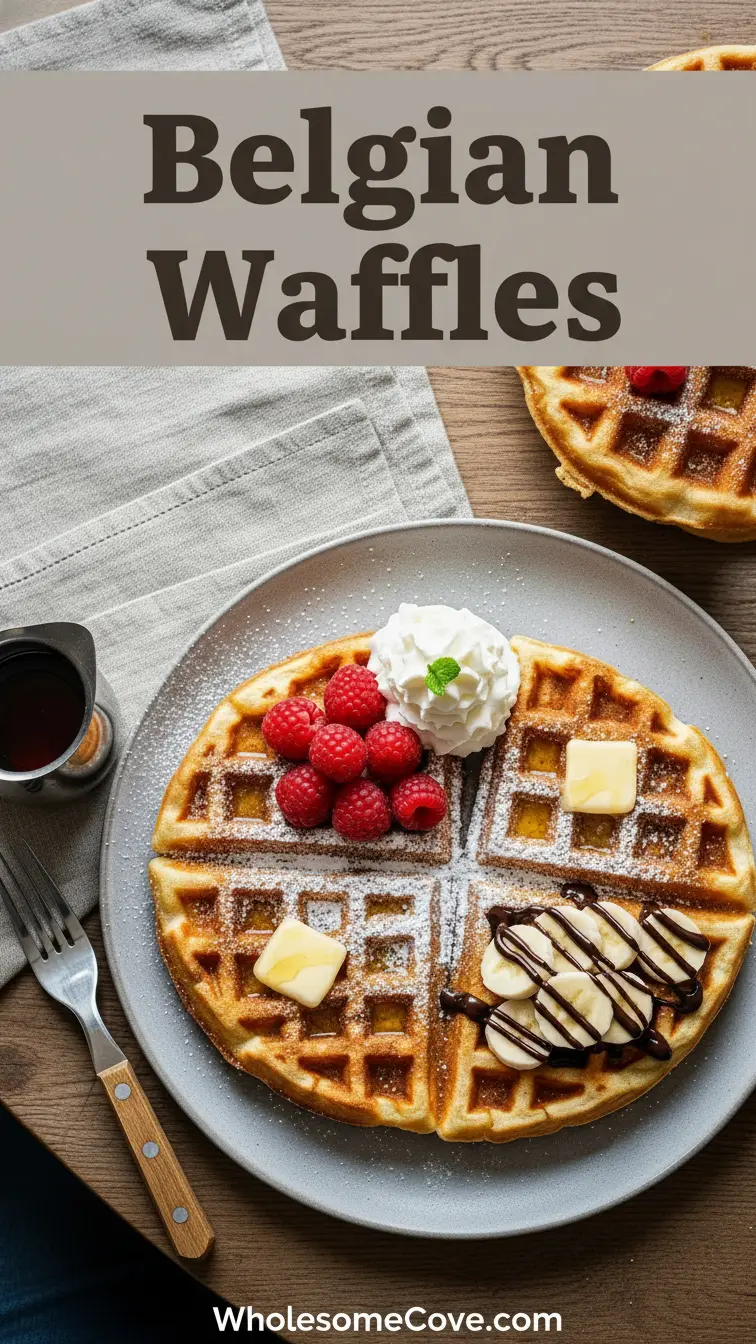
- Classic sweet toppings: Fresh berries, whipped cream, maple syrup, powdered sugar, or my Caramel Sauce
- Fruit compotes: Strawberry Sauce, blueberry compote, or warm apple cinnamon topping
- Decadent additions: Nutella, peanut butter, chocolate chips, sliced bananas, or vanilla ice cream for dessert waffles
- Savory options: Fried eggs, crispy bacon, Sausage Balls, or even fried chicken for chicken and waffles
- Breakfast sides: Fresh fruit salad, yogurt parfait, or Deviled Eggs for a complete brunch spread
- Beverages: Hot coffee, fresh-squeezed orange juice, or Hot Chocolate for a cozy weekend breakfast
My personal favorite combination is warm waffles with fresh strawberries macerated in a little sugar, a dollop of whipped cream, and a drizzle of real maple syrup. The contrast between the crispy waffle and the juicy berries is absolutely perfect.
Read Also: Homemade Biscuit Recipe
Variations of Belgian Waffles
Once you’ve mastered the basic recipe, these variations add fun twists without requiring major changes to the technique. I rotate through these on weekends to keep breakfast exciting.
- Chocolate Belgian waffles: Add ⅓ cup of cocoa powder to the dry ingredients and increase the sugar to 3 tablespoons. These are amazing with vanilla ice cream for dessert.
- Cinnamon sugar waffles: Mix 1 tablespoon of cinnamon into the dry ingredients and brush finished waffles with melted butter, then toss in cinnamon sugar.
- Lemon poppyseed: Add 2 tablespoons of poppy seeds and 1 tablespoon of lemon zest to the batter for a bright, fresh flavor that’s perfect for spring.
- Whole wheat Belgian waffles: Replace half the all-purpose flour with whole wheat flour for a nuttier flavor and extra fiber. You might need to add an extra tablespoon of milk if the batter seems too thick.
- Buttermilk variation: Substitute buttermilk for the regular milk for a tangier flavor and even fluffier texture. The acidity in buttermilk creates an extra tender crumb.
- Pumpkin spice: Mix in ½ cup of pumpkin puree, 1 teaspoon of pumpkin pie spice, and reduce the milk by ¼ cup. Perfect for fall mornings.
- Bacon and cheddar: Fold in ½ cup of cooked, crumbled bacon and ½ cup of shredded sharp cheddar cheese for savory waffles. Serve these with Alabama White Sauce for dipping.
- Blueberry waffles: Gently fold in ¾ cup of fresh blueberries after the batter has rested. Frozen blueberries work too, but don’t thaw them first.
For a savory twist, try serving these with Southern Chicken Salad.
Storage and Reheating
One of the best things about Belgian waffles is how well they store and reheat. I often make a double batch on Sunday and have quick breakfasts ready for the entire week.
- Refrigerator storage: Let waffles cool completely on a wire rack, then stack them with parchment paper between each waffle to prevent sticking. Store in an airtight container or resealable bag for up to 3 days. They’ll stay crispy if you toast them before serving.
- Freezer storage: Cool waffles completely and place them in a single layer on a baking sheet. Freeze for 1 hour until solid, then transfer to a freezer-safe bag, separating layers with parchment paper. They’ll keep for up to 3 months without losing quality.
- Reheating in the toaster: This is my favorite method. Pop frozen or refrigerated waffles directly into the toaster on medium-high heat. This restores the crispy exterior perfectly. Watch them closely so they don’t burn.
- Reheating in the oven: Preheat oven to 350°F (175°C), place waffles directly on the oven rack (or on a baking sheet), and heat for 5 to 7 minutes until warmed through and crispy.
- Reheating in the air fryer: Place waffles in a single layer in the air fryer basket at 350°F (175°C) for 2 to 3 minutes. This method gives you the crispiest results, almost like they’re freshly made.
- Microwave (last resort): I don’t recommend this method because it makes waffles soggy, but if you’re desperate, microwave on medium power for 30 to 45 seconds. They won’t be crispy, but they’ll be warm.
You might also enjoy: Air Fryer Pancake

Nutritional Facts
Here’s the approximate nutritional information for one Belgian waffle without toppings, based on the recipe making 8 large waffles:
- Calories: 285
- Total Fat: 14g
- Saturated Fat: 8g
- Cholesterol: 95mg
- Sodium: 265mg
- Total Carbohydrates: 32g
- Dietary Fiber: 1g
- Sugars: 4g
- Protein: 7g
Note: These values are estimates and will vary based on specific ingredients used and portion sizes. Adding pearl sugar increases the calories by approximately 50 calories per waffle. Toppings like syrup, butter, and whipped cream will add additional calories and sugar.
For a lighter breakfast option, check out my Protein Overnight Oats.
Health Benefits of Key Ingredients
While Belgian waffles are definitely an indulgent breakfast treat, some of the ingredients do offer nutritional benefits. I don’t pretend these are health food, but it’s nice to know you’re getting some good stuff alongside the deliciousness.
Here’s what you’re getting from the main ingredients:
- Eggs: Rich in high-quality protein, vitamin D, B vitamins, and choline, which supports brain health. The three eggs in this recipe provide a solid protein foundation that helps keep you satisfied.
- Milk: Provides calcium for bone health, vitamin D, and protein. The milk also contributes to the tender, custardy interior texture of the waffles.
- Butter: Contains vitamins A, D, E, and K, plus healthy fats that help your body absorb those fat-soluble vitamins. Yes, butter has saturated fat, but in moderation it’s part of a balanced diet.
- Whole wheat variation: If you make the whole wheat version, you’ll get additional fiber, B vitamins, and minerals like iron and magnesium that are stripped from refined white flour.
- Yeast: Provides B vitamins and trace minerals. Active dry yeast also supports gut health by introducing beneficial microorganisms.
Balance is key. I serve these waffles with fresh fruit and sometimes add a side of protein like Sausage Balls to create a more complete meal.
Another favorite: Avocado Toast
FAQs About Belgian Waffles
1. What makes Belgian waffles different from regular waffles?
Belgian waffles are made with yeast instead of just baking powder, which creates deeper pockets and a lighter, airier texture. They also use a special Belgian waffle maker with larger, deeper grids (about 1 inch deep) compared to regular waffle makers that only have shallow ½-inch pockets.
2. Can I make Belgian waffle batter the night before?
Absolutely! In fact, letting the batter rest overnight in the refrigerator often improves the flavor and texture.
Just cover it tightly and let it come to room temperature for about 30 minutes before cooking. The yeast will continue working slowly in the fridge, developing more complex flavors.
3. Why are my Belgian waffles not crispy?
The most common culprits are not preheating the waffle maker long enough, using too much batter, or stacking hot waffles on top of each other. Make sure your waffle maker is fully preheated, use the right amount of batter, and place finished waffles on a wire rack instead of stacking them.
Also, check that your leavening is fresh and active.
4. Can I substitute the all-purpose flour with gluten-free flour?
Yes, but the texture will be different. Use a 1:1 gluten-free baking blend designed for yeast recipes, and you may need to add an extra tablespoon of liquid since gluten-free flours tend to absorb more moisture.
The waffles won’t be quite as crispy, but they’ll still be delicious.
5. Do I have to use pearl sugar for authentic Belgian waffles?
Pearl sugar is traditional for Liège-style Belgian waffles and creates those amazing caramelized pockets, but it’s not required. The waffles will still be delicious without it, just less authentic and without those crunchy sweet spots.
If you can’t find pearl sugar, you could crush sugar cubes as a substitute, though the texture won’t be quite the same.
Read Also: Creme Brulee French Toast
Final Thoughts
Making Belgian waffles from scratch might seem intimidating at first, but once you get the hang of it, you’ll wonder why you ever bothered with frozen waffles or the boxed mix. The hour of waiting for the batter to rest is honestly the hardest part, and it’s mostly hands-off time anyway.
The actual cooking is quick and straightforward, and the results are so much better than anything you can buy pre-made. I encourage you to try this Belgian Waffle Recipe this weekend.
Start a new breakfast tradition, impress your family or houseguests, or just treat yourself to something special on a lazy Sunday morning. Once you taste these light, crispy, deeply pocketed waffles fresh off the waffle maker, you’ll be hooked.
Let me know how your Belgian waffles turn out! I’d love to hear about your favorite toppings or any creative variations you try. Drop a comment below, and don’t forget to share this recipe with anyone who appreciates a truly exceptional breakfast.
Recommended:
- Chocolate Chip Cookies Recipe
- Sugar Cookies Recipe
- Pumpkin Cheesecake Recipe
- Creme Brulee Recipe
- Apple Pie Recipe
- Pumpkin Pie Recipe
- Dinner Rolls Recipe
- Shakshuka Recipe
- Fruit Tart Recipe
- Hot Chocolate Bombs Recipe
