
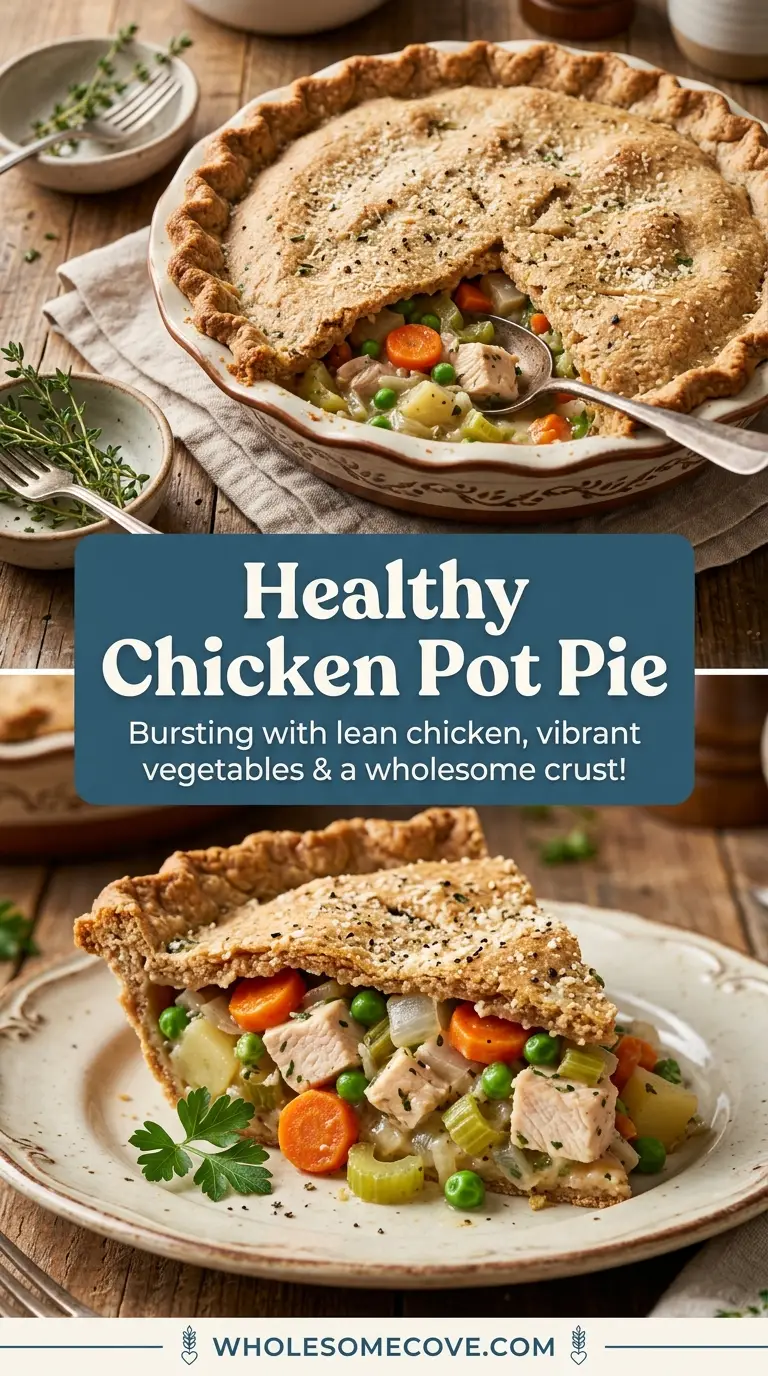
I was convinced for years that a healthy chicken pot pie recipe just couldn’t exist. Every time I tried to lighten it up, I’d end up with something thin and sad, or worse, a filling that tasted more like a diet meal than the creamy, golden comfort food I grew up loving.
Then I had a moment of desperation on a cold January evening, staring at a fridge full of leftover roast chicken, a bag of frozen peas, and two sad carrots. I was not going to let those go to waste, and I was craving something hearty and cozy that wouldn’t make me regret dinner the next morning.
That experiment turned into the recipe I’ve made on repeat ever since. It skips the heavy cream and the buttery double crust, but it doesn’t skip a single drop of flavor.
The filling is thick, creamy, and loaded with tender chicken and vegetables. It bakes under a single, golden whole wheat crust that comes out flaky and just a little nutty. I’ve served this to dinner guests who had no idea they were eating something lighter, and more than a few of them asked to take the leftovers home.
| Quick Recipe Summary | |
|---|---|
| Prep Time | 25 minutes |
| Cook Time | 45 minutes |
| Total Time | 1 hour 10 minutes |
| Servings | 6 servings |
| Difficulty Level | Medium |
If you love hearty, wholesome dinners like this one, you’ll also want to check out my Healthy Shepherd’s Pie — it uses the same cozy concept with a lighter mashed potato topping.

Why You’ll Love This Healthy Chicken Pot Pie Recipe
This is the kind of meal that feels like a hug on a plate. It’s the one I reach for when the weather turns cold or when my family is craving something deeply satisfying.
Here’s why this recipe keeps earning its spot in my weekly rotation:
- No canned soups. The creamy filling is made completely from scratch using real ingredients, so you control exactly what goes in.
- Single top crust. Skipping the bottom crust alone cuts a significant number of calories and grams of fat without sacrificing that iconic pot pie experience.
- Loaded with protein. With shredded chicken breast as the base, each serving delivers a solid hit of lean protein to keep you full.
- Packed with vegetables. Carrots, peas, celery, and onion bring color, nutrients, and natural sweetness to the filling.
- Uses whole wheat flour. Both in the crust and the filling, whole wheat flour adds fiber and a subtle, nutty depth of flavor.
- Low-fat milk instead of cream. You still get a luscious, creamy sauce, but without the heavy cream calories or saturated fat.
- Freezer-friendly. This pot pie freezes beautifully before or after baking, making it ideal for meal prep.
- Kid-approved. I have never once had a child at my table turn this down, and that is saying something.
For another comforting chicken dinner that’s just as weeknight-friendly, try my Chicken and Sweet Potato recipe — sweet, savory, and on the table in under an hour.
Ingredients
You don’t need anything exotic or hard to find for this recipe. I’ve kept the ingredient list focused on whole, real foods that you likely already have on hand or can grab at any grocery store.
For the Filling:
- 3 cups (420g) cooked chicken breast, shredded or diced
- 2 tablespoons (30ml) olive oil
- 1 medium yellow onion (about 1 cup / 150g), diced
- 3 medium carrots (about 1 cup / 130g), peeled and diced
- 3 celery stalks (about 1 cup / 110g), sliced
- 3 garlic cloves, minced
- 1/3 cup (42g) whole wheat flour
- 2 cups (480ml) low-sodium chicken broth
- 1 cup (240ml) low-fat milk (2% works great)
- 1 cup (130g) frozen peas
- 1 teaspoon dried thyme
- 1/2 teaspoon dried rosemary
- 1/2 teaspoon garlic powder
- Salt and black pepper, to taste
For the Whole Wheat Crust:
- 1 1/4 cups (160g) whole wheat flour
- 1/2 teaspoon salt
- 1/2 cup (115g) cold unsalted butter, cut into small cubes
- 3-4 tablespoons (45-60ml) ice water
For the Egg Wash:
- 1 large egg, beaten
- 1 tablespoon (15ml) low-fat milk
Read Also: Easy Healthy Dinner Recipes for Family
Kitchen Equipment Needed
You won’t need anything unusual to pull this recipe together. These are all staples of a well-stocked home kitchen, and a few of them are worth investing in if you cook regularly.
Here’s what you’ll need:
- 9-inch deep-dish pie dish — deep enough to hold the full filling without overflow
- Large oven-safe skillet or saucepan — for building the filling
- Mixing bowl — for making the crust dough
- Pastry cutter or food processor — to cut butter into the flour evenly
- Rolling pin — for rolling out the crust
- Chef’s knife and cutting board — for dicing the vegetables
- Measuring cups and spoons
- Wooden spoon or silicone spatula
- Whisk — for smoothing out the filling sauce
- Pastry brush — for applying the egg wash to the crust
- Aluminum foil or pie shield — to prevent the crust from over-browning
You might also enjoy: Roast Chicken Recipe
Recommended Products for This Recipe
These are products I personally use and genuinely stand behind for making this recipe the best it can be.
1. Lodge Enameled Cast Iron Skillet
Building your filling in a cast iron or enameled skillet makes a huge difference in how evenly the sauce cooks and thickens. It retains heat so well that you’ll get a beautifully consistent result without any scorching. I use mine almost every time I make this recipe.
2. Emile Henry Ceramic Deep Dish Pie Dish
A quality ceramic pie dish bakes more evenly than standard metal ones, which means your filling stays creamy while the crust gets perfectly golden. The depth on this one is ideal for a filling as generous as this one. It’s also gorgeous enough to go straight from oven to table.
3. King Arthur Whole Wheat Flour
Not all whole wheat flour is created equal. King Arthur’s whole wheat flour gives you a tender, flaky crust rather than a dense, cardboard-like one. I stopped using other brands after I found how much better this one behaved in pastry dough.
4. OXO Good Grips Pastry Blender
Getting the butter cut into pea-sized pieces is the secret to a flaky crust, and a good pastry blender makes it so much easier than trying to do it with two forks. This one has a comfortable grip and sturdy blades that hold up beautifully over time.
Read Also: Chicken Stew Recipe

Step-by-Step Instructions: How to Make Healthy Chicken Pot Pie
Step 1: Make the Pie Crust Dough
- In a large mixing bowl, combine 1 1/4 cups (160g) of whole wheat flour with 1/2 teaspoon of salt and whisk them together briefly to distribute the salt evenly throughout the flour.
- Add 1/2 cup (115g) of cold unsalted butter that you’ve cut into small cubes, about 1/2-inch pieces, directly into the flour mixture.
- Using a pastry cutter or two forks, work the butter into the flour by pressing and cutting until the mixture resembles coarse, uneven crumbs with some butter pieces about the size of small peas. This irregular texture is what creates flakiness — don’t overmix.
- Add ice-cold water, one tablespoon at a time (starting with 3 tablespoons / 45ml), and stir gently with a fork after each addition. Stop adding water as soon as the dough just begins to hold together when pressed between your fingers.
- Turn the dough out onto a lightly floured surface and press it gently into a flat disk shape. Wrap it tightly in plastic wrap and refrigerate for at least 20 minutes. This rest period allows the gluten to relax, which makes the dough much easier to roll.
Step 2: Preheat the Oven and Prepare Your Dish
- Set your oven to 400°F (200°C) and allow it to preheat fully while you prepare the filling. A properly preheated oven is important for getting the crust to cook evenly and turn golden.
- Lightly grease your 9-inch (23cm) deep-dish pie plate with a small amount of olive oil or nonstick cooking spray, then set it aside on a baking sheet. The baking sheet makes it much easier to transfer the pie in and out of the oven, and it will catch any drips.
Step 3: Sauté the Vegetables
- Heat 2 tablespoons (30ml) of olive oil in a large oven-safe skillet or heavy-bottomed saucepan over medium heat. Allow the oil to heat for about 1 minute until it shimmers slightly.
- Add the diced yellow onion and cook, stirring occasionally, for about 3-4 minutes until it starts to soften and become translucent.
- Add the diced carrots and sliced celery to the pan. Stir everything together and continue cooking for another 4-5 minutes, stirring occasionally, until the carrots begin to soften at the edges.
- Push the vegetables to one side of the pan and add the minced garlic to the cleared space. Cook the garlic for 30-60 seconds, stirring it constantly so it doesn’t burn, then stir it into the rest of the vegetables.
- Season the vegetable mixture with 1 teaspoon of dried thyme, 1/2 teaspoon of dried rosemary, 1/2 teaspoon of garlic powder, a generous pinch of salt, and black pepper to taste. Stir everything together well.
Step 4: Build the Creamy Sauce
- Sprinkle 1/3 cup (42g) of whole wheat flour evenly over the sautéed vegetable mixture in the pan. Stir immediately and continuously for about 2 minutes, making sure the flour coats all the vegetables and there are no dry white clumps remaining. This step cooks out the raw flour taste.
- Slowly pour in 2 cups (480ml) of low-sodium chicken broth, adding it in a steady stream while whisking or stirring constantly to prevent lumps from forming.
- Add 1 cup (240ml) of low-fat milk in the same way, pouring slowly while stirring.
- Increase the heat slightly to medium-high and bring the mixture to a gentle simmer, stirring frequently. The sauce will thicken noticeably after about 4-6 minutes of simmering. You’re looking for a consistency similar to a thick, creamy gravy that coats the back of a spoon.
- Taste the sauce and adjust the salt and pepper as needed.
Step 5: Add the Chicken and Peas
- Reduce the heat back to low and stir in 3 cups (420g) of your shredded or diced cooked chicken breast into the sauce. Make sure the chicken is well distributed throughout the filling.
- Add 1 cup (130g) of frozen peas and stir them in gently. You don’t need to thaw the peas beforehand — they’ll warm through quickly and you want them to stay slightly firm rather than turning mushy.
- Stir the filling one more time, then taste it a final time and adjust seasoning. Remove the pan from heat and let the filling cool slightly while you roll out the crust.
Step 6: Roll Out the Crust
- Remove the chilled dough disk from the refrigerator and place it on a lightly floured surface or between two pieces of parchment paper. Parchment makes this easier and requires less flour, which keeps the crust more tender.
- Using a floured rolling pin, roll the dough out from the center toward the edges, rotating the dough a quarter turn every few passes to keep it roughly circular. Roll it to about 1/8-inch (3mm) thickness — thin enough to be flaky, but not so thin it tears.
- The rolled dough should be about 1-2 inches (3-5cm) larger in diameter than your pie dish all the way around, so it can drape over the edges.
- If the dough cracks at the edges while rolling, just pinch it back together with your fingers and continue.
Step 7: Assemble the Pot Pie
- Pour the filling into your prepared 9-inch (23cm) pie dish, spreading it into an even layer. The filling should come close to the top of the dish.
- Carefully transfer the rolled crust on top of the filling by rolling it loosely around your rolling pin and then unrolling it over the dish, or by folding it in quarters and positioning it over the dish before unfolding.
- Press the edges of the crust gently against the rim of the pie dish to seal it. Fold the overhanging dough under itself along the edge and crimp it with your fingers or a fork to create a decorative, sealed edge.
- In a small bowl, whisk together 1 beaten egg and 1 tablespoon (15ml) of low-fat milk to make the egg wash. Brush this evenly over the entire surface of the crust, including the crimped edges. The egg wash is what gives the crust its beautiful golden color.
- Using a sharp knife, cut 4-5 small slits in the center of the crust. These vents allow steam to escape while the pie bakes, which prevents the crust from puffing up and cracking unevenly.
Step 8: Bake the Pot Pie
- Place the assembled pie (on its baking sheet) into the fully preheated oven at 400°F (200°C).
- Bake for 30-35 minutes, until the crust is deeply golden brown all over. If the edges of the crust start to brown too quickly before the center is done, cover just the edges loosely with a strip of aluminum foil or a pie shield and continue baking.
- The filling should be bubbling visibly through the vents by the time the pie is done, which tells you it’s hot all the way through.
- Remove the pie from the oven and let it rest for at least 10 minutes before cutting. This rest period allows the filling to set up slightly so that it doesn’t pour out immediately when you cut the first slice.
I learned this resting lesson the hard way the first time I made pot pie — I cut into it immediately and had a beautiful, soupy puddle on my plate. Trust me, 10 minutes is worth it.
Another comforting chicken recipe the whole family loves: Easy Chicken Noodle Soup
Tips for The Best Healthy Chicken Pot Pie
Making a great pot pie comes down to a few key techniques. These are the things I’ve learned through trial and error that make the biggest difference in the final result.
- Use cold butter for the crust. Warm butter melts into the flour before baking, which eliminates the flakiness. Cut your butter into cubes and pop them back in the freezer for 10 minutes before using them if your kitchen is warm.
- Don’t overwork the crust dough. Overworking develops gluten, which results in a tough, chewy crust instead of a tender, flaky one. Mix only until the dough barely comes together, then stop.
- Let the filling cool slightly before topping. A very hot filling will start to steam from below immediately, which can make the bottom of your crust soggy before it has time to set. A 5-minute cool-down makes a real difference.
- Use rotisserie chicken to save time. Shredded rotisserie chicken is one of the best shortcuts in cooking. It’s already flavorful and perfectly tender, and it takes this recipe from weeknight-long to weeknight-possible.
- Don’t skip the flour cooking step. When you add the flour to the vegetables and cook it for two full minutes before adding the liquid, you’re cooking out the raw, starchy taste. Rushing this step leaves a floury flavor in the finished sauce.
- Taste and season the filling before baking. Once the crust goes on, you can’t adjust the seasoning anymore. Take an extra minute to taste the filling and make sure it’s well-seasoned before assembling.
- Vent the crust generously. More slits mean more steam can escape, which keeps the crust from becoming soft or falling apart in the center.
- Chill the rolled crust if you have time. After you roll out the dough, you can slide it onto a baking sheet and refrigerate it for 15 minutes before placing it on the pie. This helps it hold its shape better during baking.
- Watch the oven in the last 10 minutes. Ovens vary, and this is when the difference between golden and burnt happens. Stay nearby and check through the oven window.
Read Also: Healthy Mashed Potatoes Recipe
What to Serve with Healthy Chicken Pot Pie
Chicken pot pie is a complete meal on its own, but a simple side can round out the dinner table beautifully. I tend to lean toward lighter, fresh accompaniments that contrast nicely with the rich, creamy filling.
Here are my favorite pairings:
- Healthy Coleslaw — The cool, crisp crunch of a vinegar-based coleslaw is a perfect contrast to the warm, creamy pot pie filling.
- Broccoli Salad — A fresh broccoli salad with a light dressing adds color and crunch without competing with the flavors of the pie.
- Green Bean Casserole — This classic side dish is a cozy companion for pot pie at any time of year, especially around the holidays.
- Healthy Cornbread — A slice of lightly sweet cornbread is wonderful for scooping up any extra filling left on the plate.
- A simple green salad — Mixed greens with a lemon vinaigrette keep things fresh and bright alongside the hearty main dish.
- Roasted asparagus or green beans — Simple oven-roasted vegetables with olive oil, salt, and pepper are easy to prepare while the pot pie bakes.
For another family-friendly fall dinner that pairs beautifully with similar sides, check out my Fall Dinner Recipes roundup.
Variations of Healthy Chicken Pot Pie
Once you’ve made the base recipe a couple of times, you’ll find yourself wanting to riff on it. These are all tested variations that I’ve made and loved.
- Turkey Pot Pie: Swap the chicken for leftover roasted turkey after Thanksgiving. The flavor profile is very similar and it’s a brilliant use of holiday leftovers.
- Crustless Chicken Pot Pie: Skip the crust entirely and pour the filling into a baking dish. Top with a sprinkle of whole wheat panko breadcrumbs mixed with a little olive oil and bake until golden. You save even more calories and it still delivers on comfort.
- Puff Pastry Topping: Use a sheet of store-bought whole wheat puff pastry instead of the homemade crust if you’re short on time. It bakes up beautifully golden and flaky with minimal effort.
- Vegetarian Pot Pie: Replace the chicken with 2 cups of chickpeas or white beans and swap the chicken broth for vegetable broth. Add a few mushrooms to the sauté for extra heartiness and umami depth.
- Sweet Potato Addition: Stir in 1 cup of diced and par-cooked sweet potato with the chicken and peas for extra color, natural sweetness, and a boost of vitamin A.
- Spicy Version: Add 1/2 teaspoon of smoked paprika and a pinch of cayenne pepper to the filling for a subtle kick that makes everything feel a little more alive.
- Individual Pot Pies: Divide the filling evenly among 6 oven-safe ramekins and top each with a small circle of crust. Individual pot pies bake in about 20-25 minutes and are a great choice for portion control or dinner parties.
- Dairy-Free Version: Replace the low-fat milk with unsweetened oat milk or canned full-fat coconut milk. The filling will still be creamy and delicious, and nobody at the table will know the difference.
You might also enjoy: Healthy Orange Chicken Recipe
Storage and Reheating
One of my favorite things about this pot pie is how well it keeps. It actually tastes even better the next day once all the flavors have had time to meld together overnight.
- Refrigerator: Store leftover pot pie covered tightly with plastic wrap or aluminum foil in the refrigerator for up to 4 days.
- Reheating slices: Place individual slices on a baking sheet and reheat in a 350°F (175°C) oven for 15-20 minutes until heated through. This keeps the crust from becoming soggy, which is the main problem with microwaving.
- Microwave reheating: If you’re in a hurry, you can microwave individual slices for 2-3 minutes on medium power, stopping to check halfway through. The crust won’t be as crispy but the filling will still be delicious.
- Freezing before baking: Assemble the pot pie completely, cover it tightly with plastic wrap and then aluminum foil, and freeze for up to 3 months. Bake directly from frozen at 400°F (200°C) for 60-70 minutes, covering the edges if they brown too quickly.
- Freezing after baking: Cool the baked pie completely before wrapping and freezing. Thaw overnight in the refrigerator and reheat in a 350°F (175°C) oven for 25-30 minutes.
- Freezing filling only: If you prefer to keep the crust fresh, freeze just the filling in an airtight container for up to 3 months. Thaw overnight, reheat on the stovetop, and prepare a fresh crust when you’re ready to bake.
For another wholesome, freezer-friendly family meal, try my Easy Healthy Crockpot Chili.
Nutritional Facts
The following estimates are based on one serving out of six total servings and are calculated using the ingredients as listed. Values will vary based on specific brands and any substitutions made.
| Nutrient | Per Serving (1/6 of pie) |
|---|---|
| Calories | ~380 kcal |
| Total Fat | 16g |
| Saturated Fat | 7g |
| Cholesterol | 105mg |
| Sodium | 340mg |
| Total Carbohydrates | 32g |
| Dietary Fiber | 4g |
| Sugars | 5g |
| Protein | 28g |
This recipe is a meaningful upgrade from a traditional chicken pot pie, which can easily exceed 600-700 calories per serving when made with a butter-heavy double crust and cream-based filling.
Another favorite: Healthy Chicken Parmesan Recipe
Health Benefits of Key Ingredients
This recipe does more than just cut calories — it actively works in your favor with every ingredient.
Each component was chosen for both flavor and nutritional value, and here’s what they bring to the table:
- Chicken breast is one of the leanest sources of complete protein available. A single serving provides roughly 25-30 grams of protein, supporting muscle maintenance, satiety, and stable energy levels throughout the day.
- Olive oil replaces butter in the filling and delivers heart-healthy monounsaturated fats along with anti-inflammatory compounds. Just two tablespoons provide a solid dose of healthy fats without the cholesterol-raising saturated fat of butter.
- Carrots are rich in beta-carotene, which the body converts to vitamin A. They also provide fiber and natural sweetness that helps round out the savory filling beautifully.
- Celery is extremely low in calories while contributing a satisfying crunch and a hit of vitamin K, which plays a key role in bone health and blood clotting.
- Frozen peas are nutritional powerhouses that are often underestimated. They provide plant-based protein, fiber, vitamin C, and vitamin K, all while adding bright color and a natural sweetness to the filling.
- Whole wheat flour brings significantly more fiber, B vitamins, and minerals to both the crust and the sauce than refined white flour. The fiber content helps slow digestion and keeps you feeling full longer.
- Low-fat milk delivers calcium, vitamin D, and potassium while keeping the sauce creamy without the saturated fat load of heavy cream. A cup of low-fat milk has roughly two-thirds fewer calories than the same volume of heavy cream.
- Low-sodium chicken broth adds deep, savory flavor to the filling while letting you stay in control of the sodium content — an important factor for heart health and blood pressure management.
Read Also: Lentil and Vegetable Soup Recipe
FAQs About Healthy Chicken Pot Pie
1. Can I use store-bought pie crust instead of making my own?
Absolutely. A refrigerated whole wheat or regular pie crust from the grocery store works perfectly in this recipe. It saves a solid 20 minutes of prep time and still bakes up golden and flaky.
2. Can I make this recipe ahead of time?
Yes, this is actually one of the best make-ahead recipes I know. You can assemble the entire pie up to 24 hours before baking, cover it tightly, and keep it in the refrigerator — just add 5-10 minutes to the baking time if it’s going in cold.
3. Can I use chicken thighs instead of chicken breast?
Chicken thighs work wonderfully here and add even more richness and depth to the filling. They do have slightly more fat than chicken breast, but they’re still a far healthier option than what you’d find in a traditional, butter-heavy pot pie.
4. Why is my filling not thick enough?
This usually happens when the flour isn’t cooked long enough before adding the liquids, or if the sauce wasn’t simmered long enough to thicken. Make sure you cook the flour with the vegetables for a full 2 minutes before adding the broth and milk. Then keep simmering, stirring frequently, until the sauce coats the back of a spoon.
5. Can I make this gluten-free?
Yes, with a couple of adjustments. Replace the whole wheat flour in the filling with a 1:1 gluten-free all-purpose flour blend — it works almost identically for thickening. For the crust, use a gluten-free 1:1 baking flour and add an extra tablespoon of cold water since gluten-free flours tend to be drier. The crust may be slightly more delicate to handle, but the flavor is excellent.
For more comforting soup-style dinners, check out my Chicken Potato Soup.
Healthy Chicken Pot Pie
Ingredients
- 1 1/4 cups whole wheat flour - 160g
- 1/2 tsp salt - for the crust
- 1/2 cup cold unsalted butter - 115g, cut into small cubes
- 3-4 tbsp ice water - 45-60ml, added one tablespoon at a time
- 2 tbsp olive oil - 30ml
- 1 medium yellow onion - about 1 cup or 150g, diced
- 3 medium carrots - about 1 cup or 130g, peeled and diced
- 3 stalks celery - about 1 cup or 110g, sliced
- 3 cloves garlic - minced
- 1/3 cup whole wheat flour - 42g, for thickening the sauce
- 2 cups low-sodium chicken broth - 480ml
- 1 cup low-fat milk - 240ml, 2% works great
- 3 cups cooked chicken breast - 420g, shredded or diced; rotisserie chicken works great
- 1 cup frozen peas - 130g, no need to thaw
- 1 tsp dried thyme
- 1/2 tsp dried rosemary
- 1/2 tsp garlic powder
- salt - to taste
- black pepper - to taste
- 1 large egg - beaten
- 1 tbsp low-fat milk - 15ml
Equipment
- 9-inch deep-dish pie dish - Ceramic or glass recommended for even baking
- Large oven-safe skillet or heavy-bottomed saucepan - For building the filling
- Mixing bowl - Large, for making the crust dough
- Pastry cutter or food processor - For cutting butter into flour
- Rolling Pin - For rolling out the pie crust
- Chef’s knife - For dicing vegetables
- Cutting board
- Measuring cups and spoons
- Wooden spoon or silicone spatula
- Whisk - For smoothing out the filling sauce
- Pastry brush - For applying egg wash to the crust
- Baking sheet - To place under the pie dish in the oven to catch drips
- Aluminum foil or pie crust shield - (optional) To prevent crust edges from over-browning
- Plastic wrap - For wrapping and chilling the dough
Method
- In a large bowl, whisk together 1 1/4 cups whole wheat flour and 1/2 tsp salt. Cut in the cold butter cubes using a pastry cutter until the mixture resembles coarse crumbs with pea-sized butter pieces.Add ice water one tablespoon at a time, stirring gently, until the dough just holds together when pressed. Shape into a disk, wrap in plastic wrap, and refrigerate for at least 20 minutes.
- Preheat your oven to 400°F (200°C). Lightly grease a 9-inch deep-dish pie dish with olive oil or nonstick spray and set it on a baking sheet.
- Heat 2 tbsp olive oil in a large skillet over medium heat. Add the diced onion and cook for 3-4 minutes until softened, then add the carrots and celery and cook another 4-5 minutes.Push the vegetables aside, add the minced garlic and cook for 30-60 seconds, then stir it in along with the thyme, rosemary, garlic powder, salt, and pepper.
- Sprinkle the 1/3 cup whole wheat flour over the vegetables and stir constantly for 2 full minutes to cook out the raw flour taste. Slowly pour in the chicken broth and then the milk, stirring constantly to prevent lumps.Increase heat to medium-high and simmer for 4-6 minutes, stirring frequently, until the sauce thickens to a creamy gravy consistency that coats the back of a spoon. Taste and adjust seasoning.
- Reduce heat to low and stir in the shredded chicken breast and frozen peas until evenly distributed. Taste the filling one final time and adjust salt and pepper as needed, then remove from heat and let cool slightly.
- Place the chilled dough on a lightly floured surface or between two sheets of parchment paper. Roll from the center outward, rotating the dough a quarter turn each time, until it is about 1/8-inch (3mm) thick and 1-2 inches larger than your pie dish all around.
- Pour the filling into the prepared pie dish and spread evenly. Carefully drape the rolled crust over the top, press the edges to seal, fold under and crimp. Whisk together the egg and 1 tbsp milk, then brush evenly over the crust.Cut 4-5 small slits in the center of the crust to allow steam to escape during baking.
- Bake at 400°F (200°C) for 30-35 minutes until the crust is deeply golden and the filling is bubbling through the vents. If the crust edges brown too quickly, cover them loosely with foil.Remove from the oven and let rest for at least 10 minutes before slicing and serving, so the filling sets properly.
Nutrition
Notes
- Cold butter is key: Always use cold butter for the crust — warm butter melts into the flour before baking and eliminates flakiness. If your kitchen is warm, pop the butter cubes in the freezer for 10 minutes before using.
- Don’t overwork the dough: Mix the crust only until it barely holds together. Overworking develops gluten and results in a tough, chewy crust instead of a tender, flaky one.
- Rotisserie chicken shortcut: Use store-bought shredded rotisserie chicken to save significant prep time without sacrificing flavor. It’s already seasoned and perfectly tender.
- Cook the flour properly: Stir the flour with the vegetables for a full 2 minutes before adding the liquid. Skipping this step leaves a raw, starchy taste in the finished sauce.
- Let the filling cool slightly: A very hot filling creates immediate steam from below, which can make the underside of the crust soggy. A 5-minute rest before topping makes a real difference.
- Crust shield tip: If the edges of the crust begin to brown before the center is done, cover just the edges loosely with a strip of aluminum foil or a pie crust shield and continue baking.
- Make-ahead option: Assemble the entire pot pie up to 24 hours in advance, cover tightly, and refrigerate. Add 5-10 extra minutes to the baking time if going in straight from the fridge.
- Freezer instructions: Freeze the assembled (unbaked) pie for up to 3 months. Bake directly from frozen at 400°F (200°C) for 60-70 minutes, covering edges as needed. Alternatively, freeze the filling alone and prepare a fresh crust when ready to bake.
- Dairy-free option: Replace the low-fat milk in both the filling and egg wash with unsweetened oat milk or canned full-fat coconut milk for a completely dairy-free version.
- Store-bought crust shortcut: A refrigerated whole wheat pie crust works perfectly in this recipe and saves about 20 minutes of prep time. Look for one in the refrigerated section of your grocery store.
Private Notes
Tried this recipe?
Let us know how it was!Final Thoughts
This healthy chicken pot pie recipe has become one of the most-requested things I make. It’s the kind of dinner that makes a cold weeknight feel like a cozy occasion.
If you’ve been putting off making pot pie from scratch because it seemed too indulgent or too complicated, I hope this recipe changes that. It’s more approachable than it looks and genuinely more wholesome than you’d expect comfort food to be.
Give it a try, and let me know how it turns out in the comments below. I especially love hearing if you put your own spin on the filling — this is a recipe that welcomes creativity.
If you take a photo, tag me on social media! Seeing your pot pies come to life absolutely makes my day.
Recommended:
- Healthy Shepherd’s Pie Recipe
- Chicken Stew Recipe
- Chicken Gravy Recipe
- Slow Cooker Chicken Enchilada Casserole Recipe
- Baked Chicken Meatballs with Spaghetti Squash Recipe
- Chicken Fajita Lettuce Wraps Recipe
- Turkey and Quinoa Stuffed Peppers Recipe
- Best Chicken Soup Recipes
- Healthy Pizza Dough Recipe
- Easy Healthy Homemade Granola Recipe