
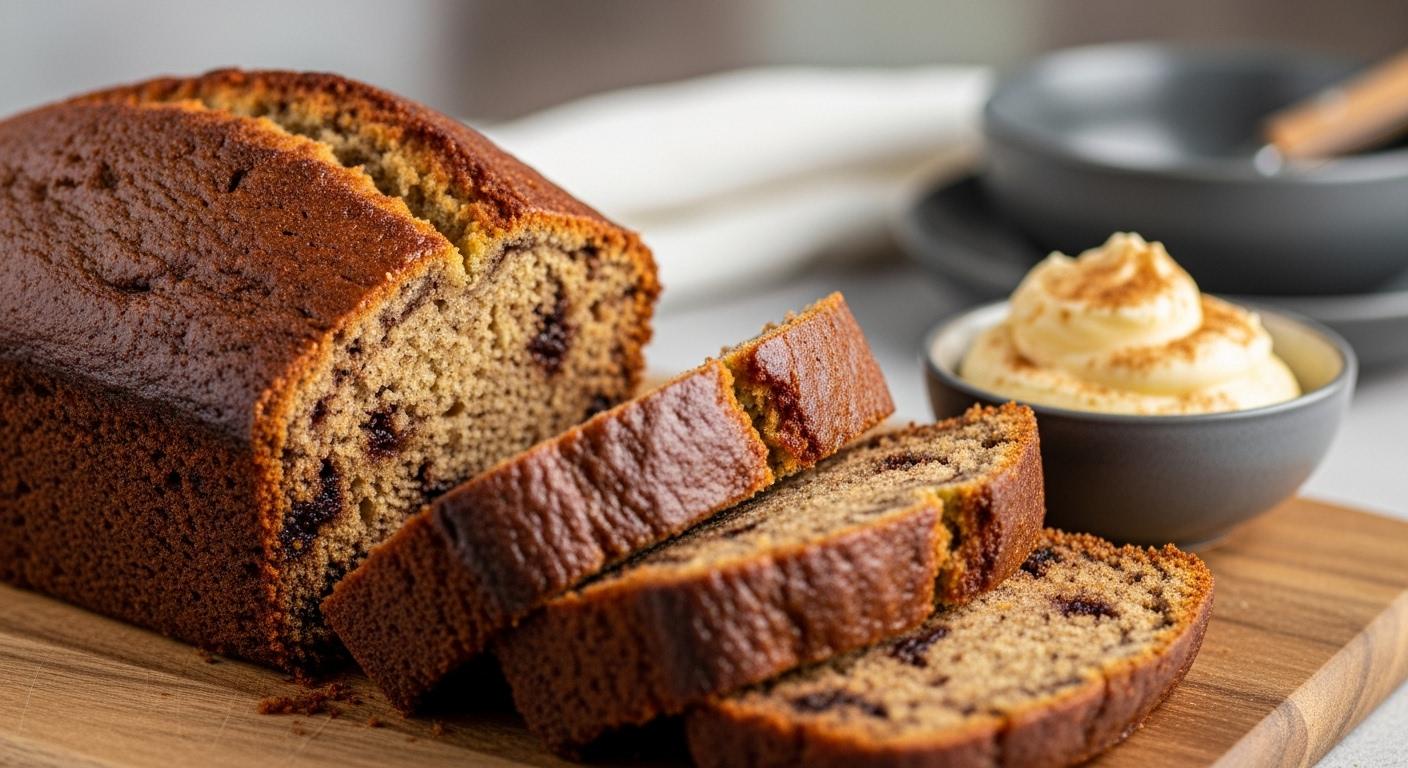
There’s nothing quite like the smell of freshly baked banana bread wafting through your kitchen, and I’ve discovered a way to make it even better: using an air fryer.
This Air Fryer Banana Bread Recipe has completely changed how I use up those overripe bananas sitting on my counter. The first time I tried making banana bread in my air fryer, I was honestly skeptical.
Could it really turn out as moist and flavorful as the oven-baked version I’d been making for years? Spoiler alert: it absolutely does, and it’s ready in half the time.
I still remember that first attempt vividly. I had three bananas that were almost too far gone, and my oven was already occupied with a casserole for dinner.
Out of desperation more than innovation, I thought, “Why not try the air fryer?” The result was incredible. The outside had this beautiful golden-brown crust that was slightly crisp, while the inside remained incredibly tender and moist.
My family devoured the entire loaf in one sitting, and my daughter asked if we could make it again the very next day.
| Quick Recipe Summary | |
|---|---|
| Prep Time | 10 minutes |
| Cook Time | 25 minutes |
| Total Time | 35 minutes |
| Servings | 8 slices |
| Difficulty Level | Easy |
This banana bread pairs beautifully with my Healthy Banana Bread if you’re looking for more nutritious breakfast options.

Why You’ll Love This Air Fryer Banana Bread Recipe
This recipe has become my go-to for so many reasons. First, it’s ridiculously quick compared to traditional oven baking.
While a conventional banana bread takes nearly an hour in the oven, this air fryer version is done in about 25 minutes. That means you can have warm, homemade banana bread on the table in under 40 minutes from start to finish.
The texture is absolutely perfect. The air fryer creates this wonderful contrast between a slightly crispy exterior and an incredibly moist, tender crumb inside.
I’ve found that the circulating hot air gives the bread an even, consistent bake without any of those annoying dry edges or undercooked centers. Every single slice comes out perfect.
Here’s what makes this recipe truly special:
- Energy efficient: Uses significantly less energy than heating up your entire oven
- Perfect portion size: Makes one loaf that’s just right for a small family or couple
- No preheating wait: Your air fryer heats up in minutes, not the 10-15 minutes an oven needs
- Easy cleanup: Just one pan to wash instead of dealing with oven racks and drips
- Consistent results: The controlled environment of an air fryer means your bread turns out perfect every single time
- Incredibly moist: The sealed environment keeps moisture locked in beautifully
- Space-saving: Perfect for small kitchens, RVs, or dorm rooms where oven access is limited
Another favorite breakfast option is my Air Fryer Pancake.
Ingredients
This recipe uses simple pantry staples that you probably already have on hand. I’ve kept the ingredient list intentionally straightforward because banana bread should never be complicated.
The bananas are truly the star here. I’ve learned through trial and error that the more spotted and soft they are, the sweeter and more flavorful your bread will be.
- 3 large overripe bananas, mashed (about 1½ cups or 340g)
- ⅓ cup (75g) melted butter or coconut oil
- ¾ cup (150g) granulated sugar
- 1 large egg, beaten
- 1 teaspoon vanilla extract
- 1 teaspoon baking soda
- Pinch of salt
- 1½ cups (190g) all-purpose flour
- ½ teaspoon ground cinnamon
- ¼ teaspoon ground nutmeg
- ½ cup (85g) chocolate chips or chopped walnuts (optional)
The optional add-ins are where you can get creative. I usually rotate between chocolate chips and walnuts depending on what I’m in the mood for.
Try my Easy Banana Bread Recipe.
Kitchen Equipment Needed
Having the right tools makes this recipe even easier. I’ve made banana bread in various air fryers, and while they all work, having quality equipment does make a difference.
You don’t need anything fancy, but a few key items will set you up for success.
- Air fryer (6-quart or larger works best)
- 7-inch or 8-inch loaf pan that fits in your air fryer basket
- Large mixing bowl
- Medium mixing bowl
- Fork or potato masher for mashing bananas
- Whisk or electric mixer
- Rubber spatula
- Measuring cups and spoons
- Toothpick or cake tester
- Cooling rack
I highly recommend using a metal loaf pan rather than silicone for this recipe. The metal conducts heat better and gives you that beautiful golden crust on all sides.
You might also enjoy: Starbucks Banana Bread
Recommended Products for This Recipe
After making this banana bread dozens of times, I’ve found a few products that really elevate the results and make the process smoother.
These aren’t just random recommendations, they’re the actual items I reach for every single time I make this recipe.
1. Cosori 6-Quart Air Fryer
This is the air fryer I use in my own kitchen, and it’s absolutely perfect for baking. The temperature control is incredibly precise, which matters when you’re baking delicate items like banana bread.
The basket is roomy enough to fit a standard loaf pan with plenty of air circulation around it. I’ve tried cheaper models, and they just don’t give you the same consistent results.
2. USA Pan Aluminized Steel Loaf Pan
This 8.5 x 4.5-inch loaf pan is my absolute favorite for air fryer baking. The aluminized steel distributes heat evenly, and it’s just the right size to fit perfectly in most air fryer baskets.
The non-stick coating releases the bread beautifully every time, and it cleans up in seconds. I’ve had mine for three years and it still looks brand new.
3. King Arthur Baking Company Unbleached All-Purpose Flour
The quality of your flour makes a real difference in how your banana bread turns out. King Arthur flour is consistently milled and has the perfect protein content for tender, fluffy quick breads.
I’ve used cheaper store brands, and the texture just isn’t the same. This flour gives you that bakery-quality crumb every single time.
4. Ghirardelli Semi-Sweet Chocolate Chips
If you’re adding chocolate chips to your banana bread (and you absolutely should at least once), these are the ones to use. They melt beautifully without becoming greasy, and the chocolate flavor is rich without being overwhelming.
The chips hold their shape during baking, giving you those perfect pockets of melted chocolate in every slice.
For another delicious bread variation, try my Chocolate Chip Bread.

Step-by-Step Instructions: How to Make Air Fryer Banana Bread
I’ve broken down this recipe into detailed steps that walk you through exactly what to do. Even if you’re a complete beginner, you’ll be able to follow along easily and get perfect results.
The key is taking your time with the mixing and not rushing the process.
1. Prepare Your Air Fryer and Pan
- Take your loaf pan and spray it generously with non-stick cooking spray, making sure to get into all the corners and edges
- Alternatively, line the pan with parchment paper, leaving some overhang on the long sides to use as handles for easy removal later
- Set your air fryer to 320°F (160°C) and let it preheat for about 3 minutes while you prepare the batter
- Make sure your air fryer basket is clean and dry before placing the loaf pan inside
2. Mash the Bananas
- Peel your overripe bananas and place them in a large mixing bowl
- Use a fork or potato masher to mash them thoroughly until they’re mostly smooth with just a few small lumps remaining
- The consistency should be similar to chunky applesauce, not completely pureed
- Measure out exactly 1½ cups of mashed banana to ensure the right moisture level in your bread
I learned the hard way that using too much banana makes the bread too dense and wet. Stick to the measurements!
3. Mix the Wet Ingredients
- Add the melted butter (or coconut oil if using) to the mashed bananas and stir well to combine
- Pour in the granulated sugar and mix until it’s fully incorporated and the mixture looks slightly glossy
- Crack the egg into the bowl and beat it in thoroughly with a whisk or fork
- Add the vanilla extract and give everything a final good stir until the wet ingredients are completely smooth and uniform
4. Combine the Dry Ingredients
- In a separate medium bowl, whisk together the all-purpose flour, baking soda, salt, cinnamon, and nutmeg
- Make sure to whisk thoroughly to distribute the baking soda and spices evenly throughout the flour
- This step is crucial because it prevents pockets of baking soda that can create an unpleasant metallic taste
- Break up any lumps in the flour with your whisk as you go
5. Fold Dry Ingredients into Wet Ingredients
- Create a well in the center of your wet ingredients
- Pour the dry ingredient mixture into the well all at once
- Using a rubber spatula, gently fold the dry ingredients into the wet ingredients with broad, sweeping motions
- Stop mixing as soon as you no longer see dry flour streaks, even if the batter looks a bit lumpy
- Overmixing at this stage will develop the gluten in the flour and make your bread tough and chewy instead of tender
- The entire folding process should take no more than 20-30 gentle strokes
6. Add Optional Mix-Ins
- If using chocolate chips or chopped walnuts, sprinkle them over the batter now
- Gently fold them in with just 3-4 more strokes of your spatula
- Reserve a small handful of chips or nuts to press into the top of the batter for a prettier presentation
- Don’t overmix at this stage, you want the add-ins distributed throughout but not crushed or broken up
7. Pour Batter into Prepared Pan
- Pour the batter into your prepared loaf pan, using your spatula to scrape every last bit from the bowl
- Gently tap the pan on the counter 2-3 times to release any large air bubbles trapped in the batter
- Use your spatula to smooth the top of the batter so it’s relatively even
- If you reserved any chocolate chips or nuts, press them gently into the top surface of the batter now
8. Air Fry the Banana Bread
- Carefully place the loaf pan into the preheated air fryer basket
- Set the timer for 25 minutes at 320°F (160°C)
- Don’t open the air fryer during the first 20 minutes of cooking, as this can cause the bread to collapse
- At the 25-minute mark, insert a toothpick or cake tester into the center of the bread
- If it comes out clean or with just a few moist crumbs (not wet batter), your bread is done
- If the toothpick comes out with wet batter, cook for an additional 3-5 minutes and test again
- If the top is browning too quickly but the center isn’t done, tent a piece of aluminum foil loosely over the top and continue cooking
9. Cool and Remove from Pan
- Once the bread is fully cooked, carefully remove the loaf pan from the air fryer using oven mitts (it will be very hot)
- Place the pan on a wire cooling rack and let it cool for 10 minutes
- This resting time allows the bread to set up properly and makes it easier to remove from the pan without breaking
- After 10 minutes, run a butter knife around the edges of the pan to loosen the bread
- If you used parchment paper, simply lift the bread out using the overhanging paper as handles
- Transfer the bread to the cooling rack and let it cool for at least another 15 minutes before slicing
- For the cleanest slices, wait until the bread is completely cool, but I understand if you can’t resist cutting into it while it’s still warm
Read Also: Keto Banana Bread
Tips for The Best Air Fryer Banana Bread
Over the years of making this recipe, I’ve learned a few tricks that take it from good to absolutely incredible. These tips might seem small, but they make a real difference in the final result.
Pay special attention to the banana ripeness and mixing technique.
- Use extremely ripe bananas: The more brown spots, the better. Bananas that are almost completely black on the outside will give you the sweetest, most flavorful bread. If your bananas aren’t ripe enough, place them in a paper bag with an apple for a day or two to speed up the process.
- Don’t overmix the batter: Once you add the dry ingredients to the wet, mix only until you can’t see dry flour anymore. Overmixing develops gluten and makes the bread tough and dense instead of tender.
- Check your air fryer size: Make sure your loaf pan actually fits in your air fryer basket with at least an inch of space around it for air circulation. I once tried using a pan that was too big and the bread came out unevenly cooked.
- Adjust cooking time as needed: All air fryers are slightly different. Start checking your bread at the 20-minute mark, especially if you have a smaller or more powerful model. Mine takes exactly 25 minutes, but yours might need a few minutes more or less.
- Let it cool properly: I know it’s tempting to slice into hot banana bread, but letting it cool for at least 25 minutes total makes the texture so much better and prevents it from falling apart when you cut it.
- Use room temperature ingredients: Take your egg out of the fridge about 30 minutes before baking. Room temperature eggs incorporate better and create a more uniform batter.
- Measure flour correctly: Spoon flour into your measuring cup and level it off with a knife rather than scooping directly from the bag. Scooping packs the flour and can result in dry, dense bread.
- Don’t skip the preheating: Those 3 minutes of preheating ensure your bread starts cooking at the right temperature immediately, which helps it rise properly.
- Line with parchment for easy removal: Cut a strip of parchment paper to line the bottom and long sides of your pan with overhang. This makes removing the bread foolproof.
- Test for doneness properly: A toothpick should come out with a few moist crumbs, not completely clean. If it’s completely clean, you might have slightly overcooked it.
Read Also: Snickerdoodle Banana Bread Recipe
What to Serve with Air Fryer Banana Bread
This banana bread is incredibly versatile and works beautifully at any time of day. I’ve served it for breakfast, as an afternoon snack, and even as a dessert.
The warm, comforting flavors pair well with both sweet and savory accompaniments.
Here are my favorite ways to serve it:
- Butter and honey: Spread warm butter on a thick slice while it’s still slightly warm and drizzle with raw honey
- Cream cheese spread: Whipped cream cheese with a touch of cinnamon makes an incredible topping
- Fresh berries: Serve alongside fresh strawberries, blueberries, or raspberries for a lighter option
- Greek yogurt: A dollop of vanilla Greek yogurt adds protein and a tangy contrast
- Hot Chocolate: Perfect for dunking on a chilly morning
- Coffee or tea: The classic pairing that never disappoints
- Ice cream: Make it a dessert by serving it warm with a scoop of vanilla ice cream
- Peanut butter: Spread natural peanut butter on top for extra protein and flavor
- Overnight Oats: Crumble a slice over your morning oats for added texture
- Fruit Cocktail Cake: Serve both for a dessert spread
- Whipped cream: A small dollop of lightly sweetened whipped cream makes it feel extra special
- Chocolate spread: For the ultimate indulgence, spread Nutella on warm slices
For a heartier breakfast spread, try it with Baked Oatmeal.
Variations of Air Fryer Banana Bread
One of the things I love most about this recipe is how adaptable it is. Once you master the basic version, you can customize it endlessly based on what you have on hand or what flavors you’re craving.
I’ve tried dozens of variations over the years, and these are my absolute favorites.
- Double Chocolate Banana Bread: Add ¼ cup cocoa powder to the dry ingredients (reducing the flour by ¼ cup) and fold in ¾ cup chocolate chips for an ultra-decadent version that tastes like a brownie.
- Peanut Butter Banana Bread: Swirl ½ cup of creamy peanut butter through the batter before air frying. Use a knife to create a marble pattern for both flavor and visual appeal.
- Banana Bread with No Eggs: Replace the egg with ¼ cup unsweetened applesauce or a flax egg (1 tablespoon ground flaxseed mixed with 3 tablespoons water, let sit 5 minutes).
- Coconut Banana Bread: Add ½ cup shredded coconut to the batter and sprinkle more on top before baking. Use coconut oil instead of butter to double down on the tropical flavor.
- Blueberry Banana Bread: Gently fold in 1 cup fresh or frozen blueberries (don’t thaw if frozen) along with the chocolate chips or instead of them.
- Maple Walnut Banana Bread: Replace the granulated sugar with pure maple syrup and add 1 cup chopped walnuts. The maple flavor is incredible with the banana.
- Cinnamon Swirl Banana Bread: Mix 2 tablespoons sugar with 1 tablespoon cinnamon. Pour half the batter into the pan, sprinkle with half the cinnamon sugar, add remaining batter, top with remaining cinnamon sugar, and swirl with a knife.
- Zucchini Banana Bread: Replace 1 of the bananas with ¾ cup shredded zucchini (squeeze out excess moisture first). This adds extra moisture and sneaks in a vegetable.
- Gluten-Free Banana Bread: Substitute the all-purpose flour with a 1:1 gluten-free baking flour blend. The texture will be slightly different but still delicious.
- Protein Banana Bread: Add ¼ cup vanilla protein powder and reduce the flour by ¼ cup for a more filling, protein-packed version that’s perfect post-workout.
Another favorite bread option: Sweet Potato Bread
Storage and Reheating
Proper storage is key to keeping your banana bread moist and delicious for as long as possible. I’ve learned through experience that how you store it makes a huge difference in how long it stays fresh.
Here’s exactly what I do to keep my banana bread at its best.
- Room temperature storage: Wrap the completely cooled bread tightly in plastic wrap or aluminum foil. Store at room temperature for up to 3 days. Place it in an airtight container for extra protection against drying out.
- Refrigerator storage: For longer storage, wrap the bread tightly and refrigerate for up to 1 week. The cold temperature slows mold growth but can dry out the bread slightly. Bring to room temperature or warm before serving.
- Freezer storage: This is my favorite method for long-term storage. Wrap individual slices in plastic wrap, then place them all in a freezer-safe zip-top bag. Freeze for up to 3 months. This way you can thaw just one or two slices at a time.
- Whole loaf freezing: Wrap the entire cooled loaf tightly in plastic wrap, then in aluminum foil, then place in a freezer bag. Freeze for up to 3 months. Thaw overnight in the refrigerator before serving.
- Reheating individual slices: Place a slice on a microwave-safe plate and heat for 15-20 seconds. The bread will taste freshly baked again.
- Reheating in the air fryer: Place slices in the air fryer at 300°F (150°C) for 2-3 minutes for a slightly crispy exterior and warm, soft interior.
- Reheating frozen slices: No need to thaw first. Microwave frozen slices for 30-40 seconds or toast them directly in your toaster until warm.
- Preventing sogginess: If your bread seems too moist, leave it unwrapped at room temperature for 30 minutes to let excess moisture evaporate before wrapping it for storage.
- Moisture trick: If your bread has dried out slightly, wrap it in a damp paper towel and microwave for 10-15 seconds to restore moisture.
If you love make-ahead breakfast options, check out my Protein Overnight Oats.
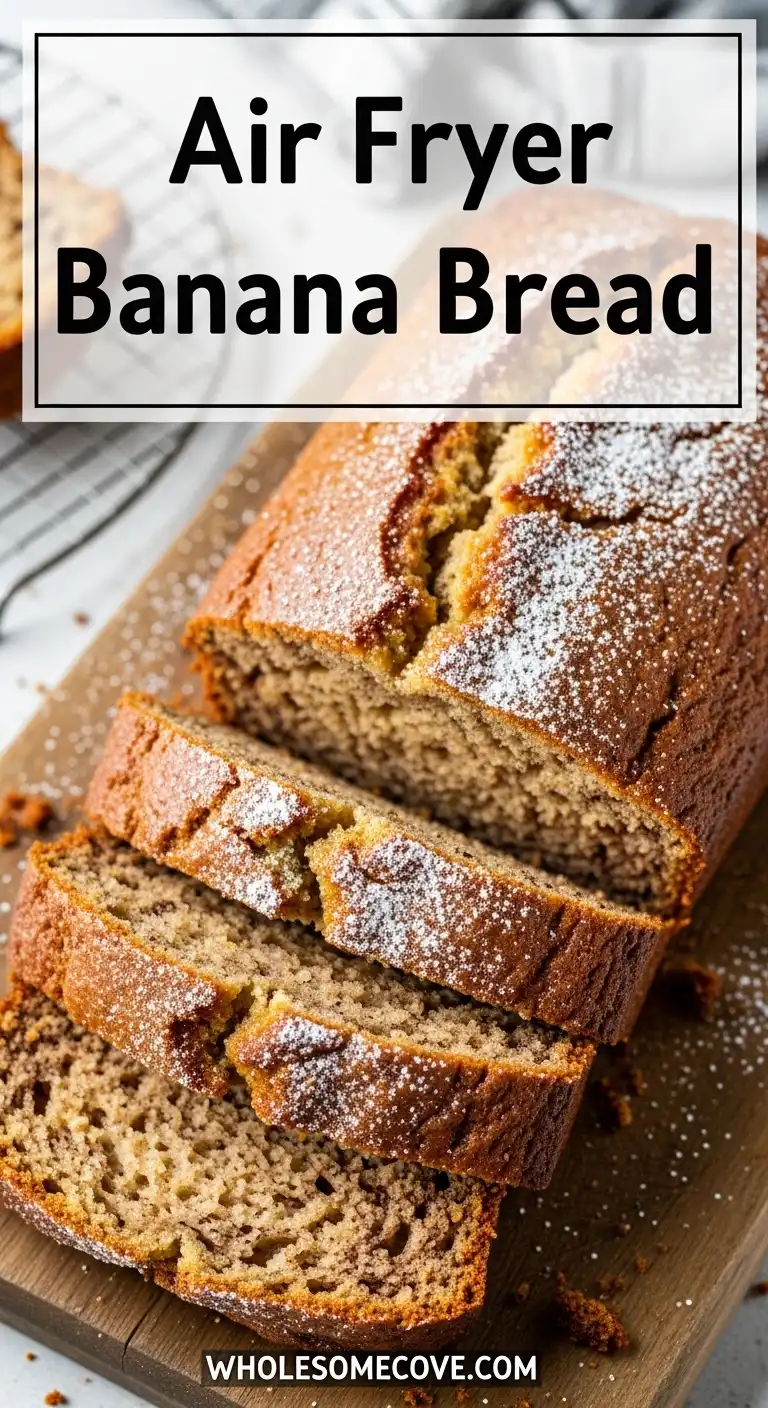
_result.jpg "Air Fryer Banana Bread Recipe – Healthy & Delicious!")
Nutritional Facts
Here’s the approximate nutritional breakdown per slice (based on 8 slices, without optional add-ins):
- Calories: 245
- Total Fat: 8g
- Saturated Fat: 5g
- Cholesterol: 40mg
- Sodium: 180mg
- Total Carbohydrates: 41g
- Dietary Fiber: 2g
- Sugars: 22g
- Protein: 3g
- Potassium: 230mg
- Vitamin A: 6% DV
- Vitamin C: 4% DV
- Calcium: 2% DV
- Iron: 6% DV
Note that these values will increase slightly if you add chocolate chips or nuts. Adding ½ cup chocolate chips adds approximately 35 calories and 2g fat per slice.
Another delicious breakfast treat: Banana Muffin with Two Bananas
Health Benefits of Key Ingredients
While banana bread is definitely a treat, it does contain some genuinely nutritious ingredients. I always feel a little better about enjoying a slice knowing that it’s not entirely devoid of nutritional value.
The bananas especially pack quite a nutritional punch.
Here’s what each main ingredient brings to the table:
- Bananas: Rich in potassium (essential for heart health and blood pressure regulation), vitamin B6 (supports brain health and mood), vitamin C (boosts immune function), and dietary fiber (aids digestion). The riper the banana, the higher its antioxidant content.
- Whole wheat flour (if substituting): Provides more fiber, B vitamins, iron, and magnesium than white flour. It helps stabilize blood sugar and keeps you fuller longer.
- Eggs: Excellent source of high-quality protein, choline (important for brain health), vitamin D, and B vitamins. The yolk contains most of the nutrients, so use the whole egg.
- Cinnamon: Contains powerful antioxidants, has anti-inflammatory properties, may help lower blood sugar levels, and can improve insulin sensitivity. It also adds flavor without calories.
- Nutmeg: Contains compounds that may support digestive health, has antibacterial properties, and provides small amounts of vitamins and minerals.
- Walnuts (if using): Packed with omega-3 fatty acids (support heart and brain health), antioxidants, protein, and fiber. They’re one of the healthiest nuts you can eat.
- Dark chocolate chips (if using): Rich in flavonoids and antioxidants, may improve heart health and brain function, and can boost mood. Choose chips with at least 70% cocoa for maximum benefits.
You might also like: Healthy Cornbread
FAQs About Air Fryer Banana Bread
1. Can I make this banana bread without an air fryer?
Absolutely! You can bake this exact recipe in a conventional oven at 350°F (175°C) for 50-60 minutes, or until a toothpick inserted in the center comes out clean.
The air fryer version is just faster and uses less energy, but the oven method works beautifully too.
2. Why is my banana bread dense and gummy?
This usually happens from one of three things: overmixing the batter (which develops too much gluten), using bananas that aren’t ripe enough, or not cooking it long enough. Make sure your bananas have lots of brown spots, mix the batter just until combined, and test for doneness with a toothpick.
If the toothpick has wet batter on it (not just moist crumbs), it needs more time.
3. Can I reduce the sugar in this recipe?
Yes, you can reduce the sugar by up to ¼ cup without dramatically affecting the texture. The bread won’t be quite as sweet, but the ripe bananas will still provide plenty of natural sweetness.
I’ve also successfully used coconut sugar or monk fruit sweetener as substitutes, though the texture may be slightly different.
4. My banana bread is browning too quickly on top. What should I do?
This is common in air fryers because the heating element is usually quite close to the food. Simply tent a piece of aluminum foil loosely over the top of the loaf pan once it reaches your desired color.
This shields it from direct heat while allowing it to continue cooking through to the center.
5. Can I double this recipe?
Due to the size constraints of most air fryers, I don’t recommend doubling the recipe to make one large loaf. However, you can absolutely make two separate loaves, one after the other.
Alternatively, you could use the doubled batter to make muffins, which would cook in about 12-15 minutes at the same temperature.
Read Also: Old Fashioned Pumpkin Bread
Final Thoughts
This Air Fryer Banana Bread Recipe has earned a permanent spot in my weekly rotation, and I truly hope it becomes one of your favorites too. The combination of minimal effort, quick cooking time, and absolutely delicious results makes it a winner in my book.
Whether you’re using up overripe bananas, looking for a quick breakfast option, or just craving something warm and comforting, this recipe delivers every single time. Don’t be afraid to experiment with the variations or make it your own by adding your favorite mix-ins.
I’d love to hear how your banana bread turns out! Drop a comment below with your results, any variations you tried, or questions you might have. Happy baking!
Recommended:
- Easy Pancake Recipe
- Vasilopita Bread Recipe
- Einkorn Bread Recipe
- Cracklin Bread Recipe
- Same Day Sourdough Bread Recipe
- Fall Bread Recipes
- Dinner Rolls Recipe
- Homemade Biscuit Recipe
- Avocado Toast Recipe
- Pumpkin Bar Recipe
