
I’ve been making homemade refried beans recipe from scratch for years now, and I genuinely cannot go back to the canned stuff.
My first attempt was a disaster — I dumped beans in a pan, mashed them with a fork, and ended up with a grayish paste that tasted like nothing. Then a neighbor who grew up making frijoles refritos showed me what I was doing wrong, and everything changed.
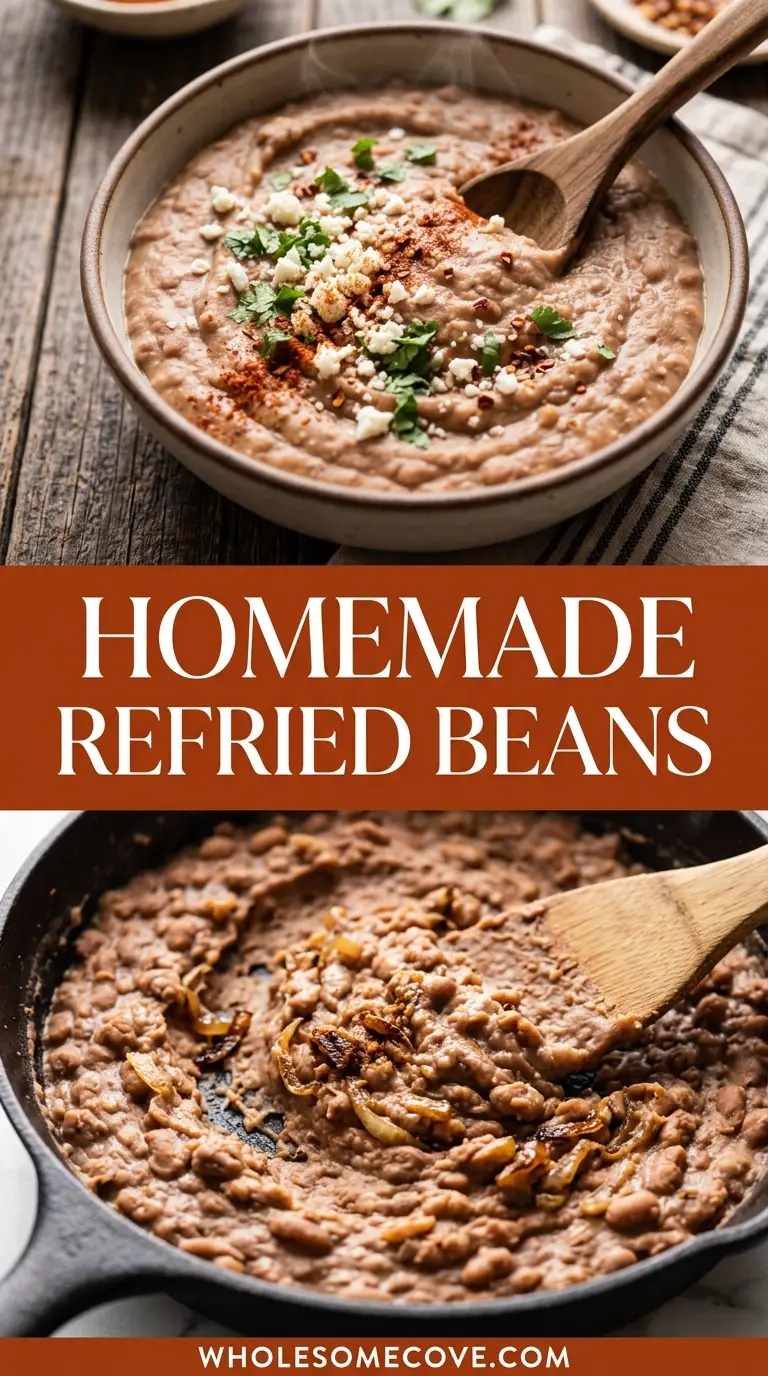
The secret? It’s all about building flavor at every stage. From cooking the beans with aromatics right through to frying them in a proper fat with sautéed onion and garlic.
My family now requests these on taco nights, burrito nights, and honestly sometimes just as a dip with tortilla chips for movie night.
This recipe uses dried pinto beans for the deepest flavor, but I’ll also share the quick canned bean method so you can pick what works for your schedule. Either way, you’re going to end up with something miles better than anything from a can.
| Quick Recipe Summary | |
|---|---|
| Prep Time | 15 minutes (plus overnight soak) |
| Cook Time | 1 hour 45 minutes |
| Total Time | About 2 hours (active time: 30 minutes) |
| Servings | 6 servings |
| Difficulty Level | Easy |
If you love Mexican-inspired recipes, you’ll also love these Chimichurri Steak Tacos — they pair perfectly with a side of these refried beans.
Why You’ll Love This Refried Beans Recipe
Once you make refried beans from scratch, you’ll understand immediately why people make such a fuss about it. The flavor is richer, creamier, and more complex than anything from a can.
You get to control every element — the saltiness, the consistency, and how much garlic punch you want. That kind of control is something canned beans can never give you.
This recipe is also deeply budget-friendly, since a bag of dried pinto beans costs very little and yields a generous amount. Even the quick canned version comes in cheaper and tastier than store-bought refried beans.
The recipe is naturally gluten-free and vegetarian when made with oil instead of lard. It’s also incredibly versatile as a side dish, spread, dip, or filling.
Here’s why this recipe wins every time:
- Incredible depth of flavor — cooking the beans with onion, garlic, and cumin gives them a savory base that can’t be replicated with canned beans
- Perfect creamy texture — mashing with reserved bean broth keeps things smooth without getting watery
- Totally customizable — make them smooth or leave them slightly chunky, mild or spiced up
- Make-ahead friendly — a big batch stores beautifully in the fridge for a whole week
- Better nutrition — no mystery additives, no excess sodium, just wholesome, whole-food ingredients
- Works as anything — a side dish, a burrito filling, a tostada base, or a chip dip
Read Also: Chicken Quesadilla Recipe
Ingredients
Refried beans are a dish where simplicity is the entire point. A short ingredient list means every item has to pull its weight, so make sure you start with quality dried beans if you can.
- 2 cups (400g) dried pinto beans — the classic choice for refried beans; they mash up creamy and smooth
- 8 cups (2 liters) water, plus more as needed, for cooking the beans
- 1 medium white onion — half goes into the bean pot, and the other half gets finely diced for the frying step
- 4 cloves garlic — 2 crushed cloves go into the bean pot, and 2 minced cloves go into the skillet
- 1 tsp (3g) ground cumin — this is essential; it gives refried beans that warm, earthy backbone
- 1 tsp (3g) dried Mexican oregano — slightly different from regular oregano; adds a citrusy herbal note
- 3 tbsp (45ml) lard or neutral vegetable oil — lard produces the most authentic, rich flavor; vegetable oil works great for a vegetarian version
- 1 tsp (6g) salt, plus more to taste
- 1/4 tsp (0.5g) black pepper
- 1/2 tsp (1.5g) smoked paprika — adds a subtle smokiness
- 1 tbsp (15ml) fresh lime juice — brightens everything up at the end; don’t skip it
- Fresh cilantro (optional, for garnish)
For the quick canned version: substitute 2 cans (15 oz / 425g each) of pinto beans, drained and rinsed, and use 1 cup (240ml) chicken or vegetable broth in place of the bean broth.
You might also enjoy: Black Bean Enchilada Casserole
Kitchen Equipment Needed
You don’t need much to make amazing refried beans, but having the right tools does make the process smoother and more enjoyable.
- Large heavy-bottomed pot or Dutch oven — essential for cooking the dried beans evenly without scorching
- Large cast iron skillet or heavy skillet (at least 12 inches / 30cm) — gives you even heat for frying the beans
- Potato masher — the best tool for achieving a slightly textured, creamy consistency
- Immersion blender (optional) — use this if you want ultra-smooth, restaurant-style refried beans
- Colander — for draining and rinsing soaked beans
- Wooden spoon or heat-resistant spatula — for stirring beans while frying
- Ladle — for transferring reserved bean broth into the skillet
- Sharp chef’s knife and cutting board — for prepping the onion and garlic
- Measuring cups and spoons — to keep seasoning accurate
Read Also: Beef Enchilada Casserole Recipe
Recommended Products for This Recipe
These are products I personally use and genuinely recommend based on years of making this dish regularly.
1. Lodge Cast Iron Skillet (12-inch)
A good cast iron skillet is the single most important piece of equipment for this recipe. The even heat distribution means your beans fry consistently without hot spots, and the depth of the pan lets you mash without splatter. I’ve used mine almost weekly for years and it keeps getting better. It’s worth every penny.
2. Manteca Lard (Traditional Cooking Fat)
If you want the most authentic, restaurant-quality refried beans, lard is the ingredient that makes the biggest difference. It gives the beans a silky, rich texture that vegetable oil just can’t replicate. Once you try it, you’ll understand why traditional Mexican cooks have always preferred it.
3. OXO Good Grips Potato Masher
The design of your masher matters more than you’d think. This one has a comfortable grip and a wide, flat mashing surface that lets you get through a whole pot of beans quickly without tiring your hand out. It also leaves just enough texture in the beans to keep them interesting.
4. Rancho Gordo Dried Pinto Beans
These heirloom dried pinto beans are a step above the standard grocery store bag. They’re fresher, which means they cook faster and develop a much creamier texture when mashed. If you’ve ever had dried beans that refused to soften properly, stale beans were probably the culprit. These are consistently excellent.
Another favorite: Cheese Quesadilla

Step-by-Step Instructions: How to Make Refried Beans
Step 1: Sort and Soak the Beans Overnight
- Spread your 2 cups (400g) of dried pinto beans out on a clean baking sheet or light-colored surface.
- Pick through them carefully, removing any shriveled beans, small pebbles, or debris — this step takes about 2 minutes but it matters.
- Transfer the sorted beans to a large bowl and rinse them well under cold running water.
- Cover the beans with at least 3 inches (7.5cm) of cold water — they will expand significantly overnight, so use a larger bowl than you think you need.
- Leave the beans to soak at room temperature for at least 8 hours, or overnight.
- The next day, drain and rinse the soaked beans thoroughly using a colander — discard the soaking water.
Step 2: Cook the Beans with Aromatics
- Add the drained, soaked beans to your large pot or Dutch oven.
- Add 8 cups (2 liters) of fresh water — the beans should be covered by at least 2 inches (5cm) of water.
- Add the half onion (unpeeled or peeled, either works), and 2 crushed garlic cloves directly to the pot.
- Add 1/2 tsp of the ground cumin and 1/2 tsp of the dried Mexican oregano to the water.
- Bring the pot to a boil over medium-high heat, then skim off any grayish foam that rises to the surface using a spoon or ladle — this makes for cleaner-tasting beans.
- Once skimmed, reduce the heat to a steady simmer (not a rolling boil), partially cover with a lid, and cook for 1.5 to 2 hours.
- Check the beans every 30 minutes, adding hot water as needed to keep the beans submerged.
- The beans are done when they are completely tender and you can easily squish one between your fingers with no resistance — they should not taste chalky at all.
- Important: Before draining, use a ladle to scoop out and reserve at least 2 cups (480ml) of the bean cooking liquid — this flavorful broth is what you’ll use to get the perfect consistency in the next steps.
- Remove and discard the onion half and the garlic cloves, then drain the rest of the liquid.
Step 3: Sauté the Onion and Garlic
- Heat your large cast iron skillet or heavy skillet over medium heat.
- Add the 3 tablespoons (45ml) of lard or vegetable oil to the pan and let it fully melt and heat through — it should shimmer but not smoke.
- Add the finely diced remaining half onion to the pan and spread it in an even layer.
- Cook the onion, stirring occasionally, for about 5 to 7 minutes until it is completely soft and translucent — don’t rush this step; properly softened onion melts into the beans and creates a smooth texture.
- Add the 2 minced garlic cloves and stir into the onion.
- Cook for 1 more minute, stirring constantly, until the garlic is fragrant — watch it carefully so it doesn’t burn.
Step 4: Add the Beans and Season
- Add all of the cooked, drained pinto beans to the skillet with the softened onion and garlic.
- Pour in about 1/2 cup (120ml) of the reserved bean broth.
- Add the salt, black pepper, remaining 1/2 tsp cumin, remaining 1/2 tsp oregano, and smoked paprika.
- Stir everything together well so the beans are coated in the fat and well mixed with the seasonings.
- Let the beans cook for 2 to 3 minutes, stirring occasionally, so they can absorb the fat and the seasonings can bloom.
Step 5: Mash the Beans to Your Desired Consistency
- Reduce the heat to medium-low.
- Using your potato masher, begin mashing the beans directly in the skillet, pushing down and working across the pan in sections.
- As you mash, add more reserved bean broth — about 1/4 cup (60ml) at a time — to loosen the texture and help you mash.
- Continue mashing and adding broth until you reach your preferred consistency: slightly chunky for texture, or smooth and creamy for a more classic restaurant style.
- If you prefer ultra-smooth beans, switch to an immersion blender at this point and blend briefly in the pan — add more broth as needed and go slowly so you don’t over-blend to a gluey paste.
- The beans will thicken noticeably as they cool, so aim for slightly looser than your final desired consistency right now.
Step 6: Final Seasoning and Finish
- Continue to cook the mashed beans over medium-low heat, stirring frequently, for about 5 more minutes until they are heated through and have reached a creamy, cohesive texture.
- Stir in the tablespoon (15ml) of fresh lime juice — this brightens the entire dish and balances the earthiness of the beans.
- Taste the beans and adjust salt as needed — this is the most important tasting moment, so don’t skip it.
- If the beans have thickened too much, add another splash of bean broth or water and stir well.
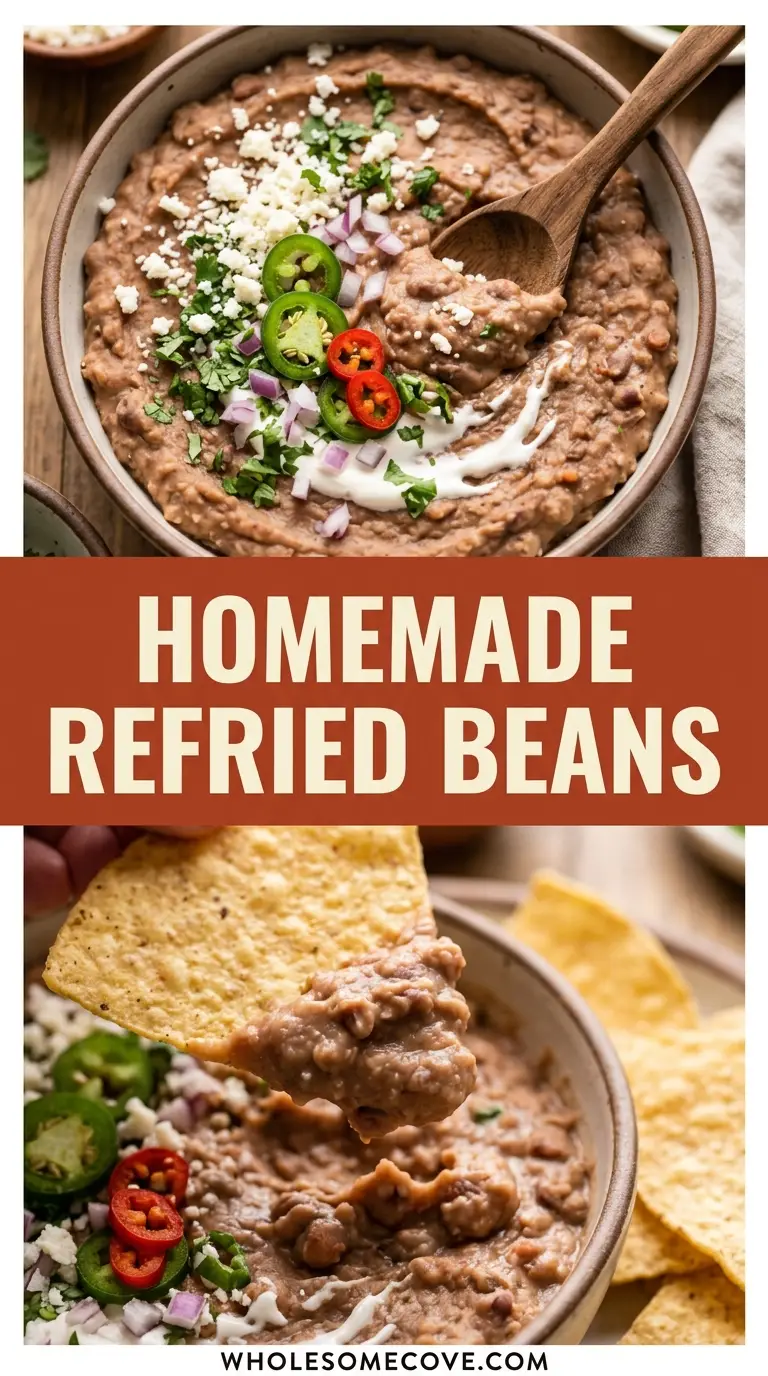
- Remove from heat and serve topped with fresh cilantro if desired.
Read Also: Enchilada Sauce Recipe
Tips for The Best Refried Beans
Getting refried beans right comes down to a few key techniques that are easy once you know them. Keep these in mind and you’ll nail the texture and flavor every time.
- Never add salt while the beans are cooking — salt toughens the skin of dried beans and can prevent them from softening properly; always season after cooking
- Save more broth than you think you’ll need — you can always discard extra, but you can’t get it back once it’s gone; aim for 2 to 3 cups reserved
- Use hot bean broth, not cold water, when adjusting consistency — cold liquid can make the beans seize up and turn grainy
- Finely dice your onion — big chunks of onion won’t soften enough to meld into the beans; the smaller the dice, the creamier the final result
- Choose your fat wisely — lard produces the richest, most traditional flavor; vegetable oil is great for a vegetarian version; bacon fat adds a smoky, salty depth
- Don’t over-blend — if using an immersion blender, pulse slowly and stop while there’s still a little texture; over-blending makes beans gluey and pasty
- Taste as you go — the right amount of salt varies based on your fat choice and bean broth; trust your palate and adjust gradually
- Add the lime juice at the very end — adding it too early can cause it to turn bitter; a fresh squeeze right before serving makes a huge difference
- Make a double batch — refried beans freeze exceptionally well and having them in the freezer makes weeknight Mexican dinners effortless
The taco soup on our site uses a similar approach to layering Mexican flavors — check out the Taco Soup for more inspiration.
What to Serve with Refried Beans
Refried beans are one of the most versatile side dishes you can make. They pair beautifully with almost anything in the Mexican food universe, and a few things outside it too.
Here are some of our favorite ways to serve them:
- Street Tacos — spread a spoonful of beans inside a warm corn tortilla before adding your taco filling for an extra layer of flavor
- Chicken Enchilada Casserole — serve the beans as a hearty side dish alongside a bubbling enchilada casserole for a full Mexican dinner
- Steak Quesadilla — refried beans are the perfect dipping accompaniment to any quesadilla
- Mexican Street Corn — the contrast between the creamy beans and the charred, cheesy corn is absolutely fantastic
- Tostadas — spread the beans generously on a crispy tostada and top with shredded chicken, cheese, and salsa for a quick weeknight meal
- Chipotle Guacamole — serve both as a double dip platter with tortilla chips for a crowd-pleasing snack spread
- Breakfast Burrito — add a few spoonfuls to your breakfast burrito alongside scrambled eggs and cheese for a filling morning meal
- Healthy Nachos — dollop the beans over baked chips along with cheese, jalapeños, and your favorite toppings
- Rice and beans — serve alongside cilantro-lime rice for the classic combination that never gets old
You might also enjoy: Shrimp Quesadilla
Variations of Refried Beans
The classic pinto bean version is always a winner, but there are some really delicious ways to switch things up depending on what you’re in the mood for or what you have in your pantry.
- Black Bean Refried Beans — swap the pinto beans for dried or canned black beans; the flavor is slightly earthier and the color is a beautiful dark purple; these are especially good inside burritos
- Spicy Refried Beans — add 1 finely diced jalapeño (seeds removed for moderate heat, seeds in for fire) to the skillet along with the onion; you can also stir in 1/4 tsp cayenne pepper with the other spices
- Bacon Refried Beans — render 3 to 4 strips of bacon in the skillet first, remove the bacon, and use the bacon fat in place of lard or oil; crumble the cooked bacon back over the finished beans as a topping
- Vegan Refried Beans — use a good quality neutral vegetable oil or avocado oil in place of lard and use vegetable broth for any adjustments; these are completely plant-based and incredibly satisfying
- Cheesy Refried Beans — stir 1/2 cup (55g) of shredded Monterey Jack or sharp cheddar cheese into the hot beans right after mashing; stir until melted and creamy — this version is especially great as a dip or nacho topping
- Chipotle Refried Beans — add 1 to 2 finely minced chipotle peppers in adobo sauce along with the garlic; this gives the beans a deep, smoky heat that is absolutely addictive
- Instant Pot / Pressure Cooker Version — skip the soaking step; cook unsoaked dried pinto beans on high pressure for 45 minutes with the aromatics; natural release for 15 minutes; proceed with frying and mashing as directed
Read Also: Taco Casserole Recipe
Storage and Reheating
Refried beans store and reheat beautifully, which makes them an excellent candidate for batch cooking at the start of the week.
- Refrigerator — store completely cooled refried beans in an airtight container in the fridge for up to 5 to 7 days; the beans will thicken considerably as they cool, which is completely normal
- Freezer — transfer cooled beans to freezer-safe containers or zip-lock bags (laid flat saves space) and freeze for up to 3 months; portion them into roughly 1-cup (240ml) amounts so you can defrost only what you need
- Thawing — thaw frozen beans overnight in the refrigerator for the best texture; avoid defrosting at room temperature as this can affect the quality
- Reheating on the stovetop — place beans in a skillet over low to medium-low heat and add a splash of water, chicken broth, or reserved bean broth; stir frequently until warmed through and creamy again; add liquid gradually to reach your desired consistency
- Reheating in the microwave — transfer to a microwave-safe bowl, add a tablespoon (15ml) of water or broth, cover loosely with a damp paper towel, and microwave in 30-second intervals, stirring between each, until heated through
- Do not boil aggressively when reheating — high heat can cause the beans to dry out and stick; always use low, gentle heat and stir often
The Mexican Chicken Soup is another great make-ahead dish that reheats just as well — worth bookmarking for your weekly meal prep rotation.
Nutritional Facts
Per serving (approximately 1/2 cup / 120g), based on the recipe made with vegetable oil. Values are estimates.
| Nutrient | Amount Per Serving |
|---|---|
| Calories | 185 kcal |
| Total Fat | 6g |
| Saturated Fat | 1g |
| Trans Fat | 0g |
| Cholesterol | 0mg |
| Sodium | 390mg |
| Total Carbohydrates | 26g |
| Dietary Fiber | 7g |
| Total Sugars | 1g |
| Protein | 9g |
| Iron | 2.2mg (12% DV) |
| Potassium | 480mg (10% DV) |
| Folate | 145mcg (36% DV) |
| Magnesium | 47mg (11% DV) |
Nutritional values are approximate and will vary based on fat choice and portion size.
Another favorite: 7-Layer Taco Salad
Health Benefits of Key Ingredients
Refried beans made from scratch are genuinely one of the most nutritious things you can put on your dinner table. The humble pinto bean is a nutritional powerhouse, and several of the supporting ingredients bring their own benefits to the dish.
Here’s a breakdown of what you’re getting with every serving:
- Pinto beans are a protein superstar — with roughly 9 grams of plant-based protein per half-cup serving, they’re an excellent protein source for vegetarians and meat-eaters alike, supporting muscle maintenance and keeping you full longer
- Outstanding fiber content — 7 grams of dietary fiber per serving feeds your gut microbiome, supports healthy digestion, and helps regulate blood sugar levels; this makes refried beans particularly beneficial for people managing diabetes or pre-diabetes
- Rich in folate — pinto beans are one of the best food sources of folate, a B-vitamin that’s critical for cell repair, red blood cell formation, and especially important during pregnancy for preventing neural tube defects
- Cumin supports digestion — this essential spice has been used in traditional medicine for centuries; it contains compounds that stimulate the production of digestive enzymes and can help reduce bloating and gas
- Garlic has powerful anti-inflammatory properties — the allicin compound in garlic has been extensively studied for its ability to support immune function, reduce blood pressure, and offer cardiovascular protection
- Lime juice delivers vitamin C — the tablespoon of fresh lime juice adds a small but meaningful amount of vitamin C, which importantly also helps your body absorb the iron present in the pinto beans more efficiently
- Low glycemic index — despite being starchy, pinto beans have a low glycemic index because their fiber slows the release of sugar into the bloodstream, making them a smarter carbohydrate choice than refined grains
- Heart-healthy fats with vegetable oil — when made with a good quality vegetable or avocado oil, refried beans provide monounsaturated fats that support healthy cholesterol levels
Read Also: Healthy Hummus Recipe
FAQs About Refried Beans
1. Why are they called “refried” beans if they’re only fried once?
The name is actually a translation issue. The Spanish name is “frijoles refritos,” where “refritos” doesn’t mean “fried again” — it comes from the prefix “re-” used to intensify the meaning, so “refritos” actually means “well-fried” or “very fried.” English speakers translated it literally as “refried,” and the name stuck.
2. Can I use canned pinto beans instead of dried?
Absolutely yes, and it’s a great shortcut when you don’t have time to soak and cook dried beans. Use two 15-ounce (425g) cans of pinto beans, drained and rinsed, and substitute chicken or vegetable broth for the bean cooking liquid. The flavor won’t be quite as deep, but the result is still miles better than store-bought refried beans.
3. How do I make refried beans vegetarian or vegan?
Simply swap the lard for a neutral vegetable oil, avocado oil, or even a good quality olive oil. Use vegetable broth instead of chicken broth if adjusting the consistency. Every other ingredient in this recipe is already plant-based, so those two swaps are all you need.
4. My refried beans turned out too thick. How do I fix them?
Beans thicken significantly as they cool, and a thick batch is an easy fix. Warm them gently in a skillet over low heat and add splashes of warm water, bean broth, or vegetable broth, stirring well after each addition. Repeat until you’ve reached the consistency you want. Just avoid adding too much liquid at once, which can make them watery.
5. Can I make refried beans in a slow cooker or Instant Pot?
Yes to both! For the slow cooker, add sorted and rinsed dried beans (no need to soak) with water, onion, garlic, and spices, and cook on low for 8 to 10 hours or on high for 5 to 6 hours until very tender. For the Instant Pot, cook on high pressure for 45 minutes with a 15-minute natural release. In either case, proceed with the frying and mashing steps as written after the beans are cooked.
For more Mexican-inspired dishes to add to your rotation, check out the Mexican Chicken Salad.
Homemade Refried Beans
Ingredients
- 2 cups dried pinto beans - 400g; the classic choice for creamy refried beans
- 8 cups water - 2 liters, plus more as needed for cooking the beans
- 1 medium white onion - half for bean pot, half finely diced for frying
- 4 cloves garlic - 2 crushed for bean pot, 2 minced for skillet
- 1 tsp ground cumin - 3g; divided
- 1 tsp dried Mexican oregano - 3g; divided
- 3 tbsp lard or neutral vegetable oil - 45ml; lard for authentic rich flavor, oil for vegetarian
- 1 tsp salt - 6g, plus more to taste
- 1/4 tsp black pepper - 0.5g
- 1/2 tsp smoked paprika - 1.5g; for subtle smokiness
- 1 tbsp fresh lime juice - 15ml; to brighten at the end
- fresh cilantro - optional, for garnish
- 2 cans pinto beans - 15 oz / 425g each, drained and rinsed
- 1 cup chicken or vegetable broth - 240ml; in place of bean broth
Equipment
- Large heavy-bottomed pot or Dutch oven - for cooking the dried beans evenly
- Large cast iron skillet or heavy skillet (at least 12 inches / 30cm) - for frying the beans with even heat
- Potato masher - for achieving slightly textured creamy consistency
- Immersion blender - (optional) for ultra-smooth restaurant-style beans
- Colander - for draining and rinsing beans
- Wooden spoon or heat-resistant spatula - for stirring beans while frying
- Ladle - for transferring reserved bean broth
- Sharp chef’s knife and cutting board - for prepping onion and garlic
- Measuring cups and spoons - to keep seasoning accurate
Method
- Sort and soak the dried pinto beans overnight: spread on a baking sheet to remove debris, rinse, and cover with plenty of cold water for at least 8 hours.
- Cook the beans with aromatics: drain soaked beans, add to pot with fresh water, half onion, 2 crushed garlic cloves, and half the cumin and oregano. Boil, skim foam, then simmer 1.5-2 hours until tender. Reserve 2 cups broth, discard aromatics, and drain.
- Sauté the onion and garlic: heat lard or oil in skillet over medium, add finely diced remaining onion and cook 5-7 minutes until soft, then add minced garlic and cook 1 minute until fragrant.
- Add the beans and season: add cooked beans to skillet with 1/2 cup reserved broth and remaining seasonings. Stir and cook 2-3 minutes to absorb fat and bloom spices.
- Mash to desired consistency: reduce heat to medium-low, mash with potato masher while gradually adding more warm bean broth until creamy or slightly chunky. Use immersion blender for ultra-smooth if desired.
- Finish the beans: cook mashed beans 5 minutes more, stir in lime juice, taste and adjust salt, and add broth if needed for consistency. Garnish with cilantro if desired.
Nutrition
Notes
- Never add salt during initial bean cooking as it can toughen the skins; season after mashing.
- Reserve at least 2-3 cups of hot bean broth — it creates the perfect creamy texture and shouldn’t be replaced with cold water.
- Use lard for the most authentic rich flavor; vegetable, avocado, or bacon fat are great alternatives.
- Beans thicken as they cool, so make them slightly looser than your final desired consistency.
- Finely dice the onion for the frying step to ensure it melts smoothly into the beans.
- For quick version, use 2 cans drained pinto beans and 1 cup broth instead of homemade bean liquid.
- Make a double batch — refried beans freeze beautifully for up to 3 months.
- Store in the fridge up to 7 days or freezer up to 3 months; reheat gently with added liquid to restore creaminess.
- Variations: try black beans, add jalapeño for spice, bacon for smokiness, or cheese for a creamy dip.
- Don’t over-blend or the beans can become gluey; leave a little texture for the best mouthfeel.
Private Notes
Tried this recipe?
Let us know how it was!Final Thoughts
Making refried beans from scratch is one of those cooking projects that feels ambitious the first time and completely effortless by the third. The results are so dramatically better than the canned version that you’ll wonder why you ever settled.
Once you have a batch in the fridge, you’ll find yourself reaching for them constantly — tucked into a Chipotle Burrito, spooned alongside scrambled eggs, or just eaten straight from the pot with a chip when nobody’s watching.
Give this recipe a try and make it your own. Drop a comment below and let me know how it went — did you go with lard or oil? Smooth or chunky? I’d love to hear!
Recommended:
- Mexican Pork Stew
- Green Chile Chicken Enchilada Casserole
- Guacamole
- Healthy Guacamole
- Buffalo Chicken Quesadilla
- Breakfast Quesadilla
- Slow Cooker Taco Soup
- Chicken Taco Soup
- Beef Quesadilla
- Green Chile Pork Stew