
I first made this hashbrown casserole recipe for a family brunch about five years ago, and it’s been a staple at every gathering since. My aunt had brought something similar to Thanksgiving dinner, and I was determined to recreate it at home.
What started as a “let me figure out this recipe” challenge turned into the dish everyone now requests by name. I’ve tweaked the original countless times, adjusting the cheese ratio, experimenting with different toppings, and finally landing on this perfect version.
The best part? You probably have most of the ingredients in your kitchen right now.
| Quick Recipe Summary | |
|---|---|
| Prep Time | 15 minutes |
| Cook Time | 45 minutes |
| Total Time | 1 hour |
| Servings | 10-12 servings |
| Difficulty Level | Easy |

Why You’ll Love This Hashbrown Casserole Recipe
This casserole is the definition of comfort food without any fuss. It comes together in minutes and feeds a crowd, making it perfect for busy mornings or potluck dinners.
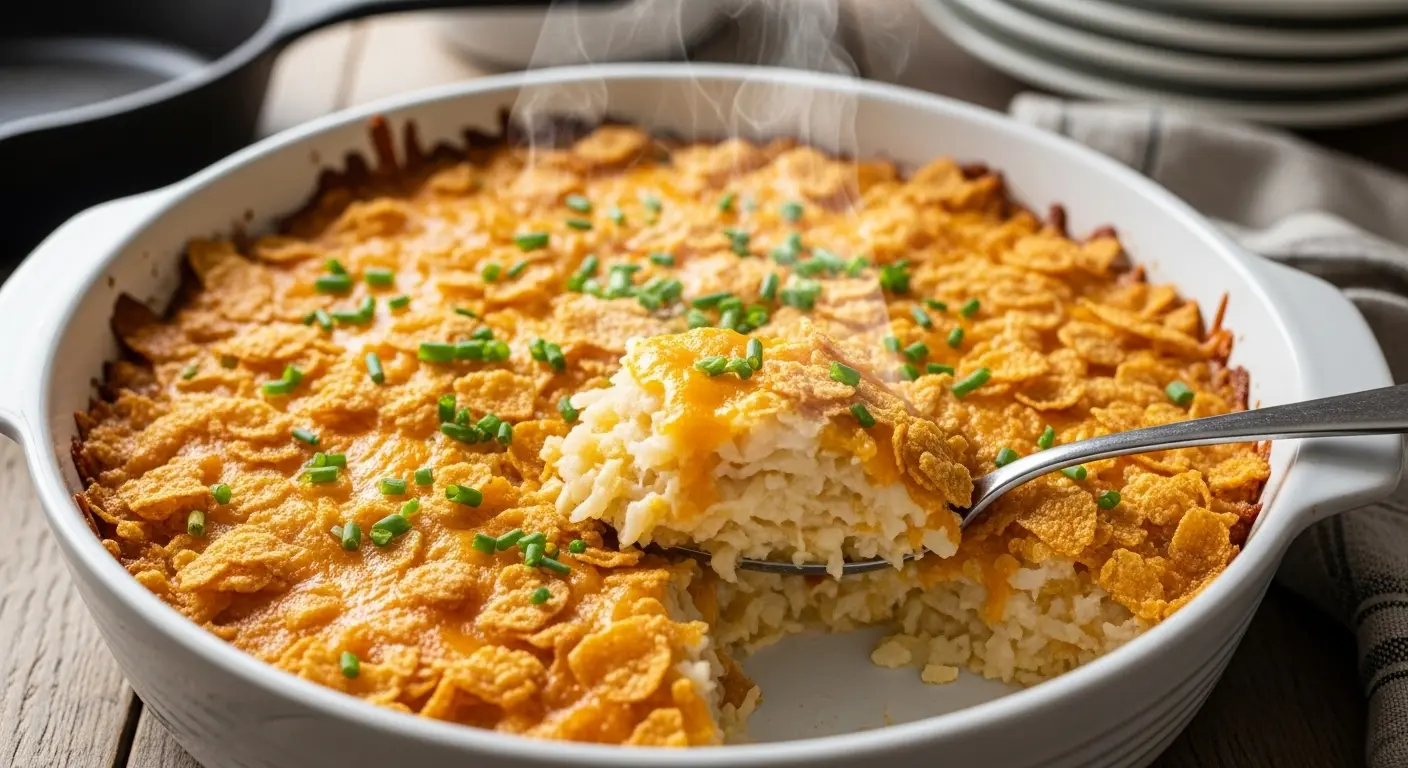
The creamy center contrasts beautifully with the golden, crispy top. Every bite is loaded with cheese, and the texture is somewhere between a potato gratin and a loaded baked potato, but easier than both.
Here’s what makes this recipe stand out:
- Minimal prep work: No peeling or shredding potatoes required
- Make-ahead friendly: Assemble the night before and bake in the morning
- Crowd-pleasing flavors: Everyone from picky kids to adventurous eaters loves this dish
- Versatile serving options: Works for breakfast, brunch, lunch, or dinner
- Budget-friendly ingredients: Uses pantry staples and affordable frozen hashbrowns
- Freezer-friendly: Make a double batch and freeze half for later
Read Also: Mississippi Pot Roast Recipe
Ingredients
This recipe uses simple, accessible ingredients that create maximum flavor. I prefer frozen shredded hashbrowns over cubed ones because they create a better texture and help the casserole hold together beautifully.
- 2 pounds (900g) frozen shredded hashbrowns, thawed
- 2 cups (480ml) sour cream
- 1 can (10.5 oz/300g) cream of chicken soup
- 3 cups (340g) shredded cheddar cheese, divided
- 1/2 cup (115g) unsalted butter, melted
- 1 small onion, finely diced (about 1 cup/150g)
- 1 teaspoon garlic powder
- 1 teaspoon salt
- 1/2 teaspoon black pepper
- 1/2 teaspoon paprika
- 2 cups (60g) crushed cornflakes or crushed Ritz crackers
- 3 tablespoons butter, melted (for topping)
- Fresh chives or green onions, chopped (for garnish, optional)
You might also enjoy: Taco Casserole Recipe
Kitchen Equipment Needed
Having the right tools makes this recipe even easier to pull together. I’ve learned that using quality baking dishes helps achieve that perfectly golden crust we’re after.
- 9×13-inch baking dish: A ceramic or glass dish works best for even heating
- Large mixing bowl: For combining all the creamy ingredients
- Whisk or wooden spoon: To mix everything together smoothly
- Measuring cups and spoons: For accurate ingredient portions
- Knife and cutting board: For dicing onions and garnishes
- Small bowl: For mixing the topping
- Aluminum foil: To cover during initial baking
- Oven mitts: For safe handling of hot dishes
- Spatula or serving spoon: For portioning and serving
Another favorite: Stuffed Shells Recipe
Recommended Products for This Recipe
I’ve tested this recipe with various products over the years, and these are the ones that consistently deliver the best results. Quality ingredients and tools really do make a difference in the final dish.
1. Le Creuset Stoneware 9×13 Baking Dish
This baking dish has been my go-to for years, and it distributes heat so evenly that you get that perfect golden crust without any burnt edges. The stoneware retains heat beautifully, keeping your casserole warm at the table for seconds and thirds.
2. Tillamook Sharp Cheddar Cheese
Not all cheddar cheese is created equal, and Tillamook makes a huge difference in flavor. The sharp variety adds that tangy punch that makes this casserole memorable, and it melts perfectly without getting greasy or separating.
3. Daisy Sour Cream
I always use full-fat Daisy sour cream for the creamiest texture. Low-fat versions can make the casserole watery and lack that rich, indulgent flavor we’re going for here.
4. Simply Potatoes Shredded Hash Browns
While frozen hashbrowns work great, Simply Potatoes refrigerated hashbrowns take this dish to the next level. They have a fresher taste and fluffier texture, though they do cost a bit more.
Step-by-Step Instructions: How to Make Hashbrown Casserole
Follow these detailed steps to create the perfect hashbrown casserole. I’ve included every tip I’ve learned through trial and error so you can get it right on your first try.
1. Prepare Your Oven and Baking Dish
- Preheat your oven to 350°F (175°C)
- Generously grease your 9×13-inch baking dish with butter or cooking spray, making sure to coat the sides and corners well to prevent sticking
- If using frozen hashbrowns, place them in a colander and let them thaw completely at room temperature for about 30 minutes, then press out as much excess moisture as possible using paper towels or a clean kitchen towel (this step is crucial for a creamy, not watery, casserole)
- Set the prepared baking dish aside while you mix the filling
2. Mix the Creamy Base
- In a large mixing bowl, combine the sour cream and cream of chicken soup, whisking until completely smooth with no lumps remaining
- Add 2 cups of the shredded cheddar cheese (reserving 1 cup for later), the melted butter, diced onion, garlic powder, salt, black pepper, and paprika
- Stir everything together until well combined and the mixture looks uniform throughout
- The base should be thick and creamy, coating the back of your spoon
3. Combine with Hashbrowns
- Add the thawed and dried hashbrowns to the creamy mixture in the bowl
- Using a large spoon or your hands (I prefer hands for better mixing), gently fold the hashbrowns into the mixture until every shred is coated with the creamy sauce
- Make sure there are no dry pockets of hashbrowns hiding at the bottom of the bowl
- The mixture will seem thick and chunky, which is exactly what you want
4. Transfer to Baking Dish
- Pour the hashbrown mixture into your prepared baking dish
- Use a spatula to spread it evenly across the dish, pressing down gently to create an even layer with no gaps or air pockets
- Smooth the top so it bakes evenly
- The mixture should fill the dish about 2 inches deep
5. Add the First Layer of Cheese
- Sprinkle the remaining 1 cup of shredded cheddar cheese evenly over the top of the casserole
- Make sure the cheese reaches all the way to the edges so you get that crispy, cheesy border everyone fights over
- Cover the baking dish tightly with aluminum foil to trap moisture during the initial baking
6. Bake Covered
- Place the covered casserole in your preheated oven on the center rack
- Bake for 30 minutes, which allows the hashbrowns to cook through and the flavors to meld together
- During this time, the cheese will melt and the mixture will start to bubble around the edges
- Resist the urge to peek too often, as you want to keep the heat trapped inside
7. Prepare the Crispy Topping
- While the casserole bakes, prepare your topping by crushing the cornflakes or Ritz crackers in a small bowl (I use a fork to crush them to medium-fine crumbs)
- Add 3 tablespoons of melted butter to the crumbs and toss until they’re evenly coated and resemble wet sand
- If you prefer a more buttery topping, feel free to add an extra tablespoon of butter
This pairs beautifully with my Slow Cooker Pot Roast for a complete comfort food meal.
8. Add Topping and Finish Baking
- After 30 minutes, carefully remove the casserole from the oven and remove the foil
- Sprinkle the buttered crumb mixture evenly over the top, creating a complete layer from edge to edge
- Return the uncovered casserole to the oven and bake for an additional 15 minutes, or until the topping is golden brown and crispy
- The edges should be bubbling and the top should have a beautiful golden color
9. Rest and Serve
- Remove the casserole from the oven and let it rest for 5-10 minutes before serving (this allows it to set up and makes cutting and serving much easier)
- The casserole will be extremely hot, so this resting time also prevents anyone from burning their mouth
- Garnish with freshly chopped chives or green onions if desired for a pop of color and fresh flavor
- Cut into squares and serve hot with a large serving spoon

Tips for The Best Hashbrown Casserole
These tips come from my years of making this recipe for various occasions. Each one addresses a common issue I’ve encountered or a way to elevate the dish even further.
- Thaw and drain properly: The most common mistake is not removing enough moisture from frozen hashbrowns, which results in a soupy casserole. Squeeze them thoroughly in a clean kitchen towel until no more water comes out.
- Don’t skip the rest time: Letting the casserole sit for 5-10 minutes after baking helps it set up and makes serving much neater. It also allows the flavors to settle together.
- Use full-fat dairy: Low-fat or fat-free sour cream makes the casserole watery and less flavorful. The full-fat version creates that rich, creamy texture we’re after.
- Customize your cheese: While cheddar is classic, I’ve had great success mixing in some Monterey Jack, Gruyere, or even pepper jack for extra kick.
- Season generously: Potatoes need more seasoning than you think. Don’t be shy with the salt and pepper, and taste your mixture before baking if you can.
- Make it ahead: Assemble the casserole completely, cover it tightly, and refrigerate for up to 24 hours before baking. Add 10 minutes to the covered baking time if starting from cold.
- Prevent soggy topping: Always add the crumb topping after the initial covered baking period, never at the beginning. This ensures it stays crispy and golden.
- Check for doneness: The casserole is done when the center is hot (insert a knife in the middle and touch it to your wrist to check temperature), the edges are bubbly, and the top is golden brown.
- Use fresh onions: While dried onions work in a pinch, fresh diced onions add so much more flavor and texture to the dish.
- Try different toppings: Cornflakes are my go-to, but French fried onions, crushed potato chips, or panko breadcrumbs all make excellent alternatives.
Read Also: Crockpot Beef Stew Recipe
Serving Suggestions

This versatile casserole works beautifully in so many different meal contexts. I’ve served it at breakfast, brunch, lunch, and dinner with equal success.
Pair it with these dishes for a complete meal:
- Breakfast spreads: Serve alongside scrambled eggs, crispy bacon, breakfast sausages, and fresh fruit for a hearty weekend brunch
- Holiday dinners: This makes an excellent side dish for Thanksgiving, Christmas, or Easter alongside roasted turkey, baked ham, or prime rib
- Casual barbecues: Pair with grilled steaks, BBQ Pulled Pork Sandwiches, or rotisserie chicken for a summer cookout
- Potluck parties: This travels well and stays warm in the dish, making it perfect for church suppers and community gatherings
- Simple dinners: Serve with a crisp green salad and Healthy Coleslaw for a lighter accompaniment
- Game day spreads: Cut into smaller squares and serve as an appetizer alongside Deviled Eggs and chicken wings
Variations of Hashbrown Casserole
One of the best things about this recipe is how easily it adapts to different tastes and dietary needs. I’ve tried dozens of variations over the years, and these are my favorites.
- Loaded Baked Potato Style: Add 1 cup of cooked, crumbled bacon and replace half the cheddar with sharp white cheddar. Top with extra bacon bits and sliced green onions before serving.
- Southwestern Twist: Mix in 1 cup of corn, 1 diced jalapeño, and 1 teaspoon of cumin. Use pepper jack cheese instead of cheddar and top with crushed tortilla chips.
- Vegetarian Version: Replace cream of chicken soup with cream of mushroom or cream of celery soup. Add 1 cup of sautéed mushrooms or diced bell peppers for extra vegetables.
- Ham and Cheese: Fold in 2 cups of diced cooked ham for a complete meal in one dish. This is my favorite way to use leftover holiday ham.
- Ranch Style: Add 2 tablespoons of dry ranch seasoning mix to the creamy base for a tangy flavor boost that everyone loves.
- Lighter Version: Use reduced-fat cream of chicken soup, light sour cream, and reduce the cheese to 2 cups total. It won’t be quite as indulgent but still delicious.
- Buffalo Chicken: Add 2 cups of shredded cooked chicken mixed with 1/3 cup buffalo sauce. Top with blue cheese crumbles and serve with ranch dressing.
- Broccoli Addition: Fold in 2 cups of small broccoli florets (fresh or frozen, thawed) for added nutrition and color.
- Caramelized Onion: Replace raw onions with caramelized onions and add fresh thyme for a more sophisticated flavor profile.
- Breakfast Sausage: Brown 1 pound of breakfast sausage and mix it into the casserole for a heartier, protein-packed version perfect for brunch.
For a lighter option, try my Healthy Alfredo Sauce served alongside.
Storage and Reheating
Proper storage keeps this casserole delicious for days, and it actually tastes even better the next day as the flavors meld together.
Refrigerator Storage:
- Let the casserole cool completely to room temperature before covering (this prevents condensation that can make it soggy)
- Cover tightly with aluminum foil or transfer to an airtight container
- Store in the refrigerator for up to 4 days
- The topping may soften slightly during storage, which is normal
Freezer Storage:
- Cool the casserole completely before freezing
- Wrap the entire baking dish tightly in plastic wrap, then cover with aluminum foil, or cut into individual portions and freeze in airtight containers
- Label with the date and contents
- Freeze for up to 3 months for best quality
- Thaw overnight in the refrigerator before reheating
Reheating Instructions:
- For refrigerated casserole: Cover with foil and reheat at 350°F (175°C) for 20-25 minutes until heated through
- For frozen casserole: Thaw completely, then reheat covered at 350°F (175°C) for 30-35 minutes
- For individual portions: Microwave on high for 2-3 minutes, stirring halfway through
- For crispy topping: Remove foil for the last 5 minutes of oven reheating to recrisp the top layer
- Add a tablespoon of milk or cream if the casserole seems dry when reheating
You might also enjoy: Velveeta Mac and Cheese Recipe
Nutritional Facts
Here’s the approximate nutritional information per serving (based on 12 servings):
- Calories: 385
- Total Fat: 26g
- Saturated Fat: 14g
- Cholesterol: 65mg
- Sodium: 620mg
- Total Carbohydrates: 28g
- Dietary Fiber: 2g
- Sugars: 3g
- Protein: 11g
- Vitamin A: 15% DV
- Vitamin C: 8% DV
- Calcium: 20% DV
- Iron: 6% DV
Note: Nutritional values are estimates and will vary based on specific brands and ingredient substitutions used.
Health Benefits of Key Ingredients
While this is definitely an indulgent comfort food, it does contain some beneficial ingredients that contribute to your overall nutrition.
Potatoes are an excellent source of vitamin C, potassium, and vitamin B6. They provide sustained energy through complex carbohydrates and contain resistant starch when cooked and cooled, which supports digestive health.
Cheese delivers high-quality protein and calcium for strong bones and teeth. It also provides vitamin A for eye health and zinc for immune function.
Onions contain antioxidants and anti-inflammatory compounds that support heart health. They’re also rich in vitamin C and fiber.
Sour cream provides probiotics that support gut health when using cultured varieties. It also adds healthy fats that help your body absorb fat-soluble vitamins.
Garlic powder offers immune-boosting properties and may help reduce blood pressure. It contains compounds that have been linked to improved heart health.
Another favorite: Best Lobster Mac and Cheese
FAQs About Hashbrown Casserole
1. Can I use fresh potatoes instead of frozen hashbrowns?
Yes, you absolutely can use fresh potatoes. Peel and shred about 2 pounds of russet potatoes using a box grater or food processor. Rinse the shredded potatoes in cold water to remove excess starch, then squeeze them completely dry in a clean kitchen towel. The texture will be slightly different from frozen hashbrowns but still delicious.
2. Why is my hashbrown casserole watery?
A watery casserole usually results from not draining the hashbrowns properly or using low-fat dairy products. Frozen hashbrowns contain a lot of moisture, so it’s essential to thaw them completely and squeeze out as much liquid as possible. Using full-fat sour cream and cream of chicken soup also helps create a thicker, creamier consistency.
3. Can I make this casserole dairy-free?
You can create a dairy-free version by using dairy-free sour cream, plant-based cream soup, vegan butter, and dairy-free cheese alternatives. The texture and flavor will differ from the original, but it can still be quite tasty. I recommend using brands specifically designed for cooking and melting for the best results.
4. How do I know when the casserole is fully cooked?
The casserole is done when it’s bubbling around the edges, the top is golden brown, and a knife inserted into the center comes out hot to the touch. The internal temperature should reach 165°F (74°C). If the top is browning too quickly but the center isn’t hot enough, cover it with foil and continue baking.
5. Can I double this recipe for a crowd?
Yes, this recipe doubles beautifully. Use two 9×13-inch baking dishes or one extra-large roasting pan. Keep in mind that a larger, deeper casserole may need an additional 10-15 minutes of baking time. Check the center for doneness before removing from the oven.
Read Also: Marry Me Chicken Casserole Recipe
Final Thoughts
This hashbrown casserole has become my go-to dish for so many occasions, from lazy Sunday brunches to holiday dinners and everything in between.
I love how it brings people together around the table, and the recipe is forgiving enough that even beginners can master it on their first try. The creamy, cheesy center paired with that crispy golden topping creates the perfect comfort food combination.
Give this recipe a try at your next gathering, and I promise it’ll become a regular request in your household too. I’d love to hear how it turns out for you, so drop a comment below and let me know what variations you tried or how your family enjoyed it!
Recommended:
- Brunswick Stew Recipe
- Cheese Ball Recipe
- Coleslaw Recipe
- Cheeseburger Soup Recipe
- French Toast Recipe
- Lasagna Recipe
- Meatloaf Recipe
- Roasted Brussels Sprouts with Bacon
- Healthy Mashed Potatoes
- Air Fryer Simple Baked Potatoes
