
I first discovered the magic of a 7 Layer Taco Salad Recipe at a backyard potluck about five years ago, and I’ve been making it ever since. My sister-in-law brought this stunning dish to the party, and I watched as people kept going back for seconds (and thirds). The vibrant layers, the satisfying crunch, and that perfect blend of textures made it an instant hit.
What I love most is how forgiving this recipe is. The first time I made it, I accidentally used way too much sour cream on one layer, and it still turned out delicious. Since then, I’ve tweaked the seasoning, experimented with different toppings, and found the perfect balance that my family requests at every gathering.
This 7 Layer Taco Salad isn’t just another salad recipe. It’s a conversation starter, a party centerpiece, and honestly, a meal prep dream. You can prepare most components ahead of time and assemble everything just before serving.
| Quick Recipe Summary | |
|---|---|
| Prep Time | 20 minutes |
| Cook Time | 15 minutes |
| Total Time | 35 minutes |
| Servings | 10-12 servings |
| Difficulty Level | Easy |
Another favorite: Mexican Street Corn Recipe
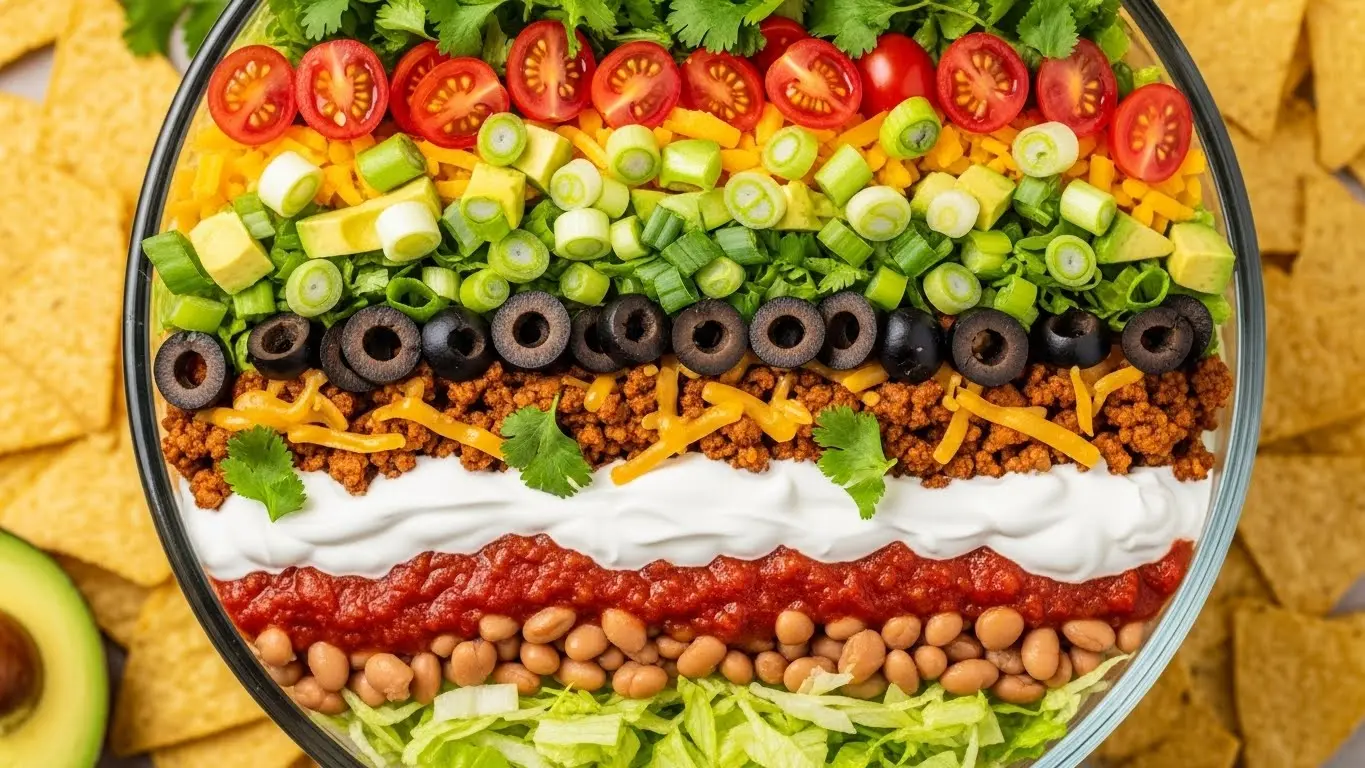
_result.jpg "7 Layer Taco Salad Recipe - Family Favorite Dinner")
Why You’ll Love This 7 Layer Taco Salad Recipe
This salad has become my go-to dish for every occasion, and once you make it, you’ll understand why. It’s incredibly versatile and can be customized to suit any dietary preference or taste.
The visual appeal alone is worth the effort. When you present this salad in a clear glass bowl or trifle dish, guests can see all seven colorful layers stacked perfectly. It’s like edible art that happens to taste amazing.
Here’s what makes this recipe truly special:
- No cooking skills required – If you can layer ingredients in a bowl, you can make this salad
- Make-ahead friendly – Prepare it up to 24 hours in advance without losing freshness
- Feeds a crowd easily – Perfect for potlucks, tailgates, or family reunions
- Customizable to taste – Swap ingredients based on preferences or dietary needs
- Budget-friendly – Uses affordable, accessible ingredients that won’t break the bank
- Kid-approved – Even picky eaters love the familiar flavors and fun presentation
- Stays fresh longer – The layering technique keeps the bottom layers crisp
- Great for meal prep – Store in individual containers for easy grab-and-go lunches
Ingredients
This recipe calls for simple, fresh ingredients that you can find at any grocery store. I’ve learned that using quality ingredients really does make a difference, especially with the sour cream and cheese.
The beauty of this salad is that each layer serves a purpose, creating the perfect bite when you scoop through all seven levels.
For the Seasoned Ground Beef:
- 1 lb (450g) ground beef (80/20 blend works best)
- 1 packet (1 oz/28g) taco seasoning or 2 tablespoons homemade
- ¼ cup (60ml) water
- 1 tablespoon olive oil
For the Salad Layers:
- 1 head (12 oz/340g) iceberg lettuce, chopped
- 1 can (15 oz/425g) refried beans
- 1½ cups (360ml) sour cream
- 1 cup (240ml) salsa (your preferred heat level)
- 2 cups (200g) shredded Mexican cheese blend or cheddar
- 1 cup (150g) cherry tomatoes, halved
- ½ cup (75g) black olives, sliced
- 3 green onions, thinly sliced
- 1 avocado, diced (added just before serving)
- ½ cup (80g) red onion, finely diced
- 1 jalapeño, seeded and minced (optional)
For Serving:
- Tortilla chips
- Fresh cilantro, chopped
- Lime wedges
Read Also: Taco Soup Recipe
Kitchen Equipment Needed
Having the right tools makes assembling this salad so much easier. I initially tried making this in a regular mixing bowl, and while it worked, I couldn’t see those beautiful layers. Investing in a clear trifle dish changed everything.
Here’s what you’ll need:
- Large clear glass bowl or trifle dish (3-4 quart capacity)
- Large skillet for browning meat
- Sharp chef’s knife for chopping
- Cutting board (preferably one for produce and one for meat)
- Wooden spoon for stirring
- Measuring cups and spoons
- Small bowls for organizing ingredients
- Spatula or large spoon for spreading layers
- Paper towels for draining meat
Recommended Products for This Recipe
After making this salad countless times for parties and gatherings, I’ve found a few specific products that genuinely make the process easier and the results better. These aren’t must-haves, but they’ve certainly elevated my taco salad game.
1. Anchor Hocking 2-Quart Glass Trifle Bowl
This bowl is perfect for showing off all those gorgeous layers. The pedestal base gives it an elegant presentation, and the thick glass keeps everything nice and cold when you refrigerate it. I’ve had mine for years, and it’s survived countless parties without a scratch.
2. Ortega Taco Seasoning Mix
I’ve tried dozens of taco seasoning brands, and Ortega consistently delivers the best flavor without being too salty. The blend of spices is perfectly balanced, and it doesn’t contain weird fillers or MSG. A little goes a long way with this stuff.
3. Old El Paso Refried Beans
These refried beans have the ideal creamy consistency for layering. They spread smoothly without being too runny, and the flavor is authentic without being overpowering. I always keep a few cans in my pantry for last-minute taco salad cravings.
4. Sargento 4 Cheese Mexican Blend
This cheese blend melts beautifully and has the perfect mix of cheddar, Monterey Jack, queso quesadilla, and asadero. The shred size is ideal for even distribution throughout the salad, and it doesn’t clump together like some other brands.
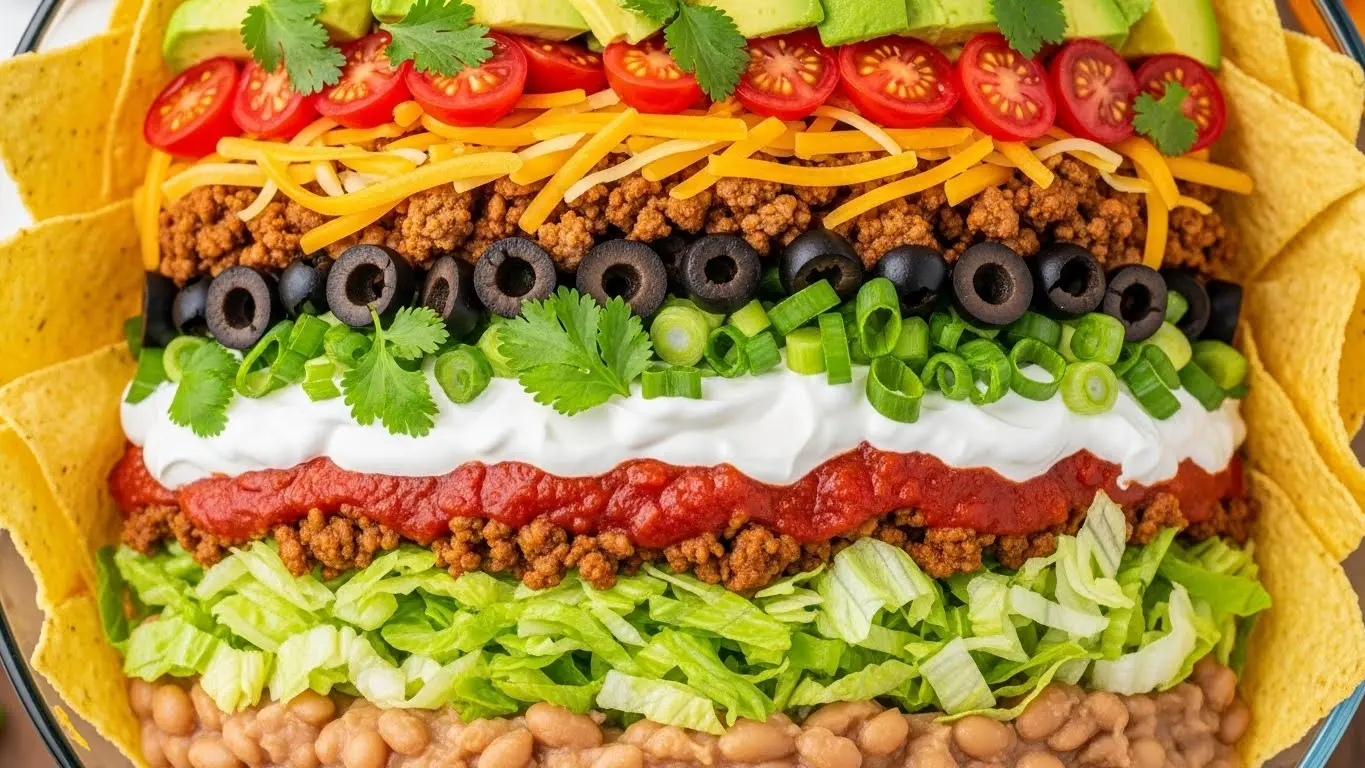
You might also enjoy: Taco Casserole Recipe
_result.jpg "7 Layer Taco Salad Recipe - Potluck Salad Everyone Loves")
Step-by-Step Instructions: How to Make 7 Layer Taco Salad
Making this salad is all about organization and patience. I learned the hard way that rushing through the layering process leads to messy, uneven layers. Take your time, and you’ll be rewarded with a stunning presentation.
1. Prepare the Seasoned Ground Beef
- Heat 1 tablespoon of olive oil in a large skillet over medium-high heat until it shimmers
- Add the ground beef and break it apart with a wooden spoon or spatula into small crumbles
- Cook for 8-10 minutes, stirring occasionally, until the meat is browned and no pink remains
- Drain the excess fat by carefully pouring the meat into a colander, or use paper towels to absorb the grease
- Return the meat to the skillet and reduce heat to medium-low
- Sprinkle the taco seasoning evenly over the meat and stir to coat
- Add ¼ cup of water and stir continuously for 2-3 minutes until the liquid evaporates and the seasoning coats the meat
- Transfer the seasoned beef to a bowl and let it cool to room temperature (this prevents wilting the lettuce)
- Set aside while you prepare the other layers
2. Prepare the Refried Bean Layer
- Open the can of refried beans and transfer to a microwave-safe bowl
- Microwave on high for 1-2 minutes, stirring halfway through, until the beans are warm and spreadable
- If the beans are too thick, add 1-2 tablespoons of water and stir until you reach a smooth, spreadable consistency
- Alternatively, you can heat the beans in a small saucepan over low heat, stirring frequently
- Season with a pinch of salt if desired (taste first as canned beans can be salty)
- Set aside to cool slightly before layering
3. Chop and Prepare the Fresh Ingredients
- Rinse the iceberg lettuce under cold water and pat dry with paper towels or use a salad spinner
- Remove the core and chop the lettuce into bite-sized pieces, about ½-inch (1.25cm) cubes
- Place the chopped lettuce in a large bowl and refrigerate until ready to layer
- Wash the cherry tomatoes and cut each one in half through the stem
- Drain the black olives and slice them into rings about ¼-inch (0.6cm) thick
- Trim the root ends of the green onions and slice thinly, using both white and green parts
- Dice the red onion very finely so the pieces are small and evenly distributed
- If using jalapeño, cut it in half lengthwise, remove all seeds and membranes (this reduces heat), and mince finely
- Cover each prepared ingredient in separate bowls and refrigerate until assembly
4. Create the First Layer (Refried Beans)
- Select your clear glass bowl or trifle dish and make sure it’s clean and dry
- Spoon the warmed refried beans into the bottom of the bowl
- Using the back of a spoon or small offset spatula, spread the beans evenly across the entire bottom surface
- Create a smooth, level layer about ½-inch (1.25cm) thick
- Make sure the beans reach all the way to the edges so you can see the layer through the glass
- Use a paper towel to wipe any smudges off the inside of the glass above the bean layer
5. Build the Lettuce Layer
- Remove the chopped lettuce from the refrigerator
- Add the entire amount of lettuce on top of the refried bean layer
- Press down gently with your hands to compact the lettuce slightly (this creates room for more layers)
- Spread the lettuce evenly so it covers the beans completely
- The lettuce layer should be about 2 inches (5cm) thick
- Make sure the lettuce extends to the edges of the bowl for clean layer visibility
This pairs beautifully with my Broccoli Salad Recipe for a complete meal spread.
6. Add the Sour Cream and Salsa Layer
- Dollop the sour cream evenly across the top of the lettuce in several spots
- Using a spatula or the back of a large spoon, spread the sour cream gently to create an even layer
- Work carefully to avoid pulling up lettuce from the layer below
- The sour cream layer should be about ¼-inch (0.6cm) thick and cover the lettuce completely
- Spoon the salsa over the sour cream layer, distributing it evenly
- Spread the salsa gently with the back of a spoon to create another thin, even layer
- Don’t worry if some sour cream mixes with the salsa slightly, it adds visual interest
7. Layer the Seasoned Beef
- Once the ground beef has cooled to room temperature (warm beef will wilt the lettuce), sprinkle it evenly over the salsa layer
- Use your hands or a spoon to distribute the beef crumbles across the entire surface
- Press down very gently to help the beef settle into an even layer
- Make sure the beef reaches the edges of the bowl for visibility through the glass
- The beef layer should completely cover the salsa beneath it
8. Add the Cheese Layer
- Sprinkle the shredded cheese evenly over the seasoned beef
- Use your fingers to distribute the cheese uniformly across the entire surface
- Create a thick, generous layer that covers all the beef
- Pat the cheese down lightly to help it adhere to the layer below
- Make sure cheese extends to the bowl’s edges for a complete visual layer
9. Add the Final Toppings
- Distribute the halved cherry tomatoes evenly over the cheese layer
- Scatter the sliced black olives across the top
- Sprinkle the sliced green onions over everything
- Add the diced red onion, distributing evenly
- If using jalapeño, sprinkle it across the top (or keep it on the side for guests to add themselves)
- At this point, you can cover the salad with plastic wrap and refrigerate for up to 24 hours
10. Final Touches Before Serving
- Right before serving, dice the avocado and squeeze a little lime juice over it to prevent browning
- Scatter the diced avocado across the top of the salad
- Garnish with fresh chopped cilantro for color and flavor
- Place the bowl on your serving table with a large serving spoon
- Arrange tortilla chips in a basket or bowl alongside the salad
- Set out small plates or bowls for guests to scoop their portions
- Provide extra salsa, sour cream, or hot sauce on the side for those who want more
Read Also: Mexican Chicken Salad Recipe
_result.jpg "7 Layer Taco Salad Recipe - Quick Mexican Food Favorite")
Tips for The Best 7 Layer Taco Salad
I’ve made this salad dozens of times, and through trial and error, I’ve discovered some tricks that take it from good to absolutely incredible. These tips will help you avoid common pitfalls and create a salad that looks as good as it tastes.
The most important lesson I learned was about temperature control and timing.
- Cool the beef completely – Hot meat will wilt the lettuce and make your sour cream runny. Let it cool for at least 15 minutes before layering.
- Use a clear glass bowl – This isn’t just about presentation; it helps you see if layers are even and reach the edges properly.
- Drain your lettuce well – Excess water will make your salad soggy. Pat dry thoroughly with paper towels or spin multiple times.
- Season each layer lightly – Add a pinch of salt and pepper to the lettuce and sour cream layers for better flavor distribution.
- Don’t overmix the sour cream and salsa – Keep them as distinct layers for better visual appeal and flavor contrast.
- Add avocado last minute – It browns quickly, so dice and add it right before serving for the freshest appearance.
- Use room temperature beans – Cold beans are hard to spread smoothly; warm beans create an even, spreadable layer.
- Press layers gently – This compacts ingredients and makes room for more layers without squishing everything.
- Keep ingredients separate until assembly – Prep everything first, then layer quickly to maintain freshness.
- Refrigerate for at least 2 hours – This allows flavors to meld and makes serving easier as layers set slightly.
- Save some toppings – Keep extra cheese, tomatoes, and olives aside to refresh the top before serving.
- Use a large spoon for serving – A big spoon ensures guests get all seven layers in one scoop.
- Make it spicy – Mix hot sauce into the sour cream layer, or add diced jalapeños throughout for heat lovers.
Serving Suggestions

This 7 Layer Taco Salad is substantial enough to serve as a complete meal, but it also works beautifully as part of a larger spread. I’ve served it at everything from casual weeknight dinners to fancy birthday parties, and it always fits perfectly.
The key is thinking about complementary flavors and textures.
- Serve with Healthy Guacamole and extra tortilla chips for scooping
- Pair with warm Healthy Cornbread for a comforting combination
- Add Deviled Eggs to your appetizer spread
- Serve alongside Mexican Street Corn for a complete Mexican feast
- Offer Chimichurri Steak Tacos as a protein-rich complement
- Include a pitcher of homemade margaritas or Mexican beer for adults
- Set out Chipotle Burrito components for guests who want to build their own
- Finish the meal with churros or tres leches cake for a sweet ending
- Create a taco bar alongside the salad so guests can customize both
- Serve individual portions in clear cups for a party-friendly presentation
Variations of 7 Layer Taco Salad
One of the things I love most about this recipe is how easily it adapts to different dietary needs and flavor preferences. I’ve made versions of this salad for vegan friends, keto-following family members, and picky kids, and everyone has found something to love.
Here are my favorite variations:
- Vegetarian Version – Replace ground beef with seasoned black beans, pinto beans, or plant-based ground meat crumbles
- Chicken Taco Salad – Use shredded rotisserie chicken or grilled chicken breast seasoned with taco spices instead of beef
- Seafood Twist – Substitute seasoned grilled shrimp or blackened fish for a lighter, coastal-inspired version
- Keto-Friendly – Skip the refried beans and add an extra layer of seasoned ground beef, plus more cheese and avocado
- Vegan Option – Use cashew sour cream, vegan cheese, and skip the meat or use seasoned lentils or walnut taco meat
- Extra Spicy – Add diced chipotle peppers in adobo to the sour cream layer and use pepper jack cheese
- Greek-Inspired – Replace taco seasonings with Greek spices, use tzatziki instead of sour cream, feta instead of cheddar
- BBQ Ranch Version – Mix ranch dressing with BBQ sauce, use pulled pork instead of ground beef
- Breakfast Style – Layer scrambled eggs, breakfast sausage, hash browns, cheese, and salsa for a morning twist
- Asian Fusion – Use teriyaki-glazed ground pork, add edamame, mandarin oranges, and crispy wonton strips
- Loaded Nacho Salad – Add a layer of nacho cheese sauce and crushed tortilla chips between layers
- Low-Carb Cauliflower Version – Use cauliflower rice instead of lettuce for the base layer
- Kid-Friendly Mild – Use mild salsa, skip jalapeños, and add more cheese and sour cream
Another favorite: Shrimp and Avocado Salad Recipe
Storage and Reheating
Proper storage is crucial for maintaining the quality of your 7 Layer Taco Salad. I’ve learned that while this salad is best served fresh, you can definitely prepare it ahead with the right techniques.
Here’s how to store and handle leftovers:
- Advance Preparation – Assemble the salad up to 24 hours ahead, but add avocado, cilantro, and chips right before serving
- Refrigerator Storage – Cover tightly with plastic wrap, pressing it directly onto the surface to prevent air exposure
- Individual Portions – Store leftovers in airtight containers with layers intact for grab-and-go lunches
- Shelf Life – Refrigerate for up to 2-3 days, though the lettuce may lose some crispness after the first day
- Freezing – Not recommended, as the lettuce, sour cream, and tomatoes don’t freeze well and become watery when thawed
- Reviving Leftovers – Add fresh lettuce on top and extra cheese to refresh the appearance before serving again
- Separation Prevention – If liquid accumulates at the bottom, carefully tilt and drain before serving
- Reheating Meat – If you prefer warm meat, reheat just the beef portion separately and add it to cold layers
- Chip Storage – Keep tortilla chips separate in an airtight container to maintain crunchiness
- Ingredient Storage – Store prepped ingredients separately in containers if making within 2-3 days
- Transport Tips – Use a bowl with a tight-fitting lid or wrap well with plastic wrap for transport to parties
_result.jpg "7 Layer Taco Salad Recipe")
Nutritional Facts
Here’s the approximate nutritional information per serving (based on 12 servings):
- Calories: 285 kcal
- Protein: 15g
- Carbohydrates: 14g
- Dietary Fiber: 4g
- Sugars: 3g
- Fat: 18g
- Saturated Fat: 8g
- Cholesterol: 55mg
- Sodium: 520mg
- Potassium: 385mg
- Vitamin A: 850 IU
- Vitamin C: 12mg
- Calcium: 180mg
- Iron: 2mg
Note: Nutritional values are approximate and will vary based on specific ingredients and portion sizes used.
You might also enjoy: Chickpea Salad Recipe
Health Benefits of Key Ingredients
While this salad is definitely indulgent, it actually contains several nutritious ingredients that provide genuine health benefits. I love that I can enjoy something delicious while also nourishing my body.
Here’s what makes this salad surprisingly good for you:
- Lean Ground Beef – Provides high-quality protein (24g per serving), iron for oxygen transport, zinc for immune function, and B vitamins for energy metabolism
- Lettuce – Offers hydration (95% water content), vitamin K for bone health, folate for cell growth, and fiber for digestive health
- Black Beans – Deliver plant-based protein, resistant starch for gut health, antioxidants for inflammation reduction, and folate for heart health
- Tomatoes – Packed with lycopene for heart protection, vitamin C for immune support, potassium for blood pressure regulation, and antioxidants for skin health
- Avocado – Contains heart-healthy monounsaturated fats, potassium for electrolyte balance, fiber for satiety, and vitamins E and K
- Black Olives – Provide healthy fats, vitamin E for skin health, iron for energy, and anti-inflammatory compounds
- Cheese – Supplies calcium for strong bones, protein for muscle maintenance, vitamin A for vision, and probiotics in aged varieties
- Green Onions – Offer vitamin K for blood clotting, vitamin C for immunity, and quercetin for anti-inflammatory benefits
FAQs About 7 Layer Taco Salad
1. Can I make 7 Layer Taco Salad the night before?
Absolutely, and it often tastes even better the next day. Assemble all layers except the avocado up to 24 hours in advance. Cover tightly with plastic wrap and refrigerate. The flavors will meld beautifully overnight, creating a more cohesive taste. Add the diced avocado, fresh cilantro, and tortilla chips just before serving to maintain their freshness and texture.
2. What can I substitute for refried beans?
You have several great options depending on your preferences. Black beans, pinto beans, or white beans work wonderfully when mashed slightly with a fork. For a lower-carb option, try mashed cauliflower seasoned with cumin and garlic. Hummus or black bean dip also make excellent substitutes that spread easily and add protein.
3. How do I prevent my 7 Layer Taco Salad from getting soggy?
The key is proper layering and ingredient preparation. Always drain and dry your lettuce thoroughly using paper towels or a salad spinner. Cool the seasoned beef completely before adding it to prevent condensation. Spread the refried beans and sour cream layers carefully without pressing too hard, which can release moisture. Finally, add watery ingredients like tomatoes and avocado right before serving.
4. Can I use ground turkey or chicken instead of beef?
Yes, ground turkey or chicken work perfectly in this recipe. Use 93/7 lean ground turkey or chicken and brown it the same way as beef. Since these meats are leaner, you might want to add an extra tablespoon of olive oil to the pan for moisture. Season generously with taco seasoning as poultry has a milder flavor than beef.
5. What size bowl do I need for this recipe?
A 3 to 4-quart clear glass bowl or trifle dish works best for this amount of ingredients. The clear glass allows guests to see all the beautiful layers, which is part of the appeal. If you’re serving a smaller crowd, you can halve the recipe and use a 2-quart bowl. For large parties, double the recipe and use a large serving platter instead.
Read Also: Pasta House Salad Recipe
7 Layer Taco Salad
Ingredients
- 1 lb ground beef - 450g, 80/20 blend works best
- 1 packet taco seasoning - 1 oz/28g or 2 tablespoons homemade
- ¼ cup water - 60ml
- 1 tablespoon olive oil
- 1 head iceberg lettuce - 12 oz/340g, chopped
- 1 can refried beans - 15 oz/425g
- 1½ cups sour cream - 360ml
- 1 cup salsa - 240ml, your preferred heat level
- 2 cups shredded Mexican cheese blend - 200g or cheddar
- 1 cup cherry tomatoes - 150g, halved
- ½ cup black olives - 75g, sliced
- 3 green onions - thinly sliced
- 1 avocado - diced, added just before serving
- ½ cup red onion - 80g, finely diced
- 1 jalapeño - seeded and minced (optional)
- tortilla chips
- fresh cilantro - chopped
- lime wedges
Equipment
- Large clear glass bowl or trifle dish - 3-4 quart capacity
- Large skillet - for browning meat
- Sharp chef’s knife
- Cutting board - preferably one for produce and one for meat
- Wooden spoon
- Measuring cups and spoons
- Small bowls - for organizing ingredients
- Spatula or large spoon - for spreading layers
- Paper towels - for draining meat
- Microwave-safe bowl - for heating beans
Method
- Heat olive oil in a large skillet over medium-high heat. Add ground beef and cook for 8-10 minutes until browned. Drain excess fat, add taco seasoning and water, and simmer until liquid evaporates. Cool completely.
- Warm refried beans in the microwave or on the stovetop until spreadable. Add a pinch of salt if needed and set aside to cool slightly.
- Chop iceberg lettuce into bite-sized pieces and refrigerate. Halve cherry tomatoes, slice black olives and green onions, finely dice red onion, and mince jalapeño if using. Prepare all fresh ingredients in advance.
- Spoon warmed refried beans into the bottom of a clear glass trifle dish. Spread evenly into a smooth layer reaching the edges.
- Add chopped lettuce on top of the beans. Press down gently to compact and spread evenly to the edges.
- Dollop sour cream over the lettuce and spread evenly. Spoon salsa over the sour cream and spread gently into a thin layer.
- Sprinkle cooled seasoned ground beef evenly over the salsa layer. Press down gently to create an even layer reaching the edges.
- Sprinkle shredded cheese evenly over the beef layer. Pat down lightly to adhere.
- Distribute halved cherry tomatoes, sliced black olives, green onions, diced red onion, and optional jalapeño evenly over the cheese. Cover and refrigerate up to 24 hours if making ahead.
- Just before serving, dice avocado and toss with lime juice. Scatter over the top along with chopped cilantro. Serve with tortilla chips and lime wedges on the side.
Nutrition
Notes
- Cool the seasoned beef completely before layering to prevent wilting the lettuce or making the sour cream runny.
- Use a clear glass trifle dish for the best visual presentation of the layers.
- Drain and dry the lettuce thoroughly to keep the salad crisp and prevent sogginess.
- Assemble up to 24 hours in advance but add avocado, cilantro, and tortilla chips right before serving.
- For vegetarian version, replace ground beef with seasoned black beans or plant-based crumbles.
- Refrigerate leftovers for up to 2-3 days; the lettuce may soften after the first day.
- Press each layer gently to compact ingredients and create space for all seven layers.
- Customize heat level by adjusting salsa, adding jalapeños, or mixing hot sauce into the sour cream.
- Keep tortilla chips separate until serving to maintain their crunch.
- A large serving spoon ensures guests get all layers in one scoop.
Private Notes
Tried this recipe?
Let us know how it was!Final Thoughts
This 7 Layer Taco Salad has become more than just a recipe in my kitchen. It’s the dish that brings my family together, the one my friends request for every gathering, and the meal that never fails to impress.
I hope you’ll give this recipe a try and experience the same joy it brings to my table. Don’t be afraid to make it your own by adjusting ingredients to suit your taste. Drop a comment below and let me know how your taco salad turns out, or share your favorite variation with me.
Recommended:
- Potato Salad Recipe
- Coleslaw Recipe
- Cranberry Jello Salad Recipe
- BLT Pasta Salad Recipe
- Chicken Caesar Pasta Salad Recipe
- Orange Dreamsicle Salad Recipe
- Tuna and White Bean Salad Recipe
- Shrimp Macaroni Salad Recipe
- Ono Hawaiian Macaroni Salad Recipe
- Healthy Coleslaw Recipe