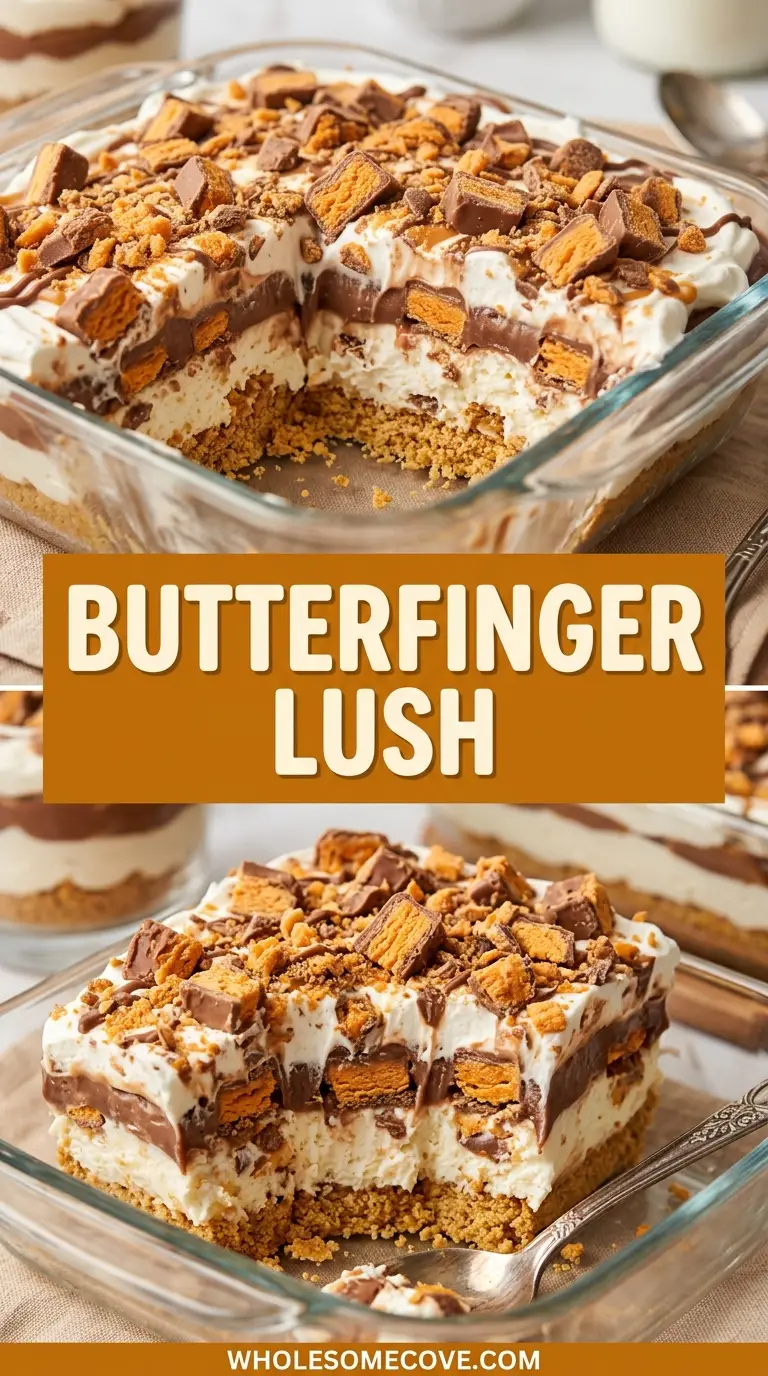
The hardest part of a Butterfinger Lush is getting four soft layers to hold their own clean lines instead of sliding into one muddy stripe. This Butterfinger Lush recipe solves that with cold milk, instant pudding, and a quick chill between the messy steps, so each layer stays exactly where you put it.
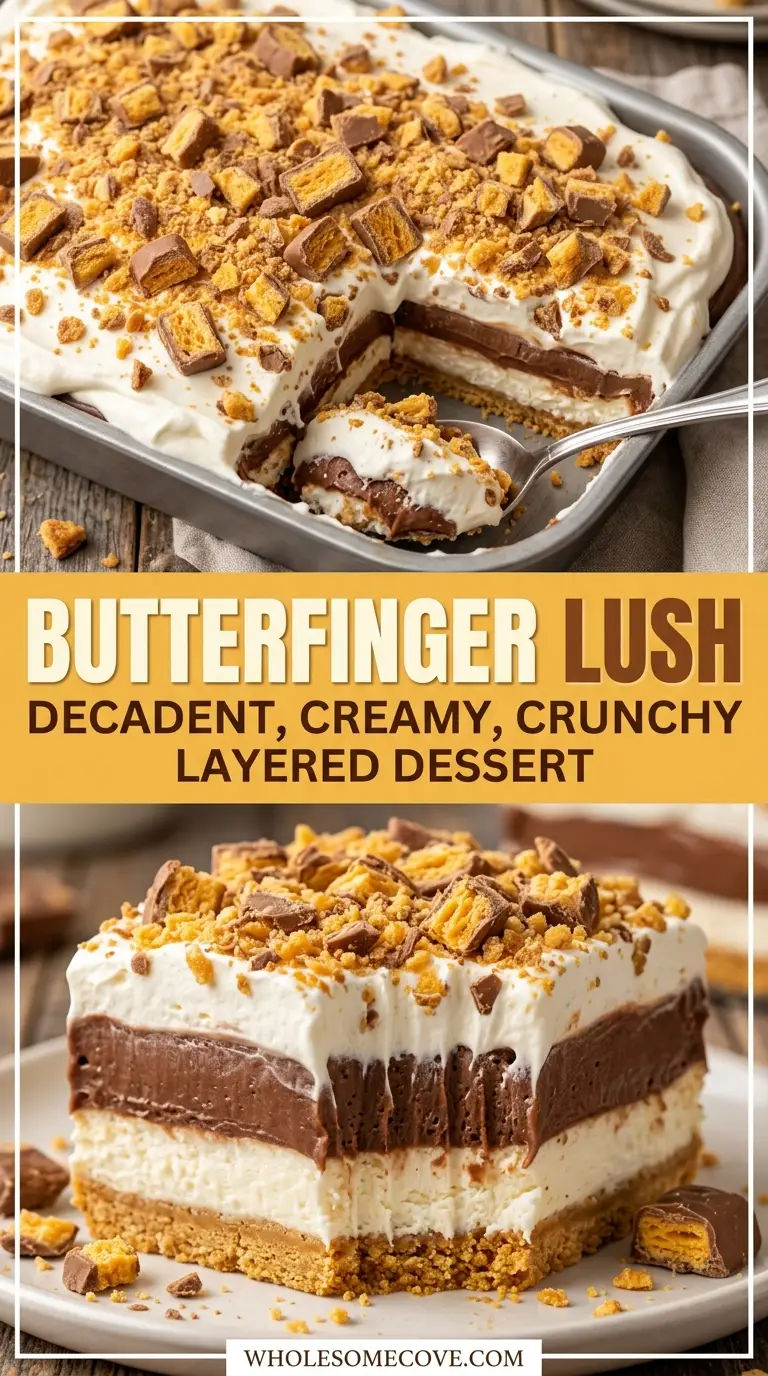
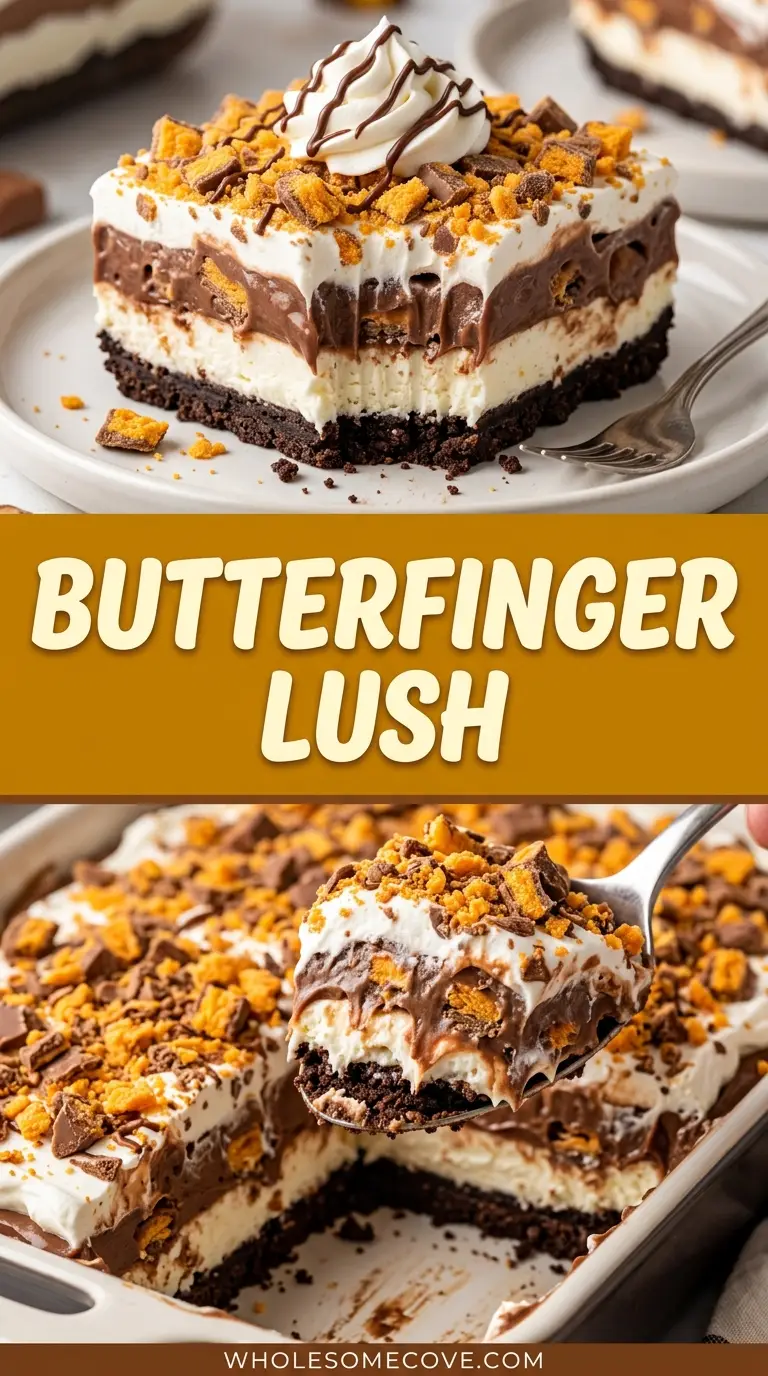
You get an Oreo crust, a peanut butter cheesecake layer, a chocolate pudding layer, and a cloud of whipped topping, all under a scatter of crushed candy. The whole thing comes together in one 9×13 pan with about 25 minutes of hands-on work and no oven at all.
The most common wreck here comes from grabbing the wrong pudding. Cook-and-serve pudding never firms up cold, so the layer stays soupy and the candy sinks, which is why this version leans on instant chocolate pudding whisked with cold milk.
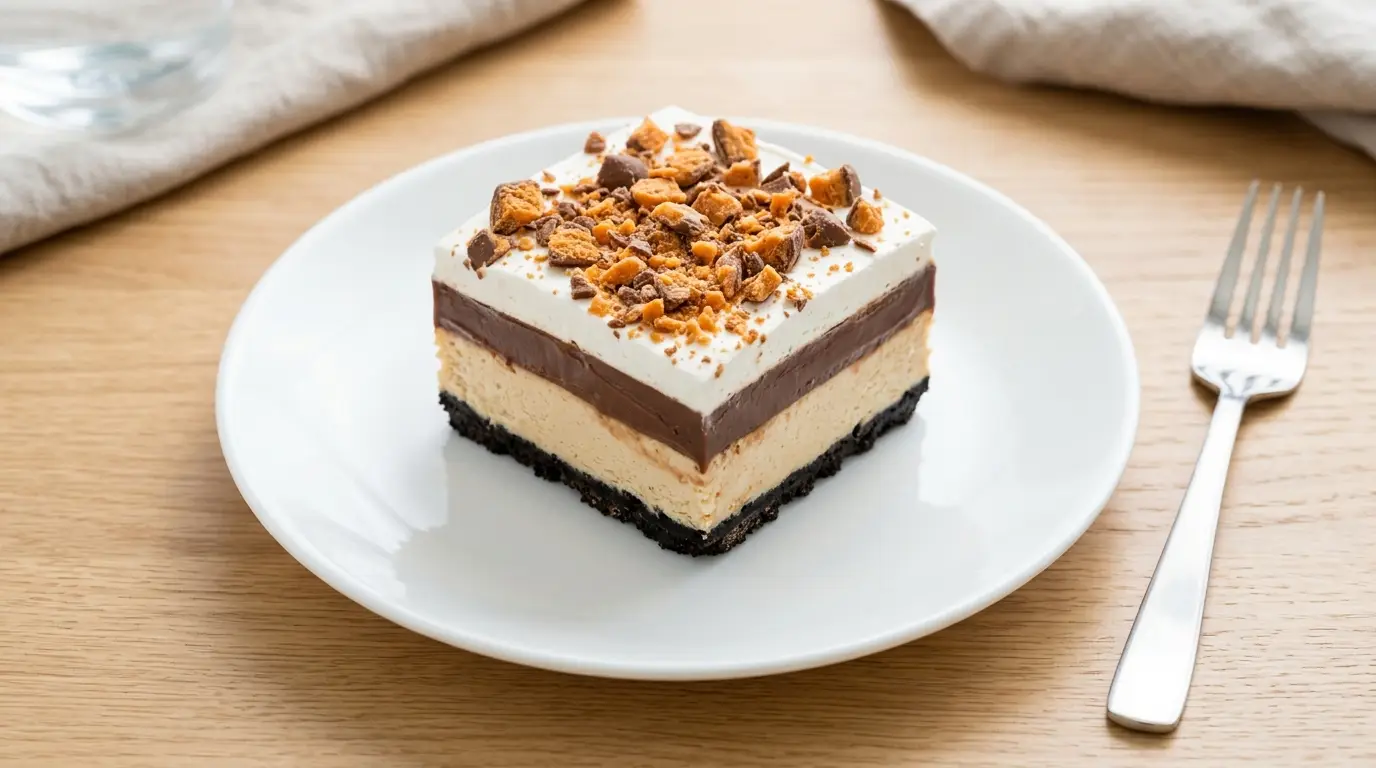
Chilled through, a slice cuts into four visible stripes with shards of Butterfinger catching the light on top. It feeds 15 comfortably, which is why it shows up at so many potlucks and birthday tables.
| Quick Recipe Summary | |
|---|---|
| Prep Time | 25 minutes |
| Chill Time | 4 hours |
| Total Time | 4 hours 25 minutes |
| Servings | 15 servings |
| Difficulty Level | Easy |
Read Also: Chocolate Lush
Why You’ll Love This Butterfinger Lush Recipe
This dessert earns its spot because it does a lot of work for very little effort. Below are the specific reasons it keeps getting made.
- No oven, no stovetop. Every component is either crushed, whisked, or folded, which makes it a lifesaver in summer or any time the kitchen is already crowded.
- It feeds a crowd from one pan. A single 9×13 dish yields 15 squares, so it stretches across a party without a second batch.
- The texture contrast is the whole point. A firm cookie base sits under tangy peanut butter cheesecake, silky chocolate pudding, and airy whipped topping, with crunchy candy on top.
- It is a genuine make-ahead. The layers actually set better overnight, so you can build it a day before and forget about it until serving.
- Kids and adults both reach for it. The Butterfinger and chocolate read as candy to kids, while the cream cheese tang keeps it from being cloying for adults.
- Almost no skill required. If you can crush cookies and stir pudding, you can make this cleanly on the first try.
For a version with deeper toffee notes, try Butterscotch Lush, which uses the same layered method with a caramel-forward pudding.
Ingredients
Everything here comes from the regular grocery aisles, and most of it is shelf-stable pantry and dairy-case items. Measure the candy and whipped topping by how they divide between layers, since both get split.
For the Oreo crust:
- 1 package (14.3 oz / 405 g) Oreo cookies, whole (about 36 cookies)
- 8 tablespoons (1 stick / 113 g) unsalted butter, melted and slightly cooled
For the peanut butter cheesecake layer:
- 8 oz (226 g) cream cheese, softened to room temperature
- 1 cup (250 g) creamy peanut butter, no-stir style
- 1 cup (120 g) powdered sugar
- 1 cup whipped topping (from the container below)
For the chocolate pudding layer:
- 2 packages (3.9 oz / 111 g each) instant chocolate pudding mix
- 3 cups (720 ml) cold whole milk
For the topping:
- 1 container (12 oz / 340 g) whipped topping, thawed and divided (1 cup goes in the cheesecake layer, the rest goes on top)
- 6 full-size (1.9 oz / 54 g each) Butterfinger candy bars, chopped and divided
I ruined my first lush by reaching for the wrong peanut butter. A natural, oil-separated jar made the cheesecake layer loose and greasy, and a standard no-stir peanut butter fixed it completely on the next try.
A related recipe is Cherry Lush, which swaps the chocolate and candy for a bright fruit layer if you want a lighter finish.
Kitchen Equipment Needed
You don’t need anything specialized, but a few tools make the layers cleaner and faster to build. Here is the full list.
- A 9×13 baking dish, glass or ceramic, for assembling and serving
- An electric hand mixer for the cream cheese layer
- A set of glass mixing bowls in a couple of sizes
- An offset spatula for spreading each layer flat
- A food processor for crushing the Oreos quickly (a zip-top bag and rolling pin also work)
- A silicone spatula for folding whipped topping without deflating it
- A balloon whisk for the pudding
- A set of measuring cups and spoons
You might also enjoy: Strawberry Lush
Recommended Products for This Recipe
These are the items I reach for specifically when making layered no-bake desserts like this one. Each one solved a real problem I ran into more than once.
1. Pyrex 9×13 Glass Baking Dish with Lid
The fight I kept losing was plastic wrap peeling off on the drive to a potluck and smearing the candy topping. A dish with a snap-on lid seals the top without touching it, and the clear glass lets you see the four layers from the side.
2. Ghirardelli Unsweetened Cocoa Powder
If your instant pudding tastes flat, whisking in a spoonful of good cocoa deepens the chocolate layer without loosening it. This one dissolves smoothly and turns a boxed pudding into something that reads as homemade.
3. Jif Creamy Peanut Butter
After the natural-peanut-butter disaster, I stick to a no-stir jar for the cheesecake layer. It stays emulsified, so the layer sets firm and slices cleanly instead of weeping oil into the crust.
4. KitchenAid Hand Mixer
Cold cream cheese fights a weak motor and leaves lumps. A sturdy hand mixer whips the cream cheese, peanut butter, and powdered sugar smooth in under a minute, which is the difference between a silky layer and a grainy one.
For more recipes in this style, check out Pumpkin Lush.
Step-by-Step Instructions: How to Make Butterfinger Lush
Follow these steps in order and you’ll have a clean, four-layer Butterfinger Lush ready to chill in about 25 minutes.
1. Make and press the Oreo crust
- Add the whole Oreo cookies, filling included, to a food processor and pulse until they become fine crumbs. If you’re using a zip-top bag, seal out the air and crush with a rolling pin until no large chunks remain.
- Pour the crumbs into a bowl and stir in the melted, slightly cooled butter until every crumb looks damp, like wet sand.
- Tip the mixture into the 9×13 dish and press it firmly and evenly across the bottom using the flat base of a measuring cup or your hands.
- Slide the dish into the refrigerator to firm up while you build the next layer.
2. Whip the peanut butter cheesecake layer
- In a large bowl, beat the softened cream cheese, creamy peanut butter, and powdered sugar with an electric mixer until completely smooth, scraping the bowl once or twice.
- Add 1 cup of the whipped topping and fold it in gently with a silicone spatula until no white streaks remain. Folding rather than beating keeps this layer light.
- Fold in about a third of the chopped Butterfingers for pockets of crunch inside the layer.
- Spread this mixture evenly over the chilled crust with an offset spatula, pushing it all the way to the corners. Return the dish to the fridge.
3. Mix and add the chocolate pudding layer
- In a medium bowl, whisk the two packages of instant chocolate pudding mix with the 3 cups of cold milk for about 2 minutes, until it thickens noticeably.
- Let the pudding sit for 5 minutes to firm up before you touch it again.
- Spoon the thickened pudding in dollops over the peanut butter layer, then spread it gently and evenly. Dolloping first keeps you from dragging the peanut butter up into the pudding.
4. Finish with topping and candy
- Spread the remaining whipped topping (about 3½ cups) over the pudding in a smooth, even layer.
- Sprinkle the remaining chopped Butterfingers across the top so every square gets candy.
- Cover the dish and chill for at least 4 hours, or overnight, so the layers set firm enough to slice cleanly.
I’ve found that spooning the pudding on in dollops beats pouring it in one pour every time, because a single pour lands with enough force to break the peanut butter surface and swirl the two layers together.
You might also like: Chocolate Chip Cookies
Tips for The Best Butterfinger Lush
Small choices make the difference between a lush that slices into neat stripes and one that slumps. These are the ones that matter most.
- Use instant pudding, never cook-and-serve. Only instant pudding sets up cold, which is the entire mechanism holding this dessert together.
- Keep the milk cold. Cold milk thickens instant pudding faster and firmer, so the layer sets instead of staying loose.
- Soften the cream cheese fully. Room-temperature cream cheese blends lump-free, while cold cream cheese leaves grainy bits that never smooth out.
- Fold whipped topping, don’t beat it. Beating knocks the air out and gives you a dense, flat layer instead of a light one.
- Chop the candy cold. I keep the Butterfingers in the fridge until the last second, because cold bars shatter into clean shards while warm ones smear and stick to the knife.
- Chill between the messy layers. Ten minutes in the fridge firms each layer enough that the next one spreads without tearing it.
- Reserve enough candy for the top. The topping is where the candy shows, so save the larger share for the final scatter.
For a citrus twist, try: Lemon Lush
What to Serve with Butterfinger Lush
This is a rich, chocolate-and-peanut-butter dessert, so the best partners either cut through it or lean into the same cozy register. Here are pairings that work at a table or on a dessert spread.
- A hot cup of coffee, which balances the sweetness with a little bitterness
- A mug of Hot Chocolate for a full cold-weather dessert course
- A Pumpkin Spice Latte at fall gatherings and holiday tables
- A cold glass of milk, the classic match for anything peanut butter
- A scoop of vanilla ice cream alongside each square for an à la mode plate
- Fresh raspberries or sliced strawberries to brighten the plate and cut the richness
- A dessert-table lineup with No-Bake Cookies and Peanut Butter Fudge for a spread of easy no-bake sweets
A related recipe is Peanut Butter Cookies, which fits the same peanut-forward dessert table.
Variations of Butterfinger Lush
The four-layer structure is flexible, so you can swap components without losing what makes it a lush. Try any of these once you have the basic method down.
- Nutter Butter crust. Trade the Oreos for crushed Nutter Butter cookies to double down on peanut butter flavor in the base.
- Extra candy layer. Scatter a full layer of chopped Butterfingers between the peanut butter and pudding layers for crunch in the middle.
- Vanilla or butterscotch pudding. Swap the chocolate pudding for vanilla or butterscotch to let the Butterfinger flavor lead.
- Individual cups. Layer everything into clear cups or small jars for grab-and-go party servings.
- Mocha version. Whisk a teaspoon of instant espresso into the pudding milk for a coffee-chocolate edge.
- Candy mash-up. Replace half the Butterfingers with chopped Reese’s or Snickers for a mixed-candy top.
- Homemade whipped cream. Use stabilized whipped cream in place of the tub for a fresher, less sweet finish.
Another option worth trying is Pumpkin Cheesecake when you want a no-fuss creamy dessert with a seasonal spin.
Storage and Reheating
This is a chilled dessert, so there is no reheating involved, only proper cold storage. Handle it as you would any cream-based no-bake treat.
- Refrigerator: Cover the dish tightly with a lid or plastic wrap and store for up to 4 days. The flavor actually deepens after the first day.
- Keep it cold: Don’t leave the lush at room temperature for more than about 10 minutes at a time, since the cream layers soften quickly.
- Freezer: Wrap the whole dish, or individual squares, tightly in plastic and foil and freeze for up to 1 month. Expect the texture to soften slightly after thawing.
- Thawing: Move frozen lush to the fridge overnight before serving, or let squares sit 30 minutes for an icebox-cake texture.
- Clean slices: For sharp squares, dip your knife in hot water and wipe it between cuts.
- Make-ahead: Build it a full day before serving so the layers set completely.
Read Also: Fudge
Nutritional Facts
Values are estimates per serving, based on 15 servings from one 9×13 pan. Actual numbers vary with the specific brands you use.
| Nutrient | Amount per Serving |
|---|---|
| Calories | 410 kcal |
| Total Fat | 24 g |
| Saturated Fat | 11 g |
| Cholesterol | 25 mg |
| Sodium | 320 mg |
| Total Carbohydrates | 44 g |
| Sugars | 32 g |
| Protein | 6 g |
For a lighter option, try: Peanut Butter Banana Smoothie
Health Benefits of Key Ingredients
This is a treat first, but a few of its core ingredients carry real nutritional value worth knowing about. Here is what each one brings to the table.
- Peanut butter: Supplies plant protein, monounsaturated fats, and vitamin E, along with a dose of magnesium.
- Milk: Adds calcium, phosphorus, and protein, and it is the source of the pudding layer’s body.
- Cream cheese: Contributes calcium and a small amount of fat-soluble vitamin A.
- Cocoa in the chocolate pudding: Brings flavonoids, the plant compounds cocoa is studied for.
- Eggs and dairy in the crust and cream layers: Provide protein that helps the dessert feel more satisfying than pure sugar.
Keep in mind the candy and added sugar make this an occasional dessert rather than an everyday food. Enjoying it in a reasonable portion is the sensible way to fit it in.
You’ll find more inspiration in Cannoli Poke Cake.
FAQs About Butterfinger Lush
1. Can I make Butterfinger Lush ahead of time?
Yes, and it is genuinely better when you do. The layers firm up overnight, which makes for cleaner slices and a more set texture.
Build it up to a full day in advance, cover it, and keep it refrigerated until serving. Add a fresh sprinkle of candy right before it goes out if you want maximum crunch.
2. Why is my pudding layer runny?
The usual culprit is cook-and-serve pudding, which never firms up when chilled. Only instant pudding sets cold, so check the box before you buy.
The other fix is cold milk and slightly less of it than the box directs. Whisking for a full 2 minutes and letting it rest before spreading also helps it thicken.
3. Can I freeze Butterfinger Lush?
You can freeze it for up to a month, wrapped tightly in plastic and foil. The creamy layers soften a little on thawing, but the flavor holds up well.
Thaw it in the refrigerator overnight before serving. Some people actually prefer it served partially frozen, closer to an ice cream cake.
4. Do I have to use an Oreo crust?
Not at all, the crust is easy to swap. Crushed Nutter Butter cookies, graham crackers, or chocolate wafer cookies all work with the same butter ratio.
Each one shifts the flavor slightly, so pick based on whether you want more peanut butter, more chocolate, or something milder. Press and chill it the same way regardless of which you choose.
5. Can I use real whipped cream instead of Cool Whip?
Yes, but it needs to be stabilized so it holds up over several days. Whip heavy cream with a little powdered sugar and a stabilizer like gelatin or instant pudding powder.
Unstabilized whipped cream will weep and deflate in the fridge. If you want a fresher, less sweet dessert, this is a worthwhile swap.
6. What is the difference between a lush and a dump cake?
A lush is a chilled, no-bake dessert built from distinct creamy layers over a pressed crust. A dump cake is baked, with fruit and dry cake mix layered and cooked together until it forms a cobbler-like top.
The two share a casual, crowd-friendly spirit, but the methods are opposites. One sets in the fridge, the other bakes in the oven.
You might also enjoy: Coconut Cream Pie
Butterfinger Lush
Ingredients
- 1 package Oreo cookies - 14.3 oz / 405 g, whole (about 36 cookies)
- 8 tablespoons unsalted butter - 1 stick / 113 g, melted and slightly cooled
- 8 oz cream cheese - 226 g, softened to room temperature
- 1 cup creamy peanut butter - 250 g, no-stir style
- 1 cup powdered sugar - 120 g
- 1 cup whipped topping - from the 12 oz container below
- 2 packages instant chocolate pudding mix - 3.9 oz / 111 g each
- 3 cups cold whole milk - 720 ml
- 1 container whipped topping - 12 oz / 340 g, thawed and divided (1 cup goes in the cheesecake layer, the rest goes on top)
- 6 full-size Butterfinger candy bars - 1.9 oz / 54 g each, chopped and divided
Equipment
- 9×13 Baking Dish - glass or ceramic, for assembling and serving
- Electric hand mixer - for the cream cheese layer
- Glass mixing bowls - in a couple of sizes
- Offset spatula - for spreading each layer flat
- Food processor - for crushing the Oreos quickly (a zip-top bag and rolling pin also work)
- Silicone spatula - for folding whipped topping without deflating it
- Balloon whisk - for the pudding
Method
- Add the whole Oreo cookies, filling included, to a food processor and pulse until they become fine crumbs. If using a zip-top bag, seal out the air and crush with a rolling pin until no large chunks remain.
- Pour the crumbs into a bowl and stir in the melted, slightly cooled butter until every crumb looks damp, like wet sand.
- Tip the mixture into the 9×13 dish and press it firmly and evenly across the bottom using the flat base of a measuring cup or your hands. Slide the dish into the refrigerator to firm up while you build the next layer.
- In a large bowl, beat the softened cream cheese, creamy peanut butter, and powdered sugar with an electric mixer until completely smooth, scraping the bowl once or twice.
- Add 1 cup of the whipped topping and fold it in gently with a silicone spatula until no white streaks remain. Fold in about a third of the chopped Butterfingers for pockets of crunch.
- Spread this mixture evenly over the chilled crust with an offset spatula, pushing it all the way to the corners. Return the dish to the fridge.
- In a medium bowl, whisk the two packages of instant chocolate pudding mix with the 3 cups of cold milk for about 2 minutes, until it thickens noticeably. Let the pudding sit for 5 minutes to firm up.
- Spoon the thickened pudding in dollops over the peanut butter layer, then spread it gently and evenly. Dolloping first keeps you from dragging the peanut butter up into the pudding.
- Spread the remaining whipped topping (about 3½ cups) over the pudding in a smooth, even layer. Sprinkle the remaining chopped Butterfingers across the top so every square gets candy.
- Cover the dish and chill for at least 4 hours, or overnight, so the layers set firm enough to slice cleanly.
Nutrition
Notes
- Use instant pudding, never cook-and-serve. Only instant pudding sets up cold, which is the entire mechanism holding this dessert together.
- Keep the milk cold. Cold milk thickens instant pudding faster and firmer, so the layer sets instead of staying loose.
- Soften the cream cheese fully. Room-temperature cream cheese blends lump-free, while cold cream cheese leaves grainy bits that never smooth out.
- Fold whipped topping, don’t beat it. Beating knocks the air out and gives you a dense, flat layer instead of a light one.
- Chop the candy cold. Keep the Butterfingers in the fridge until the last second, because cold bars shatter into clean shards while warm ones smear and stick to the knife.
- Chill between the messy layers. Ten minutes in the fridge firms each layer enough that the next one spreads without tearing it.
- Reserve enough candy for the top. The topping is where the candy shows, so save the larger share for the final scatter.
- For clean slices, dip your knife in hot water and wipe it between cuts.
- Store covered in the refrigerator for up to 4 days. The flavor actually deepens after the first day.
- To freeze, wrap the whole dish or individual squares tightly in plastic and foil and freeze for up to 1 month. Thaw in the refrigerator overnight before serving.
Private Notes
Tried this recipe?
Let us know how it was!Final Thoughts
Butterfinger Lush is the kind of dessert that looks impressive in a glass dish but asks almost nothing of you in return. Four layers, one pan, and a stretch of fridge time do all the work.
Make it the night before your next gathering and let it set while you sleep. By the time you cut into it, the stripes will be sharp and the candy on top will still crunch.
If you give this one a try, I’d love to hear how it turned out. Leave a comment with your favorite crust swap, and share it with anyone who loves a good no-bake treat.
Recommended:
- Oatmeal Cookies
- Sugar Cookies
- Pecan Pie
- Fudge Brownie
- Creme Brulee
- Red Velvet Cake
- Funnel Cake Bites
- Fruit Tart
- Peanut Butter Smoothie