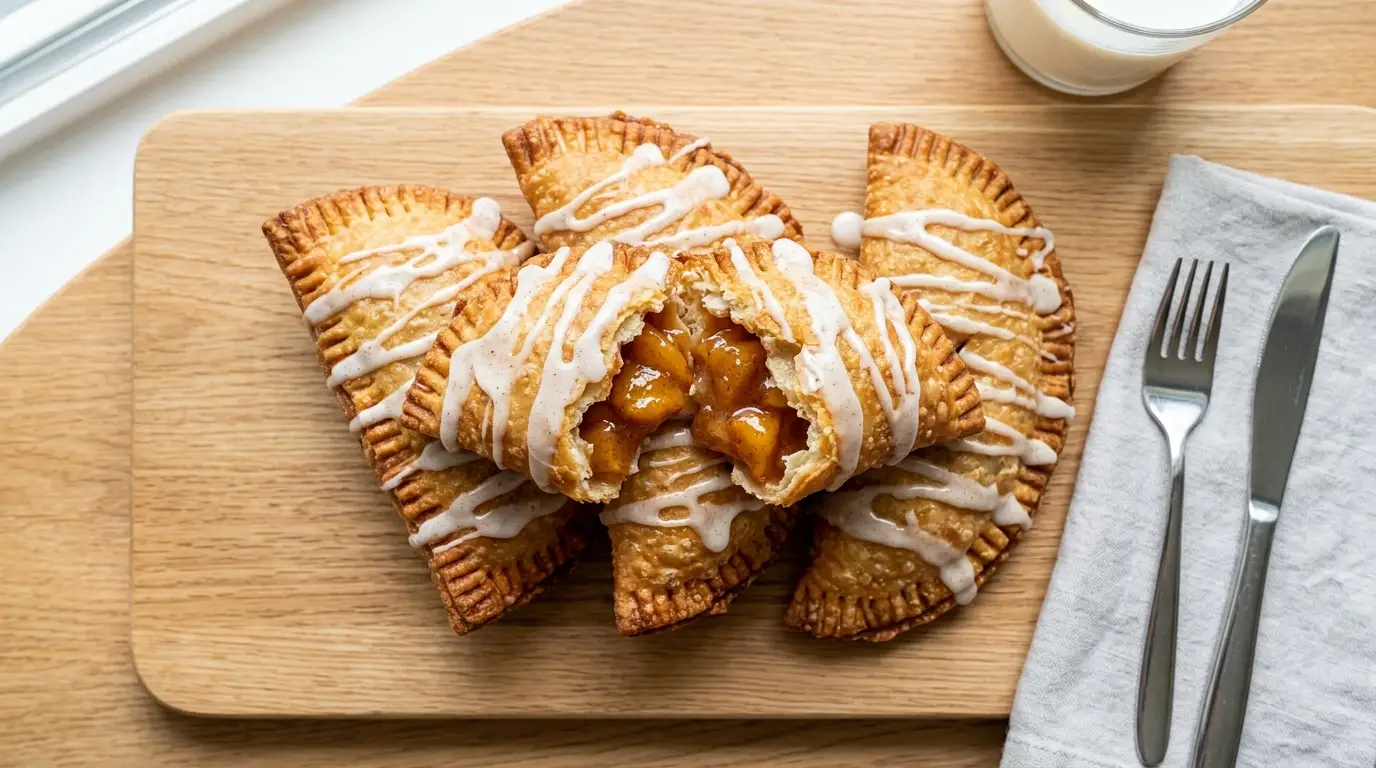
This fried peach pies recipe turns fresh peaches into ten golden, crisp-shelled hand pies with a jammy filling that holds its shape after the first bite. Cooking the peaches down with cornstarch before they ever meet the dough is what keeps the inside thick instead of runny.
Most homemade fried peach pies end up soggy or split open in the oil because the filling was never reduced enough or the edges weren’t sealed tight. This version fixes both problems with a filling cooked to a jam-like consistency and a fork-crimped seal that holds under hot oil.
From mixing the dough to draining the last pie on a rack, the whole process takes about an hour and makes ten pies, enough for a small gathering or a weekend treat that keeps for a couple of days.
| Quick Recipe Summary | |
|---|---|
| Prep Time | 40 minutes |
| Cook Time | 20 minutes |
| Total Time | 60 minutes |
| Servings | 10 hand pies |
| Difficulty Level | Medium |
For another take on this same fruit, Peach Pie uses the same style of filling in a full-size, baked format.

Why You’ll Love This Fried Peach Pies Recipe
Fried peach pies pack the flavor of a whole peach pie into a portable, crisp-edged pocket you can eat with one hand. The dough fries up into a shatter-crisp shell in under four minutes per pie, while the peach filling stays soft and jammy inside.
- Ready in about an hour from start to finish, including chill time for the dough.
- Made with fresh peaches, so there’s no soaking or rehydrating dried fruit involved.
- Cornstarch thickens the filling enough that the pies don’t leak in the oil.
- A biscuit-style pastry crust that fries up flaky instead of tough.
- Makes 10 hand pies, easy to double for a cookout or potluck.
- Finished with a warm cinnamon glaze for extra sweetness on top.
- No plates or forks required, just a napkin.
- Freezer-friendly, so unfried pies can be made ahead and fried later.
A similar folded-dough treatment shows up in Peach Turnovers, which bakes instead of fries.
Ingredients
Gather everything below before starting, since the dough needs to chill while the filling cooks and cools.
For the Dough
- 2 ½ cups (315g) all-purpose flour, plus more for rolling
- 1 tablespoon granulated sugar
- 1 teaspoon salt
- ½ cup (115g) cold unsalted butter, cubed
- ¼ cup (45g) cold vegetable shortening, cubed
- 6 to 8 tablespoons (90-120ml) ice water
For the Filling
- 4 cups (about 5 medium peaches, 700g) fresh peaches, peeled and diced
- ½ cup (100g) light brown sugar, packed
- 2 tablespoons (25g) granulated sugar
- 1 tablespoon (15ml) fresh lemon juice
- 1 tablespoon (8g) cornstarch
- 1 teaspoon ground cinnamon
- ¼ teaspoon ground nutmeg
- ¼ teaspoon salt
- 2 tablespoons (28g) unsalted butter
For Frying
- 4 to 6 cups (1-1.4L) peanut oil or vegetable oil
For the Glaze
- 1 cup (120g) powdered sugar
- 2 to 3 tablespoons (30-45ml) whole milk
- ½ teaspoon vanilla extract
- ¼ teaspoon ground cinnamon, optional
Freestone peaches worked better than clingstone in testing, because the flesh separates cleanly from the pit and leaves less liquid behind in the filling.
Ripe, in-season Peach Bread uses the same fruit if you have extra peaches left over after making these pies.
Kitchen Equipment Needed
None of this equipment is unusual, but a few specific tools make the dough easier to handle and the frying safer.
- Large mixing bowl
- Pastry cutter or two forks, for cutting butter into flour
- Rolling pin
- 4 to 5-inch round cutter or a small bowl to trace circles
- Plastic wrap, for chilling the dough
- Rimmed baking sheet
- Medium saucepan, for cooking the filling
- Wooden spoon
- Dutch oven or other deep, heavy-bottomed pot
- Deep-fry thermometer
- Spider strainer or slotted spoon
- Wire cooling rack
- Small bowl and pastry brush, for the glaze
A sturdy pot matters more here than it does in most recipes, since thin pans hold heat unevenly and make it harder to keep the oil at a steady temperature. Related reading: Peach Galette uses a similar dough but skips the deep-fry step entirely.
Recommended Products for This Recipe
These are tools and ingredients that made a real difference the last several times these pies were tested, not just a generic shopping list.
1. Candy and Deep-Fry Thermometer
Guessing at oil temperature is the fastest way to end up with pies that are dark outside and raw in the middle, or pale and greasy from oil that’s too cool. A clip-on thermometer holds steady at the side of the pot and makes it easy to keep the oil right around 350°F the whole time.
2. Bench Scraper
Biscuit-style pie dough is sticky and soft straight out of the fridge, and a bench scraper lifts and portions it without warming it up the way hands do. It also makes quick work of cleaning flour off the counter between batches.
3. Pastry Blender
Cutting cold butter into flour with two forks works, but it’s slow and the butter tends to warm up before it’s fully incorporated. A pastry blender cuts the fat into pea-size pieces in under a minute, which is part of what keeps the finished crust flaky instead of dense.
4. Stainless Steel Wire Rack
Setting fried pies directly on paper towels traps steam underneath and softens the bottom crust within minutes. A wire rack set over a baking sheet lets air move under the pies, so the crust that came out crisp stays that way while the rest of the batch fries.
For a lighter, no-fry dessert built on the same fruit, Peach Crumble Pie bakes instead.

Step-by-Step Instructions: How to Make Fried Peach Pies
Follow these steps in order and the dough and filling will be ready to assemble by the time the chilling and cooling are done.
1. Make the Dough
- Whisk together the flour, granulated sugar, and salt in a large mixing bowl.
- Add the cold cubed butter and shortening, then cut them into the flour using a pastry blender or two forks until the mixture looks like coarse crumbs with some pea-size pieces of fat still visible.
- Add the ice water one tablespoon at a time, stirring after each addition, until the dough just comes together and no dry flour remains at the bottom of the bowl.
- Turn the dough out onto a floured surface, divide it in half, and shape each half into a flat disc.
- Wrap each disc tightly in plastic wrap and refrigerate for at least 30 minutes.
2. Make the Peach Filling
- Combine the diced peaches, brown sugar, granulated sugar, lemon juice, cornstarch, cinnamon, nutmeg, and ¼ teaspoon salt in a medium saucepan.
- Set the pan over medium heat and cook, stirring often, until the peaches soften and release their juices, about 5 minutes.
- Continue cooking, stirring more frequently, until the mixture thickens to a jam-like consistency, about 3 to 5 minutes longer.
- Remove the pan from the heat and stir in the 2 tablespoons of butter until melted and glossy.
- Transfer the filling to a bowl and let it cool completely at room temperature while the dough finishes chilling.
3. Roll and Cut the Dough
- Remove one dough disc from the refrigerator and lightly flour a clean work surface.
- Roll the dough out to about ⅛ inch thick, rotating it occasionally so it doesn’t stick.
- Cut circles from the dough using a 4 to 5-inch round cutter, gathering and re-rolling scraps as needed.
- Repeat with the second disc until you have 10 circles total.
4. Fill and Seal the Pies
- Place about 1 ½ tablespoons of cooled peach filling in the center of each dough circle, leaving a ½-inch border clear around the edge.
- Lightly moisten the edge of the circle with a wet fingertip, then fold the dough over the filling to form a half-moon shape.
- Press the edges together firmly with your fingers to remove air pockets, then crimp the edge all the way around with the tines of a fork.
- Set each finished pie on the prepared baking sheet as you go.
The first batch split open in the oil because the edges weren’t crimped tightly enough, so now the fork tines get pressed all the way through the dough on every single pie.
5. Heat the Oil
- Pour the oil into a Dutch oven or other deep, heavy-bottomed pot until it reaches about 2 inches deep.
- Clip a deep-fry thermometer to the side of the pot and heat the oil over medium heat to 350°F.
- Adjust the burner as needed to hold that temperature steady before adding any pies.
6. Fry the Pies
- Carefully lower 2 to 3 pies into the hot oil at a time, without crowding the pot.
- Fry for 3 to 4 minutes, flipping once halfway through, until both sides are deep golden brown.
- Use a spider strainer or slotted spoon to transfer the fried pies to the prepared wire rack.
- Let the oil return to 350°F between batches before adding the next set of pies.
7. Glaze and Serve
- Whisk together the powdered sugar, milk, vanilla extract, and optional cinnamon in a small bowl until smooth and pourable.
- Brush or drizzle the glaze over each pie while it’s still warm.
- Let the glaze set for about 5 minutes before serving.

Tips for The Best Fried Peach Pies
A few small adjustments make the difference between pies that hold together and ones that leak or turn greasy.
- Keep the dough cold right up until it’s rolled out, since warm dough is harder to seal and fries up tougher.
- Cook the filling until it’s thick enough to mound on a spoon without running, not just softened.
- Don’t overfill the circles, since too much filling makes sealing the edges difficult.
- Fry in small batches so the oil temperature doesn’t drop too far below 350°F.
- Let the oil come back up to temperature between batches for even browning.
- Drain fried pies on a wire rack instead of paper towels to keep the bottoms crisp.
- Glaze the pies while they’re still warm so it sets into a thin, glossy shell.
- Re-roll dough scraps only once, since dough that’s worked too much turns tough.
A bowl of ice water kept next to the stove makes it easy to test how firm a small piece of dough stays before rolling out the rest of the batch. For a version made with a shortcut crust, Peach Dump Cake uses a similar peach filling with far less hands-on work.
What to Serve with Fried Peach Pies
Fried peach pies are rich and sweet on their own, so simple pairings tend to work best alongside them.
- A scoop of vanilla ice cream, which melts slightly against the warm glaze.
- Sweet tea or fresh lemonade for a classic Southern pairing.
- A cup of black coffee to balance the sweetness of the glaze.
- A short stack of Buttermilk Waffles if serving these as part of a brunch spread.
- French Toast for a heartier breakfast plate built around the pies.
- A Peach Smoothie to keep the peach theme going at breakfast.
- A bowl of fresh fruit salad for a lighter contrast to the fried crust.
- A slice of Peach Coffee Cake if building a full peach dessert table.
- Crispy bacon on the side for a sweet-and-savory breakfast plate.
- Freshly whipped cream instead of, or in addition to, the glaze.
You might also enjoy: Peach Tarte Tatin
Variations of Fried Peach Pies
The base recipe adapts easily once the technique for sealing and frying is down.
- Dried peach filling: Swap fresh peaches for rehydrated dried peaches, simmered in water until soft, for a more old-fashioned version.
- Mixed berry filling: Replace half the peaches with blackberries or blueberries for a two-fruit filling.
- Baked version: Brush assembled pies with melted butter and bake at 400°F for 18 to 20 minutes instead of frying.
- Bourbon peach filling: Stir 1 tablespoon of bourbon into the filling after it’s removed from the heat.
- Cinnamon sugar coating: Skip the glaze and toss warm pies in cinnamon sugar instead.
- Mini hand pies: Use a 2 to 3-inch cutter to make bite-size party portions, reducing fry time to about 2 minutes per side.
- Spiced filling: Add a pinch of ground ginger or cardamom alongside the cinnamon and nutmeg.
- Store-bought crust shortcut: Use refrigerated pie crust rounds in place of homemade dough when short on time.
Read Also: Blackberry Peach Galette Recipe
Storage and Reheating
Fried peach pies are best eaten the day they’re made, but leftovers still reheat well with the right method.
- Store cooled pies in an airtight container at room temperature for up to 2 days.
- Refrigerate for up to 4 days if the kitchen is warm or humid.
- Freeze fried and cooled pies in a single layer, then transfer to a freezer bag for up to 2 months.
- Freeze unfried, assembled pies on a tray, then bag them once solid and fry straight from frozen, adding an extra minute or two to the fry time.
- Reheat refrigerated or thawed pies in a 350°F oven for about 8 minutes to re-crisp the crust.
- Avoid stacking pies while they’re still warm, since trapped steam softens the crust.
Reheated pies crisp back up better in a toaster oven than in the microwave, which tends to leave the crust soft and slightly chewy. For a make-ahead peach dessert that doesn’t require reheating, Peach Cobbler holds up well over several days in the fridge.
Nutritional Facts
| Nutrition (per pie, glazed) | |
|---|---|
| Calories | 260 kcal |
| Total Fat | 12g |
| Saturated Fat | 4g |
| Cholesterol | 15mg |
| Sodium | 190mg |
| Total Carbohydrates | 35g |
| Dietary Fiber | 1g |
| Sugars | 18g |
| Protein | 3g |
Values are estimates and will vary based on the amount of oil absorbed during frying and the exact size of each pie.
For a pie that leans more toward dessert-table centerpiece than handheld snack, see Peach Bread Pudding.
Health Benefits of Key Ingredients
This is a fried dessert, so it’s not a health food, but a few of the ingredients still carry real nutritional value.
- Peaches provide vitamin C and vitamin A, along with fiber that helps offset some of the sugar in the filling.
- Lemon juice adds a small amount of vitamin C and helps brighten the overall flavor of the filling.
- Cinnamon contains antioxidant compounds and has been studied for its effect on blood sugar regulation.
- Nutmeg contributes small amounts of manganese and has traditionally been used to support digestion.
- Butter supplies vitamin A and contributes to the flaky texture of the crust.
- Eggs are not used in this recipe, which makes it a straightforward option for anyone avoiding egg-based pastry glazes.
Related: Apple Pie uses a similar spice blend if peaches aren’t in season.
FAQs About Fried Peach Pies
1. Can I use canned or frozen peaches instead of fresh?
Canned peaches packed in light syrup work well if drained thoroughly first, though the filling may need an extra pinch of cornstarch to compensate for the added liquid. Frozen peaches should be thawed and drained before cooking, since they release more water than fresh fruit.
2. Why did my fried peach pies turn out soggy or greasy?
This usually happens when the oil temperature drops too low, which lets the dough soak up oil instead of frying quickly. Frying in small batches and letting the oil return to 350°F between rounds solves this in most cases.
3. Can I bake fried peach pies instead of frying them?
Yes, brushing the assembled pies with melted butter and baking them at 400°F for 18 to 20 minutes produces a similar hand pie with a lighter texture. The crust won’t be quite as crisp as the fried version, but it holds together just as well.
4. How do I keep the dough from cracking when I fold it over the filling?
Cracking usually means the dough warmed up too much before folding, so working quickly and returning any soft dough to the fridge for a few minutes helps. Rolling the dough slightly thicker, around ⅛ inch, also makes it more forgiving to fold.
5. Can I make the dough or filling ahead of time?
Both the dough and the cooled filling can be made up to 2 days ahead and stored separately in the refrigerator. The dough can also be frozen for up to a month if wrapped tightly.
6. What oil is best for frying peach pies?
Peanut oil and vegetable oil both have a high smoke point and a neutral flavor that won’t compete with the peach filling. Avoid oils with strong flavors, like olive oil, since they can overpower the finished pie.
Read Also: Pecan Pie Recipe
Fried Peach Pies
Ingredients
- 2 ½ cups all-purpose flour - 315g, plus more for rolling
- 1 tablespoon granulated sugar
- 1 teaspoon salt
- ½ cup unsalted butter - 115g, cold, cubed
- ¼ cup vegetable shortening - 45g, cold, cubed
- 6 to 8 tablespoons ice water - 90-120ml
- 4 cups fresh peaches - about 5 medium peaches, 700g, peeled and diced
- ½ cup light brown sugar - 100g, packed
- 2 tablespoons granulated sugar - 25g
- 1 tablespoon fresh lemon juice - 15ml
- 1 tablespoon cornstarch - 8g
- 1 teaspoon ground cinnamon
- ¼ teaspoon ground nutmeg
- ¼ teaspoon salt
- 2 tablespoons unsalted butter - 28g
- 4 to 6 cups peanut oil - 1-1.4L, or vegetable oil
- 1 cup powdered sugar - 120g
- 2 to 3 tablespoons whole milk - 30-45ml
- ½ teaspoon vanilla extract
- ¼ teaspoon ground cinnamon - optional
Equipment
- Pastry Cutter - or two forks, for cutting butter into flour
- 4 to 5-inch round cutter - or a small bowl to trace circles
- Plastic wrap - for chilling the dough
- Medium saucepan - for cooking the filling
- Dutch oven - or other deep, heavy-bottomed pot
- Deep-fry thermometer
- Spider strainer - or slotted spoon
- Small bowl - for the glaze
- Pastry brush - for the glaze
- Bench scraper
Method
- Whisk together the flour, granulated sugar, and salt in a large mixing bowl.
- Add the cold cubed butter and shortening, then cut them into the flour using a pastry blender or two forks until the mixture looks like coarse crumbs with some pea-size pieces of fat still visible.
- Add the ice water one tablespoon at a time, stirring after each addition, until the dough just comes together and no dry flour remains.
- Turn the dough out onto a floured surface, divide it in half, and shape each half into a flat disc. Wrap each disc tightly in plastic wrap and refrigerate for at least 30 minutes.
- Combine the diced peaches, brown sugar, granulated sugar, lemon juice, cornstarch, cinnamon, nutmeg, and salt in a medium saucepan.
- Set the pan over medium heat and cook, stirring often, until the peaches soften and release their juices, about 5 minutes.
- Continue cooking, stirring more frequently, until the mixture thickens to a jam-like consistency, about 3 to 5 minutes longer.
- Remove the pan from the heat and stir in the 2 tablespoons of butter until melted and glossy. Transfer the filling to a bowl and let it cool completely at room temperature.
- Remove one dough disc from the refrigerator and lightly flour a clean work surface.
- Roll the dough out to about ⅛ inch thick, rotating it occasionally so it doesn’t stick.
- Cut circles from the dough using a 4 to 5-inch round cutter, gathering and re-rolling scraps as needed. Repeat with the second disc until you have 10 circles total.
- Place about 1 ½ tablespoons of cooled peach filling in the center of each dough circle, leaving a ½-inch border clear around the edge.
- Lightly moisten the edge of the circle with a wet fingertip, then fold the dough over the filling to form a half-moon shape.
- Press the edges together firmly with your fingers to remove air pockets, then crimp the edge all the way around with the tines of a fork. Set each finished pie on the prepared baking sheet.
- Pour the oil into a Dutch oven or other deep, heavy-bottomed pot until it reaches about 2 inches deep.
- Clip a deep-fry thermometer to the side of the pot and heat the oil over medium heat to 350°F. Adjust the burner as needed to hold that temperature steady before adding any pies.
- Carefully lower 2 to 3 pies into the hot oil at a time, without crowding the pot.
- Fry for 3 to 4 minutes, flipping once halfway through, until both sides are deep golden brown.
- Use a spider strainer or slotted spoon to transfer the fried pies to the prepared wire rack. Let the oil return to 350°F between batches before adding the next set of pies.
- Whisk together the powdered sugar, milk, vanilla extract, and optional cinnamon in a small bowl until smooth and pourable.
- Brush or drizzle the glaze over each pie while it’s still warm. Let the glaze set for about 5 minutes before serving.
Nutrition
Notes
- Keep the dough cold right up until it’s rolled out, since warm dough is harder to seal and fries up tougher.
- Cook the filling until it’s thick enough to mound on a spoon without running, not just softened.
- Don’t overfill the circles, since too much filling makes sealing the edges difficult.
- Fry in small batches so the oil temperature doesn’t drop too far below 350°F.
- Let the oil come back up to temperature between batches for even browning.
- Drain fried pies on a wire rack instead of paper towels to keep the bottoms crisp.
- Glaze the pies while they’re still warm so it sets into a thin, glossy shell.
- Re-roll dough scraps only once, since dough that’s worked too much turns tough.
- Store cooled pies in an airtight container at room temperature for up to 2 days. Reheat in a 350°F oven for about 8 minutes to re-crisp.
- Freeze unfried, assembled pies on a tray, then bag them once solid and fry straight from frozen, adding an extra minute or two to the fry time.
Private Notes
Tried this recipe?
Let us know how it was!Final Thoughts
Fried peach pies take a little more hands-on time than a baked pie, but the crisp shell and jammy peach center are worth the extra step.
Once the dough and filling technique feels familiar, a batch comes together quickly enough for a weeknight dessert. Give this recipe a try, and share how your pies turned out in the comments below.
Recommended:
- Peach Muffins
- Blueberry Peach Muffins
- Peach Scones
- Banana Peach Bread
- Mini Peach Tart
- No-Bake Peach Tart
- Crockpot Peach Dump Cake
- Blueberry Peach Galette
- Peach Crumble
- Peach Pie Filling