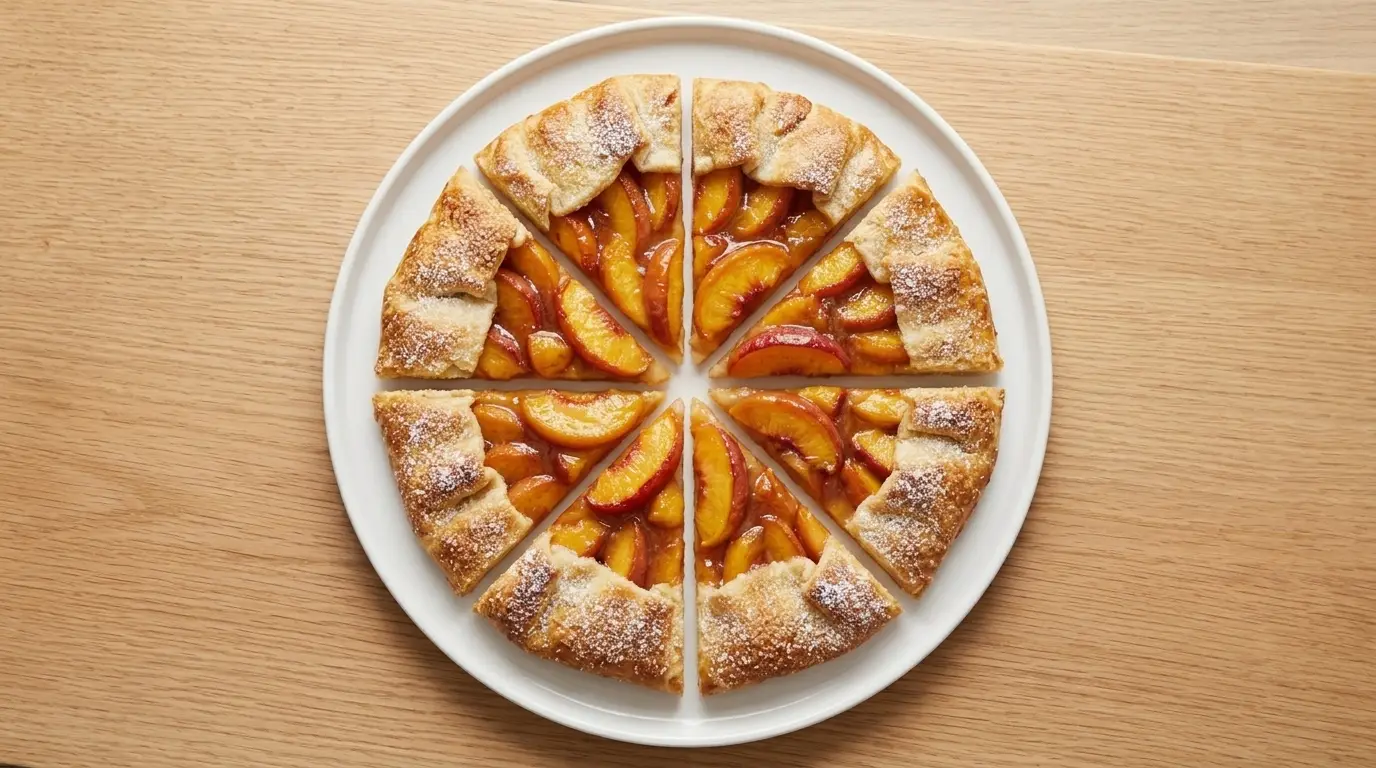
This peach galette recipe turns four ripe peaches and a simple butter crust into a free form pastry that slices into eight generous wedges. The dough gets folded by hand around the fruit, so there is no pie plate to fit and no crimped edge to perfect.
Most peach pastries turn watery because the sliced fruit is left to sit in its own juice before it ever meets the oven. Two tablespoons of cornstarch tossed through the peaches ahead of time keep the filling thick enough to hold its shape when the first slice comes out.
The crust bakes to a deep gold in about forty minutes, and the whole dessert comes together in around an hour and a half start to finish, including the time the dough spends chilling in the refrigerator.
| Quick Recipe Summary | |
|---|---|
| Prep Time | 45 minutes (includes 30 minute chill) |
| Cook Time | 40 minutes |
| Total Time | 1 hour 25 minutes |
| Servings | 8 slices |
| Difficulty Level | Easy |
For a version with a different texture altogether, see Peach Galette with Puff Pastry.

Why You’ll Love This Peach Galette Recipe
A galette skips most of the fuss that comes with a full pie, and it still delivers the same buttery crust and juicy fruit in every bite. It also forgives a wonky shape, since the whole point of the fold is that it looks handmade.
- No pie plate required. The dough bakes free form directly on a sheet pan, so there’s no fitting, trimming, or crimping to worry about.
- Shorter bake time than a full pie. A single layer of crust and fruit bakes through in under 40 minutes instead of the hour or more a double crust pie needs.
- Only one crust to make. Skipping the top crust cuts the pastry work roughly in half compared to a traditional peach pie.
- Naturally forgiving shape. Uneven folds and rustic edges are part of the look, so there’s no pressure for a picture perfect result.
- Adjustable sweetness. The sugar in the filling can be scaled up or down depending on how ripe and sweet the peaches already are.
- Good make ahead option. The dough can be mixed and chilled a day in advance, leaving only the fruit prep and assembly for baking day.
- Works with a scoop of ice cream or on its own. The crust holds its structure well enough to eat plain, warm, or with a topping.
You might also enjoy: Peach Pie
Ingredients
The filling ingredients do double duty of flavoring the peaches and thickening their juices, while the crust ingredients stay close to a standard all-butter pastry. Both imperial and metric measurements are listed below.
For the crust:
- 1 1/4 cups (160g) all-purpose flour
- 1 tablespoon (12g) granulated sugar
- 1/2 teaspoon fine salt
- 1/2 cup (113g) unsalted European-style butter, cold and cut into small cubes
- 3 to 4 tablespoons (45 to 60ml) ice water
For the peach filling:
- 4 large ripe peaches, about 700g (1.5 lbs), pitted and sliced 1/4 inch (6mm) thick
- 1/4 cup (50g) granulated sugar
- 2 tablespoons (25g) packed brown sugar
- 2 tablespoons (16g) cornstarch
- 1 lemon, zested and juiced
- 1/2 teaspoon ground cinnamon
- 1/4 teaspoon ground nutmeg
- 1 teaspoon (5ml) pure vanilla extract
- Pinch of salt
- 1 tablespoon (14g) unsalted butter, cut into small pieces
For assembly:
- 1 large egg, beaten with 1 tablespoon water (egg wash)
- 1 tablespoon turbinado sugar, for sprinkling
Freestone peaches hold their slices better than clingstone varieties in this filling, since the flesh doesn’t tear away from the pit and turn stringy while it’s tossed with the sugar and cornstarch.
Read Also: Peach Pie Filling
Kitchen Equipment Needed
Nothing here is unusual for a home kitchen, though a few tools make rolling and transferring the dough noticeably less stressful.
- Large mixing bowl (for the dough)
- Small mixing bowl (for tossing the peach filling)
- Pastry blender or fork (for cutting the butter into the flour)
- Rolling pin
- Rimmed baking sheet
- Parchment paper
- Bench scraper, for lifting and shaping the dough edges
- Offset spatula, for spreading the filling evenly
- Cooling rack
- Kitchen scale, for measuring the flour and butter precisely
A similar buttery crust shows up in Peach Crumble, though the topping there is more streusel than pastry.
Recommended Products for This Recipe
These are tools I’ve come to rely on for this recipe specifically, based on what actually made the dough and filling easier to manage.
1. OXO Good Grips Pastry Blender
Cutting cold butter into flour with two knives works, but it takes twice as long and warms the butter with every pass. This blender’s thick wires cut through the cubes in under a minute, which keeps the fat cold enough for a flakier finished crust.
2. USA Pan Nonstick Half Sheet Baking Pan
Thin, flimsy baking sheets tend to warp in a hot oven, which can tip a galette’s juices toward one side. This pan’s heavier gauge steel stays flat through a 400°F bake and browns the crust bottom evenly instead of leaving pale patches.
3. Microplane Premium Zester
A box grater tears citrus zest into uneven strips and catches too much of the bitter white pith underneath. This zester takes off just the fragrant outer layer of the lemon in a few short strokes, which makes a noticeable difference in the filling’s brightness.
4. Silicone Pastry Brush Set
Natural bristle brushes shed hairs into the egg wash more often than they should, and they’re hard to fully dry between uses. Silicone bristles wipe clean in seconds and spread the egg wash in an even, streak-free layer across the folded crust.
5. French Tapered Rolling Pin
A pin with handles tends to press harder at the center of the dough than at the edges, leaving the middle thinner than the border. A tapered French pin distributes even pressure across the whole circle, which makes for a more consistent bake.
For a deep-dish version of this same flavor combination, try: Peach Crumble Pie

Step-by-Step Instructions: How to Make Peach Galette
Follow these steps in order and the crust and filling will come together at the same pace, so nothing sits waiting on the counter longer than it needs to.
1. Make the Pastry Dough
- In a large mixing bowl, whisk together the flour, 1 tablespoon granulated sugar, and 1/2 teaspoon salt.
- Add the cold, cubed butter and cut it into the flour using a pastry blender or two forks until the mixture looks like coarse crumbs with some pea-sized pieces of butter remaining.
- Sprinkle in the ice water, 1 tablespoon at a time, tossing gently with a fork after each addition.
- Stop adding water as soon as the dough holds together when squeezed; it should not feel wet or sticky.
- Gather the dough into a disk, flatten it slightly, and wrap it tightly in plastic wrap.
2. Chill the Dough
- Refrigerate the wrapped dough for at least 30 minutes.
- Use this time to prepare the peach filling so both components are ready at the same time.
- If the dough has been chilled longer than an hour, let it sit at room temperature for 5 to 10 minutes before rolling so it doesn’t crack.
3. Prepare the Peach Filling
- Slice the pitted peaches into 1/4 inch (6mm) wedges and place them in a medium bowl.
- Add the granulated sugar, brown sugar, cornstarch, lemon zest, and lemon juice.
- Sprinkle in the cinnamon, nutmeg, vanilla extract, and a pinch of salt.
- Toss gently with a spatula until every slice is coated, then set the bowl aside while you roll out the dough.
4. Roll Out the Dough
- Lightly flour a clean work surface and unwrap the chilled dough.
- Roll the dough from the center outward, rotating a quarter turn between passes, until it forms a rough circle about 12 inches (30cm) across.
- Transfer the dough to a parchment-lined rimmed baking sheet by rolling it loosely around the rolling pin, then unrolling it over the pan.
5. Assemble the Galette
- Spoon the peach filling into the center of the dough, leaving a 2 inch (5cm) border of bare dough all the way around.
- Leave any excess liquid behind in the bowl so the crust doesn’t turn soggy.
- Scatter the small pieces of butter evenly over the mounded peaches.
- Fold the bare edge of the dough up and over the outer ring of fruit, pleating it every 2 to 3 inches as you go around.
I’ve found that chilling the shaped galette on its pan for 10 to 15 minutes before it goes in the oven holds the pleats in place better than baking it right away, since the butter in the folded dough has time to firm back up.
6. Add the Egg Wash and Sugar
- Brush the beaten egg wash over the exposed edges of the folded crust.
- Sprinkle the turbinado sugar over the egg-washed crust for a crisp, sparkling finish.
7. Bake the Galette
- Preheat the oven to 400°F (205°C) while the assembled galette chills.
- Bake on the middle rack for 35 to 40 minutes, until the crust is deep golden brown and the peach juices are bubbling visibly.
- If the crust edges brown too quickly, loosely tent them with foil for the last 10 minutes of baking.
8. Cool and Slice
- Remove the galette from the oven and let it rest on the pan for 15 to 20 minutes.
- Use the parchment paper to slide the galette onto a cutting board or serving platter before slicing into 8 wedges.
Read Also: Peach Cobbler

Tips for The Best Peach Galette
A few small adjustments make the difference between a crust that stays crisp and one that turns soft under the fruit.
- Keep the butter and water as cold as possible; even slightly warm butter makes the dough harder to roll and less flaky once baked.
- Don’t skip the cornstarch step, since it’s what keeps the peach juices from pooling under the crust.
- Use a slotted spoon to transfer the peaches onto the dough, leaving behind any liquid that has collected at the bottom of the bowl.
- Bake on the middle oven rack so the bottom crust browns at the same rate as the top edges.
- Let the galette cool for at least 15 minutes before slicing, since the filling continues to set as it cools.
- Choose peaches that give slightly to gentle pressure; overly firm peaches won’t release enough natural juice, while overripe ones can turn mushy in the oven.
I ruined my first attempt at this by skipping the cornstarch entirely, thinking the peaches had enough natural pectin to hold together, and ended up with a puddle of syrup pooling around the crust on the baking sheet.
The same peach and brown sugar combination appears in Blueberry Peach Crumble, mixed with a handful of berries.
What to Serve with Peach Galette
A slice of warm peach galette pairs well with something cold and creamy to balance the tartness of the lemon and the sweetness of the crust sugar. It also works as part of a larger dessert spread when guests are around.
- A scoop of vanilla ice cream, which melts slightly into the warm peach juices
- Lightly sweetened whipped cream
- A dollop of mascarpone or crème fraîche for a tangier contrast
- Fresh mint leaves scattered over the top for color and a hint of freshness
- A drizzle of honey or extra caramel sauce for those who want it sweeter
- A Peach Smoothie alongside a slice for a brunch-style pairing
- A hot cup of coffee or tea to cut through the richness of the crust
For a cooler dessert option in the same fruit family, try: Peach Crisp
Variations of Peach Galette
The base recipe adapts easily to different fruit combinations and dough styles without changing the overall method.
- Mixed berry and peach galette: Swap one peach for a cup of blackberries or raspberries for a more layered flavor.
- Spiced peach galette: Add a pinch of ground ginger or cardamom to the filling alongside the cinnamon and nutmeg.
- Puff pastry version: Use store-bought puff pastry instead of the butter crust for a flakier, more delicate texture.
- Mini hand galettes: Divide the dough into four smaller portions and fold each around a smaller mound of filling for individual servings.
- Almond frangipane layer: Spread a thin layer of almond cream over the dough before adding the peaches for a bakery-style finish.
- Gluten-free crust: Substitute a 1:1 gluten-free flour blend for the all-purpose flour in the crust.
- Grilled peach galette: Grill the peach slices for 2 to 3 minutes per side before tossing them with the filling ingredients for a smokier flavor.
Blueberry Peach Crisp uses a similar filling base with an oat topping instead of a pastry shell.
Storage and Reheating
Peach galette holds up well in the refrigerator and reheats without losing much of its texture, as long as it isn’t microwaved for too long at once.
- Store leftover slices loosely covered with plastic wrap or foil in the refrigerator for up to 3 days.
- Freeze fully cooled slices in a single layer, then transfer to an airtight container for up to 2 months.
- Reheat refrigerated slices in a 350°F (175°C) oven for 8 to 10 minutes to re-crisp the crust.
- Thaw frozen slices in the refrigerator overnight before reheating in the oven.
- Avoid stacking warm slices directly on top of each other, since trapped steam softens the crust.
I keep a stack of parchment squares in the freezer drawer specifically for layering between frozen galette slices, since it keeps them from sticking together into one solid block.
Read Also: Peach Crumble Bars
Nutritional Facts
| Nutrition (per slice, 1 of 8) | |
|---|---|
| Calories | 280 |
| Total Fat | 14g |
| Saturated Fat | 8g |
| Cholesterol | 50mg |
| Sodium | 140mg |
| Total Carbohydrate | 36g |
| Dietary Fiber | 2g |
| Total Sugars | 18g |
| Protein | 3g |
Values are estimates and will vary based on the exact size of the peaches and the brand of ingredients used.
For a cold, blended take on peaches, try: Strawberry Peach Smoothie
Health Benefits of Key Ingredients
Peach galette is a dessert first, but a few of its main ingredients bring some nutritional value along with the flavor.
- Peaches: A good source of vitamin C and potassium, along with a few grams of fiber per fruit.
- Lemon juice and zest: Adds vitamin C and a small amount of plant compounds called flavonoids.
- Cinnamon: Contains antioxidants and has been studied for its potential role in supporting stable blood sugar levels.
- Butter: Provides small amounts of vitamin A along with the fat that carries flavor through the crust.
- Eggs: The egg wash contributes a small amount of protein and choline to the finished pastry.
Fruit Tart takes a related approach with a shortcrust base and glazed fruit on top.
FAQs About Peach Galette
1. Can I use frozen or canned peaches for this peach galette?
Yes, though fresh peaches give the cleanest texture since frozen and canned peaches release more liquid as they thaw or drain. If using frozen peaches, thaw and pat them dry before tossing with the filling ingredients, and drain canned peaches thoroughly first.
2. Why is my peach galette soggy on the bottom?
A soggy bottom usually means too much peach liquid made it onto the dough, or the cornstarch step was skipped. Draining excess juice before assembling and baking on the middle rack both help the crust stay crisp.
3. Can I make the dough ahead of time?
The dough can be made up to 2 days ahead and kept wrapped in the refrigerator. It can also be frozen for up to 1 month; thaw it overnight in the fridge before rolling.
4. Do I need to peel the peaches first?
Peeling is optional, since the skins soften considerably during baking and add a bit of color to the filling. For a smoother texture, blanch the peaches in boiling water for 30 seconds before peeling.
5. Can I freeze a baked peach galette?
Whole or sliced baked galette freezes well for up to 2 months in an airtight container. Reheat directly from frozen in a 350°F (175°C) oven for about 20 minutes, or thaw in the refrigerator first for a shorter reheating time.
For a different fruit in the same style of dessert, try: Apple Crisp
Peach Galette
Ingredients
- 1 1/4 cups all-purpose flour - 160g
- 1 tablespoon granulated sugar - 12g
- 1/2 teaspoon fine salt
- 1/2 cup unsalted European-style butter - 113g, cold and cut into small cubes
- 3 to 4 tablespoons ice water - 45 to 60ml
- 4 large ripe peaches - about 700g or 1.5 lbs, pitted and sliced 1/4 inch (6mm) thick
- 1/4 cup granulated sugar - 50g
- 2 tablespoons packed brown sugar - 25g
- 2 tablespoons cornstarch - 16g
- lemon - zested and juiced
- 1/2 teaspoon ground cinnamon
- 1/4 teaspoon ground nutmeg
- 1 teaspoon pure vanilla extract - 5ml
- salt - pinch
- 1 tablespoon unsalted butter - 14g, cut into small pieces
- 1 large egg - beaten with 1 tablespoon water (egg wash)
- 1 tablespoon turbinado sugar - for sprinkling
- vanilla ice cream - for serving
- fresh mint leaves - for garnish
Equipment
- Pastry blender or fork - For cutting butter into flour
- Rimmed baking sheet - Heavy-gauge recommended to prevent warping
- Bench scraper - For lifting and shaping dough edges
- Offset spatula - For spreading filling evenly
- Kitchen scale - For precise flour and butter measurement
- OXO Good Grips Pastry Blender - Optional – keeps butter cold and cuts quickly
- USA Pan Nonstick Half Sheet Baking Pan - Optional – heavy gauge stays flat
- Microplane Premium Zester - Optional – for fine lemon zest
- Silicone Pastry Brush Set - Optional – for streak-free egg wash
- French Tapered Rolling Pin - Optional – provides even pressure
Method
- Make the pastry dough by whisking together flour, 1 tablespoon sugar, and salt in a large bowl. Cut in cold butter until mixture resembles coarse crumbs with pea-sized pieces of butter remaining. Add ice water one tablespoon at a time, tossing with a fork, and gather into a disk when it holds together.
- Chill the wrapped dough for at least 30 minutes. If chilled longer, let it sit at room temperature for 5 to 10 minutes before rolling.
- Prepare the filling by slicing peaches into 1/4 inch wedges. In a medium bowl, combine with granulated sugar, brown sugar, cornstarch, lemon zest and juice, cinnamon, nutmeg, vanilla, and a pinch of salt. Toss gently to coat evenly.
- Roll the dough on a lightly floured surface into a rough 12-inch circle. Transfer to a parchment-lined rimmed baking sheet by rolling it around the pin, then unrolling over the pan.
- Spoon the peach filling into the center leaving a 2-inch border, leaving excess liquid behind. Scatter butter pieces over the fruit. Fold the bare edge up over the fruit, pleating every 2 to 3 inches. Chill shaped galette on the pan for 10-15 minutes.
- Brush the exposed crust with egg wash and sprinkle with turbinado sugar.
- Bake on the middle rack of a preheated 400°F oven for 35 to 40 minutes, until crust is deep golden and juices are bubbling. Tent edges with foil if browning too quickly.
- Cool on the pan for 15-20 minutes, then slide onto a cutting board and slice into 8 wedges.
Nutrition
Notes
- Keep butter and ice water as cold as possible for the flakiest crust.
- Do not skip the cornstarch; it thickens the peach juices and prevents a soggy bottom.
- Use a slotted spoon to transfer peaches to the dough, leaving excess liquid behind.
- Bake on the middle rack to ensure the bottom crust browns evenly.
- Let the galette cool for at least 15 minutes before slicing so the filling can set.
- Choose peaches that give slightly to gentle pressure for the best texture and flavor.
- If your crust browns too quickly, tent with foil for the last 10 minutes of baking.
- For a different texture, try store-bought puff pastry or a gluten-free flour blend.
- Store leftovers loosely covered in the refrigerator for up to 3 days; reheat at 350°F to re-crisp.
- Freeze baked slices for up to 2 months; thaw overnight before reheating.
Private Notes
Tried this recipe?
Let us know how it was!Final Thoughts
A peach galette gives you most of what makes a peach pie good, with less time spent on technique and pastry perfection. The fold is forgiving, the filling is simple, and the payoff is a warm, golden dessert straight from the oven.
Give this recipe a try the next time peaches are at their best, and let me know in the comments how your version turned out. Feel free to share a photo if you post it anywhere online.
Recommended:
- Peach Crisp with Canned Peaches
- Bisquick Peach Cobbler
- Peach Cobbler with Cake Mix
- Grilled Peach and Burrata Salad
- Apple Pie
- Pecan Pie
- Coconut Cream Pie
- Pumpkin Pie
- Healthy Apple Pie
- Strawberry Smoothie