
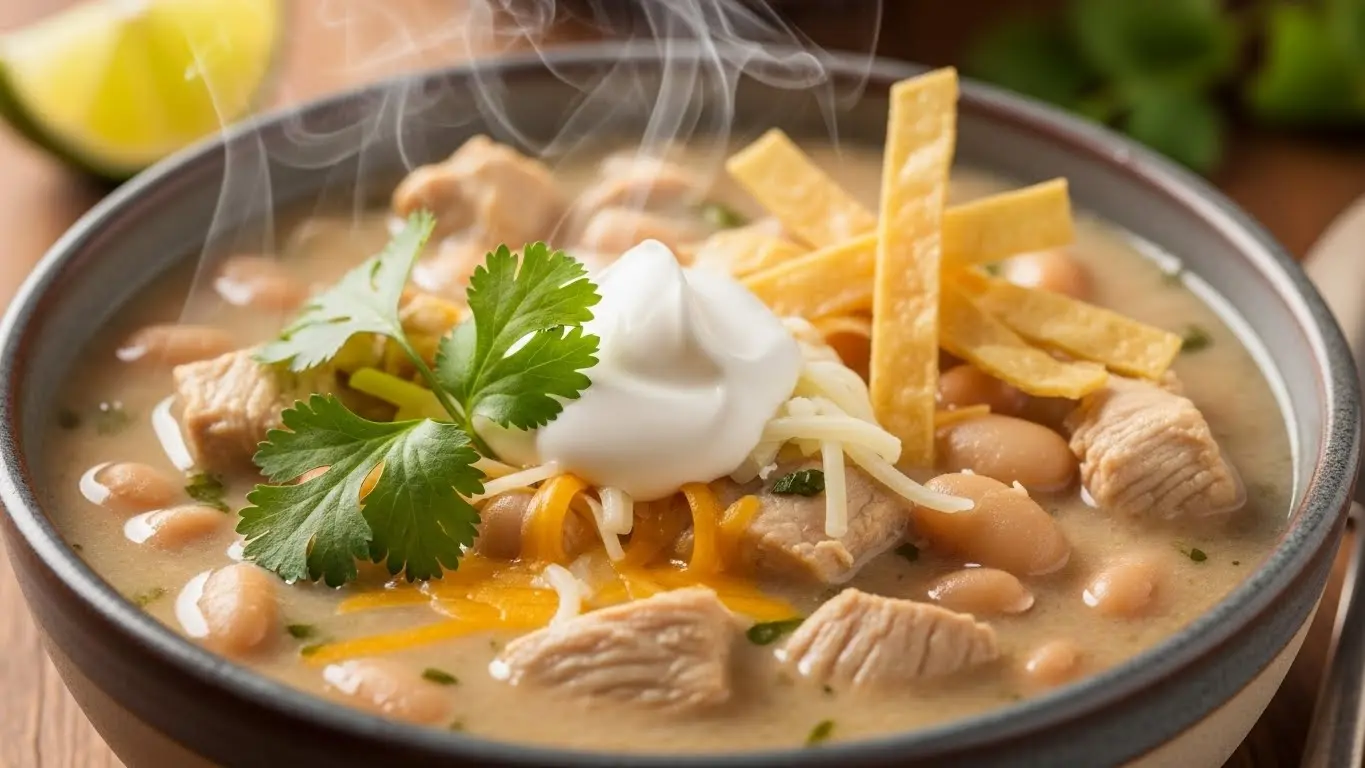
I’ll never forget the first time I made Bush’s White Chicken Chili Recipe on a chilly October evening after finding a can of white beans in my pantry.
My family was skeptical at first because we were all used to traditional red chili. But one spoonful of this creamy, slightly spicy white chili changed everything.
Now it’s become our go-to comfort meal whenever the temperature drops, and I’ve made it at least a dozen times since then. The combination of tender chicken, creamy white beans, and just the right amount of heat creates something truly special.
| Quick Recipe Summary | |
|---|---|
| Prep Time | 15 minutes |
| Cook Time | 35 minutes |
| Total Time | 50 minutes |
| Servings | 6-8 bowls |
| Difficulty Level | Easy |
_result.jpg "Bush's White Chicken Chili Recipe for Healthy Comfort Food")
Why You’ll Love This Bush’s White Chicken Chili Recipe
This white chicken chili has become my secret weapon for impressing guests without spending hours in the kitchen. The first time I served it at a fall gathering, three people asked for the recipe before they even finished their bowls.
What I love most is how forgiving it is. I once forgot about it simmering on the stove for an extra 20 minutes, and it still turned out incredible because the longer cooking time just made the flavors more developed.
Here’s what makes this chili stand out:
- Quick weeknight-friendly cooking time: You can have dinner on the table in under an hour, making it perfect for busy evenings when you need something hearty and satisfying.
- Budget-friendly ingredients: Using canned beans and rotisserie chicken keeps the cost down without sacrificing flavor or quality.
- Naturally gluten-free: Perfect for family members or friends with dietary restrictions, and nobody will even miss the traditional chili ingredients.
- Customizable heat level: Start mild and let everyone add their own jalapeños or hot sauce, which means even my spice-averse mother-in-law can enjoy it.
- Makes incredible leftovers: The flavors actually improve overnight, so I always make a double batch on purpose.
- Crowd-pleaser appeal: Even picky eaters love the creamy texture and mild flavor profile, and you can dress it up with fun toppings.
I’ve also found this pairs wonderfully with my homemade biscuit recipe for soaking up every last drop of that creamy broth.
Ingredients
This recipe relies on simple, pantry-friendly ingredients that come together to create something far greater than the sum of their parts. I always keep these staples on hand because I know I can whip up a satisfying meal whenever the craving hits.
For the Chili Base:
- 2 tablespoons olive oil
- 1 large yellow onion, diced (about 1½ cups / 200g)
- 4 cloves garlic, minced
- 2 (4-ounce / 113g) cans diced green chiles
- 1 jalapeño pepper, seeded and minced (optional, for extra heat)
- 4 cups (960ml) low-sodium chicken broth
- 3 (15.8-ounce / 447g) cans Bush’s Great Northern Beans, drained and rinsed
- 3 cups (450g) cooked chicken breast, shredded or cubed
- 2 teaspoons ground cumin
- 1½ teaspoons dried oregano
- 1 teaspoon ground coriander
- ½ teaspoon smoked paprika
- ½ teaspoon cayenne pepper (adjust to taste)
- Salt and black pepper to taste
- 1 cup (240ml) heavy cream or half-and-half
- 2 tablespoons fresh lime juice
- ¼ cup (15g) fresh cilantro, chopped
For Serving:
- Shredded Monterey Jack or pepper jack cheese
- Sour cream or Greek yogurt
- Tortilla chips or strips
- Diced avocado
- Additional cilantro
- Lime wedges
- Sliced jalapeños
- Chopped green onions
Kitchen Equipment Needed
Having the right tools makes this recipe come together smoothly and helps you avoid any cooking mishaps. I learned the hard way that a thin-bottomed pot leads to scorched beans at the bottom.
- Large heavy-bottomed pot or Dutch oven (6-8 quart / 5.7-7.6L capacity)
- Wooden spoon or silicone spatula
- Sharp chef’s knife
- Cutting board
- Measuring cups and spoons
- Can opener
- Immersion blender (optional, for creamier texture)
- Ladle
- Serving bowls
Recommended Products for This Recipe
Over the years of perfecting this white chicken chili, I’ve discovered a few products that genuinely make a difference in both the cooking process and the final result. These aren’t just nice-to-haves; they’re the tools and ingredients that have helped me create consistently delicious batches every single time.
1. Le Creuset Enameled Cast Iron Dutch Oven
This Dutch oven has been my workhorse for making this chili countless times, and it distributes heat so evenly that I’ve never had issues with beans sticking or burning on the bottom. The heavy lid traps moisture perfectly, keeping the chicken incredibly tender while the flavors meld together beautifully. Yes, it’s an investment, but I’ve had mine for over seven years and it still looks nearly new.
2. Bush’s Great Northern Beans
I specifically call for Bush’s beans in this recipe because their texture holds up beautifully during simmering without turning mushy. I’ve tried other brands, and while they work, Bush’s beans have that perfect creamy interior while maintaining their shape. Stock up when they’re on sale because you’ll want to make this chili again and again.
3. Cuisinart Smart Stick Immersion Blender
While this is optional, using an immersion blender to partially blend about a third of the chili creates that restaurant-quality creamy texture that makes people think you spent hours making it. I just pulse it a few times right in the pot, which is so much easier than transferring hot liquid to a regular blender. Plus, cleanup is a breeze.
4. Hatch Green Chiles
The quality of your green chiles makes a noticeable difference in the final flavor profile. Hatch green chiles from New Mexico have this perfect balance of mild heat and smoky flavor that canned chiles from other brands just don’t match. I always keep several cans in my pantry because they elevate so many recipes beyond just this chili.
5. Mexican Oregano
If you can find Mexican oregano instead of Mediterranean oregano, grab it for this recipe. It has a more robust, slightly citrusy flavor that complements the cumin and chiles perfectly. I learned this tip from a friend who grew up in New Mexico, and it’s been a total revelation for my white chicken chili.
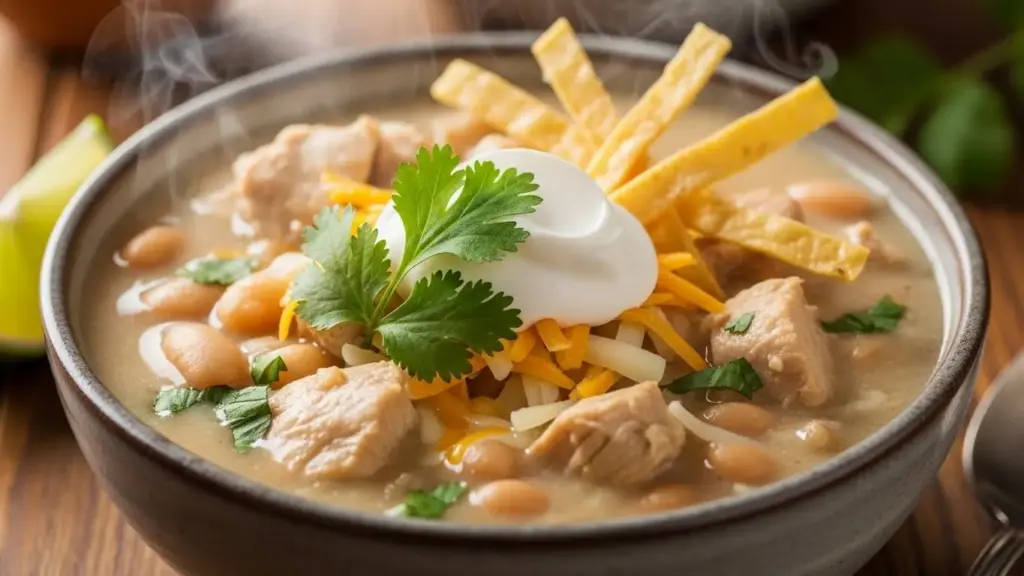
_result.jpg "Bush's White Chicken Chili Recipe That Everyone Will Love")
Step-by-Step Instructions: How to Make Bush’s White Chicken Chili
These detailed instructions will walk you through every step of creating this comforting chili. I’ve included all the little tricks and techniques I’ve learned through trial and error so you can get it perfect on your first try.
1. Prepare Your Ingredients
- Dice your onion into small, even pieces about ¼-inch (6mm) in size so they cook uniformly and don’t leave large crunchy chunks in the finished chili.
- Mince the garlic cloves finely, or use a garlic press for even distribution of flavor throughout the dish.
- If using fresh jalapeño, slice it in half lengthwise, scrape out the seeds and white membranes with a spoon (this is where most of the heat lives), then mince it finely.
- Shred your cooked chicken into bite-sized pieces using two forks, or cube it into ½-inch (1.3cm) pieces if you prefer a chunkier texture.
- Drain and rinse your Bush’s Great Northern Beans in a colander under cold running water for about 30 seconds to remove excess sodium and the starchy liquid that can make the chili cloudy.
2. Sauté the Aromatics
- Heat your Dutch oven or large pot over medium heat for about 2 minutes until it feels warm when you hold your hand a few inches above the surface.
- Add the olive oil and swirl it around to coat the bottom of the pot evenly.
- Add the diced onion to the hot oil and cook for 5-7 minutes, stirring occasionally with your wooden spoon, until the pieces become translucent and start to soften at the edges.
- Stir in the minced garlic and jalapeño (if using) and cook for just 1 minute more, stirring constantly to prevent the garlic from burning and turning bitter.
- You’ll know it’s ready when your kitchen smells absolutely amazing and the garlic becomes fragrant but hasn’t started to brown.
Another favorite: Easy Chicken Noodle Soup Recipe
3. Add the Liquids and Beans
- Pour in all 4 cups (960ml) of chicken broth, making sure to scrape up any browned bits from the bottom of the pot with your wooden spoon (these add tons of flavor).
- Add the drained and rinsed Bush’s Great Northern Beans to the pot, stirring them gently to distribute them evenly throughout the liquid.
- Open your cans of diced green chiles and add them along with any liquid in the cans for extra flavor.
- Increase the heat to medium-high and bring the mixture to a gentle boil, which should take about 5-7 minutes.
- Once bubbling, reduce the heat to low so the chili maintains a gentle simmer with just a few bubbles breaking the surface occasionally.
4. Season and Add the Chicken
- Add the ground cumin, dried oregano, ground coriander, smoked paprika, and cayenne pepper to the pot.
- Stir everything together thoroughly for about 30 seconds to evenly distribute the spices and allow them to bloom in the hot liquid, which intensifies their flavors.
- Add your shredded or cubed chicken to the pot, stirring it in so every piece gets coated with the flavorful broth.
- Season with ½ teaspoon salt and ¼ teaspoon black pepper to start (you can always add more later after tasting).
- Let the chili simmer uncovered for 20-25 minutes, stirring every 5 minutes or so to prevent anything from sticking to the bottom.
- The chili is ready for the next step when the flavors have melded together and the liquid has reduced slightly to a thicker consistency.
Read Also: Panera Broccoli Cheddar Soup Recipe
5. Create the Creamy Texture (Optional But Recommended)
- If you want that ultra-creamy restaurant-style texture, remove the pot from the heat temporarily.
- Use an immersion blender to pulse and blend about one-third of the chili directly in the pot, moving it around to different areas.
- Blend just until some of the beans and chicken break down into smaller pieces, creating a thicker, creamier base while still leaving plenty of chunks for texture.
- Alternatively, carefully transfer 2 cups of the chili to a regular blender, blend until smooth, then stir it back into the pot (just be very careful with hot liquids in a blender and leave the lid slightly ajar to let steam escape).
6. Finish with Cream and Fresh Flavors
- Return the pot to low heat if you removed it for blending.
- Pour in the heavy cream or half-and-half, stirring constantly as you add it to prevent the dairy from curdling or separating.
- Let the chili heat through for 3-5 minutes, stirring occasionally, until it’s steaming hot but not boiling (boiling can cause the cream to separate).
- Remove the pot from the heat completely before adding the fresh lime juice and chopped cilantro.
- Stir in the lime juice, which brightens all the flavors and adds a subtle tanginess that balances the richness.
- Add the fresh cilantro and stir it in gently, reserving a little for garnish if desired.
- Taste the chili and adjust the seasoning with additional salt, black pepper, or cayenne pepper if needed.
You might also enjoy: Slow Cooker Chili Recipe
7. Serve and Garnish
- Ladle the hot white chicken chili into individual serving bowls, making sure each person gets a good mix of beans, chicken, and creamy broth.
- Set out all your toppings in small bowls so everyone can customize their bowl exactly how they like it.
- I always recommend adding at least the shredded cheese, sour cream, and tortilla chips because they add wonderful textural contrast and richness.
- Serve immediately while piping hot, with extra lime wedges on the side for anyone who wants an extra citrus kick.
- Don’t forget to warn your guests that the bowls might be hot if you’ve preheated them.
_result.jpg "Bush's White Chicken Chili Recipe with Beans and Spices")
Tips for The Best Bush’s White Chicken Chili
After making this recipe dozens of times and teaching it to friends and family, I’ve gathered some essential tips that will help you avoid common pitfalls and achieve perfect results every single time. These little tricks make a surprisingly big difference in the final dish.
- Use rotisserie chicken for ultimate convenience: I buy a rotisserie chicken from the grocery store and shred the meat, which saves about 30 minutes of cooking time and adds incredible flavor from the seasoned skin and juices. You’ll get roughly 3-4 cups of shredded meat from one chicken, and you can freeze any extra for another batch.
- Don’t skip rinsing the beans: This step removes the starchy, salty liquid that can make your chili taste canned and overly salty. I learned this the hard way when my first batch turned out way too salty because I dumped the beans in with all their liquid.
- Layer your spices: Add half the spices when you first start simmering and the other half about 10 minutes before serving for a more complex, dimensional flavor profile. This technique gives you both deep background notes and bright top notes.
- Control the consistency: If your chili gets too thick, thin it out with additional chicken broth or even just hot water, adding ¼ cup at a time until you reach your desired consistency. If it’s too thin, let it simmer uncovered for 10-15 minutes longer to reduce.
- Add cream at the end: Always wait until the very end to add your cream or half-and-half to prevent it from curdling or separating during the long simmer. I once added it too early and ended up with an unappealing grainy texture.
- Toast your spices first: For an even deeper flavor, toast the cumin, coriander, and oregano in a dry skillet for 30 seconds before adding them to the pot. This releases their essential oils and makes them much more aromatic.
- Make it ahead: This chili tastes even better the next day after all the flavors have had time to meld together in the refrigerator overnight. I actually prefer making it a day in advance when I’m having guests over.
- Adjust the heat level carefully: Start with less cayenne pepper than you think you need because you can always add more at the table with hot sauce, but you can’t take it away. I learned this lesson when I made it too spicy for my kids to enjoy.
- Save the pasta water trick: If you accidentally make it too spicy, stir in an extra can of drained beans and a splash more broth to dilute the heat without losing the volume of your dish.
For a heartier meal, try serving this alongside Healthy Cornbread Recipe.
Serving Suggestions
The beauty of white chicken chili is how well it pairs with different sides and toppings to create a complete, satisfying meal. I’ve served this at casual weeknight dinners and fancier gatherings, and these accompaniments always get rave reviews.
Classic Pairings:
- Warm cornbread or corn muffins: The slightly sweet flavor and crumbly texture provide the perfect contrast to the savory, spicy chili, and they’re ideal for soaking up every last drop of that creamy broth.
- Crispy tortilla chips or strips: I usually make my own by cutting corn tortillas into strips, brushing them with oil, and baking them at 375°F (190°C) for 10-12 minutes until golden and crispy.
- Fresh avocado toast: The cool, creamy avocado balances the warm spices beautifully and adds healthy fats that make the meal more satisfying.
- Simple green salad with lime vinaigrette: A crisp, acidic salad cuts through the richness of the cream and provides a refreshing contrast in both temperature and texture.
- Mexican rice or cilantro lime rice: This turns the chili into an even heartier meal and adds another layer of flavor that complements the southwestern spices perfectly.
- Quesadillas: I sometimes make cheese quesadillas on the side, cut them into wedges, and let people dip them directly into their bowls of chili.
Variations of Bush’s White Chicken Chili
One of my favorite things about this recipe is how adaptable it is to different tastes, dietary needs, and whatever ingredients you happen to have on hand. These variations have all been tested in my kitchen and loved by my family.
- Slow Cooker Version: After sautéing the onions, garlic, and jalapeño in a skillet, transfer everything to a slow cooker with the remaining ingredients except the cream, lime juice, and cilantro. Cook on low for 6-8 hours or high for 3-4 hours, then stir in the cream and fresh ingredients just before serving.
- Turkey White Chili: Substitute ground turkey or leftover Thanksgiving turkey for the chicken, which gives you a slightly lighter flavor profile and works beautifully with all the same seasonings and beans.
- Vegetarian Version: Skip the chicken entirely and add two more cans of beans (try adding a can of cannellini beans or chickpeas for variety), plus 2 cups of diced zucchini or bell peppers. Use vegetable broth instead of chicken broth for a completely plant-based meal.
- Spicy Poblano Version: Add 2 roasted poblano peppers (charred, peeled, and diced) instead of the canned green chiles for a smokier, more complex heat that takes the flavor profile to the next level.
- Extra Creamy Version: Stir in 4 ounces (113g) of softened cream cheese along with the heavy cream at the end, which creates an incredibly rich, velvety texture that coating every bean and piece of chicken.
- Southwest Corn Chili: Add 2 cups (300g) of frozen corn kernels and 1 diced red bell pepper during the last 10 minutes of cooking for extra sweetness, color, and texture that kids especially love.
- Instant Pot Method: Use the sauté function to cook the onions and garlic, then add all ingredients except cream, lime, and cilantro. Pressure cook on high for 15 minutes with natural release for 10 minutes. Stir in finishing ingredients after releasing pressure.
- Spicy Sausage White Chili: Brown 1 pound (450g) of hot Italian sausage and use it in place of half the chicken for a spicier, more robust flavor with little bits of fennel and red pepper that add complexity.
Read Also: Taco Soup Recipe
Storage and Reheating
Proper storage is key to enjoying this white chicken chili for days after you make it, and honestly, I think it tastes even better as leftovers when all those flavors have had more time to mingle together. Here’s how I handle storing and reheating to maintain the best texture and flavor.
Refrigerator Storage:
- Let the chili cool to room temperature before storing, which should take about 30-45 minutes on the counter (don’t leave it out longer than 2 hours for food safety reasons).
- Transfer cooled chili to airtight containers, leaving about an inch of space at the top since liquids expand slightly as they chill.
- Store in the refrigerator for up to 4-5 days, making sure your fridge temperature is at 40°F (4°C) or below.
- The cream may separate slightly during storage, but don’t worry because a quick stir while reheating brings it right back together.
Freezer Storage:
- This chili freezes beautifully for up to 3 months, though I’ve had it frozen for 4 months and it was still delicious.
- Cool completely before portioning into freezer-safe containers or heavy-duty freezer bags, removing as much air as possible to prevent freezer burn.
- Freeze in individual serving sizes or family-sized portions depending on your needs, which makes it super easy to grab exactly what you want for a quick meal.
- Label each container with the date and contents using a permanent marker so you don’t end up with mystery food in your freezer.
- Thaw overnight in the refrigerator before reheating for the most even results and best texture.
Reheating Instructions:
- Stovetop method (my preferred way): Pour chili into a pot over medium-low heat, stirring occasionally until heated through (about 10-15 minutes from refrigerated, 20-25 minutes from frozen). Add a splash of chicken broth or water if it’s thickened too much during storage.
- Microwave method: Place individual portions in microwave-safe bowls, cover with a microwave-safe lid or damp paper towel, and heat on medium power for 2-3 minutes, stirring halfway through. Continue heating in 1-minute intervals until steaming hot throughout.
- Slow cooker method: Pour refrigerated or thawed chili into your slow cooker and heat on low for 2-3 hours or high for 1-2 hours, stirring occasionally to ensure even heating throughout.
You might also enjoy: Zuppa Toscana Recipe
_result.jpg "Bush's White Chicken Chili Recipe")
Nutritional Facts
Understanding the nutritional profile of this Bush’s White Chicken Chili can help you make informed decisions about portion sizes and how it fits into your overall dietary goals. These values are approximate and based on one serving (assuming 8 servings total).
Per Serving (approximately 1½ cups / 360ml):
- Calories: 385
- Total Fat: 16g (21% DV)
- Saturated Fat: 7g (35% DV)
- Trans Fat: 0g
- Cholesterol: 75mg (25% DV)
- Sodium: 680mg (30% DV)
- Total Carbohydrates: 32g (12% DV)
- Dietary Fiber: 8g (29% DV)
- Sugars: 3g
- Protein: 28g (56% DV)
- Vitamin A: 12% DV
- Vitamin C: 25% DV
- Calcium: 15% DV
- Iron: 20% DV
- Potassium: 18% DV
Notes on Nutrition:
The high protein content from the chicken and beans makes this an excellent choice for building and maintaining muscle mass. The fiber from the beans helps keep you feeling full longer and supports healthy digestion.
If you’re watching your fat intake, you can reduce the heavy cream to ½ cup or substitute with half-and-half or even plain Greek yogurt. You can also significantly reduce the sodium by using low-sodium or no-salt-added beans and broth, which would bring the sodium content down to around 350-400mg per serving.
The carbohydrate content is moderate and comes primarily from the beans, which are complex carbs that provide sustained energy. This chili is naturally gluten-free, making it suitable for those with celiac disease or gluten sensitivity.
Health Benefits of Key Ingredients
Beyond just tasting incredible, this white chicken chili packs a serious nutritional punch thanks to its wholesome ingredients. I love knowing that I’m feeding my family something that’s both delicious and genuinely good for them.
Great Northern Beans:
- Excellent source of plant-based protein and dietary fiber that supports digestive health and helps regulate blood sugar levels. Beans are also rich in folate, magnesium, and iron, which support heart health and energy production.
Chicken Breast:
- Provides high-quality lean protein that’s essential for muscle maintenance and repair, and it’s also a good source of B vitamins, particularly niacin and B6, which support metabolism and brain function.
Garlic:
- Contains allicin and other sulfur compounds that have been shown to support immune function and cardiovascular health. Garlic has natural antimicrobial properties that have been used medicinally for centuries.
Green Chiles:
- Rich in vitamin C and capsaicin, which may boost metabolism and have anti-inflammatory properties. They add flavor and nutrition without adding many calories.
Cumin:
- This warming spice is packed with iron and has been traditionally used to aid digestion and reduce bloating. It also contains antioxidants that may help fight inflammation.
Olive Oil:
- A heart-healthy fat rich in monounsaturated fatty acids and antioxidants that support cardiovascular health and reduce inflammation throughout the body.
Cilantro:
- More than just a garnish, cilantro provides vitamins A, C, and K, plus it contains compounds that may help the body eliminate heavy metals and support detoxification processes.
Lime Juice:
- High in vitamin C, which supports immune function and collagen production, and the acidity helps your body absorb the iron from the beans more effectively.
For another nutritious comfort food, try my Lentil and Vegetable Soup Recipe.
FAQs About Bush’s White Chicken Chili
Over the years of making and sharing this recipe, I’ve been asked the same questions repeatedly, so I wanted to address the most common concerns and curiosities here. These answers come from my own experience and countless batches of this delicious chili.
1. Can I use a different type of white bean instead of Great Northern beans?
Absolutely, cannellini beans or navy beans work beautifully in this recipe and have a similar creamy texture. I’ve tried both, and while Great Northern beans are my personal favorite for their size and texture, the other white beans are perfectly acceptable substitutes that won’t change the recipe significantly.
2. How can I make this recipe dairy-free?
Skip the heavy cream and use full-fat coconut milk instead, which provides a similar richness and creamy texture without any dairy. You can also substitute the sour cream topping with coconut yogurt or simply use extra avocado for creaminess, and I promise you won’t miss the dairy at all.
3. Can I make this spicier without adding more cayenne pepper?
Yes, there are several ways to increase the heat level beyond cayenne. Try adding diced fresh serrano peppers instead of jalapeños, use hot green chiles instead of mild ones, or stir in your favorite hot sauce at the end. I personally love adding a tablespoon of chipotle peppers in adobo sauce for a smoky, deeper heat.
4. Why is my chili too watery and how can I fix it?
If your chili is too thin, you can fix it by simmering it uncovered for an additional 15-20 minutes to reduce the liquid. Another quick fix is to mash some of the beans against the side of the pot with your spoon, which releases their starch and naturally thickens the chili without adding any extra ingredients.
5. Can I use raw chicken instead of pre-cooked chicken?
Yes, you can add 1½ pounds (680g) of raw chicken breasts or thighs directly to the pot after adding the broth and let everything simmer together for 25-30 minutes until the chicken is cooked through. Remove the chicken, shred it with two forks, then return it to the pot, though this method does add about 15 minutes to your total cooking time.
Final Thoughts
This Bush’s White Chicken Chili Recipe has earned its place as a beloved staple in my kitchen, and I make it at least once a month during the cooler seasons. The combination of creamy beans, tender chicken, and perfectly balanced spices creates something truly special that brings everyone to the table.
What I love most is how this recipe brings people together, sparking conversations over steaming bowls while everyone customizes their toppings. It’s become my signature dish for potlucks and casual gatherings because it’s always the first thing to disappear.
I hope you’ll give this white chicken chili a try and experience the same joy it’s brought to my family. Drop a comment below and let me know how yours turned out, or share any creative variations you come up with!
Recommended:
- Chicken Gnocchi Soup Recipe
- Italian Wedding Soup Recipe
- Pasta Fagioli Recipe
- Cheeseburger Soup Recipe
- Lasagna Soup Recipe
- Creamy Tomato Basil Soup Recipe
- Carrot Ginger Soup Recipe
- Beef Barley Soup Recipe
- Potato Leek Soup Recipe
- French Onion Beef Short Rib Soup Recipe
