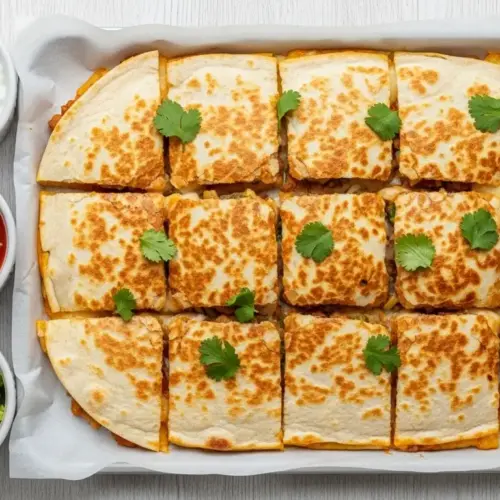
Sheet Pan Quesadillas

These sheet pan quesadillas are the ultimate weeknight shortcut — crispy, golden tortillas stuffed with seasoned chicken, black beans, corn, and a melty blend of Monterey Jack and sharp cheddar, all baked at once in one pan. No flipping, no babysitting the stove, and no messy cleanup. Whether you're feeding a hungry family or hosting a casual get-together, this method delivers perfectly crisped, evenly melted quesadillas in under 35 minutes with almost zero effort.
Equipment
- Rimmed half sheet pan (18x13 inch) - Essential for this recipe; the rim holds all layers in place
- Parchment paper - Or aluminum foil for lining the sheet pan
- Large mixing bowl - For combining the filling ingredients
- Cutting board and chef's knife - For dicing vegetables
- Cast iron or heavy skillet - (optional) For sautéing the vegetables before adding to filling
- Pizza cutter or sharp knife - For slicing the finished quesadilla into portions
- Flat spatula - For lifting slices cleanly from the pan
Ingredients
For the Quesadilla
- 4 large flour tortillas - 10-inch / 25 cm burrito-size; divided into 2 for bottom layer and 2 for top layer
- 2 cups shredded Monterey Jack cheese - 225 g; divided, half for bottom layer and half for top
- 1 cup shredded sharp cheddar cheese - 115 g
- 2 cups cooked chicken breast - 280 g; shredded or diced; rotisserie chicken works great
- 1 can (15 oz) black beans - 425 g; drained and rinsed
- 1 cup corn kernels - 150 g; fresh, frozen and thawed, or canned and drained
- 1 medium red bell pepper - diced small
- 1/2 medium red onion - finely diced
- 1 jalapeño - seeded and minced; optional, for heat
Seasonings
- 2 tsp taco seasoning - 5 g
- 1 tsp garlic powder - 3 g
- 1/2 tsp smoked paprika - 1 g
- salt and black pepper - to taste
- 2 tbsp olive oil - 30 ml; or cooking spray
For Serving
- fresh cilantro - for garnish
- sour cream - for serving
- salsa - for serving
- guacamole - for serving
Instructions
- Preheat oven to 425°F (220°C). Line an 18x13 inch (46x33 cm) rimmed sheet pan with parchment paper and lightly brush or spray with olive oil.
- Heat 1 tablespoon (15 ml) of olive oil in a skillet over medium heat. Add the diced red bell pepper, red onion, and jalapeño (if using) and sauté for 3 to 4 minutes until softened, then season with salt and pepper and remove from heat.
- In a large bowl, combine the shredded chicken, black beans, corn, and sautéed vegetables. Add the taco seasoning, garlic powder, and smoked paprika and stir until evenly combined.
- Lay 2 large flour tortillas on the prepared sheet pan, overlapping slightly in the center to cover the full surface. Press them flat against the parchment paper.
- Sprinkle 1 cup (112 g) of the shredded Monterey Jack cheese evenly over the bottom tortillas, spreading it all the way to the edges to help seal in the filling.
- Distribute the chicken and vegetable filling evenly over the cheese layer, spreading to the edges and keeping the layer about 1/2 inch (1.3 cm) thick. Press down lightly with a spatula to compact.
- Sprinkle the remaining 1 cup (112 g) of Monterey Jack and all of the sharp cheddar cheese evenly over the filling.
- Lay the remaining 2 flour tortillas over the cheese, overlapping slightly in the center, then brush the tops with olive oil. Press a second sheet pan firmly on top for 10 to 15 seconds to compact the layers.
- Bake at 425°F (220°C) for 10 minutes, remove the top sheet pan if used, then bake for another 8 to 10 minutes until the top is golden brown and the cheese is fully melted and bubbling at the edges.
- Let the quesadilla rest for 3 to 5 minutes before using a pizza cutter to slice into squares or triangles. Serve immediately with sour cream, salsa, guacamole, and fresh cilantro.
Notes
- Don't overfill — keep the filling layer to about 1/2 inch (1.3 cm) thick to ensure clean slices and a crispy result.
- Pat canned beans and corn dry with a paper towel before adding to the filling; excess moisture leads to soggy quesadillas.
- Use large burrito-size flour tortillas (10 inch / 25 cm) — corn tortillas are too small and tend to crack under the weight of the filling.
- Always brush the top tortilla with olive oil before baking; this is what creates the golden-brown, crispy surface.
- Pressing the layers together with a second sheet pan before baking keeps everything compact and makes the quesadilla much easier to slice cleanly.
- Let the baked quesadilla rest for 3 to 5 minutes before cutting so the cheese can set and the filling stays in place.
- Rotisserie chicken is a great time-saving swap for the cooked chicken breast — it adds extra flavor and requires no prep.
- Store leftovers in an airtight container in the fridge for up to 4 days. Reheat in a 375°F (190°C) oven for 8 to 10 minutes to restore crispiness.
- To freeze, wrap individual slices tightly in plastic wrap, place in a zip-top freezer bag, and freeze for up to 2 months. Thaw overnight in the fridge before reheating.
- For a vegetarian version, omit the chicken and double the black beans or add sautéed mushrooms and zucchini — the same seasoning blend works perfectly.
Nutrition
Serving: 1ServingCalories: 380kcalCarbohydrates: 35gProtein: 26gFat: 16gSaturated Fat: 8gPolyunsaturated Fat: 1gMonounsaturated Fat: 5gCholesterol: 60mgSodium: 620mgPotassium: 380mgFiber: 5gSugar: 2gVitamin A: 18IUVitamin C: 45mgCalcium: 25mgIron: 12mg
Tried this recipe?Let us know how it was!