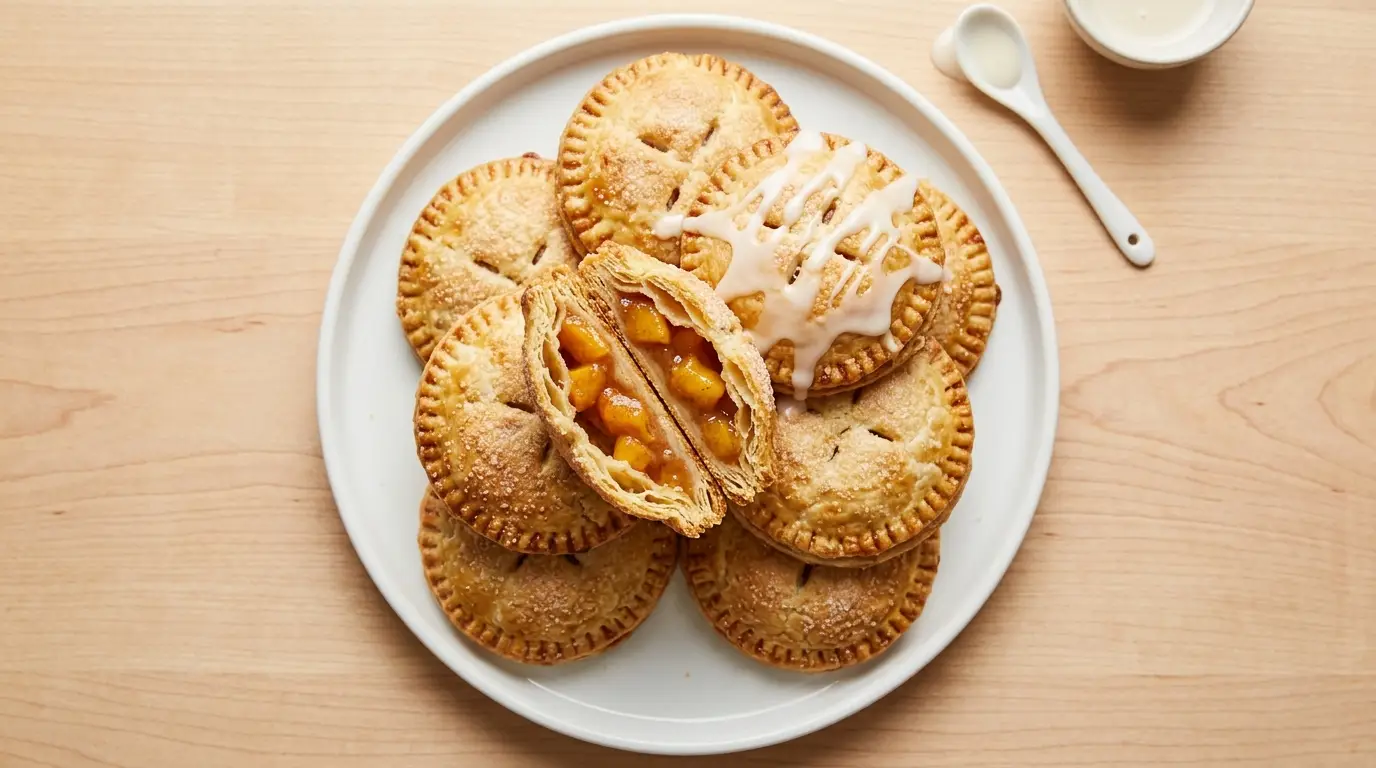
This peach hand pies recipe turns four ripe peaches and a buttery, flaky crust into twelve golden, hand-held pastries. Each one holds about two tablespoons of cinnamon-spiced peach filling inside a crimped edge that seals in the juices during baking.
The crust comes together with cold butter cut into flour, the same base used for a traditional double-crust pie, so the pastry shatters into flaky layers instead of turning tough or greasy. A short 30-minute chill keeps the butter solid enough to create those layers once the pies hit a hot oven.
Twelve pies come out of one batch of dough and four peaches, which is enough for a small gathering with a couple left over for the next morning.
| Quick Recipe Summary | |
|---|---|
| Prep Time | 30 minutes |
| Chill Time | 30 minutes |
| Cook Time | 25 minutes |
| Total Time | 85 minutes |
| Servings | 12 hand pies |
| Difficulty Level | Easy |
For another handheld peach dessert, see Peach Turnovers.

Why You’ll Love This Peach Hand Pies Recipe
These hold up in a lunch box, a picnic basket, or a plate next to coffee without falling apart. The crust is flaky enough to shatter with the first bite, and the filling stays put instead of pooling everywhere.
- Portable by design. No fork, no plate, no mess. Each pie is a complete, sealed package of crust and filling.
- Real fruit filling. Diced peaches cooked down with sugar, lemon juice, and cinnamon, not a canned filling stretched with syrup.
- Make-ahead friendly. The dough and filling can both be made a day in advance, and unbaked pies freeze well.
- Beginner-friendly crust. A standard butter pie dough with a simple technique that doesn’t require special pastry skills.
- Customizable finish. Top with turbinado sugar for crunch, a vanilla glaze for sweetness, or both.
- Better fruit-to-crust ratio than a full pie. Since each pie is individually wrapped in dough, every bite gets a fair share of both.
You might also like Peach Pie if you’d rather serve one big pie for a crowd.
Ingredients
Gather everything before you start rolling dough. The filling and crust each need a few minutes of prep before they come together, and having every ingredient measured out ahead of time keeps the butter cold and the process moving.
For the Crust
- 2 ½ cups (315g) all-purpose flour, plus more for dusting
- 1 tablespoon (12g) granulated sugar
- 1 teaspoon salt
- 1 cup (226g) unsalted butter, cold, cut into small cubes
- 6-8 tablespoons (90-120ml) ice water
For the Peach Filling
- 4 medium ripe peaches (about 3 cups/450g), peeled and diced small
- ⅓ cup (67g) granulated sugar
- 2 tablespoons (16g) cornstarch
- 1 tablespoon (15ml) fresh lemon juice
- ½ teaspoon ground cinnamon
- ¼ teaspoon salt
- ½ teaspoon pure vanilla extract
For Assembly
- 1 large egg, beaten with 1 tablespoon water
- 2 tablespoons turbinado sugar, for topping
For the Glaze (Optional)
- 1 cup (120g) powdered sugar
- 2-3 tablespoons (30-45ml) milk
- ½ teaspoon vanilla extract
I’ve found that peaches with a slight give near the stem soften just enough for the filling without turning mushy once they hit the oven.
For a filling shortcut when peaches aren’t in season, see Peach Pie Filling.
Kitchen Equipment Needed
None of this requires specialty bakeware, but a few tools make the crust easier to work with. Most of it is likely already in a home kitchen, aside from maybe the round cutter.
- Pastry cutter or bench scraper
- Rolling pin
- 5-inch round cutter or large biscuit cutter
- Large mixing bowl
- Medium saucepan (for cooking the peach filling)
- Rimmed baking sheet
- Parchment paper
- Pastry brush
- Fork, for crimping edges
- Wire cooling rack
- Measuring cups and spoons
For a comparison of crust styles, see Apple Pie.
Recommended Products for This Recipe
These are the tools and ingredients I actually reach for when I make this recipe, based on what has made the biggest difference in the final pies.
1. Ceylon Ground Cinnamon
Standard supermarket cinnamon is usually cassia, which has a sharper, more bitter edge when it’s cooked into fruit. Ceylon cinnamon has a softer, slightly citrusy flavor that doesn’t fight with the peaches, so the filling tastes like fruit first and spice second.
2. OXO Good Grips Pastry Cutter
Cutting cold butter into flour by hand warms it up fast, which softens the layers that make a crust flaky. A sturdy pastry cutter breaks the butter into pea-sized pieces in under a minute, keeping everything cold enough to laminate properly in the oven.
3. Round Biscuit Cutter Set
A round cutter with a sharp edge gives clean circles that seal properly, while a dull edge or a drinking glass tends to crimp the dough shut instead of cutting through it, which weakens the seam. A set with multiple sizes also makes it easy to switch between full-size and mini hand pies.
4. USA Pan Nonstick Baking Sheet
An uneven baking sheet creates hot spots that brown one side of the pies faster than the other. This one has a heavier gauge and a corrugated surface that promotes even airflow, so a full tray of hand pies bakes to the same shade of golden brown.
5. Silicone Pastry Brush
A natural-bristle brush can shed and leaves streaky, uneven egg wash. A silicone brush spreads a thin, even coat without dragging on the dough, which matters right before baking when the seams are still soft.
Read Also: Peach Danish

Step-by-Step Instructions: How to Make Peach Hand Pies
Follow these steps in order and the dough stays cold enough to bake up flaky every time.
1. Make the Pie Dough
- In a large bowl, whisk together the flour, granulated sugar, and salt.
- Add the cold, cubed butter and cut it into the flour using a pastry cutter until the mixture looks like coarse crumbs with pea-sized pieces of butter still visible.
- Add the ice water one tablespoon at a time, mixing gently after each addition, until the dough just comes together and holds when pressed.
- Divide the dough into two discs, wrap each tightly in plastic wrap, and refrigerate for 30 minutes.
2. Make the Peach Filling
- While the dough chills, combine the diced peaches, granulated sugar, cornstarch, lemon juice, cinnamon, and salt in a medium saucepan.
- Set the pan over medium heat and cook, stirring often, until the mixture thickens and the peaches soften slightly, about 5 to 7 minutes.
- Remove from heat and stir in the vanilla extract.
- Let the filling cool to room temperature before assembling, so it doesn’t melt the butter in the dough.
3. Roll and Cut the Dough
- Preheat the oven to 400°F (200°C) and line a baking sheet with parchment paper.
- On a lightly floured surface, roll one disc of dough to about ⅛-inch thickness.
- Using the 5-inch round cutter, cut out circles, gathering and re-rolling scraps as needed.
- Repeat with the second disc of dough. You should have about 12 circles total.
4. Fill and Seal the Pies
- Spoon about 1 ½ to 2 tablespoons of cooled peach filling onto one half of each dough circle, leaving a ½-inch border.
- Fold the other half of the dough over the filling to form a half-moon shape.
- Press the edges together with your fingers, then crimp with the tines of a fork to seal.
- Cut two small slits in the top of each pie to let steam escape while baking.
5. Egg Wash and Bake
- Arrange the sealed pies on the prepared baking sheet, spacing them at least 1 inch apart.
- Brush the top of each pie with the egg wash, then sprinkle with turbinado sugar.
- Bake for 22 to 25 minutes, or until the crust is deep golden brown and the filling is bubbling through the slits.
- Transfer the pies to a wire rack and let them cool for at least 10 minutes before glazing.
6. Glaze and Serve
- Whisk together the powdered sugar, milk, and vanilla extract until smooth.
- Drizzle the glaze over the warm (not hot) pies.
- Let the glaze set for about 10 minutes before serving.
For more crumb-topped peach desserts, see Peach Crumble.

Tips for The Best Peach Hand Pies
A few small adjustments make the difference between a pie that leaks in the oven and one that holds its shape. Most of these come down to temperature control and how firmly the edges get sealed.
- Keep the butter and water as cold as possible. Warm butter melts before it hits the oven, which flattens the layers instead of puffing them.
- Cool the peach filling completely before filling the dough, since warm filling softens the crust and makes sealing harder. Spreading it on a plate for a few minutes speeds up cooling if time is tight.
- Don’t overfill. More than two tablespoons of filling per pie puts too much pressure on the seam.
- Crimp firmly with a fork rather than just pinching with your fingers, which seals more reliably.
- Cut vent slits every time. Steam that has nowhere to go will find the weakest seam and push through it.
- Chill assembled, unbaked pies for 10 minutes before baking if your kitchen is warm, so the butter firms back up.
- Use a light hand when re-rolling scraps, since dough that’s been worked too much turns tough instead of flaky.
I ruined my first batch by rolling the dough too thin, which made the seams split open before the pies had a chance to brown.
What to Serve with Peach Hand Pies
These pies work as a stand-alone treat, but they also fit naturally into a bigger spread.
- A scoop of vanilla ice cream alongside a warm pie
- Fresh whipped cream for dipping
- A side of Potato Salad if serving at a picnic or cookout
- A batch of Classic Pasta Salad for a full potluck dessert table
- Iced coffee or cold brew for a morning treat
- A glass of cold milk for an afternoon snack
- Fresh berries on the side for color and contrast
- A cheese board with mild, creamy cheeses for a brunch spread
For another take on peach flavor in a completely different form, see Peach Crisp.
Variations of Peach Hand Pies
Once the base technique is down, there’s room to adjust the crust, filling, and finish. None of these changes require a different method, just a swap here or there.
- Puff pastry version: Swap the shortcrust dough for store-bought puff pastry for a flakier, more layered shell.
- Cream cheese crust: Replace a quarter of the butter with cream cheese for a more tender, slightly tangy dough.
- Spiced peach: Add a pinch of nutmeg and ground ginger to the filling along with the cinnamon.
- Peach-raspberry: Stir in ½ cup of fresh raspberries with the peaches for a tart contrast.
- Bourbon peach: Add 1 tablespoon of bourbon to the filling while it cooks for a deeper, boozy note.
- Mini hand pies: Use a 3-inch cutter instead of a 5-inch one for bite-sized pies, and reduce the filling to about 1 teaspoon each.
- Air fryer hand pies: Air fry at 350°F (175°C) for 12 to 14 minutes, checking halfway through for even browning.
- Maple glaze: Replace the vanilla glaze with a mixture of powdered sugar, milk, and maple syrup.
Puff pastry rises higher around the edges than shortcrust does, which changes the pie-to-filling ratio more than you’d expect.
For a similar fruit combination in a different format, see Blueberry Peach Galette.
Storage and Reheating
Baked and unbaked hand pies both store well, which makes this a good recipe to prep in stages. Deciding whether to freeze the pies baked or unbaked mostly comes down to how much time is available on the day they’re served.
- Counter: Store baked, glazed pies in an airtight container at room temperature for up to 2 days.
- Refrigerator: Baked pies keep in the refrigerator for up to 5 days in an airtight container.
- Freezer (baked): Freeze baked, unglazed pies in a single layer, then transfer to a freezer bag for up to 3 months.
- Freezer (unbaked): Freeze assembled, unbaked pies on a tray until solid, then transfer to a freezer bag for up to 3 months. Bake from frozen, adding 5 to 7 minutes to the bake time.
- Reheating: Warm baked pies in a 300°F (150°C) oven for 8 to 10 minutes to re-crisp the crust.
- Avoid the microwave for reheating, since it softens the crust instead of keeping it flaky.
I keep a stack of parchment squares in the freezer specifically for stacking unbaked hand pies, since it stops them from sticking to each other.
For more peach dessert options, see Peach Tart.
Nutritional Facts
| Nutrition Per Hand Pie (approximate) | |
|---|---|
| Calories | 240 |
| Total Fat | 12g |
| Saturated Fat | 7g |
| Carbohydrates | 32g |
| Sugar | 15g |
| Fiber | 1g |
| Protein | 3g |
| Sodium | 150mg |
Nutritional values are estimates and will vary based on exact ingredients and portion sizes. Values will also shift if the optional glaze is skipped or if a different sugar amount is used in the filling.
For a lighter alternative, see Peach Cobbler.
Health Benefits of Key Ingredients
The filling in these pies is built on real fruit, which brings some nutritional value along with the flavor.
- Peaches: A good source of vitamin C and vitamin A, along with dietary fiber that supports digestion.
- Lemon juice: Adds vitamin C and helps balance the sweetness of the filling without extra sugar.
- Cinnamon: Contains antioxidant compounds and has been studied for its potential role in supporting stable blood sugar levels.
- Eggs: The egg wash contributes a small amount of protein and helps the crust develop its golden color.
- Butter: Provides fat-soluble vitamins A and D, along with the richness that makes the crust taste like more than flour and water.
A similar list of fruit-forward benefits applies to Peach Scones.
FAQs About Peach Hand Pies
1. Can I use canned or frozen peaches instead of fresh?
Yes, frozen peaches work well if they’re thawed and well-drained first. Canned peaches in juice or light syrup can also work, but they add extra liquid, so reduce the added sugar slightly and drain them thoroughly before dicing.
2. Why is my peach hand pie filling runny?
Runny filling usually means the peaches released more juice than the cornstarch could absorb. Cooking the filling until it visibly thickens on the stove, then letting it cool completely before filling the dough, solves this in most cases.
3. Can I make peach hand pies ahead of time?
Both the dough and the cooked filling can be made up to 2 days in advance and stored separately in the refrigerator. Assembled, unbaked pies also freeze well, so you can prep a batch and bake only what you need.
4. Do I need to peel the peaches?
Peeling is recommended for the best texture, since peach skin can turn slightly tough and chewy once baked. A quick blanch in boiling water for 30 seconds makes the skins slip off easily.
5. Can I freeze baked peach hand pies?
Yes, baked pies freeze well for up to 3 months if wrapped tightly or stored in an airtight container. Skip the glaze until after reheating, since it doesn’t freeze or thaw cleanly.
6. Why did my hand pies leak filling in the oven?
Leaking usually comes from an overfilled pie, a weak seal along the edge, or filling that was still warm when the pies were assembled. Cooling the filling fully and crimping firmly with a fork addresses both of the most common causes.
7. What’s the difference between a hand pie and a turnover?
The two are closely related, but turnovers are traditionally made with puff pastry folded into a triangle, while hand pies typically use a shortcrust or pie dough folded into a half-moon shape. The filling and baking method are largely the same, so the distinction mostly comes down to the dough and the final shape.
For more comparison points on crust and filling ratios, see Peach Muffins.
Peach Hand Pies
Ingredients
- 2 ½ cups all-purpose flour - 315g, plus more for dusting
- 1 tablespoon granulated sugar - 12g
- 1 teaspoon salt
- 1 cup unsalted butter - 226g, cold, cut into small cubes
- ice water - 6-8 tablespoons (90-120ml)
- 4 ripe peaches - about 3 cups or 450g, peeled and diced small
- ⅓ cup granulated sugar - 67g
- 2 tablespoons cornstarch - 16g
- 1 tablespoon fresh lemon juice - 15ml
- ½ teaspoon ground cinnamon
- ¼ teaspoon salt
- ½ teaspoon pure vanilla extract
- 1 large egg - beaten with 1 tablespoon water
- 2 tablespoons turbinado sugar - for topping
- 1 cup powdered sugar - 120g
- milk - 2-3 tablespoons (30-45ml)
- ½ teaspoon vanilla extract
Equipment
- Pastry cutter or bench scraper
- 5-inch round cutter or large biscuit cutter
- Medium saucepan - For cooking the peach filling
- Fork - For crimping edges
Method
- Whisk together the flour, sugar, and salt in a large bowl. Cut in the cold butter with a pastry cutter until the mixture resembles coarse crumbs with pea-sized pieces of butter.
- Add ice water one tablespoon at a time, mixing gently until the dough just comes together. Divide into two discs, wrap in plastic, and refrigerate for 30 minutes.
- While the dough chills, combine the diced peaches, sugar, cornstarch, lemon juice, cinnamon, and salt in a medium saucepan. Cook over medium heat, stirring often, until the mixture thickens and the peaches soften, about 5-7 minutes.
- Remove the filling from heat and stir in the vanilla extract. Let it cool to room temperature before assembling.
- Preheat the oven to 400°F (200°C) and line a baking sheet with parchment paper. On a floured surface, roll one disc of dough to ⅛-inch thickness.
- Use a 5-inch round cutter to cut out circles. Repeat with the second disc of dough, re-rolling scraps as needed.
- Spoon 1 ½ to 2 tablespoons of cooled filling onto one half of each dough circle, leaving a ½-inch border. Fold the dough over to create a half-moon shape.
- Press the edges together with your fingers, then crimp with the tines of a fork to seal. Cut two small slits in the top of each pie to vent steam.
- Arrange the pies on the prepared baking sheet. Brush the tops with the egg wash and sprinkle with turbinado sugar.
- Bake for 22-25 minutes, or until the crust is deep golden brown and the filling is bubbling through the slits. Transfer to a wire rack to cool.
- Whisk together the powdered sugar, milk, and vanilla extract until smooth. Drizzle the glaze over the warm pies and let set for 10 minutes before serving.
Nutrition
Notes
- Keep it cold: Ensure your butter and water are as cold as possible. Warm butter will melt before baking, leading to a less flaky crust.
- Cool the filling completely: A warm filling will soften the dough and make it harder to seal the pies. Spread it on a plate to cool quickly if needed.
- Don’t overfill: Stick to about 2 tablespoons of filling per pie to prevent the seams from bursting.
- Seal it tight: Crimping with a fork creates a much more reliable seal than just pinching with your fingers.
- Ventilation is key: Always cut slits in the top crust to allow steam to escape, preventing leaks.
- Chill before baking: If your kitchen is warm, pop the assembled, unbaked pies in the fridge for 10 minutes to firm up the butter.
- Re-rolling scraps: Use a light hand when re-rolling dough scraps to avoid a tough crust. Overworked dough loses its flakiness.
- Make ahead: The dough and filling can be made a day in advance. Assembled, unbaked pies can also be frozen for up to 3 months.
- Storage: Baked pies last up to 2 days at room temperature or 5 days in the fridge. Reheat in a 300°F (150°C) oven to re-crisp the crust.
- Substitution: If fresh peaches aren’t in season, thawed and well-drained frozen peaches work perfectly in this recipe.
Private Notes
Tried this recipe?
Let us know how it was!Final Thoughts
Peach hand pies give you all the flavor of a full peach pie in a form that travels well and bakes faster.
The crust technique here works for other fruit fillings too, so once it feels familiar, it’s easy to swap in whatever fruit is in season.
Try this recipe the next time ripe peaches show up at the market, and let me know in the comments how yours turned out.
If you make a batch, feel free to share a photo or tag it, since seeing how these turn out in other kitchens is always a good time.
Recommended:
- Peach Coffee Cake
- Peach Dump Cake
- Peach Crumble Pie
- Peach Crumble Bars
- Blackberry Peach Galette
- Peach Tarte Tatin
- Mini Peach Tart
- Strawberry Peach Tart
- No-Bake Peach Tart
- Peach Bread