
My grandmother used to say that the best cakes are the ones that make you close your eyes after the first bite. That’s exactly what happened when I first made this Lemon Velvet Cake Recipe in my tiny apartment kitchen three years ago.
I was craving something bright and cheerful during a particularly gloomy February week, and I remembered seeing velvet cakes at a local bakery.
The combination of tangy lemon and soft, velvety texture creates something truly special. This cake has since become my go-to recipe for birthdays, spring gatherings, and any time I need a pick-me-up dessert that looks as impressive as it tastes.
| Quick Recipe Summary | |
|---|---|
| Prep Time | 20 minutes |
| Cook Time | 28 minutes |
| Total Time | 48 minutes (plus cooling time) |
| Servings | 12 slices |
| Difficulty Level | Moderate |
If you love layered cakes with bold flavors, try my Pink Velvet Cake Recipe for a fun twist on the classic.
Why You’ll Love This Lemon Velvet Cake Recipe
This Lemon Velvet Cake strikes the perfect balance between sweet and tangy. The buttermilk and vinegar create that signature velvet texture that literally melts on your tongue.
You don’t need any fancy equipment or hard-to-find ingredients. Everything you need is probably already sitting in your pantry, except maybe the lemon extract, which really makes the lemon flavor shine through.
- Incredibly moist texture: The combination of oil and buttermilk keeps this cake tender for days
- Bright, fresh lemon flavor: Fresh lemon zest, lemon juice, and lemon extract deliver a triple hit of citrus
- Soft, velvety crumb: The acid from buttermilk and vinegar creates an exceptionally tender cake structure
- Perfect for any occasion: This cake works beautifully for birthdays, Easter, showers, or just because
- Impressive presentation: The layers look professional, but the recipe is actually quite forgiving
- Make-ahead friendly: You can bake the layers in advance and freeze them until you’re ready to frost
Another favorite: White Velvet Cake Recipe
Ingredients
Creating this stunning lemon velvet cake requires two sets of ingredients: one for the cake layers and another for the luscious lemon cream cheese frosting. I’ve tested this recipe countless times to get the proportions just right.
For the Lemon Velvet Cake:
- 2 ½ cups (300g) all-purpose flour
- 1 ½ cups (300g) granulated sugar
- 1 teaspoon baking powder
- 1 teaspoon baking soda
- ½ teaspoon salt
- 1 cup (240ml) buttermilk, at room temperature
- ½ cup (120ml) vegetable oil
- ¼ cup (56g) vegetable shortening, melted
- 3 large eggs, at room temperature
- 2 tablespoons fresh lemon juice
- 1 tablespoon lemon zest (from about 2 large lemons)
- 1 tablespoon lemon extract
- 1 teaspoon vanilla extract
- 2 teaspoons white vinegar
- ⅓ cup (80ml) hot water
For the Lemon Cream Cheese Frosting:
- 16 ounces (450g) cream cheese, softened to room temperature
- 1 cup (226g) unsalted butter, softened to room temperature
- 6 cups (720g) powdered sugar, sifted
- 2 tablespoons fresh lemon juice
- 1 tablespoon lemon zest
- 1 teaspoon lemon extract
- ½ teaspoon vanilla extract
- Pinch of salt
You might also enjoy: Red Velvet Cake Recipe
Kitchen Equipment Needed
Having the right tools makes baking this lemon velvet cake so much easier. I learned this the hard way after trying to frost a cake with a butter knife during my first attempt.
- Two 9-inch (23cm) round cake pans
- Parchment paper
- Stand mixer or hand mixer
- Large mixing bowls (at least 2)
- Medium mixing bowl
- Whisk
- Rubber spatula
- Measuring cups and spoons
- Zester or microplane for lemon zest
- Cooling racks
- Offset spatula for frosting
- Cake turntable (optional but helpful)
- Toothpicks for testing doneness
- Sifter for powdered sugar
Read Also: Blue Velvet Cake Recipe
Recommended Products for This Recipe
After making this cake dozens of times, I’ve found a few products that really elevate the final result and make the process smoother.
1. Nielsen-Massey Pure Lemon Extract
This premium lemon extract has a bright, authentic lemon flavor that doesn’t taste artificial. I used to use cheaper extracts, but the difference is night and day. A little goes a long way, and one bottle lasts through many baking projects.
2. Ateco Offset Spatula
This professional-grade offset spatula makes frosting layer cakes incredibly easy. The angled blade gives you perfect control, and you can create smooth, bakery-quality frosting finishes. It’s one of those tools that instantly upgrades your cake decorating game.
3. Norpro Stainless Steel Lemon Zester
Getting fine lemon zest without the bitter white pith is crucial for this recipe. This sharp microplane zester makes the job effortless and ensures you get maximum lemon oils in your cake and frosting.
4. Fat Daddio’s Round Cake Pans
These professional anodized aluminum pans heat evenly and release cakes beautifully every single time. I had so many issues with cheap pans creating uneven layers or sticking to the bottom. These have completely solved that problem.
For another impressive cake, check out my Red Velvet Cheesecake Cake Recipe.
Step-by-Step Instructions: How to Make Lemon Velvet Cake
Follow these detailed instructions to create the perfect lemon velvet cake. I’ve included every little detail that I wish someone had told me when I first started baking layer cakes.
1. Prepare Your Pans and Preheat the Oven
- Move your oven rack to the middle position for even heat distribution
- Preheat your oven to 325°F (165°C)
- Cut two circles of parchment paper to fit the bottom of your 9-inch cake pans
- Spray or grease the pans thoroughly with butter or baking spray
- Place the parchment circles in the bottom of each greased pan
- Lightly grease the top of the parchment and dust the entire pan with flour, tapping out any excess
2. Mix the Dry Ingredients
- In a medium bowl, whisk together the all-purpose flour, baking powder, baking soda, and salt
- Whisk vigorously for about 30 seconds to ensure everything is evenly distributed
- Set this dry mixture aside (you’ll add it in stages later)
3. Prepare the Wet Ingredients
- In a liquid measuring cup, combine the buttermilk, lemon juice, lemon extract, vanilla extract, and white vinegar
- Stir gently to combine and set aside
- The mixture might look slightly curdled from the acid, which is completely normal and desired
- In a separate small bowl or cup, have your hot water ready to use later
4. Cream the Sugar and Fats
- In the bowl of your stand mixer fitted with the paddle attachment (or using a hand mixer), combine the granulated sugar, vegetable oil, and melted shortening
- Beat on high speed for 2 to 3 minutes until the mixture becomes pale and slightly fluffy
- Scrape down the sides of the bowl with a rubber spatula to ensure everything is incorporated
- This step is crucial for creating the velvety texture
5. Add the Eggs
- With the mixer on medium speed, add the eggs one at a time
- Beat for about 20 seconds after each egg before adding the next one
- Make sure each egg is fully incorporated before proceeding
- After the last egg, beat for an additional 30 seconds
- Scrape down the bowl again
6. Incorporate the Lemon Zest
- Add the freshly grated lemon zest to the batter
- Mix on low speed for about 15 seconds until the zest is evenly distributed throughout
- The zest adds intense lemon flavor and beautiful flecks of yellow throughout the cake
7. Alternate Adding Dry and Wet Ingredients
- With the mixer on low speed, add one-third of the dry flour mixture
- Mix just until the flour starts to incorporate (don’t overmix)
- Add half of the buttermilk mixture and mix until combined
- Add another third of the dry ingredients, mix briefly
- Add the remaining buttermilk mixture, mix until incorporated
- Add the final third of the dry ingredients and mix on low until just combined
- Stop the mixer and scrape down the bowl
8. Add the Hot Water
- With the mixer on low speed, slowly pour in the hot water
- Mix for about 30 seconds until the batter is smooth and well combined
- The batter will be relatively thin compared to other cakes, which is perfect
- This thin consistency helps create the tender, moist texture
9. Divide the Batter and Bake
- Divide the batter evenly between your two prepared pans (I use a kitchen scale for accuracy)
- Each pan should have about 2 ½ cups (600ml) of batter
- Gently tap the pans on the counter a few times to release any air bubbles
- Place both pans in the preheated oven on the middle rack
- Bake for 28 to 30 minutes, rotating the pans halfway through if your oven has hot spots
- The cakes are done when they spring back when lightly touched and a toothpick inserted in the center comes out with just a few moist crumbs (not wet batter)
- Don’t overbake or the cake will dry out
10. Cool the Cakes
- Remove the pans from the oven and place them on cooling racks
- Let the cakes cool in the pans for exactly 10 minutes
- Run a knife around the edges of each pan to loosen the cakes
- Invert the cakes onto the cooling racks and carefully peel off the parchment paper
- Let the cakes cool completely to room temperature (at least 1 hour) before frosting
- For best results, wrap the cooled cakes in plastic wrap and refrigerate for 30 minutes before frosting
11. Make the Lemon Cream Cheese Frosting
- In a large mixing bowl, beat the softened cream cheese and butter together on medium-high speed for 3 to 4 minutes
- The mixture should be completely smooth, fluffy, and well combined with no lumps
- Scrape down the sides of the bowl
- Add the sifted powdered sugar one cup at a time, mixing on low speed after each addition
- After all the sugar is added, increase speed to medium and beat for 2 minutes
- Add the lemon juice, lemon zest, lemon extract, vanilla extract, and pinch of salt
- Beat on medium-high speed for 2 to 3 minutes until the frosting is light, fluffy, and smooth
- If the frosting is too thick, add a teaspoon of milk at a time
- If it’s too thin, add more powdered sugar ¼ cup at a time
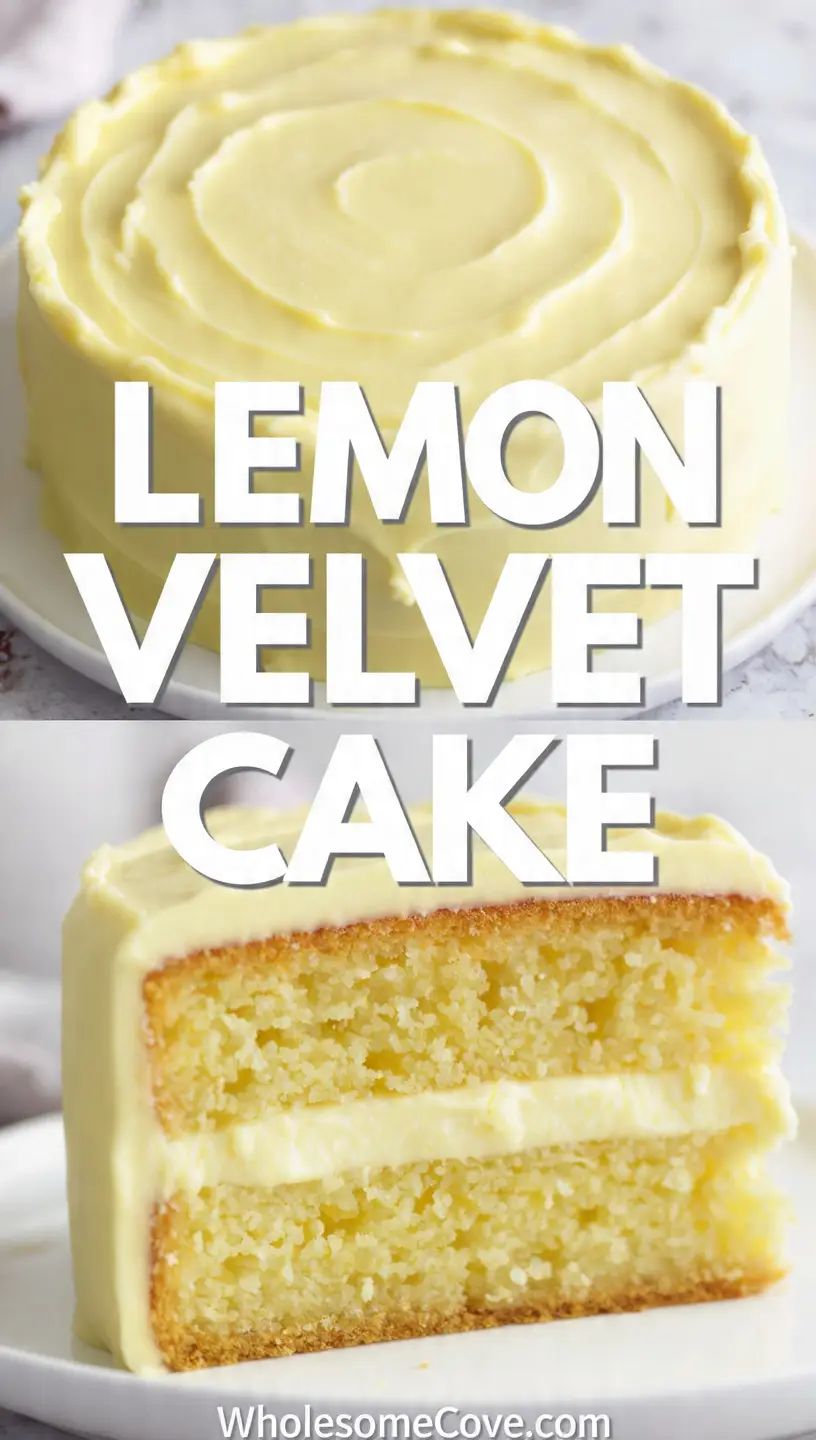
12. Assemble and Frost the Cake
- Place your first cake layer on a serving plate or cake stand
- If desired, place strips of parchment paper under the edges to keep your plate clean
- Spread about 1 ½ cups of frosting evenly over the first layer using your offset spatula
- Make sure the frosting reaches all the way to the edges
- Carefully place the second cake layer on top, making sure it’s centered
- Spread a thin “crumb coat” of frosting over the entire cake (top and sides)
- This initial layer will trap any loose crumbs
- Refrigerate the cake for 15 to 20 minutes to let the crumb coat set
- Apply the remaining frosting in a thick, even layer over the top and sides
- Use your offset spatula to smooth the frosting or create decorative swirls
- If using a turntable, spin it slowly while holding your spatula against the frosting to create smooth sides
- Remove the parchment strips from under the cake
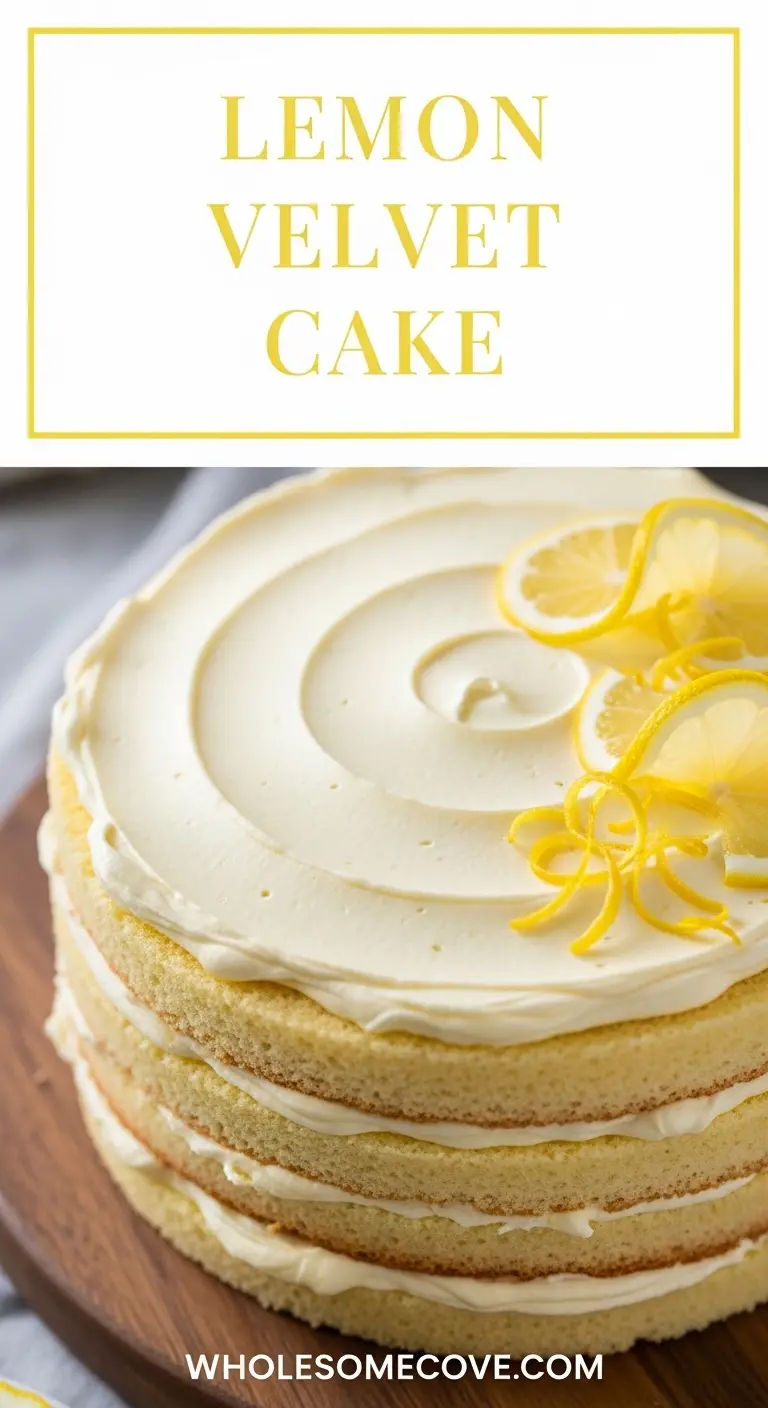
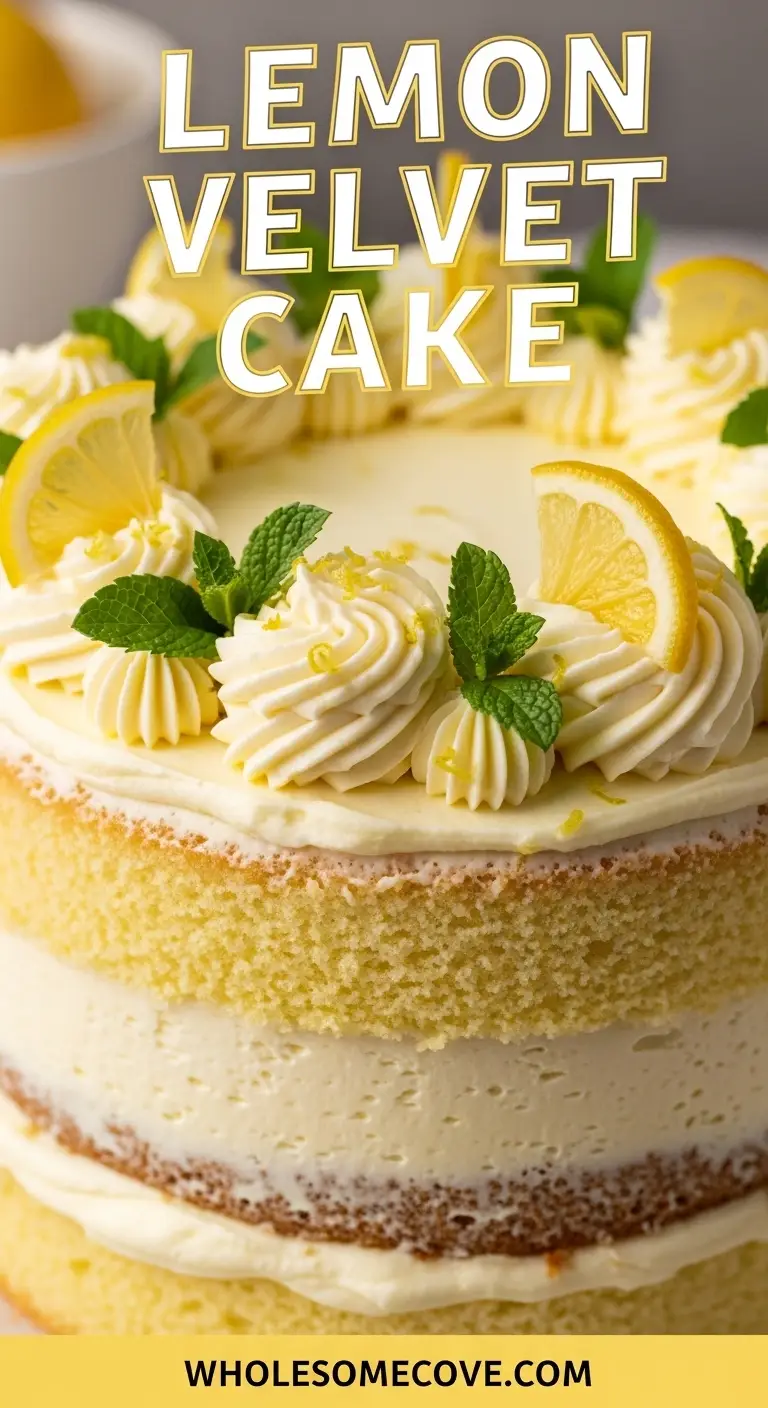
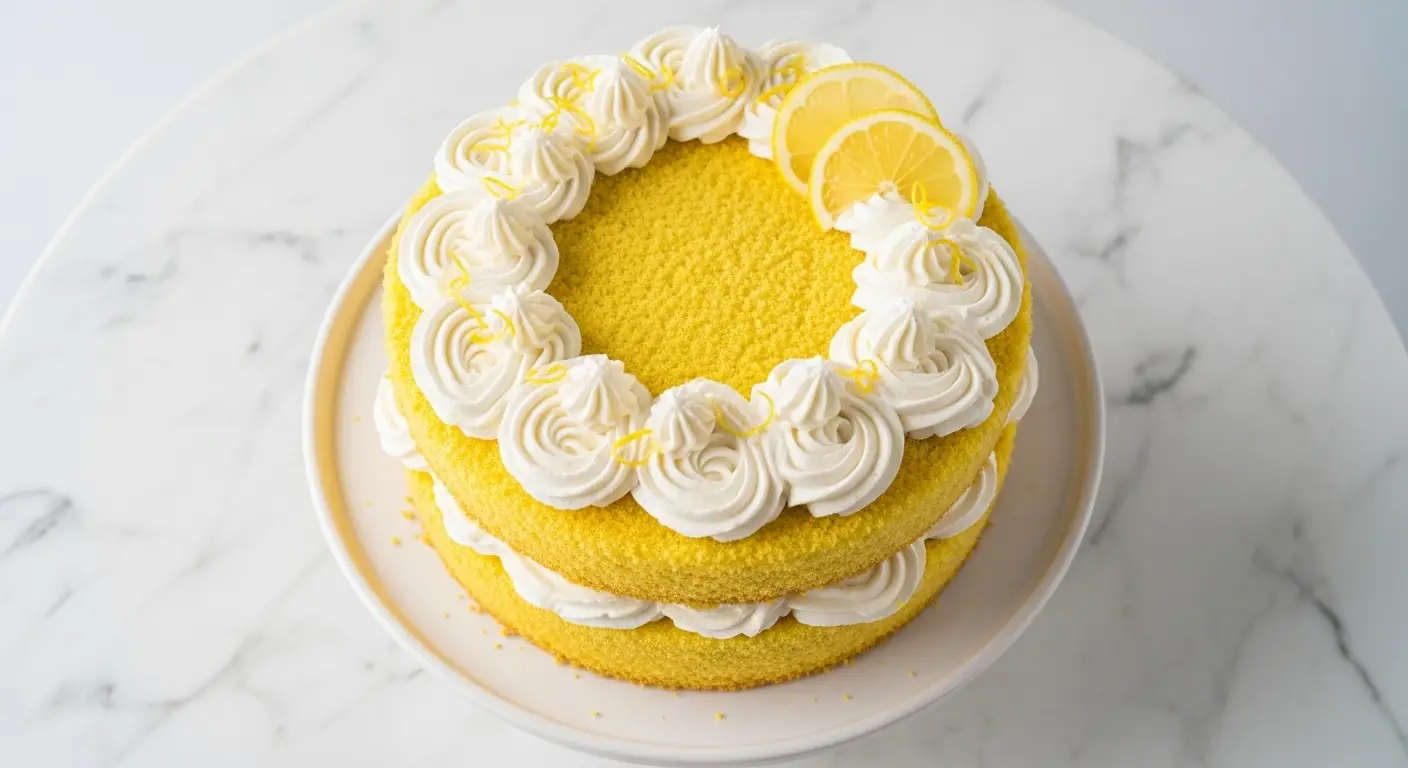
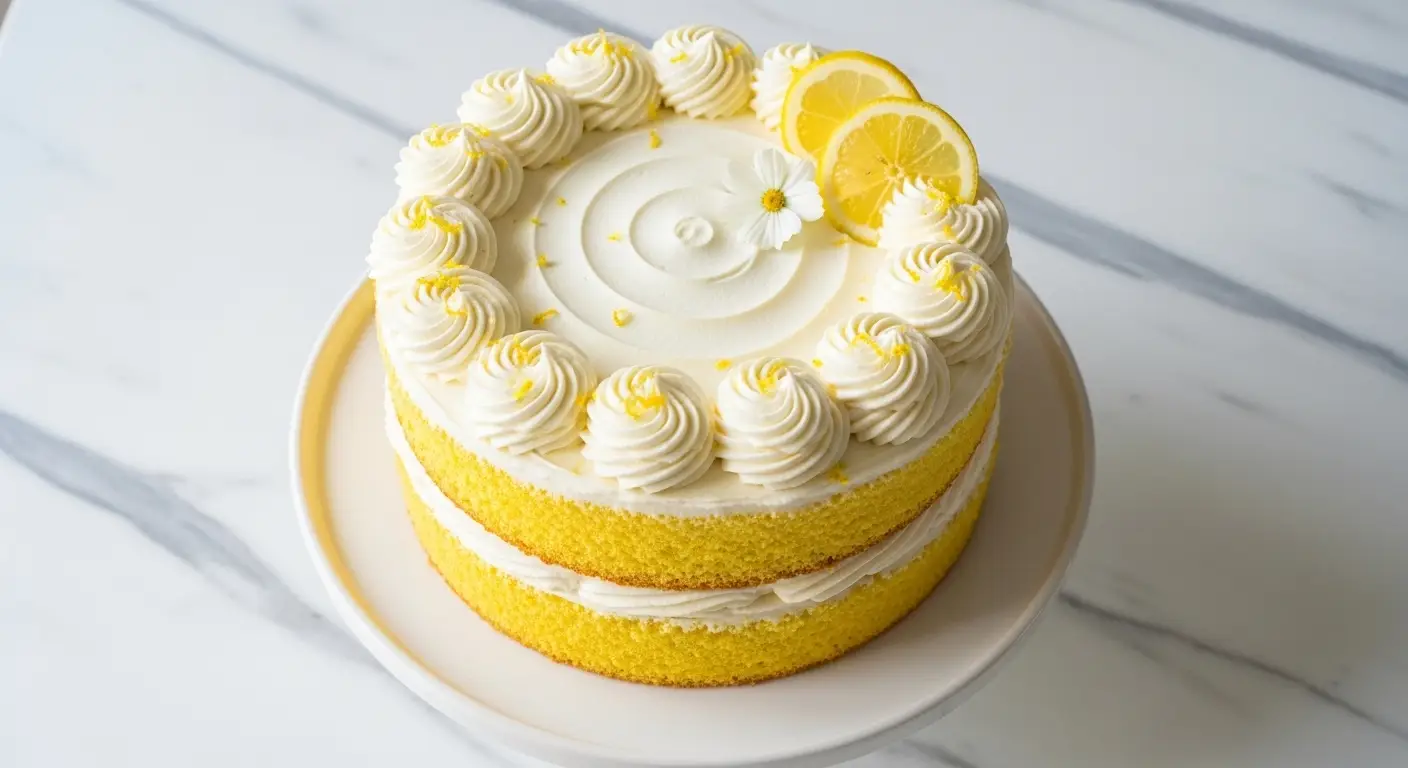
13. Garnish and Serve
- Garnish with fresh lemon slices, candied lemon zest, or edible flowers if desired
- Refrigerate the cake for at least 1 hour before slicing for the cleanest cuts
- For perfect slices, wipe your knife clean between each cut
- Let slices sit at room temperature for 10 to 15 minutes before serving for the best flavor
For a chocolatey variation, try my Black Velvet Cake Recipe.
Tips for The Best Lemon Velvet Cake
After making this cake more times than I can count, I’ve learned several tricks that guarantee perfect results every time. These tips come from both my successes and my mistakes.
- Bring ingredients to room temperature: This is absolutely crucial for velvet cakes. Room temperature eggs, buttermilk, and cream cheese create a smoother batter and frosting. Cold ingredients can cause the batter to curdle or the frosting to have lumps. Take everything out of the fridge 1 to 2 hours before baking.
- Don’t overmix the batter: Once you start adding the dry ingredients, mix only until just combined. Overmixing develops gluten, which creates a tough, dense cake instead of a tender, velvety one. It’s okay if you see a few small streaks of flour.
- Use fresh lemon zest: Pre-grated or jarred lemon zest doesn’t have the same bright, aromatic oils as freshly grated zest. Zest your lemons right before using for maximum flavor impact.
- Don’t overbake: Velvet cakes are notorious for becoming dry when overbaked. Start checking at 26 minutes. The cake is done when it springs back lightly and a toothpick has a few moist crumbs. A completely clean toothpick means you’ve already overbaked it.
- Level your cake layers: If your cakes domed in the oven, use a serrated knife or cake leveler to trim the tops flat. This creates a more stable, professional-looking layered cake.
- Chill before frosting: Refrigerating your cake layers for 30 minutes before frosting makes them sturdier and less likely to crumble or slide around during assembly.
- Soften cream cheese properly: Microwave-softened cream cheese can become too warm and create soupy frosting. Instead, let it sit at room temperature for 2 to 3 hours, or cut it into small cubes to speed up the process.
- Sift the powdered sugar: This prevents lumps in your frosting and creates a silky-smooth texture. It’s worth the extra minute.
- Add extracts at the end: Adding lemon and vanilla extracts after the powdered sugar preserves their volatile flavor compounds. They don’t get muted by extended mixing.
- Use gel food coloring if desired: If you want a more vibrant yellow cake, add a few drops of yellow gel food coloring to the batter. Liquid food coloring can alter the batter’s consistency.
- Apply a crumb coat: This thin first layer of frosting traps all the crumbs so your final coat is perfectly smooth. Don’t skip this step if you want bakery-quality results.
- Score before slicing: Use a sharp knife to lightly score where you’ll cut each slice before cutting through completely. This helps you get even, uniform slices.
You might also enjoy: Lemon Chicken Soup Recipe
What to Serve with Lemon Velvet Cake
This cake is stunning enough to stand alone, but pairing it with complementary accompaniments can elevate your dessert experience even further.
The bright lemon flavor makes this cake incredibly versatile for pairing with both light and rich additions. I love serving it at spring and summer gatherings.
- Fresh berries: Strawberries, raspberries, or blueberries add a pop of color and their natural tartness complements the sweet frosting beautifully
- Whipped cream: A dollop of lightly sweetened whipped cream adds an airy, luxurious element
- Vanilla ice cream: The cool, creamy vanilla provides a perfect temperature and flavor contrast
- Lemon curd: For serious lemon lovers, a spoonful of homemade lemon curd on the side intensifies the citrus experience
- Hot tea or coffee: Earl Grey tea or a light roast coffee pairs wonderfully with the lemony sweetness
- Champagne or sparkling wine: For celebrations, the bubbles and acidity of champagne cut through the richness perfectly
- Mint leaves: Fresh mint adds a refreshing herbal note that enhances the bright lemon flavor
- Candied lemon slices: These make a gorgeous garnish and add a sweet-tart crunch
- Deviled Eggs: For a brunch spread, serve the cake alongside savory items
- Fruit Tart: Create a beautiful dessert table with complementary citrus flavors
Variations of Lemon Velvet Cake
Once you’ve mastered the basic recipe, there are so many fun ways to customize this cake to suit different tastes and occasions. I’ve tried most of these variations myself.
- Lemon Blueberry Velvet Cake: Fold 1 ½ cups of fresh blueberries tossed in 1 tablespoon of flour into the batter before baking. The berries create beautiful purple swirls and add bursts of sweetness.
- Lemon Lavender Velvet Cake: Add 1 tablespoon of culinary lavender buds to the hot water and let steep for 10 minutes. Strain and use the lavender-infused water in the batter for a sophisticated floral note.
- Lemon Coconut Velvet Cake: Replace ½ cup of buttermilk with coconut milk and add ½ cup of sweetened shredded coconut to the batter. Top the frosted cake with toasted coconut flakes.
- Meyer Lemon Velvet Cake: Substitute Meyer lemon zest and juice for regular lemons. Meyer lemons are sweeter and less acidic, creating a more delicate flavor profile.
- Lemon Raspberry Velvet Cake: Use raspberry preserves as a filling between the layers along with the frosting. The raspberry-lemon combination is absolutely divine.
- Lemon Poppy Seed Velvet Cake: Stir 2 tablespoons of poppy seeds into the batter for added texture and a classic flavor pairing.
- Cupcake version: Divide the batter among 24 lined cupcake tins and bake at 325°F for 18 to 22 minutes. Perfect for parties and events.
- Sheet cake version: Bake the batter in a greased and floured 9×13-inch pan at 325°F for 35 to 40 minutes. Easier for casual gatherings.
- Lemon Cream Cheese Filling: Mix equal parts lemon curd and cream cheese frosting for an ultra-tangy filling between layers.
- Naked cake style: Skip the frosting on the sides and leave them exposed for a rustic, modern look. Just frost the top and between layers.
For more cake inspiration, check out my Pumpkin Cheesecake Recipe.
Storage and Reheating
Proper storage is key to maintaining this cake’s incredible moisture and flavor. I’ve learned through trial and error what works best.
- Room temperature storage: Because of the cream cheese frosting, this cake should not be left at room temperature for more than 2 hours, especially in warm weather. The frosting can soften and potentially spoil.
- Refrigerator storage: Store the cake in an airtight container or cover it with a cake dome. It will stay fresh in the refrigerator for 4 to 5 days. The texture actually improves after a day as the flavors meld together.
- Freezing whole cake: Wrap the unfrosted, cooled cake layers tightly in plastic wrap, then aluminum foil. Freeze for up to 3 months. Thaw overnight in the refrigerator before frosting and serving.
- Freezing frosted cake: If freezing a frosted cake, place it in the freezer uncovered for 1 hour to firm up the frosting. Then wrap it carefully in plastic wrap and foil. Freeze for up to 2 months.
- Bringing to room temperature: For the best flavor and texture, remove refrigerated cake 30 to 45 minutes before serving. The frosting softens slightly and the cake becomes more tender.
- Freezing slices: Wrap individual slices in plastic wrap and store in freezer bags for up to 3 months. Thaw in the refrigerator or at room temperature for 1 to 2 hours.
- Reheating: While I don’t typically reheat this cake, you can microwave a refrigerated slice for 8 to 10 seconds to take the chill off. Don’t overheat or the frosting will melt.
- Preventing drying: Place a piece of parchment or wax paper against any cut sides of the cake to prevent them from drying out in the refrigerator.
Read Also: Eggnog Cake Recipe
Nutritional Facts
Here’s the approximate nutritional information per slice (based on 12 servings):
- Calories: 685
- Total Fat: 34g
- Saturated Fat: 17g
- Trans Fat: 0g
- Cholesterol: 115mg
- Sodium: 380mg
- Total Carbohydrates: 90g
- Dietary Fiber: 1g
- Sugars: 68g
- Protein: 7g
- Vitamin A: 18% DV
- Vitamin C: 8% DV
- Calcium: 8% DV
- Iron: 6% DV
Note: Nutritional values are estimates and may vary based on specific ingredients used. This cake is a dessert indulgence meant to be enjoyed in moderation as part of a balanced diet.
Another delicious dessert: Fruit Cocktail Cake Recipe
Health Benefits of Key Ingredients
While this is definitely an indulgent dessert, some of the ingredients do offer nutritional benefits. Understanding what you’re eating makes every bite more enjoyable.
- Lemons: Rich in vitamin C, which supports immune function and skin health. The citrus bioflavonoids in lemon zest have antioxidant properties that fight free radicals. Lemons also contain small amounts of potassium and folate.
- Eggs: Provide high-quality protein and essential amino acids for muscle repair and maintenance. They’re one of the best sources of choline, important for brain health. The yolks contain lutein and zeaxanthin for eye health.
- Buttermilk: Contains probiotics that support gut health and digestion. It’s easier to digest than regular milk for many people and provides calcium for bone health. The lactic acid in buttermilk may help with mineral absorption.
- Cream cheese: Offers calcium and phosphorus for strong bones and teeth. It contains vitamin A for vision and immune function. The fat content helps with the absorption of fat-soluble vitamins.
- Flour: Enriched all-purpose flour provides B vitamins like thiamin, riboflavin, and niacin that support energy metabolism. It also contains iron for healthy blood cells.
For a healthier option, try my Healthy Carrot Cake Recipe.
FAQs About Lemon Velvet Cake
1. Can I make this cake without buttermilk?
Yes, you can make a buttermilk substitute. For every cup of buttermilk needed, combine 1 cup of regular milk with 1 tablespoon of lemon juice or white vinegar.
Stir well and let it sit for 5 minutes before using. The acid curdles the milk slightly, creating a similar tangy effect, though the texture won’t be quite as rich as real buttermilk.
2. Why is my lemon velvet cake dry?
The most common cause of dry velvet cake is overbaking. Velvet cakes have a delicate crumb and continue cooking slightly after you remove them from the oven.
Start checking for doneness at 26 minutes and remove the cake when a toothpick has a few moist crumbs, not when it comes out completely clean. Also make sure your oven temperature is accurate by using an oven thermometer.
3. Can I use lemon juice instead of lemon extract?
I don’t recommend replacing lemon extract entirely with lemon juice because you’d need so much juice that it would throw off the liquid ratios in the recipe. The extract provides concentrated lemon flavor without adding excess moisture.
If you must substitute, use ½ teaspoon of lemon oil (not juice) for every 1 teaspoon of extract. The flavor won’t be quite as strong, but it will work.
4. How do I prevent my cake layers from doming in the middle?
To get flat layers, try using baking strips around your pans (you can buy these or make them by wrapping wet towels around the pans). Also, make sure your oven isn’t running too hot.
Another trick is to slightly lower the temperature to 315°F and bake a bit longer. If you do get domes, simply level them with a serrated knife before assembling.
5. Can I make this cake in advance?
Absolutely! You can bake the cake layers up to 2 days in advance and store them wrapped in plastic wrap at room temperature, or freeze them for up to 3 months. The frosting can be made 1 day ahead and stored in the refrigerator.
Let the frosting come to room temperature and give it a quick re-whip before using. You can also assemble the entire frosted cake 1 to 2 days before serving and keep it refrigerated.
For another make-ahead dessert, try my Creme Brulee Recipe.
Lemon Velvet Cake
Ingredients
- 2 ½ cups all-purpose flour - 300g
- 1 ½ cups granulated sugar - 300g
- 1 teaspoon baking powder
- 1 teaspoon baking soda
- ½ teaspoon salt
- 1 cup buttermilk - 240ml, at room temperature
- ½ cup vegetable oil - 120ml
- ¼ cup vegetable shortening - 56g, melted
- 3 large eggs - at room temperature
- 2 tablespoons fresh lemon juice
- 1 tablespoon lemon zest - from about 2 large lemons
- 1 tablespoon lemon extract
- 1 teaspoon vanilla extract
- 2 teaspoons white vinegar
- ⅓ cup hot water - 80ml
- 16 ounces cream cheese - 450g, softened to room temperature
- 1 cup unsalted butter - 226g, softened to room temperature
- 6 cups powdered sugar - 720g, sifted
- 2 tablespoons fresh lemon juice
- 1 tablespoon lemon zest
- 1 teaspoon lemon extract
- ½ teaspoon vanilla extract
- salt - pinch
Equipment
- Two 9-inch round cake pans
- Parchment paper
- Stand mixer or hand mixer
- Large mixing bowls - At least 2
- Medium mixing bowl
- Whisk
- Rubber spatula
- Measuring cups and spoons
- Zester or microplane - For lemon zest
- Cooling racks
- Offset spatula - For frosting
- Cake turntable - optional but helpful
- Toothpicks - For testing doneness
- Sifter - for powdered sugar
Method
- Preheat oven to 325°F (165°C). Grease two 9-inch round cake pans, line with parchment paper circles, and grease the parchment.
- In a medium bowl, whisk together flour, baking powder, baking soda, and salt. Set aside.
- In a measuring cup, combine buttermilk, lemon juice, lemon extract, vanilla extract, and white vinegar. Stir and set aside.
- In a stand mixer, beat together sugar, vegetable oil, and melted shortening on high speed for 2-3 minutes until pale and fluffy.
- Add eggs one at a time on medium speed, beating 20 seconds after each addition. Beat 30 seconds after the last egg and scrape down the bowl.
- Mix in lemon zest on low speed for 15 seconds until evenly distributed.
- On low speed, alternate adding dry ingredients and buttermilk mixture in three additions, beginning and ending with dry ingredients. Mix until just combined after each addition.
- Slowly pour in hot water with mixer on low speed. Mix 30 seconds until smooth (batter will be thin).
- Divide batter evenly between prepared pans. Bake 28-30 minutes, rotating pans halfway through, until cake springs back when touched and toothpick has moist crumbs.
- Cool cakes in pans for 10 minutes, then invert onto cooling racks, remove parchment, and cool completely (at least 1 hour).
- Beat cream cheese and butter together on medium-high speed for 3-4 minutes until smooth and fluffy with no lumps.
- Add sifted powdered sugar one cup at a time on low speed. Beat on medium for 2 minutes after all sugar is added.
- Add lemon juice, lemon zest, lemon extract, vanilla extract, and salt. Beat on medium-high for 2-3 minutes until light and fluffy.
- Place first cake layer on serving plate. Spread 1½ cups frosting evenly over top, reaching to edges.
- Place second layer on top. Apply thin crumb coat over entire cake, refrigerate 15-20 minutes, then apply remaining frosting in thick, even layer.
- Garnish with lemon slices or zest if desired. Refrigerate at least 1 hour before slicing for cleanest cuts.
Nutrition
Notes
- Bring all ingredients to room temperature before starting for best results and smooth texture.
- Don’t overmix the batter once dry ingredients are added – mix only until just combined to maintain tender texture.
- Use fresh lemon zest, not pre-grated, for maximum flavor impact.
- Don’t overbake – check at 26 minutes. Cake is done when it springs back and toothpick has moist crumbs, not when completely clean.
- Chill cake layers for 30 minutes before frosting to make them sturdier and easier to work with.
- Soften cream cheese at room temperature, not in microwave, to prevent soupy frosting.
- Sift powdered sugar to prevent lumps in frosting.
- Apply a crumb coat first, chill it, then apply final frosting layer for professional-looking results.
- Store in refrigerator for up to 5 days in airtight container. Bring to room temperature 30-45 minutes before serving.
- Unfrosted cake layers can be frozen up to 3 months wrapped tightly in plastic wrap and foil.
Private Notes
Tried this recipe?
Let us know how it was!Final Thoughts
This Lemon Velvet Cake has become one of my most treasured recipes, and I hope it brings as much joy to your kitchen as it has to mine. The combination of bright lemon flavor and impossibly tender texture creates something truly special.
Every time I serve this cake, I watch people’s faces light up after the first bite. Don’t be intimidated by the layer cake format or the number of steps. Just take your time, follow the instructions, and trust the process.
I’d love to hear how your lemon velvet cake turns out! Leave a comment below with your results, any variations you tried, or questions you have. And if you loved this recipe, please share it with your friends and family who appreciate a good homemade cake.
Recommended:
- Red Velvet Cake Recipe with Cake Mix
- Chocolate Chip Cookies Recipe
- Pumpkin Waffle Recipe
- Baked Ziti Recipe
- Shepherds Pie Recipe
- Broccoli Salad Recipe
- Creme Brulee Cookies Recipe
- Amish Apple Cake Recipe
- Easy Carrot Cake Recipe
- Healthy Banana Bread Recipe