
I’ve spent years trying to find the perfect balance between a traditional apple pie and something I could feel good about serving my family more than just once a year. This healthy apple pie recipe is the result of countless Sunday afternoons experimenting in my kitchen, trying different natural sweeteners and flour combinations until I finally got it right.
My kids now request this dessert almost weekly, and I don’t feel guilty making it because it’s packed with real ingredients and significantly less sugar than the classic version. The crust is made with whole wheat flour and coconut oil, while the filling uses honey and maple syrup instead of refined sugar.
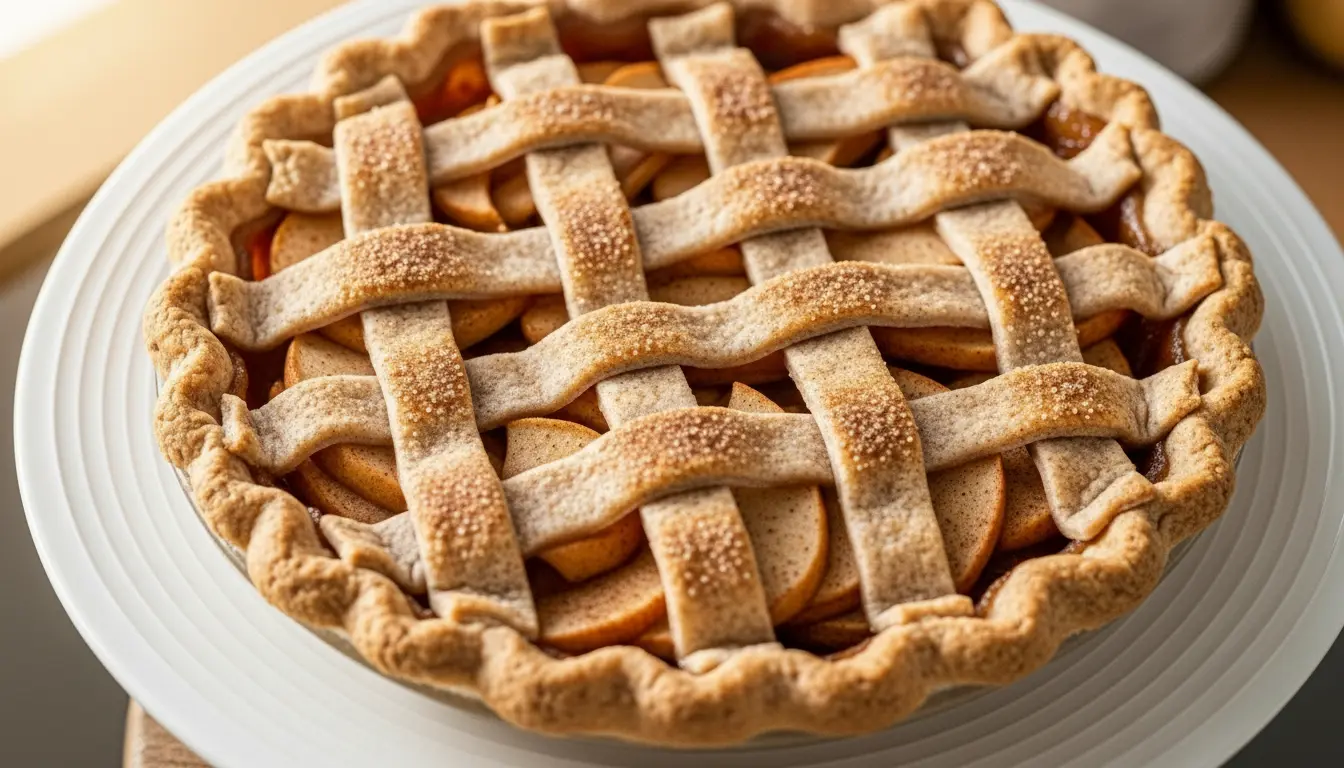
What really makes this recipe special is how it doesn’t taste “healthy” at all. The crust is still buttery and flaky, and the apple filling has that perfect balance of sweetness and spice that makes apple pie so irresistible.
| Quick Recipe Summary | |
|---|---|
| Prep Time | 30 minutes |
| Cook Time | 55 minutes |
| Total Time | 1 hour 25 minutes |
| Servings | 8 slices |
| Difficulty Level | Medium |
Why You’ll Love This Healthy Apple Pie Recipe
This recipe transforms a classic dessert into something you can enjoy without the sugar crash that usually follows. I’ve replaced all the refined ingredients with wholesome alternatives that actually enhance the natural apple flavor instead of masking it.
The whole wheat crust adds a nutty depth that complements the cinnamon-spiced apples beautifully. Plus, using coconut oil instead of butter or shortening creates a flakier texture while keeping things dairy-free for those who need it.
Here’s what makes this recipe stand out:
- Naturally sweetened: Uses honey and maple syrup instead of white sugar, reducing the overall sweetness while adding complex flavors
- Whole grain goodness: The whole wheat pastry flour provides fiber and nutrients without making the crust dense or heavy
- Flexible sweetness: You can adjust the honey and maple syrup to your taste preferences without ruining the texture
- No weird aftertaste: Unlike some healthy desserts, this pie tastes like the real deal because it IS the real deal, just made better
- Perfect texture: The crust is flaky and golden, while the apples maintain a slight bite instead of turning into mush
- Customizable spices: The warming blend of cinnamon, nutmeg, and ginger can be adjusted to your family’s preferences
I love serving this at holiday gatherings because no one ever guesses it’s a healthier version. If you’re looking for more wholesome dessert options, my healthy pumpkin pie uses similar techniques with equally delicious results.
Ingredients
This recipe uses simple, recognizable ingredients that you might already have in your pantry. I’ve broken everything down into the crust and filling components to make shopping and prep easier.
For the Whole Wheat Crust:
- 2½ cups (300g) whole wheat pastry flour, plus extra for dusting
- 1 tablespoon (12g) coconut sugar or regular sugar
- 1 teaspoon (6g) sea salt
- ¾ cup (180ml) coconut oil, solid and cold
- 6-8 tablespoons (90-120ml) ice water
- 1 tablespoon (15ml) apple cider vinegar
For the Apple Filling:
- 7-8 medium apples (about 3 pounds/1.4kg), peeled, cored, and sliced thin
- ⅓ cup (80ml) pure maple syrup
- 3 tablespoons (45ml) raw honey
- 3 tablespoons (24g) arrowroot powder or cornstarch
- 2 teaspoons (4g) ground cinnamon
- ½ teaspoon (1g) ground nutmeg
- ¼ teaspoon (0.5g) ground ginger
- ¼ teaspoon (1.5g) sea salt
- 2 tablespoons (30ml) fresh lemon juice
- 1 teaspoon (5ml) pure vanilla extract
For the Egg Wash:
- 1 egg, beaten
- 1 tablespoon (15ml) milk or non-dairy milk
Kitchen Equipment Needed
Having the right tools makes this recipe significantly easier, especially when working with whole wheat dough which can be slightly more delicate than all-purpose flour dough.
- 9-inch pie dish (glass or ceramic works best for even baking)
- Large mixing bowl for the dough
- Medium mixing bowl for the apple filling
- Food processor or pastry cutter (food processor makes the crust foolproof)
- Rolling pin for rolling out the dough
- Plastic wrap or parchment paper for chilling the dough
- Sharp knife or apple peeler for preparing the apples
- Measuring cups and spoons
- Small bowl for the egg wash
- Pastry brush for applying egg wash
- Pie weights or dried beans (optional, for blind baking)
- Aluminum foil or pie crust shield to prevent over-browning
Recommended Products for This Recipe
After making countless apple pies over the years, I’ve found that a few key products really do make a noticeable difference in the final result. These are the items I reach for every single time I make this recipe.
1. KitchenAid Food Processor
Making pie crust by hand is absolutely doable, but a food processor cuts the time in half and creates a more consistent texture. I pulse the flour and cold coconut oil together for just 10 seconds, and the crust comes together perfectly every time without overworking the dough.
2. Bob’s Red Mill Whole Wheat Pastry Flour
Not all whole wheat flours are created equal for pie making. This particular flour is finely milled, which gives you that tender, flaky crust without the dense, heavy texture that regular whole wheat flour can create. I’ve tried at least five different brands, and this one consistently produces the best results.
3. Ceramic Pie Dish with Handles
A good ceramic pie dish distributes heat evenly, which means your bottom crust gets properly cooked without the edges burning. The handles make it easy to move in and out of the oven, which is especially helpful when you’re checking on it multiple times during baking.
4. Adjustable Pie Crust Shield
This was a total revelation for me. The edges of pie crust always seem to brown faster than the rest, and this shield slides right over the rim to protect it while the center finishes baking. No more burnt edges or trying to carefully wrap aluminum foil around a hot pie.
Another favorite: healthy chocolate chip cookies
Step-by-Step Instructions: How to Make Healthy Apple Pie
1. Make the Whole Wheat Pie Crust
- Add the whole wheat pastry flour, coconut sugar, and sea salt to your food processor and pulse 2-3 times to combine everything evenly.
- Cut the cold coconut oil into small chunks (about tablespoon-sized pieces) and add them to the flour mixture.
- Pulse the mixture 8-10 times in short bursts until it resembles coarse crumbs with some pea-sized pieces of coconut oil still visible (this is what creates those flaky layers).
- Mix the apple cider vinegar with 6 tablespoons of ice water in a small cup.
- With the food processor running on low, slowly drizzle the water mixture through the feed tube until the dough just starts to come together (it should look shaggy and hold together when pinched, not form a smooth ball).
- If the dough seems too dry and crumbly, add the remaining 1-2 tablespoons of ice water, one tablespoon at a time, pulsing between additions.
- Turn the dough out onto a clean work surface and gently gather it into a ball, then divide it into two portions (one slightly larger than the other for the bottom and top crusts).
- Flatten each portion into a disk about 1 inch thick, wrap tightly in plastic wrap, and refrigerate for at least 30 minutes (this rest period allows the flour to hydrate and makes the dough much easier to roll out).
2. Prepare the Apple Filling
- Peel all the apples using a vegetable peeler or paring knife, making sure to remove all the skin for the smoothest texture.
- Cut each apple into quarters, remove the core and seeds, then slice each quarter into thin slices about ¼ inch (6mm) thick (uniform thickness ensures even cooking).
- Place all the sliced apples in a large mixing bowl and immediately drizzle with fresh lemon juice, tossing to coat (this prevents browning and adds a bright flavor that balances the sweetness).
- In a separate small bowl, whisk together the maple syrup, honey, arrowroot powder, cinnamon, nutmeg, ginger, and sea salt until the arrowroot is completely dissolved with no lumps.
- Pour the spice mixture over the apples and add the vanilla extract, then use your hands or a large spoon to toss everything together, making sure every apple slice is evenly coated.
- Let the apple mixture sit at room temperature while you roll out the bottom crust (the apples will release some juice, which is normal and will help create the filling sauce).
3. Roll Out and Place the Bottom Crust
- Remove the larger disk of dough from the refrigerator and let it sit at room temperature for about 5 minutes (this makes it easier to roll without cracking).
- Lightly flour your work surface and rolling pin to prevent sticking, but use flour sparingly as too much can make the crust tough.
- Place the dough disk in the center of your floured surface and begin rolling from the center outward in all directions, rotating the dough a quarter turn every few rolls to maintain a circular shape.
- Roll the dough into a circle about 12 inches (30cm) in diameter and approximately ⅛ inch (3mm) thick (it should be large enough to fit into your pie dish with about 1 inch of overhang).
- Carefully fold the dough circle in half, then in half again to create a quarter wedge that’s easier to transfer.
- Place the point of the wedge in the center of your pie dish and gently unfold the dough, allowing it to naturally settle into the dish without stretching (stretching causes shrinkage during baking).
- Press the dough gently into the bottom and up the sides of the pie dish, making sure there are no air pockets trapped underneath.
- Trim the excess dough around the edges, leaving about 1 inch (2.5cm) of overhang, and place the lined pie dish in the refrigerator while you roll out the top crust.
4. Fill the Pie and Add the Top Crust
- Remove the pie dish with the bottom crust from the refrigerator and pour the apple filling into the shell, spreading it out evenly with a spoon.
- Arrange the apples so they’re relatively flat and even (this prevents large air pockets that can cause the top crust to sink).
- Roll out the second disk of dough following the same method as the bottom crust, creating another 12-inch circle.
- You can either drape this circle over the entire pie for a traditional look, or cut it into ¾-inch strips to create a lattice pattern (I usually do a full top crust because it’s faster and my family prefers it).
- If using a full top crust, fold it into quarters, place it over the filling, unfold it, and press the edges together with the bottom crust.
- Trim any excess dough from both crusts, leaving about ½ inch overhang, then fold the edges under themselves and crimp decoratively using your fingers or a fork.
- Cut 4-5 small slits in the top crust to allow steam to escape during baking (this is crucial for preventing a soggy bottom crust).
- Brush the entire top crust with the beaten egg wash (this creates that beautiful golden-brown finish).
5. Bake the Pie
- Position your oven rack in the lower third of the oven and preheat to 425°F (220°C) (the lower position helps the bottom crust crisp up properly).
- Place the assembled pie on a large baking sheet to catch any drips and put it in the preheated oven.
- Bake at 425°F (220°C) for 20 minutes to set the crust and start the browning process.
- After 20 minutes, reduce the oven temperature to 375°F (190°C) without opening the oven door, and continue baking for another 35-45 minutes.
- Check the pie around the 30-minute mark (after temperature reduction) and if the edges are browning too quickly, cover them with a pie shield or strips of aluminum foil.
- The pie is done when the crust is deep golden brown, the filling is bubbling vigorously through the vents, and a knife inserted through a slit slides easily through tender apples (total baking time is usually 55-65 minutes).
- Remove the pie from the oven and place it on a wire cooling rack, allowing it to cool for at least 3-4 hours before slicing (I know it’s tempting, but cutting too early results in runny filling that hasn’t had time to set).
You might also enjoy: Healthy Carrot Cake Recipe
Tips for The Best Healthy Apple Pie
Getting this pie just right took me several attempts, and I learned some valuable lessons along the way that make all the difference.
- Choose the right apple variety: I use a combination of Granny Smith and Honeycrisp apples for the best results (the Granny Smiths provide tartness and hold their shape, while the Honeycrisps add natural sweetness and break down slightly to create a saucy filling).
- Keep everything cold: The coconut oil needs to stay solid throughout the mixing process, which is why ice water is essential (warm ingredients create a tough, dense crust instead of a flaky one).
- Don’t skip the resting time: Chilling the dough for at least 30 minutes allows the gluten to relax and the flour to fully hydrate, making it much easier to roll out without cracking or shrinking during baking.
- Use arrowroot instead of cornstarch if possible: Arrowroot creates a clearer, glossier filling and doesn’t have that chalky taste that cornstarch sometimes leaves behind (plus it’s a more natural thickener).
- Slice apples uniformly: I learned this the hard way when some pieces were mushy while others were still too firm (using a mandoline or taking time to cut evenly makes a huge difference).
- Let the filling macerate: Allowing the apples to sit in the spice mixture for 10-15 minutes before filling the pie draws out some moisture and helps the flavors meld together beautifully.
- Vent properly: Those steam vents in the top crust aren’t just decorative (without them, steam gets trapped and makes the bottom crust soggy, which is everyone’s worst pie nightmare).
- Use a lower oven rack: Placing the pie in the lower third of the oven exposes the bottom crust to more direct heat, which prevents that dreaded soggy bottom that plagues so many fruit pies.
- Be patient with cooling: This is probably the hardest tip to follow, but letting the pie cool for at least 3 hours allows the filling to thicken properly (I once cut into a pie after just an hour and ended up with apple soup).
- Brush with egg wash generously: A good coating of egg wash creates that gorgeous bakery-style golden finish (I use a combination of egg and milk for the best color and shine).
Read Also: Healthy Tiramisu Recipe
Serving Suggestions

This healthy apple pie is incredibly versatile and pairs beautifully with both classic and creative accompaniments.
I usually serve it slightly warm with a scoop of vanilla ice cream on the side, though Greek yogurt makes an excellent healthier alternative that adds a tangy contrast to the sweet apples. A dollop of homemade whipped coconut cream is another favorite in our house, especially for dairy-free guests.
For breakfast the next day (yes, really!), I love having a slice alongside my morning coffee. Some people think that’s strange, but the whole wheat crust and fruit filling make it feel less indulgent than traditional dessert.
Here are some serving ideas I’ve tried and loved:
- Classic vanilla ice cream: The cold, creamy texture against the warm pie is unbeatable
- Thick Greek yogurt: Adds protein and a slight tang that complements the sweet filling
- Salted caramel sauce: Drizzle some over the top for an extra-special presentation (yes, this adds sugar, but sometimes you want to go all out)
- Sharp cheddar cheese: This is a traditional pairing in some regions, and the savory cheese against sweet apples is surprisingly delicious
- Whipped coconut cream: Perfect for dairy-free diets and has a lighter texture than traditional whipped cream
- Warm homemade cinnamon applesauce: Intensifies the apple flavor and adds extra moisture
- Chopped toasted pecans or walnuts: Sprinkle on top for added crunch and healthy fats
- Hot spiced tea or apple cider: The perfect beverage pairing that echoes the warming spices in the pie
Variations of Healthy Apple Pie
Once you master this basic recipe, there are endless ways to customize it to your preferences or dietary needs.
- Add cranberries: Mix in 1 cup of fresh or frozen cranberries with the apples for a tart twist that’s perfect for holiday gatherings (reduce the honey slightly to compensate for the extra tartness).
- Crumb topping instead of top crust: Replace the top crust with a mixture of oats, almond flour, coconut oil, and maple syrup for an apple crisp-inspired version (this is my go-to when I’m short on time).
- Caramel apple version: Stir 3 tablespoons of almond or cashew butter into the filling for a creamy, caramel-like flavor without any refined sugar.
- Spice variations: Try adding ½ teaspoon of cardamom or a pinch of clove for a more complex spice profile that feels exotic and special.
- Gluten-free crust: Substitute the whole wheat flour with a 1:1 gluten-free flour blend (I’ve had success with Bob’s Red Mill 1-to-1 Baking Flour, though the texture is slightly different).
- Nut crust: Replace half the flour with almond flour for a nuttier flavor and extra protein (this creates a more tender, cookie-like crust).
- Mixed fruit filling: Combine apples with pears or add some blackberries for a more complex flavor profile (adjust sweetener to taste as different fruits have varying sugar levels).
- Vegan version: Use a flax egg (1 tablespoon ground flaxseed mixed with 3 tablespoons water) for the egg wash, and brush with non-dairy milk instead for a fully plant-based option.
- Individual mini pies: Use muffin tins to create personal-sized pies that are perfect for portion control and entertaining (reduce baking time by about 15 minutes).
- Streusel-topped: Skip the top crust entirely and add a crispy oat-based streusel topping for added texture and a rustic look.
Another favorite: Pumpkin Chocolate Chip Cookies
Storage and Reheating
Proper storage ensures your pie stays fresh and delicious for several days after baking.
- Room temperature storage: The pie can sit covered on the counter for up to 2 days (I use a pie keeper or aluminum foil tent to protect it while still allowing some air circulation).
- Refrigerator storage: For longer storage, cover the pie tightly with plastic wrap or aluminum foil and refrigerate for up to 5 days (bring it to room temperature before serving, or warm slightly in the oven).
- Freezing baked pie: Wrap the cooled pie tightly in plastic wrap, then in aluminum foil, and freeze for up to 3 months (thaw overnight in the refrigerator before reheating).
- Freezing unbaked pie: Assemble the entire pie, wrap it tightly, and freeze before baking (when ready to bake, add 10-15 minutes to the baking time and bake directly from frozen without thawing).
- Reheating individual slices: Place a slice on a microwave-safe plate and heat for 20-30 seconds, or warm in a 350°F (175°C) oven for 10-15 minutes until heated through.
- Reheating whole pie: Cover the pie loosely with aluminum foil and warm in a 350°F (175°C) oven for 15-20 minutes (the foil prevents over-browning while the inside heats).
- Preventing soggy crust: When reheating, place the pie or slice directly on the oven rack (not on a baking sheet) to allow heat to circulate underneath and keep the bottom crust crisp.
- Reviving leftover pie: If the crust has softened in storage, reheat it uncovered in a 375°F (190°C) oven for 10 minutes to restore some crispness.
Nutritional Facts
Per serving (1 slice, based on 8 servings):
- Calories: 320
- Total Fat: 14g
- Saturated Fat: 11g
- Cholesterol: 25mg
- Sodium: 320mg
- Total Carbohydrates: 48g
- Dietary Fiber: 5g
- Sugars: 22g
- Protein: 4g
- Vitamin C: 8% DV
- Calcium: 3% DV
- Iron: 8% DV
- Potassium: 180mg
This recipe provides significantly more fiber and fewer calories than traditional apple pie, which typically contains 400-450 calories per slice due to refined flour, butter, and excessive sugar.
Read Also: Healthy Banana Bread Recipe
Health Benefits of Key Ingredients
This healthier version of apple pie doesn’t just taste good; it actually provides some nutritional benefits that make it a more mindful dessert choice.
The ingredients work together to create a treat that satisfies your sweet tooth while offering real nutritional value. Here’s what makes each component beneficial:
- Apples: Rich in fiber, particularly pectin, which supports digestive health and helps regulate blood sugar levels (one medium apple provides about 4 grams of fiber, and this pie uses 7-8 apples).
- Whole wheat pastry flour: Contains all three parts of the wheat grain, providing more fiber, B vitamins, iron, and magnesium than refined white flour (the fiber helps slow down sugar absorption).
- Coconut oil: Contains medium-chain triglycerides (MCTs) that are metabolized differently than other fats and may support energy levels and metabolism (plus it’s dairy-free for those with sensitivities).
- Maple syrup: While still a sweetener, pure maple syrup contains minerals like manganese and zinc, plus antioxidants that aren’t found in refined white sugar.
- Raw honey: Contains trace amounts of vitamins, minerals, and antioxidants, and has antimicrobial properties (local honey may even help with seasonal allergies).
- Cinnamon: Has anti-inflammatory properties and may help regulate blood sugar levels, making it particularly beneficial in a dessert context (it also allows us to use less sweetener because it enhances perceived sweetness).
- Nutmeg and ginger: Both contain compounds that support digestion and have anti-inflammatory properties (ginger has been used medicinally for centuries to soothe upset stomachs).
FAQs About Healthy Apple Pie
1. Can I use regular all-purpose flour instead of whole wheat pastry flour?
Yes, you absolutely can substitute all-purpose flour if you don’t have whole wheat pastry flour on hand. The texture will be slightly lighter and more traditional, though you’ll lose some of the nutritional benefits and nutty flavor that whole wheat provides.
If you want a middle ground, try using half all-purpose and half whole wheat pastry flour for a lighter texture that still maintains some whole grain goodness.
2. Why is my pie filling runny even after baking?
The most common reason for runny filling is cutting into the pie before it’s fully cooled and set. The arrowroot powder needs time to thicken as the pie cools, which typically takes 3-4 hours minimum.
If you’ve waited long enough and it’s still runny, you may need to increase the arrowroot powder to 4 tablespoons next time, or make sure you’re baking until you see vigorous bubbling through the vents.
3. Can I make this pie ahead of time?
Absolutely! You can prepare and bake the pie up to 2 days in advance and store it covered at room temperature.
For even more advance prep, you can assemble the entire unbaked pie, wrap it tightly in plastic wrap and aluminum foil, and freeze it for up to 3 months (just bake it directly from frozen, adding 10-15 extra minutes to the cooking time).
4. What’s the best way to prevent a soggy bottom crust?
The key is placing your pie on the lower rack of the oven where the bottom gets more direct heat exposure. I also like to place the pie dish on a preheated baking sheet, which gives the bottom crust an extra boost of heat.
Make sure you’re baking until you see vigorous bubbling through the vents, and resist cutting into it too early (patience is truly the secret weapon against soggy crusts).
5. Can I reduce the sweetener even more?
Yes, the amount of sweetener in this recipe is already quite moderate, but you can reduce it further if you prefer less sweet desserts. I’d suggest starting by cutting the honey and maple syrup down to ¼ cup total and tasting the apple mixture before adding to the crust.
Keep in mind that the type of apples you use makes a big difference (sweeter varieties like Honeycrisp or Gala need less added sweetener than tart Granny Smiths).
For more wholesome dessert options, check out my healthy pumpkin cookies.
Final Thoughts
This healthy apple pie has become such a staple in my home that I honestly can’t remember the last time I made a traditional version. The whole wheat crust adds such a wonderful depth of flavor, and knowing that I’m serving my family something made with wholesome ingredients makes me feel good about offering seconds.
The beauty of this recipe is that it proves you don’t have to sacrifice flavor to make healthier choices. Every time I serve it to guests, they’re shocked when I tell them it’s made with whole wheat flour and natural sweeteners.
I really hope you’ll give this recipe a try. Start with the basic version as written, then feel free to experiment with the variations once you’re comfortable with the technique.
I’d love to hear how it turns out for you! Drop a comment below with your experience, any modifications you made, or your favorite way to serve it.
Recommended:
- Healthy Cornbread Recipe
- Sweet Potato Bread Recipe
- Pumpkin Spice Latte Recipe
- Baked Oatmeal Recipe
- Poached Pear Recipe
- Maple Glazed Carrots Recipe
- Fall Muffin Recipes
- Pumpkin French Toast Recipe
- Snickerdoodle Banana Bread Recipe
- Coconut Cream Pie Recipe
