This no-bake peach tart recipe uses eleven ingredients and needs about twenty-five minutes of hands-on work before the fridge does the rest.
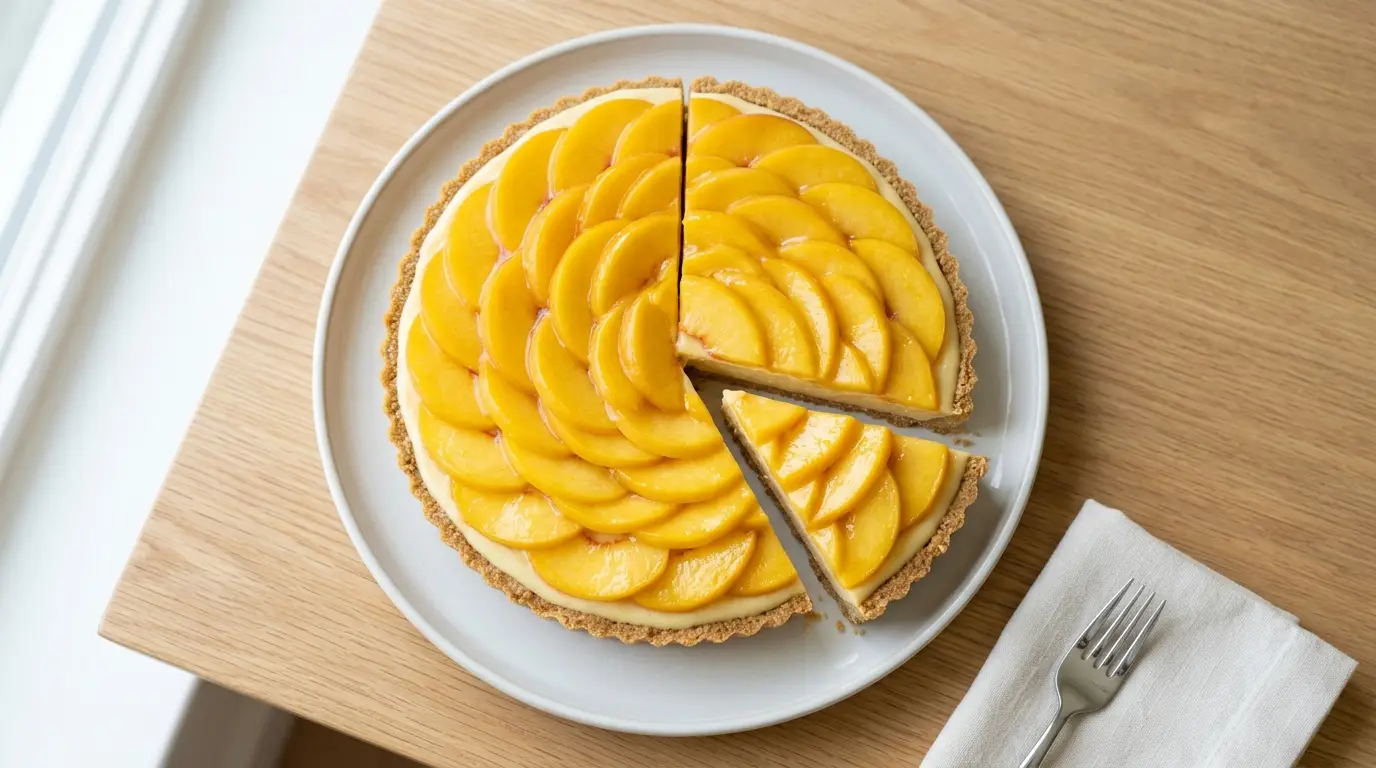
A graham cracker crust holds a lemon-brushed cream cheese filling, and thin peach slices fan across the top under a warm peach preserve glaze that sets to a light shine once chilled.
The filling firms up because the whipped cream folded into the cream cheese base is cold when it goes in, so the structure holds a clean slice instead of collapsing the moment you cut it.
| Quick Recipe Summary | |
|---|---|
| Prep Time | 25 minutes |
| Chill Time | 3 hours |
| Total Time | 3 hours 25 minutes |
| Servings | 10 slices |
| Difficulty Level | Easy |
For a version that goes through the oven instead, the Peach Tart Recipe uses a shortcrust base baked until golden before the fruit goes in.

Why You’ll Love This No-Bake Peach Tart Recipe
This dessert skips the oven entirely, which matters most in late summer when peaches are ripest and the kitchen is already warm enough. The filling comes together with a hand mixer in under ten minutes.
- No oven required, so it stays a practical option on hot days or when oven space is already taken
- A graham cracker crust that holds together firmly enough to slice cleanly once chilled
- A tangy cream cheese filling balanced with lemon zest instead of tasting purely sweet
- Fresh peach slices arranged on top, so every bite has real fruit rather than a cooked filling
- A glossy peach preserve glaze that keeps the fruit from drying out in the fridge
- Make-ahead friendly, since the tart needs to chill for hours before it’s sliced anyway
- Simple enough for a first-time baker, with no rolling pin or blind baking involved
Readers looking for a caramel-topped version instead will find one in the Peach Tarte Tatin Recipe, where the fruit cooks down before the crust goes on top.
Ingredients
Everything below is divided by component so it’s easy to see what belongs in the crust, the filling, and the topping. Measurements are given in both cups and grams so the recipe works whether you measure by volume or by weight.
For the Crust
- 1 ½ cups (150g) graham cracker crumbs
- ⅓ cup (65g) granulated sugar
- 6 tablespoons (85g) unsalted butter, melted
For the Filling
- 16 oz (450g) cream cheese, softened to room temperature
- ¾ cup (90g) powdered sugar, sifted
- 1 teaspoon pure vanilla extract
- 1 teaspoon lemon zest, finely grated
- 1 cup (240ml) heavy cream, cold
For the Topping
- 4 to 5 large ripe peaches, thinly sliced (about 700g)
- 1 tablespoon fresh lemon juice
- ½ cup (160g) peach preserves
- 1 tablespoon water
For anyone assembling something similar in a smaller size, the Mini Peach Tart Recipe uses the same idea scaled down into individual portions.
Kitchen Equipment Needed
None of the tools below are unusual, but a few of them make a real difference in how cleanly the tart slices and how easily the filling comes together without lumps.
- A 9-inch tart pan with a removable bottom
- A hand mixer or stand mixer for beating the cream cheese filling smooth
- A large and a medium mixing bowl
- A rubber spatula for folding the whipped cream into the filling without deflating it
- A pastry brush for applying the peach preserve glaze evenly
- A sharp knife for slicing the peaches thin and even
- A microplane zester for the lemon zest
- Measuring cups and spoons
If you’d rather build the crust from puff pastry instead of graham crackers, the Peach Tart with Puff Pastry uses a flaky base under the same idea of sliced peaches on top.
Recommended Products for This Recipe
These are products I reach for specifically because of problems they solve in this recipe, not just general kitchen favorites. Each one addresses something that actually goes wrong if you skip it.
1. USA Pan 9-Inch Tart Pan with Removable Bottom
A regular pie plate makes it hard to get a clean slice out without cracking the crust. The removable bottom on this pan lets you push the whole tart up and off in one piece, which keeps the crust intact and makes for a much cleaner presentation at the table.
2. KitchenAid 5-Speed Hand Mixer
Beating cold cream cheese by hand leaves lumps that never fully smooth out once the whipped cream is folded in. A hand mixer gets the cream cheese silky in under two minutes, which matters here since the filling isn’t cooked to smooth out any texture issues later.
3. OXO Good Grips Silicone Pastry Brush
A stiff bristle brush tends to drag the fruit and tear the thin peach slices when you’re brushing on the glaze. Silicone bristles glide over the fruit instead of catching on it, so the peaches stay in place while the preserves get an even, glossy coat.
4. Nielsen-Massey Pure Vanilla Extract
Since this filling is never heated, any harshness in imitation vanilla stays in the final product instead of cooking off. A real extract makes a noticeable difference in a filling this simple, where there’s nothing else to mask a weak or artificial flavor.
For a fruitier variation on this same format, the Strawberry Peach Tart Recipe swaps in a mix of berries alongside the peach slices.

Step-by-Step Instructions: How to Make No-Bake Peach Tart
Follow these steps in order and the filling will set firm enough to slice cleanly by the time the chilling window is up.
1. Make the Crust
- In a medium bowl, stir together the graham cracker crumbs and granulated sugar until evenly combined
- Pour in the melted butter and stir with a fork until the mixture looks like wet sand and holds together when pressed between your fingers
- Transfer the mixture to the 9-inch tart pan and press it firmly into the bottom and up the sides using the bottom of a measuring cup
- Place the crust in the freezer for 15 to 20 minutes to firm up while you make the filling
2. Beat the Cream Cheese Base
- Add the softened cream cheese and powdered sugar to a large mixing bowl
- Beat with a hand mixer on medium speed for about 2 minutes, until completely smooth with no visible lumps
- Add the vanilla extract and lemon zest and beat again for 30 seconds to combine
- Scrape down the sides of the bowl with a rubber spatula to make sure everything is evenly mixed
3. Whip the Cream and Fold It In
- In a separate cold bowl, whip the heavy cream with the hand mixer on medium-high speed until soft peaks form, about 2 to 3 minutes
- Add about a third of the whipped cream to the cream cheese mixture and stir it in to loosen the base
- Gently fold in the remaining whipped cream using a rubber spatula, using a scoop-and-fold motion rather than stirring, to keep the mixture light
4. Fill the Crust
- Remove the chilled crust from the freezer
- Spoon the filling into the crust and use an offset spatula or the back of a spoon to spread it into an even layer, right up to the edges
- Cover the pan loosely with plastic wrap and refrigerate for at least 3 hours, or until the filling feels firm to the touch
5. Prepare the Peaches
- Slice the peaches thinly, about ⅛ inch thick, leaving the skin on for color and structure
- Toss the peach slices gently in the lemon juice in a bowl to prevent browning while you finish the glaze
6. Make the Glaze
- Combine the peach preserves and water in a small saucepan or microwave-safe bowl
- Heat gently over low heat, or microwave in 15-second bursts, stirring until the preserves loosen into a pourable glaze
- Let the glaze cool for 5 minutes so it isn’t hot enough to melt the chilled filling underneath
7. Assemble the Tart
- Remove the tart from the refrigerator once the filling is fully set
- Starting from the outer edge, arrange the peach slices in overlapping concentric circles, working your way toward the center
- Using the pastry brush, brush the warm glaze evenly over the peach slices to coat them completely
8. Chill and Serve
- Return the assembled tart to the refrigerator for at least 20 minutes to let the glaze set before slicing
- Remove the outer ring of the tart pan, slice with a sharp knife, and serve chilled
For a technique-driven look at building fruit tarts from scratch, the Fruit Tart Recipe covers a similar assembly method using mixed berries.

Tips for The Best No-Bake Peach Tart
A few small adjustments make the difference between a tart that slices cleanly and one that slumps the moment you cut into it.
- Use full-fat block cream cheese, not the spreadable kind in a tub, since the lower moisture content is what lets the filling set firm
- Make sure the cream cheese is fully softened before beating, or small lumps will remain no matter how long you mix
- Choose peaches that are ripe but still firm; overripe peaches release too much juice and make the top layer soggy
- I ruined my first tart by slicing the peaches too thick, which made them slide right off the filling instead of lying flat in an even layer
- Chill the crust before filling it; skipping this step is the most common reason the crust crumbles instead of holding a clean slice
- Warm the glaze just enough to loosen it. If it’s too hot, it will soften the chilled filling underneath
- Pat the sliced peaches dry with a paper towel after tossing them in lemon juice so the glaze adheres instead of pooling
- Give the tart the full chilling time listed in the recipe. Cutting in early is the top reason home versions of this tart don’t hold their shape
Anyone who wants a version that leans into caramelized fruit rather than fresh slices should look at the Peach Galette Recipe, which uses a folded, rustic crust instead of a tart shell.
What to Serve with No-Bake Peach Tart
This tart is rich and tangy on its own, so it pairs best with something either cold and refreshing or lightly caffeinated to balance the sweetness.
- A scoop of vanilla ice cream alongside each slice
- A dollop of lightly sweetened whipped cream
- Fresh mint leaves scattered over the top for a bit of brightness
- Iced black tea or unsweetened iced coffee, since the tart itself is already sweet
- A chilled glass of Peach Smoothie for a fruit-forward brunch spread
- A glass of Strawberry Peach Smoothie if you want the flavor pairing to continue past dessert
- A dry sparkling wine for an adult gathering
- Fresh berries served on the side for extra color and acidity
For a warm, spoonable dessert to serve alongside it at a larger gathering, the Blackberry Peach Galette Recipe brings a different texture to the same fruit pairing.
Variations of No-Bake Peach Tart
The base recipe holds up well to substitutions, as long as you keep the ratio of filling to fruit roughly the same.
- Nectarine version: Swap the peaches for nectarines and skip peeling entirely, since nectarine skin is thinner and less fuzzy
- Mascarpone filling: Replace half the cream cheese with mascarpone for a slightly lighter, less tangy filling
- Mixed stone fruit: Combine peach slices with plums or apricots for a more varied top layer
- Ginger crust: Add ½ teaspoon ground ginger to the graham cracker crumb mixture for a warmer, spiced base
- Almond crust: Swap graham crackers for crushed vanilla wafers or shortbread cookies and add a few drops of almond extract to the filling
- Honey glaze: Replace the peach preserves with warmed honey for a lighter, less fruity glaze
- Nectarines hold their shape better than slightly underripe peaches, which I learned after a batch of peach slices that turned mushy by the time the glaze went on
For a completely different presentation using the same fruit, the Blueberry Peach Galette Recipe folds peaches into a berry-studded rustic crust instead of a tart shell.
Storage and Reheating
Because this tart is built around a cream cheese filling and fresh fruit, storage matters more here than it does for baked desserts.
- Store the tart covered in the refrigerator for up to 3 days
- I keep the tart uncovered in the fridge for the first hour after assembling, since covering it too soon traps condensation and makes the peach glaze go cloudy
- Once fully chilled, cover loosely with plastic wrap or a domed cake cover to protect the peach topping from getting crushed
- This tart is not freezer-friendly once assembled, since the fresh peaches turn watery and mushy after thawing
- If you want to freeze ahead, freeze the crust and the unfilled cream cheese base separately, then thaw, fill, and top with fresh peaches the day you plan to serve
- Leftover slices are best eaten cold and are not meant to be reheated
For a similarly make-ahead dessert that holds up even better over several days, the Peach Crumble Recipe reheats cleanly in the oven or microwave.
Nutritional Facts
| Nutrition Per Slice (1 of 10) | |
|---|---|
| Calories | 320 kcal |
| Total Fat | 22g |
| Saturated Fat | 13g |
| Carbohydrates | 28g |
| Sugar | 20g |
| Protein | 4g |
| Fiber | 1g |
| Sodium | 190mg |
Values are estimates and will vary depending on the specific brands and peach sizes used.
For another dessert with a similar nutritional profile, the Peach Crisp Recipe uses less cream cheese but adds an oat topping instead.
Health Benefits of Key Ingredients
Even though this is a dessert, a few of the ingredients bring genuine nutritional value along with the flavor.
- Peaches: A good source of vitamin C and vitamin A, along with fiber that supports digestion
- Cream cheese: Provides calcium and a modest amount of protein, though it should be enjoyed in moderation due to its saturated fat content
- Lemon zest and juice: Contains vitamin C and antioxidant compounds called flavonoids, even in the small amounts used here
- Heavy cream: Supplies fat-soluble vitamins A and D, along with the fat that helps the body absorb them
- Graham crackers: Provide a small amount of whole grain, depending on the brand used
Readers who want a version that leans further into the fruit itself might enjoy the Peach Pie Recipe, where the peaches make up a larger share of the total dish.
FAQs About No-Bake Peach Tart
1. Can I use canned or frozen peaches instead of fresh?
Canned peaches work if they’re well drained and patted dry, since excess liquid will make the top layer slide and the glaze won’t adhere properly. Frozen peaches tend to release too much water as they thaw and are not recommended for the fresh-fruit topping in this recipe.
2. How far in advance can I make this tart?
The crust and filling can be made and chilled up to 2 days ahead, covered tightly in the tart pan. Add the fresh peach slices and glaze no more than a few hours before serving, since peaches brown and soften the longer they sit.
3. Why is my filling too soft to slice cleanly?
This usually means the tart didn’t chill long enough, or the whipped cream wasn’t beaten to soft peaks before folding it in. Give it the full 3 hours in the refrigerator, and check that the cream cheese was fully softened before mixing so no dense lumps are throwing off the texture.
4. Can I make this in a pie dish instead of a tart pan?
Yes, a 9-inch pie dish works as a substitute if you don’t own a tart pan with a removable bottom. The slices just won’t release quite as cleanly, so plan to serve straight from the dish rather than trying to remove the whole tart in one piece.
5. How do I keep the peaches from browning on top?
Tossing the sliced peaches in lemon juice before arranging them is the main defense against browning. The peach preserve glaze also helps by sealing the surface of the fruit from air once it’s brushed on.
For a version built specifically around canned peaches year-round, the Peach Crisp with Canned Peaches is worth a look.
No-Bake Peach Tart
Ingredients
- 1 ½ cups graham cracker crumbs - 150g
- ⅓ cup granulated sugar - 65g
- 6 tablespoons unsalted butter - 85g, melted
- 16 oz cream cheese - 450g, softened to room temperature
- ¾ cup powdered sugar - 90g, sifted
- 1 teaspoon pure vanilla extract
- 1 teaspoon lemon zest - finely grated
- 1 cup heavy cream - 240ml, cold
- 4-5 large ripe peaches - about 700g, thinly sliced
- 1 tablespoon fresh lemon juice
- ½ cup peach preserves - 160g
- 1 tablespoon water
Equipment
- 9-inch tart pan with removable bottom
- Hand mixer or stand mixer
- Pastry brush - Silicone bristles recommended
- Microplane zester
Method
- In a medium bowl, stir together the graham cracker crumbs and granulated sugar until evenly combined. Pour in the melted butter and stir with a fork until the mixture looks like wet sand and holds together when pressed.
- Transfer the mixture to the 9-inch tart pan and press it firmly into the bottom and up the sides using the bottom of a measuring cup. Place the crust in the freezer for 15 to 20 minutes to firm up.
- Add the softened cream cheese and powdered sugar to a large mixing bowl. Beat with a hand mixer on medium speed for about 2 minutes until smooth. Add the vanilla extract and lemon zest and beat again for 30 seconds.
- Scrape down the sides of the bowl with a rubber spatula. In a separate cold bowl, whip the heavy cream until soft peaks form, about 2 to 3 minutes.
- Add about a third of the whipped cream to the cream cheese mixture and stir to loosen. Gently fold in the remaining whipped cream using a rubber spatula, using a scoop-and-fold motion to keep the mixture light.
- Remove the chilled crust from the freezer. Spoon the filling into the crust and spread it into an even layer. Cover loosely with plastic wrap and refrigerate for at least 3 hours, or until firm.
- Slice the peaches thinly, about ⅛ inch thick, leaving the skin on. Toss the peach slices gently in the lemon juice in a bowl to prevent browning.
- Combine the peach preserves and water in a small saucepan or microwave-safe bowl. Heat gently until the preserves loosen into a pourable glaze. Let the glaze cool for 5 minutes.
- Remove the tart from the refrigerator. Starting from the outer edge, arrange the peach slices in overlapping concentric circles, working your way toward the center. Brush the warm glaze evenly over the peaches.
- Return the assembled tart to the refrigerator for at least 20 minutes to let the glaze set. Remove the outer ring of the tart pan, slice with a sharp knife, and serve chilled.
Nutrition
Notes
- Use full-fat block cream cheese, not the spreadable kind in a tub, since the lower moisture content is what lets the filling set firm.
- Make sure the cream cheese is fully softened before beating, or small lumps will remain no matter how long you mix.
- Choose peaches that are ripe but still firm; overripe peaches release too much juice and make the top layer soggy.
- Slice the peaches about ⅛ inch thick—thicker slices slide off the filling and won’t lie flat.
- Chill the crust before filling it; skipping this step is the most common reason the crust crumbles instead of holding a clean slice.
- Warm the glaze just enough to loosen it. If it’s too hot, it will soften the chilled filling underneath.
- Pat the sliced peaches dry with a paper towel after tossing them in lemon juice so the glaze adheres instead of pooling.
- Give the tart the full chilling time listed in the recipe. Cutting in early is the top reason home versions of this tart don’t hold their shape.
- Store covered in the refrigerator for up to 3 days. This tart is not freezer-friendly once assembled.
- For a variation, try swapping peaches for nectarines, or replace half the cream cheese with mascarpone for a lighter filling.
Private Notes
Tried this recipe?
Let us know how it was!Final Thoughts
This tart earns its place on a summer table without ever turning on the oven. The mix of a firm graham crust, tangy filling, and fresh fruit on top makes it feel more involved than it actually is to put together.
Give it a try the next time peaches are at their best, and let me know in the comments how yours turns out. If you make this no-bake peach tart, I’d love to see a photo shared or tagged.
Recommended:
- Peach Pie Filling Recipe
- Bisquick Peach Cobbler Recipe
- Peach Crumble Pie Recipe
- Blueberry Peach Crumble Recipe
- Peach Crumble Bars Recipe
- Peach Cobbler Recipe
- Blueberry Peach Crisp Recipe
- Crockpot Peach Dump Cake Recipe
- Grilled Peach and Burrata Salad Recipe