
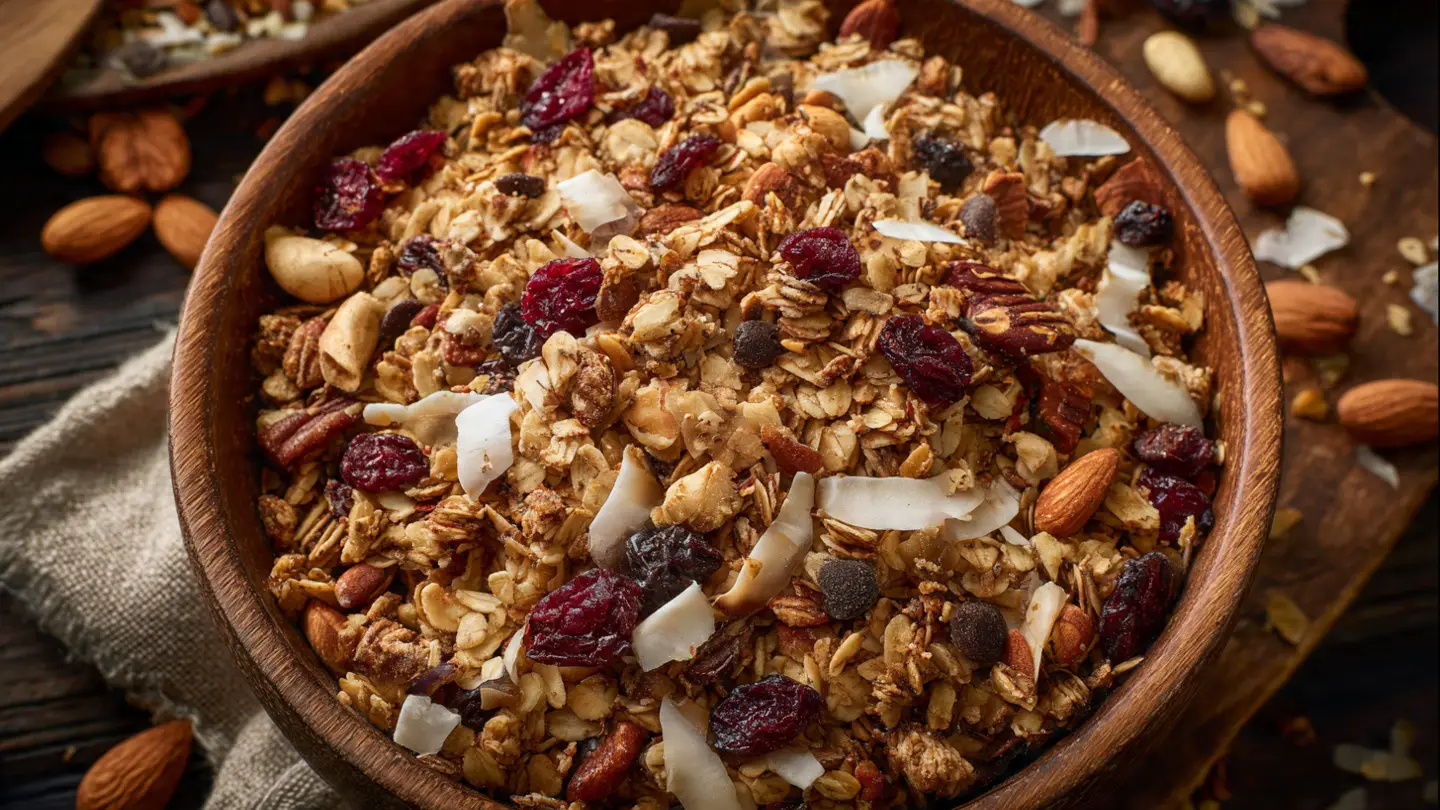
Making granola at home completely changed my breakfast routine. I used to spend a fortune on those fancy bags at the store, only to find they were loaded with sugar and ingredients I couldn’t even pronounce.
One Sunday morning, I decided to experiment with this Healthy Homemade Granola Recipe using simple ingredients I already had in my pantry. The smell alone was enough to wake up the entire household.
Now, I make a batch every week and my family actually looks forward to breakfast. The best part? You can customize it to your taste preferences and dietary needs.
| Quick Recipe Summary | |
|---|---|
| Prep Time | 10 minutes |
| Cook Time | 30 minutes |
| Total Time | 40 minutes |
| Servings | 12 servings (about 6 cups) |
| Difficulty Level | Easy |

Why You’ll Love This Healthy Homemade Granola Recipe
This granola is everything store-bought versions wish they could be. It’s perfectly crispy without being rock-hard, naturally sweet without being candy, and stays fresh for weeks in an airtight container.
I love that I can control every single ingredient that goes into it. No mysterious additives or excessive oils here.
The clusters are my favorite part. They form naturally during baking and give you those satisfying crunchy bites that make granola so addictive.
This recipe is incredibly versatile. You can eat it with milk, sprinkle it over protein overnight oats, mix it into smoothie bowls, or just grab a handful as a snack.
Here’s what makes this recipe special:
- Budget-friendly: Costs a fraction of premium store-bought granola
- Naturally sweetened: Uses honey instead of refined sugar
- Customizable: Add your favorite nuts, seeds, and dried fruits
- Perfect clusters: The secret technique ensures beautiful chunky pieces
- Meal prep friendly: Makes enough for the whole week
- Healthy fats: Coconut oil provides sustained energy
- No artificial ingredients: Just real, wholesome food
Ingredients
This granola comes together with pantry staples you probably already have. I prefer using old-fashioned rolled oats because they create the perfect texture, but quick oats work in a pinch.
Dry Ingredients:
- 3 cups (270g) old-fashioned rolled oats
- 1 cup (110g) raw almonds, roughly chopped
- 1/2 cup (60g) raw pecans, roughly chopped
- 1/2 cup (40g) unsweetened coconut flakes
- 1/4 cup (35g) pumpkin seeds
- 1/4 cup (35g) sunflower seeds
- 1 teaspoon ground cinnamon
- 1/2 teaspoon sea salt
- 1/4 teaspoon ground nutmeg
Wet Ingredients:
- 1/3 cup (80ml) virgin coconut oil, melted
- 1/3 cup (80ml) pure maple syrup or honey
- 1 teaspoon pure vanilla extract
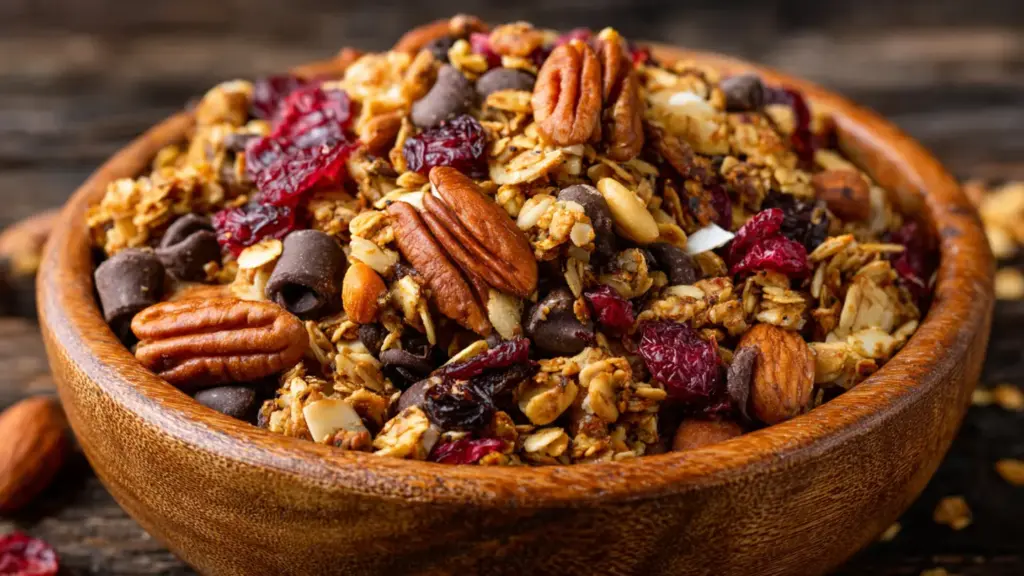
Add-Ins (after baking):
- 1/2 cup (75g) dried cranberries
- 1/2 cup (85g) dark chocolate chips (optional)
Kitchen Equipment Needed
Having the right tools makes this recipe so much easier. I learned the hard way that a flimsy baking sheet leads to uneven browning.
- Large rimmed baking sheet (18×13 inch half-sheet pan)
- Parchment paper or silicone baking mat
- Large mixing bowl
- Medium saucepan or microwave-safe bowl
- Wooden spoon or silicone spatula
- Measuring cups and spoons
- Sharp knife and cutting board for chopping nuts
- Airtight glass containers for storage
Recommended Products for This Recipe
After making this granola dozens of times, I’ve found a few products that really make a difference in the final result.
1. Nordic Ware Natural Aluminum Commercial Baker’s Half Sheet
This heavy-duty baking sheet distributes heat evenly, which is crucial for getting perfectly golden granola without burnt edges. I’ve been using mine for years and it still looks brand new. The rimmed edges prevent any oil from dripping into your oven.
2. Nature’s Way Organic Extra Virgin Coconut Oil
The quality of your coconut oil really affects the flavor. This organic cold-pressed oil adds a subtle tropical sweetness without being overwhelming. It’s also perfect for so many other recipes beyond granola.
3. Bob’s Red Mill Old Fashioned Rolled Oats
These thick-cut oats create the best texture and those coveted granola clusters. They’re also certified gluten-free if that’s a concern. I always buy the large bag because I go through it so quickly.
4. Pyrex Simply Store Glass Food Storage Containers
Granola stays fresh and crispy much longer when stored properly. These glass containers have airtight lids and won’t absorb odors. The clear glass lets you see when you’re running low so you can make another batch.
For an even heartier breakfast option, try serving this granola alongside baked oatmeal.
.jpg "Easy Healthy Homemade Granola Recipe")
Step-by-Step Instructions: How to Make Healthy Homemade Granola
1. Preheat and Prepare
- Preheat your oven to 300°F (150°C). The lower temperature is key for even toasting without burning.
- Line your large baking sheet with parchment paper, making sure it covers the entire surface. This prevents sticking and makes cleanup a breeze.
- If using a silicone mat instead, that works great too. Just avoid using a bare baking sheet as the granola will stick.
2. Mix the Dry Ingredients
- In your large mixing bowl, combine the rolled oats, chopped almonds, chopped pecans, coconut flakes, pumpkin seeds, and sunflower seeds.
- Add the ground cinnamon, sea salt, and ground nutmeg to the oat mixture.
- Use your hands or a large spoon to mix everything together thoroughly. This ensures the spices are evenly distributed throughout.
- Make sure the nuts are roughly chopped into similar-sized pieces so they toast evenly. I usually aim for about 1/2-inch pieces.
3. Prepare the Wet Mixture
- In a small saucepan over low heat, melt the coconut oil until it’s completely liquid. You can also do this in the microwave in 20-second intervals.
- Once melted, remove from heat and stir in the maple syrup (or honey) and vanilla extract.
- Whisk the wet ingredients together until they’re completely combined and smooth.
- The mixture should be slightly warm but not hot when you add it to the oats.
4. Combine Wet and Dry Ingredients
- Pour the warm coconut oil mixture evenly over the dry ingredients in the large bowl.
- Using a wooden spoon or silicone spatula, stir everything together until every oat and nut is coated with the wet mixture.
- This takes about 2-3 minutes of thorough stirring. Don’t rush this step because even coating is what creates those perfect clusters.
- The mixture should look glossy and feel slightly sticky to the touch.
5. Spread on Baking Sheet
- Transfer the granola mixture to your prepared baking sheet.
- Spread it out in an even layer, but here’s the secret: don’t spread it too thin and don’t press down too hard.
- Use your spatula to gently press the mixture into a fairly compact layer. This compression is what helps form those desirable clusters.
- The granola should cover most of the pan but doesn’t need to reach every edge.
You might also enjoy steel cut overnight oats for another nutritious breakfast option.
6. First Bake
- Place the baking sheet in the preheated oven on the middle rack.
- Bake for 15 minutes without touching or stirring. This allows the bottom to set and start forming clusters.
- Set a timer because even a few extra minutes can mean the difference between golden and burnt.
- Your kitchen will start smelling amazing around the 10-minute mark.
7. Stir and Continue Baking
- After 15 minutes, remove the pan from the oven and use a spatula to gently stir the granola.
- Focus on bringing the edges toward the center since the edges brown faster.
- Break up any sections that are getting too dark, but try to keep some larger chunks intact.
- Return the pan to the oven and bake for another 12-15 minutes, watching carefully during the last 5 minutes.
8. Check for Doneness
- The granola is done when it’s golden brown throughout and smells toasted and fragrant.
- It will still feel slightly soft when you remove it from the oven, but it will crisp up as it cools.
- Don’t wait until it’s completely crispy in the oven or it will be over-baked once cooled.
- The color should be a uniform golden brown with no pale or dark spots.
9. Cool Completely
- Remove the baking sheet from the oven and place it on a wire rack or heat-safe surface.
- This is important: don’t touch or stir the granola while it cools. Let it sit completely undisturbed for at least 30 minutes.
- As it cools, the sugars will crystallize and create those beautiful clusters.
- Breaking it up while it’s still warm will prevent cluster formation.
10. Add Final Mix-Ins
- Once the granola is completely cool and crispy, break it into your desired cluster size using your hands.
- Add the dried cranberries and dark chocolate chips (if using), tossing gently to distribute them evenly.
- Now’s also the time to add any other dried fruits you love, like raisins, cherries, or chopped apricots.
- Taste a piece and adjust sweetness if needed by adding more dried fruit.
11. Store Properly
- Transfer the cooled granola to your airtight containers immediately to preserve maximum crunchiness.
- Fill the containers to the top to minimize air exposure, but don’t pack them down.
- Label the containers with the date so you know when you made it.
- Store in a cool, dry place away from direct sunlight and heat sources.
Tips for The Best Healthy Homemade Granola
After making countless batches, I’ve learned exactly what works and what doesn’t. These tips will save you from the mistakes I made when I was starting out.
Pro tips for perfect granola every time:
- Don’t skip the parchment paper: I tried using a greased pan once and spent 20 minutes scraping burnt granola off the bottom. Not worth it.
- Keep it in a single layer: Piling the granola too high in the pan leads to uneven baking with some parts burnt and others undercooked.
- Low and slow is key: Higher temperatures might seem faster, but they burn the edges before the center cooks. The 300°F temperature is perfect.
- Resist stirring while cooling: I know it’s tempting, but this is the critical moment when clusters form. Patience pays off.
- Cool completely before storing: Even slightly warm granola will create condensation in your container, making everything soggy within hours.
- Use fresh nuts and seeds: Rancid nuts will ruin the whole batch. Smell them before using and store extras in the freezer.
- Don’t overbake: Remember that granola continues to crisp as it cools. It should be light golden, not deep brown, when you remove it.
- Customize the sweetness: Start with less sweetener than you think you need. You can always add more dried fruit later.
- Mix up your nuts: Use whatever combination you prefer or have on hand. Cashews, walnuts, and hazelnuts all work beautifully.
- Consider texture: Chopping nuts into different sizes creates interesting texture variations in the final granola.
Another healthy breakfast you might love is healthy banana bread.
What to Serve with this Healthy Homemade Granola
This granola is incredibly versatile and works with so many different breakfasts and snacks. I keep a jar on my counter for easy grabbing throughout the day.
Perfect pairings:
- Plain Greek yogurt: The tanginess balances the sweetness perfectly. I like to layer them in a glass with fresh berries for a beautiful parfait.
- Milk or plant-based milk: Almond milk, oat milk, or regular dairy milk all work great. The granola softens slightly but stays crunchy.
- Cranberry orange overnight oats: Sprinkle a handful on top for added crunch and nutrition.
- Smoothie bowls: This adds texture and substance to any blended breakfast. The clusters won’t get soggy right away.
- Fresh fruit: Sliced bananas, berries, peaches, or apples pair wonderfully with the nutty, cinnamon flavors.
- Cottage cheese: An unexpected combination that’s become one of my favorite high-protein breakfasts.
- Avocado toast: Sprinkle a bit on top for a sweet-savory contrast that’s surprisingly delicious.
- Ice cream or frozen yogurt: Makes for a healthier topping alternative to cookies or candy.
- Chia pudding: Mix some into your chia pudding for added texture and flavor.
- Shakshuka: I know it sounds weird, but a sprinkle of sweet granola on top of spicy shakshuka is amazing.
Variations of Healthy Homemade Granola
The beauty of homemade granola is that you can customize it endlessly. I make different versions depending on the season and what I’m craving.
Try these delicious variations:
- Chocolate lover’s granola: Double the chocolate chips and add 2 tablespoons of cocoa powder to the dry ingredients. Use dark chocolate chips for a richer flavor.
- Tropical granola: Replace pecans with macadamia nuts, increase coconut flakes to 1 cup, and add dried pineapple and mango after baking.
- Apple cinnamon granola: Add 1 cup of freeze-dried apple pieces after baking and increase cinnamon to 2 teaspoons. Top your pumpkin waffle recipe with this version.
- Pumpkin spice granola: Add 2 tablespoons of pumpkin puree to the wet ingredients and include 1 teaspoon of pumpkin pie spice.
- Protein-packed granola: Mix in 1/2 cup of your favorite vanilla protein powder with the dry ingredients.
- Nut-free version: Omit the nuts and double up on the seeds. Add hemp hearts, chia seeds, or quinoa flakes for extra nutrition.
- Savory granola: Skip the dried fruit and chocolate, reduce maple syrup to 2 tablespoons, and add rosemary, thyme, and a pinch of cayenne.
- Berry blast granola: Use freeze-dried strawberries, blueberries, and raspberries instead of cranberries for a vibrant burst of flavor.
- Chai-spiced granola: Replace the cinnamon and nutmeg with 1 tablespoon of chai spice blend and add candied ginger pieces.
- Maple pecan granola: Use all pecans for the nut component and add a touch of maple extract along with the vanilla.
Storage and Reheating
Proper storage is crucial for maintaining that perfect crunchiness. I learned this lesson after my first batch went stale in just a few days.
Storage instructions:
- Room temperature: Store in an airtight container at room temperature for up to 3 weeks. Make sure the container seals tightly.
- Refrigerator: If your kitchen is very humid, store in the fridge for up to 6 weeks. The cold prevents the oils from going rancid.
- Freezer: Granola freezes beautifully for up to 3 months. Portion it into freezer bags, removing as much air as possible before sealing.
- Glass containers: I prefer glass over plastic because it doesn’t absorb odors and keeps granola crispier longer.
- Mason jars: These are perfect for storing and look pretty on the counter. Use wide-mouth jars for easier scooping.
- Silica gel packets: If you live in a humid climate, toss one of these in your container to absorb excess moisture.
- Portion control: Divide into individual servings in small containers or bags for grab-and-go breakfast options.
- Check for freshness: If it smells off or the nuts taste rancid, it’s time to make a new batch.
- Revive soggy granola: If it loses its crunch, spread on a baking sheet and warm at 250°F for 10 minutes, then cool completely.
For another make-ahead breakfast idea, check out gingerbread overnight oats.
Nutritional Facts
Per serving (1/2 cup):
- Calories: 285
- Total Fat: 16g
- Saturated Fat: 5g
- Trans Fat: 0g
- Cholesterol: 0mg
- Sodium: 100mg
- Total Carbohydrates: 30g
- Dietary Fiber: 5g
- Sugars: 10g
- Protein: 7g
- Vitamin D: 0mcg
- Calcium: 40mg
- Iron: 2mg
- Potassium: 250mg
Nutritional highlights:
This granola provides a good balance of complex carbohydrates, healthy fats, and plant-based protein. The oats offer soluble fiber that helps stabilize blood sugar levels, while the nuts and seeds provide heart-healthy omega-3 fatty acids. Using natural sweeteners like maple syrup or honey means you’re avoiding refined sugars, and the cinnamon may help regulate blood glucose.
Health Benefits of Key Ingredients
I chose every ingredient in this recipe for both flavor and nutrition. These aren’t just empty calories. They’re fueling your body with real nutrients.
Why these ingredients are good for you:
- Rolled oats: High in soluble fiber called beta-glucan, which has been shown to lower cholesterol levels and improve heart health. Oats also provide sustained energy without blood sugar spikes.
- Almonds: Packed with vitamin E, magnesium, and healthy monounsaturated fats. Studies show they may help reduce the risk of heart disease and aid in weight management.
- Pecans: Rich in antioxidants and have one of the highest antioxidant capacities of any nut. They also contain oleic acid, the same healthy fat found in olive oil.
- Coconut oil: Contains medium-chain triglycerides (MCTs) that your body can use quickly for energy. It also has antimicrobial properties that support immune health.
- Pumpkin seeds: Excellent source of zinc, which supports immune function, and magnesium for bone health. They’re also rich in plant-based omega-3s.
- Sunflower seeds: High in vitamin E and selenium, powerful antioxidants that protect cells from damage. They also provide folate for heart health.
- Cinnamon: Has anti-inflammatory properties and may help improve insulin sensitivity. It’s also been linked to better cognitive function.
- Maple syrup: Contains minerals like manganese and zinc, plus antioxidant compounds. It has a lower glycemic index than refined sugar.
FAQs About Healthy Homemade Granola
1. Can I use quick oats instead of old-fashioned rolled oats?
You can, but the texture won’t be quite the same. Quick oats are thinner and more processed, so they’ll create a finer, less chunky granola.
Old-fashioned rolled oats hold their shape better during baking and create those satisfying clusters we all love. If quick oats are all you have, reduce the baking time by about 5 minutes since they cook faster.
2. Why isn’t my granola forming clusters?
The most common reason is not pressing the mixture firmly enough on the baking sheet before baking. You need to pack it down into a compact layer.
Also, make sure you’re not stirring it too much during baking, and absolutely don’t touch it while it’s cooling. The sugars need time to crystallize and bind everything together as the temperature drops.
3. How do I make this granola sugar-free or lower in sugar?
You can reduce the maple syrup to 1/4 cup for less sweetness, though the granola won’t cluster as well. For a sugar-free option, try using a sugar-free maple-flavored syrup, though results may vary.
You can also rely more on naturally sweet add-ins like unsweetened dried fruit or increase the vanilla extract and cinnamon for more perceived sweetness without actual sugar.
4. Can I make this granola nut-free for allergies?
Absolutely! Replace the nuts with more seeds like pepitas, sunflower seeds, and hemp hearts. You can also add coconut chips or flakes for extra texture.
Another option is to use roasted chickpeas for a crunchy, protein-rich alternative. The flavor will be different but still delicious.
5. My granola burned on the edges but is undercooked in the middle. What went wrong?
This usually happens when the oven temperature is too high or the granola is spread unevenly on the pan. Make sure your oven is properly preheated to exactly 300°F.
Also, spread the mixture evenly across the entire pan in a uniform layer, and rotate the pan halfway through baking. Every oven has hot spots, so rotating helps ensure even cooking throughout.
This granola pairs beautifully with French toast for a decadent weekend breakfast.
Final Thoughts
Making your own granola at home is one of those simple changes that makes a real difference in your daily routine. You’ll save money, eat healthier, and actually enjoy your breakfast more.
The best part is watching your family reach for it every morning, knowing exactly what’s in it. Give this Easy Healthy Homemade Granola Recipe a try this weekend and see how it transforms your mornings.
I’d love to hear how yours turns out! Drop a comment below with your favorite mix-ins or any creative variations you come up with. Happy baking!
Recommended:
- Overnight Oats Recipe
- Peanut Butter Overnight Oats Recipe
- Pumpkin Overnight Oats Recipe
- Breakfast Burrito Recipe
- Sourdough Waffle Recipe
- Belgian Waffle Recipe
- Buttermilk Waffle Recipe
- Healthy Banana Bread Recipe
- Starbucks Banana Bread Recipe
- Homemade Biscuit Recipe