
I never thought I’d become the person who brought a cheese ball recipe to every gathering, but here we are.
It started at my cousin’s holiday party a few years ago when I showed up with this gorgeous, herb-coated sphere of creamy goodness. Within twenty minutes, it was gone, and I had three people asking for the recipe.
Now it’s become my signature dish. The funny thing is, I used to think cheese balls were outdated, something only grandmas made in the ’70s. But after experimenting with different flavor combinations and getting it just right, I realized why they’ve stood the test of time—they’re incredibly delicious and ridiculously easy to make.
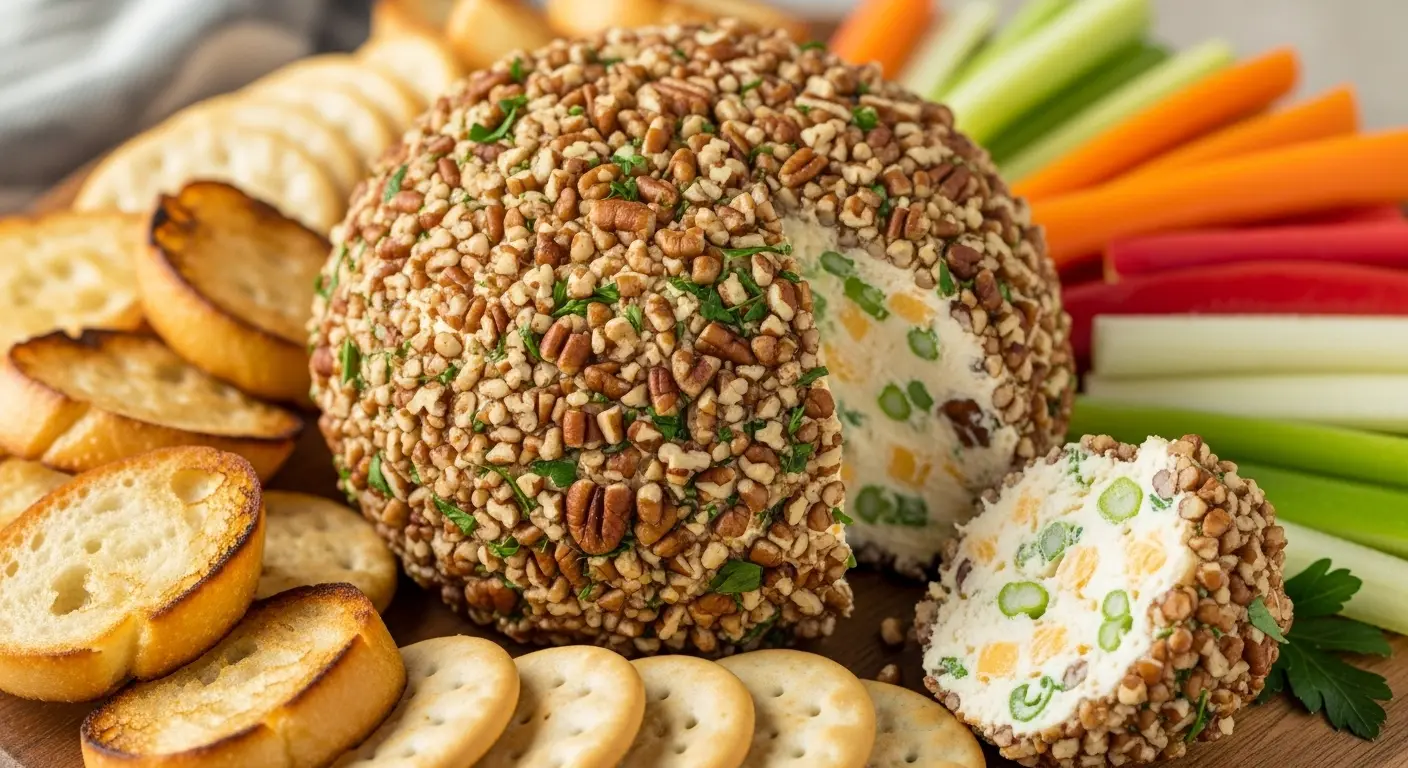
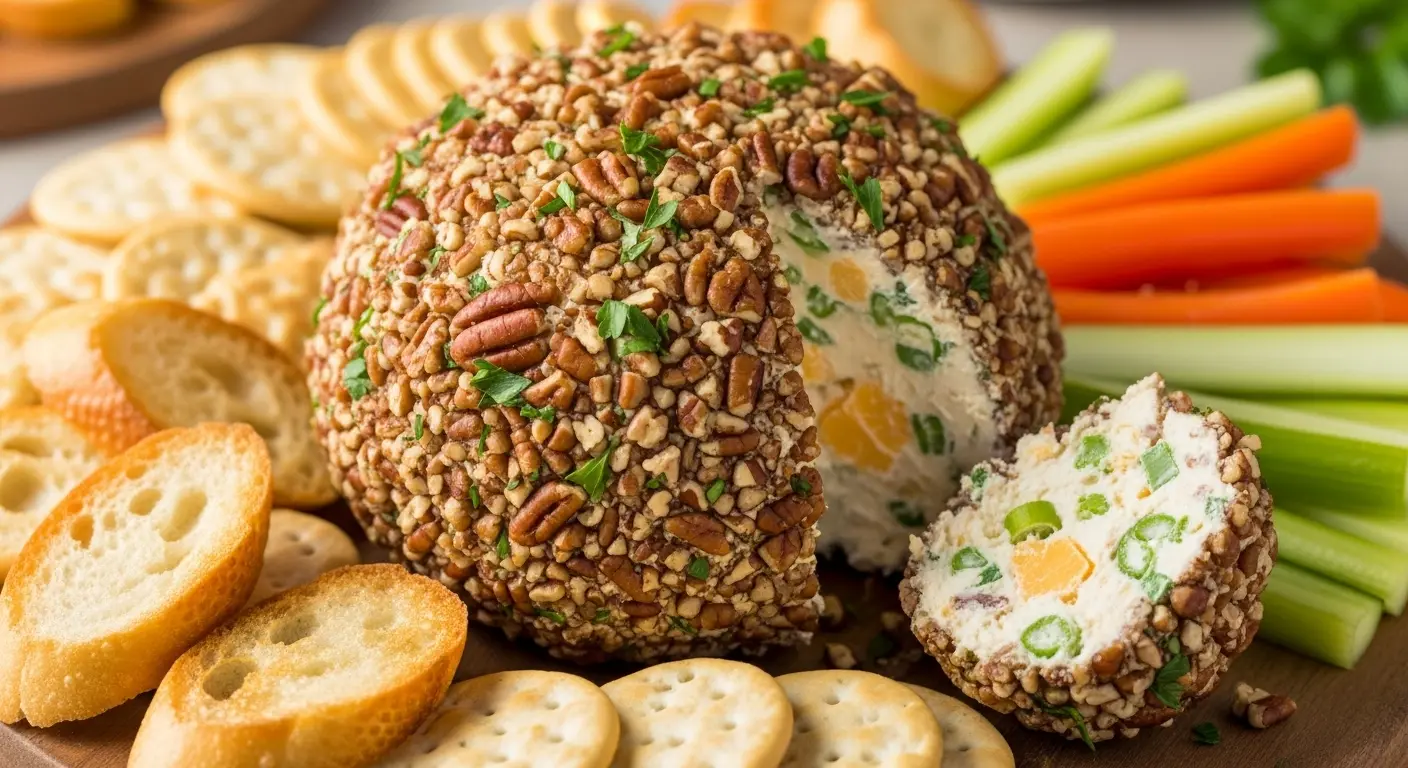
This cheese ball recipe delivers the perfect balance of tangy cream cheese, sharp cheddar, and savory seasonings, all rolled in crunchy pecans. It takes about 15 minutes of hands-on work, and you can make it up to three days ahead.
| Quick Recipe Summary | |
|---|---|
| Prep Time | 15 minutes |
| Chill Time | 2 hours |
| Total Time | 2 hours 15 minutes |
| Servings | 12-16 servings |
| Difficulty Level | Easy |

Why You’ll Love This Cheese Ball Recipe
This recipe has rescued me from last-minute party panic more times than I can count. The beauty of it is that it looks impressive but requires minimal effort—no baking, no fancy equipment, just mixing and shaping.
The flavor combination is what really sets this apart from other versions I’ve tried. I’ve added a hint of Worcestershire sauce and garlic powder that gives it a subtle umami depth most cheese balls lack.
Here’s what makes this recipe special:
- Make-ahead friendly: Prepare it up to 3 days in advance and let the flavors meld in the fridge
- Customizable coating: Use pecans, walnuts, bacon bits, or fresh herbs based on your preference
- Budget-friendly: Costs less than $10 to make and feeds a crowd
- Always impressive: People think you spent hours on it when it took only 15 minutes
- Versatile flavors: Easily adapt it with different add-ins like jalapeños, dried cranberries, or blue cheese
- Perfect texture: Creamy on the inside with a satisfying crunch on the outside
For a lighter appetizer option, try pairing this with my healthy hummus.
Ingredients
The ingredient list is surprisingly simple. I learned the hard way that quality matters here—cheap cream cheese creates a grainy texture, so spring for the good stuff.
For the Cheese Ball:
- 16 oz (450g) cream cheese, softened to room temperature
- 2 cups (200g) sharp cheddar cheese, shredded
- 4 oz (115g) blue cheese, crumbled (optional, for extra tang)
- 3 green onions, finely chopped
- 2 tablespoons Worcestershire sauce
- 1 teaspoon garlic powder
- ½ teaspoon onion powder
- ¼ teaspoon cayenne pepper (adjust to taste)
- Salt and black pepper to taste
For the Coating:
- 1½ cups (180g) pecans, finely chopped
- 2 tablespoons fresh parsley, finely chopped
- 1 teaspoon smoked paprika (optional, for color and smoky flavor)
Read Also: Deviled Eggs Recipe
Kitchen Equipment Needed
You don’t need any fancy gadgets for this recipe. Here’s what I keep on hand whenever I’m making my cheese ball.
- Large mixing bowl for combining ingredients
- Electric hand mixer or stand mixer (makes the process much easier, though you can mix by hand)
- Rubber spatula for scraping down the bowl
- Plastic wrap for shaping and chilling
- Sharp knife for chopping pecans and herbs
- Cutting board
- Measuring cups and spoons
- Small bowl for the coating mixture
- Serving platter
Another favorite: Air Fryer Herb Cheese Stuffed Mushrooms
Recommended Products for This Recipe
After making countless cheese balls over the years, I’ve found a few products that genuinely make the process better and the results more delicious.
1. Philadelphia Cream Cheese Brick
This is non-negotiable for me. I’ve tried store brands, and they just don’t have the same smooth, creamy consistency. Philadelphia blends effortlessly and creates that silky texture that makes people keep coming back for more. The brick form is crucial—don’t use the whipped version, as it changes the texture completely.
2. Tillamook Sharp Cheddar Cheese Block
Pre-shredded cheese contains anti-caking agents that prevent it from melting smoothly into the cream cheese mixture. I always buy a block of Tillamook sharp cheddar and shred it myself. The flavor is noticeably sharper and more complex, and it incorporates beautifully into the cheese ball without any graininess.
3. Fisher Chef’s Naturals Pecan Halves
The coating makes or breaks a cheese ball, and these pecans are always fresh and perfectly sized. I’ve had too many disappointing experiences with stale nuts from bulk bins. These come in a resealable bag, stay fresh for weeks, and have a rich, buttery flavor that complements the cheese perfectly.
4. KitchenAid Hand Mixer
Mixing the cheese ball ingredients by hand is possible but exhausting. This hand mixer makes the job effortless and ensures everything is evenly combined without overworking your arms. I use mine for countless other recipes too, so it’s become an indispensable tool in my kitchen.

Step-by-Step Instructions: How to Make Cheese Ball
I’m walking you through every detail here because I remember my first attempt—I didn’t let the cream cheese soften enough and ended up with lumps everywhere. Follow these steps and you’ll have a perfect cheese ball every time.
1. Soften the Cream Cheese Properly
- Remove the cream cheese from the refrigerator at least 1-2 hours before you plan to make the cheese ball
- Cut it into smaller chunks and place them in your mixing bowl to speed up the softening process
- The cream cheese should feel soft when you press it with your finger—not cold and firm, but not warm and melty either
- Room temperature cream cheese is crucial for achieving a smooth, lump-free mixture
- If you’re in a hurry, you can microwave the cream cheese in 10-second intervals, but be careful not to melt it
2. Mix the Base Ingredients
- Add the softened cream cheese to your large mixing bowl
- Using your electric hand mixer on medium speed, beat the cream cheese for about 1-2 minutes until it’s completely smooth and fluffy
- Add the shredded cheddar cheese, crumbled blue cheese (if using), Worcestershire sauce, garlic powder, onion powder, and cayenne pepper
- Beat everything together on low speed initially to prevent cheese from flying everywhere, then increase to medium speed
- Continue mixing for 2-3 minutes until all ingredients are fully incorporated and the mixture is smooth and creamy
- Stop occasionally to scrape down the sides and bottom of the bowl with your rubber spatula
- The mixture should be thick but spreadable, with no visible lumps of cream cheese
You might also enjoy: Air Fryer Mozzarella Cheese Sticks
3. Add Fresh Ingredients and Season
- Fold in the finely chopped green onions using your rubber spatula
- Taste the mixture (this is the fun part!) and adjust seasonings as needed
- Add salt and black pepper to taste—I usually add about ½ teaspoon of salt and ¼ teaspoon of black pepper
- Remember that the cheese is already salty, so start with less and add more if needed
- Mix everything together one final time until the green onions are evenly distributed throughout
4. Shape the Cheese Ball
- Lay out a large piece of plastic wrap on your counter (about 18 inches long)
- Scrape the cheese mixture onto the center of the plastic wrap using your spatula
- Bring up the edges of the plastic wrap around the cheese mixture
- Twist the top of the plastic wrap tightly, using your hands to shape the mixture into a ball through the wrap
- The plastic wrap should create a smooth, round shape—rotate the ball and tighten the wrap as needed
- Don’t worry if it’s not perfectly round yet; you’ll refine the shape after chilling
- Place the wrapped cheese ball in the refrigerator for at least 2 hours or overnight to firm up
5. Prepare the Coating
- While the cheese ball is chilling, prepare your coating mixture
- Finely chop the pecans—I like pieces about the size of a peppercorn for the best texture
- In a small bowl, combine the chopped pecans, fresh parsley, and smoked paprika (if using)
- Mix everything together thoroughly
- Spread the coating mixture out on a large plate or shallow dish in an even layer
- Cover and set aside at room temperature until you’re ready to coat the cheese ball
6. Coat the Cheese Ball
- Remove the chilled cheese ball from the refrigerator and unwrap it
- If needed, use your hands to reshape it into a perfect sphere
- Place the cheese ball in the center of your coating mixture
- Gently roll it around, using your hands to press the coating onto the surface
- Make sure the entire ball is evenly coated with pecans and herbs
- If there are any bare spots, press additional coating mixture onto those areas with your fingers
- The cheese should be firm enough that the coating sticks easily without the ball losing its shape
- Place the coated cheese ball on your serving platter
7. Final Chill and Serve
- Cover the cheese ball loosely with plastic wrap and refrigerate for another 30 minutes to let the coating set
- Remove from the refrigerator 15-20 minutes before serving to take the chill off—this brings out the best flavor and makes it easier to spread
- Arrange your favorite crackers, sliced baguette, or vegetable sticks around the cheese ball
- Provide a cheese knife or small spreader for guests to serve themselves
- Watch it disappear!
Another favorite: Healthy Bruschetta

Tips for The Best Cheese Ball
These tips come from years of trial and error. I wish someone had told me these things before my first few attempts!
Essential Tips:
- Room temperature is everything: Cold cream cheese will never mix smoothly, no matter how long you beat it. Plan ahead and leave it out for at least 90 minutes.
- Shred your own cheese: Pre-shredded cheese has anti-caking agents that create a grainy texture. Buy a block and shred it yourself for the smoothest results.
- Don’t skip the chilling time: The cheese ball needs to firm up properly before coating, or the coating won’t stick and the ball will lose its shape.
- Make it ahead: The flavor actually improves after a day or two in the fridge as the seasonings meld together.
- Adjust seasonings to taste: Always taste the mixture before shaping and adjust the salt, pepper, or spices to your preference.
- Use fresh herbs when possible: Dried herbs work in a pinch, but fresh parsley and green onions provide much better flavor and color.
- Toast the nuts first: For extra flavor, toast your pecans in a dry skillet over medium heat for 3-4 minutes before chopping. Let them cool completely before using.
- Double-wrap for freezing: If you’re making this ahead and freezing it, wrap it in plastic wrap and then aluminum foil to prevent freezer burn.
- Save some coating: Keep about ¼ cup of your coating mixture in reserve to patch up any areas that look sparse after the first roll.
- Clean hands work best: When shaping and coating the cheese ball, wash your hands frequently to prevent the mixture from sticking to your fingers.
Serving Suggestions
I’ve served this cheese ball dozens of different ways, and presentation really does matter. Here are my tried-and-true serving ideas.
The classic pairing is assorted crackers—I like to include buttery rounds, water crackers, and something with seeds for texture. Arrange them in a circle around the cheese ball for easy access.
For serving options:
- Fresh vegetables: Bell pepper strips, celery sticks, cucumber rounds, and cherry tomatoes add color and crunch
- Toasted baguette slices: Slice a French baguette on the diagonal, brush with olive oil, and toast until golden
- Pretzels: Both regular and pretzel crisps work beautifully for scooping
- Apple and pear slices: The fruit’s sweetness balances the savory cheese perfectly
- Grilled flatbread: Cut into triangles for easy dipping
- Endive leaves: These act as natural edible spoons for a more elegant presentation
- Bagel chips: Store-bought or homemade, they’re sturdy enough for generous portions
This pairs beautifully with my healthy guacamole for a complete appetizer spread.
Variations of Cheese Ball
One of my favorite things about this recipe is how easily you can customize it. I’ve probably made twenty different versions by now, and each one has been a hit.
Flavor Variations:
- Bacon Ranch Cheese Ball: Omit the blue cheese and add ½ cup crumbled cooked bacon to the mixture, plus 2 tablespoons ranch seasoning mix. Coat with more bacon bits instead of pecans.
- Everything Bagel Cheese Ball: Skip the traditional coating and roll the ball in everything bagel seasoning instead. Add 2 tablespoons of finely diced smoked salmon to the mixture for extra flavor.
- Jalapeño Popper Cheese Ball: Add 3-4 finely diced jalapeños (seeds removed) to the mixture and coat with crushed tortilla chips mixed with more diced jalapeños.
- Holiday Cranberry Cheese Ball: Mix in ½ cup dried cranberries and coat with chopped candied pecans. Add a tablespoon of orange zest to the mixture for brightness.
- Mediterranean Cheese Ball: Replace the cheddar with crumbled feta and add sun-dried tomatoes, fresh basil, and pine nuts. Coat with pine nuts and fresh herbs.
- Buffalo Chicken Cheese Ball: Add 1 cup finely shredded rotisserie chicken and 3 tablespoons buffalo sauce to the mixture. Coat with crushed blue cheese crumbles and crumbled bacon.
- Pimento Cheese Ball: Mix in ½ cup diced roasted red peppers and coat with crushed saltine crackers and paprika.
- Herb Garden Cheese Ball: Add fresh dill, chives, and thyme to the mixture and coat with a mixture of all three fresh herbs plus lemon zest.
- Smoky Chipotle Cheese Ball: Add 2 tablespoons adobo sauce from canned chipotle peppers and coat with crushed tortilla chips and cilantro.
- Sweet and Savory Cheese Ball: Mix in ¼ cup honey and coat with crushed honey-roasted almonds and a drizzle of honey before serving.
For a lighter option, try: Healthy Coleslaw
Storage and Reheating
Proper storage is key to keeping your cheese ball fresh and delicious. I always make mine at least a day ahead to let the flavors develop.
Storage Guidelines:
- Refrigerator storage: Wrap the cheese ball tightly in plastic wrap and store in an airtight container for up to 5 days. The flavors actually improve after 24-48 hours as everything melds together.
- Uncoated storage: If you want to make it even further ahead, shape the cheese ball but don’t add the coating. Wrap tightly and refrigerate for up to 3 days, then add the coating just before serving.
- Freezer storage: Wrap the shaped (but uncoated) cheese ball in two layers of plastic wrap, then in aluminum foil. Freeze for up to 1 month. Thaw overnight in the refrigerator, then add the coating before serving.
- Coating storage: Store any extra coating mixture separately in an airtight container at room temperature for up to 2 days, or refrigerate for up to a week.
- After serving: If there are leftovers (rare!), rewrap tightly and refrigerate. The coating may soften slightly, but it will still taste delicious for 2-3 more days.
- Bring to temperature: Always remove the cheese ball from the refrigerator 15-20 minutes before serving for the best flavor and spreadability.
- Don’t leave out too long: At room temperature, the cheese ball should be consumed within 2 hours for food safety reasons.
Note: This cheese ball is not suitable for reheating as it’s meant to be served cold or at room temperature.
Nutritional Facts
Per serving (based on 16 servings):
- Calories: 185
- Total Fat: 17g
- Saturated Fat: 8g
- Cholesterol: 35mg
- Sodium: 220mg
- Total Carbohydrates: 3g
- Dietary Fiber: 1g
- Sugars: 1g
- Protein: 6g
Note: Nutritional values are approximate and will vary based on specific ingredients used and portion sizes.
Health Benefits of Key Ingredients
While a cheese ball is certainly an indulgence, some of the ingredients do offer nutritional benefits. I don’t make this for its health properties, but it’s nice to know you’re getting some good stuff along with the deliciousness.
Several ingredients contribute positive nutrients:
- Cream cheese: Provides calcium for bone health and vitamin A for immune function and vision. It also contains conjugated linoleic acid (CLA), which may have anti-inflammatory properties.
- Cheddar cheese: Rich in calcium and protein, supporting bone density and muscle maintenance. Also provides vitamin K2, which helps direct calcium to bones rather than arteries.
- Pecans: Excellent source of healthy monounsaturated fats, antioxidants, and fiber. They contain more than 19 vitamins and minerals, including vitamin E, thiamin, and zinc.
- Green onions: Low in calories but high in vitamins K and C. They contain quercetin, an antioxidant that may help reduce inflammation.
- Garlic powder: Contains compounds that may support heart health and have antimicrobial properties. Garlic has been used medicinally for thousands of years.
- Parsley: High in vitamins K, C, and A, plus folate and iron. It’s also a good source of antioxidants that may support kidney health.
For more nutritious appetizers, check out: Chickpea Salad
FAQs About Cheese Ball
1. Can I make a cheese ball without blue cheese?
Absolutely! The blue cheese adds a tangy punch, but it’s completely optional. If you’re not a fan, simply omit it or replace it with an equal amount of shredded cheddar, Gouda, or pepper jack cheese. I’ve made versions with all cheddar that were just as popular.
2. Why is my cheese ball too soft to shape?
This usually happens when the cream cheese is too warm or the mixture hasn’t chilled long enough. Make sure you refrigerate the shaped ball for at least 2 hours before coating. If it’s still too soft, pop it in the freezer for 20-30 minutes to firm it up quickly.
3. Can I use a different nut for the coating?
Yes! Walnuts, almonds, pistachios, or even cashews work wonderfully. You can also skip nuts entirely and use crispy bacon bits, chopped fresh herbs, everything bagel seasoning, or crushed crackers. I’ve even used crushed pretzels for a fun twist.
4. How far in advance can I make a cheese ball?
The cheese ball actually tastes better when made ahead. You can prepare it up to 3 days before serving—just keep it refrigerated and add the coating the day you plan to serve it. For even longer storage, freeze the uncoated ball for up to a month.
5. What’s the best way to serve a cheese ball at a party?
Remove it from the fridge 15-20 minutes before guests arrive so it’s not too cold and hard to spread. Place it on a serving board or platter surrounded by an assortment of crackers, bread, and fresh vegetables. Include a small spreader or cheese knife, and consider cutting a small wedge out to show guests what’s inside and encourage them to dig in.
You might also enjoy: Shrimp and Avocado Salad
Final Thoughts
This cheese ball recipe has become my party MVP, and I genuinely hope it becomes yours too. There’s something deeply satisfying about watching people gather around it, spreading generous amounts on crackers and asking what your secret is.
The best part is that you can make it your own. Don’t be afraid to experiment with different cheeses, add-ins, and coatings until you find your perfect combination.
I’d love to hear how your cheese ball turns out! Drop a comment below with your favorite variation or any creative twists you’ve tried. And if you end up bringing this to a party, let me know what everyone thought!
Recommended:
- BLT Pasta Salad
- Cranberry Jello Salad
- Grilled Portobello Mushrooms
- Caprese Stuffed Avocados
- Orange Dreamsicle Salad
- Shrimp Macaroni Salad
- Tuna and White Bean Salad
- Air Fryer Breaded Mushrooms
- Air Fryer Onion Rings
- Grilled Vegetable Skewers
